
Operating Instructions
Page 1
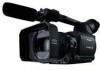
Preparation Description Before use . Model No. P Shooting Playback Editing Displays Menu Reference Before operating this product, please read the instructions carefully and save this manual for future use of parts Operating Instructions Memory Card Camera-Recorder AG- F1205S1125-H D Printed in Japan ENGLISH VQT0S52-1
Preparation Description Before use . Model No. P Shooting Playback Editing Displays Menu Reference Before operating this product, please read the instructions carefully and save this manual for future use of parts Operating Instructions Memory Card Camera-Recorder AG- F1205S1125-H D Printed in Japan ENGLISH VQT0S52-1

Operating Instructions
Page 2
... unit in a bookcase, built-in the literature accompanying the appliance. CAUTION: TO REDUCE THE RISK OF FIRE OR SHOCK HAZARD AND ANNOYING INTERFERENCE, USE THE RECOMMENDED ACCESSORIES ONLY. Disconnect the AC mains plug from the AC mains socket when not in temperatures over 140°F (60°C). •...user to the presence of uninsulated "dangerous voltage" within an equilateral triangle, is on the underside of in fire. • Do not store in use. CAUTION RISK OF ELECTRIC SHOCK DO NOT OPEN CAUTION: TO REDUCE THE RISK OF ELECTRIC SHOCK, DO NOT REMOVE COVER (OR BACK). REFER TO ...
... unit in a bookcase, built-in the literature accompanying the appliance. CAUTION: TO REDUCE THE RISK OF FIRE OR SHOCK HAZARD AND ANNOYING INTERFERENCE, USE THE RECOMMENDED ACCESSORIES ONLY. Disconnect the AC mains plug from the AC mains socket when not in temperatures over 140°F (60°C). •...user to the presence of uninsulated "dangerous voltage" within an equilateral triangle, is on the underside of in fire. • Do not store in use. CAUTION RISK OF ELECTRIC SHOCK DO NOT OPEN CAUTION: TO REDUCE THE RISK OF ELECTRIC SHOCK, DO NOT REMOVE COVER (OR BACK). REFER TO ...

Operating Instructions
Page 3
...interference by one of the following two conditions: (1) This device may not cause harmful interference, and (2) this device must use only shielded interface cables when connecting to the following measures: • Reorient or relocate the receiving antenna. • .... FCC NOTICE (USA) Declaration of Conformity Model Number: AG-HVX200P Trade Name: PANASONIC Responsible Party: Panasonic Corporation of North America One Panasonic Way, Secaucus, NJ 07094 Support contact: Panasonic Broadcast & Television Systems Company 1-800-524-1448 This device complies with Canadian ICES-003...
...interference by one of the following two conditions: (1) This device may not cause harmful interference, and (2) this device must use only shielded interface cables when connecting to the following measures: • Reorient or relocate the receiving antenna. • .... FCC NOTICE (USA) Declaration of Conformity Model Number: AG-HVX200P Trade Name: PANASONIC Responsible Party: Panasonic Corporation of North America One Panasonic Way, Secaucus, NJ 07094 Support contact: Panasonic Broadcast & Television Systems Company 1-800-524-1448 This device complies with Canadian ICES-003...

Operating Instructions
Page 5
...are provided for your outlet, consult an electrician for long periods of time. 14) Refer all instructions. 5) Do not use attachments/accessories specified by the manufacturer. 12) Use only with the cart, stand, tripod, bracket, or table specified by the manufacturer, or sold with one wider than the...cloth. 7) Do not block any heat sources such as power-supply cord or plug is used, use caution when moving the cart/ apparatus combination to avoid injury from the apparatus. 11) Only use this apparatus during lightning storms or when unused for replacement of the obsolete outlet. 10) ...
...are provided for your outlet, consult an electrician for long periods of time. 14) Refer all instructions. 5) Do not use attachments/accessories specified by the manufacturer. 12) Use only with the cart, stand, tripod, bracket, or table specified by the manufacturer, or sold with one wider than the...cloth. 7) Do not block any heat sources such as power-supply cord or plug is used, use caution when moving the cart/ apparatus combination to avoid injury from the apparatus. 11) Only use this apparatus during lightning storms or when unused for replacement of the obsolete outlet. 10) ...
Operating Instructions
Page 6
... (VFR 36 Shooting in 1080i/480i progressive mode.. 37 Shooting in manual mode 38 Switching to manual mode 38 Manual focusing 38 Using focus assist 38 Iris adjustments 39 Adjusting the gain 39 Light intensity adjustments 39 Adjusting the white balance 40 Shooting techniques for different ... Marker 43 Checking and displaying shooting status ........ 44 Changing the image size 44 Optical Image Stabilizer 45 Adding effects to images 45 Using the USER buttons 45 Backlight compensation 45 Color bars 45 Adjusting the volume while shooting 46 Backup recording 46 Pre-recording (PRE REC...
... (VFR 36 Shooting in 1080i/480i progressive mode.. 37 Shooting in manual mode 38 Switching to manual mode 38 Manual focusing 38 Using focus assist 38 Iris adjustments 39 Adjusting the gain 39 Light intensity adjustments 39 Adjusting the white balance 40 Shooting techniques for different ... Marker 43 Checking and displaying shooting status ........ 44 Changing the image size 44 Optical Image Stabilizer 45 Adding effects to images 45 Using the USER buttons 45 Backlight compensation 45 Color bars 45 Adjusting the volume while shooting 46 Backup recording 46 Pre-recording (PRE REC...
Operating Instructions
Page 7
...method (THUMBNAIL 67 Deleting clips and formatting cards (OPERATION 69 Checking the clip or card information (PROPERTY 70 Uploading the metadata (META DATA 72 Useful playback functions 73 Variable speed search (P2 card / Tape 73 Slow playback (P2 card / Tape 73 Fast forward/rewind playback (P2 card ...card/Tape 88 Analog input (Tape 89 Displays Screen displays 90 Regular displays 90 Warnings 93 Setting the DISPLAY items 95 Menus Using the setup menus 96 Using the menus 96 Initializing the menu settings 97 Setup menu structure 98 Camera mode menu 98 MCR/VCR (playback) mode menu...
...method (THUMBNAIL 67 Deleting clips and formatting cards (OPERATION 69 Checking the clip or card information (PROPERTY 70 Uploading the metadata (META DATA 72 Useful playback functions 73 Variable speed search (P2 card / Tape 73 Slow playback (P2 card / Tape 73 Fast forward/rewind playback (P2 card ...card/Tape 88 Analog input (Tape 89 Displays Screen displays 90 Regular displays 90 Warnings 93 Setting the DISPLAY items 95 Menus Using the setup menus 96 Using the menus 96 Initializing the menu settings 97 Setup menu structure 98 Camera mode menu 98 MCR/VCR (playback) mode menu...
Operating Instructions
Page 8
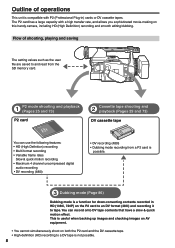
... capacity with P2 (Professional Plug-in HD (1080i, 720P) on the P2 card to an DV format (480i) and recording it to tape. You can use the following features: • HD (High Definition) recording • Multi format recording • Variable frame rates Slow & quick motion recording • Maximum 4...and playback (Pages 29 and 73) DV cassette tape You can record onto DV tape contents that have a slow & quick motion effect. This is useful when backing up images and checking images on AV equipment. • You cannot simultaneously shoot on both the P2 card and the DV cassette tape...
... capacity with P2 (Professional Plug-in HD (1080i, 720P) on the P2 card to an DV format (480i) and recording it to tape. You can use the following features: • HD (High Definition) recording • Multi format recording • Variable frame rates Slow & quick motion recording • Maximum 4...and playback (Pages 29 and 73) DV cassette tape You can record onto DV tape contents that have a slow & quick motion effect. This is useful when backing up images and checking images on AV equipment. • You cannot simultaneously shoot on both the P2 card and the DV cassette tape...

Operating Instructions
Page 9
.../Macintosh) Video equipment /Television Computer Memory card recorder The contents can be transferred as a data stream (digital dubbing). Saving and editing on external devices Before use P2 card 4 PC mode (Page 82) The data (file) is transferred for nonlinear editing on your computer or other unit. Computer USB2.0 (Windows) IEEE1394...
.../Macintosh) Video equipment /Television Computer Memory card recorder The contents can be transferred as a data stream (digital dubbing). Saving and editing on external devices Before use P2 card 4 PC mode (Page 82) The data (file) is transferred for nonlinear editing on your computer or other unit. Computer USB2.0 (Windows) IEEE1394...

Operating Instructions
Page 10
...where laser irradiation equipment is used, be careful not to allow the laser beam to the shooting of the recorded contents. You can damage the camera-recorder if you intended due to check and set and check the calendar and time zone. (Page 24) Panasonic makes no guarantees for ... cases where images and/ or sound were not recorded as weddings), always take some trial shots and check that Panasonic makes no guarantees for private use any purpose other than 1/4-20UNC. For details, refer to the respective pages. • P2 card (Page 27) • Digital video cassette tape (Page 30)...
...where laser irradiation equipment is used, be careful not to allow the laser beam to the shooting of the recorded contents. You can damage the camera-recorder if you intended due to check and set and check the calendar and time zone. (Page 24) Panasonic makes no guarantees for ... cases where images and/ or sound were not recorded as weddings), always take some trial shots and check that Panasonic makes no guarantees for private use any purpose other than 1/4-20UNC. For details, refer to the respective pages. • P2 card (Page 27) • Digital video cassette tape (Page 30)...
Operating Instructions
Page 11
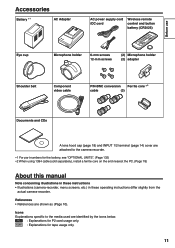
P2 : Explanations for the battery, see "OPTIONAL UNITS". (Page 132) 2 When using 1394 cable (sold separately), install a ferrite core on the end nearest the PC. (Page ...icons below. Icons Explanations specific to the camera-recorder. 1 For part numbers for P2 card usage only. Before use Accessories Battery 1 AC Adapter AC power supply cord /DC cord Wireless remote control and button battery (CR2025) Eye cup ...lens hood cap (page 18) and INPUT 1/2 terminal (page 14) cover are attached to the media used are shown as (Page 10). TAPE : Explanations for tape usage only. 11
P2 : Explanations for the battery, see "OPTIONAL UNITS". (Page 132) 2 When using 1394 cable (sold separately), install a ferrite core on the end nearest the PC. (Page ...icons below. Icons Explanations specific to the camera-recorder. 1 For part numbers for P2 card usage only. Before use Accessories Battery 1 AC Adapter AC power supply cord /DC cord Wireless remote control and button battery (CR2025) Eye cup ...lens hood cap (page 18) and INPUT 1/2 terminal (page 14) cover are attached to the media used are shown as (Page 10). TAPE : Explanations for tape usage only. 11
Operating Instructions
Page 15
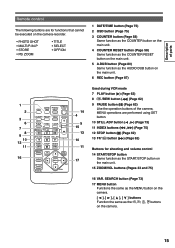
... the same as the START/STOP button on the camera. SEARCH OFF/ON P.B.DIGITAL PB. ZOOM MENU SET ITEM 14 4 5 15 13 10 11 17 Used during VCR mode 7 PLAY button ( ) (Page 62) 8 /REW button ( ) (Page 62) 9 PAUSE button ( ) (Page 62) Like the operation buttons of parts ...Remote control The following buttons are performed using SET button. 10 STILL ADV button ( , ) (Page 73) 11 INDEX buttons ( , ) (Page 75) 12 STOP button ( ) (Page 62) 13 FF/ button ( ) (Page 62...
... the same as the START/STOP button on the camera. SEARCH OFF/ON P.B.DIGITAL PB. ZOOM MENU SET ITEM 14 4 5 15 13 10 11 17 Used during VCR mode 7 PLAY button ( ) (Page 62) 8 /REW button ( ) (Page 62) 9 PAUSE button ( ) (Page 62) Like the operation buttons of parts ...Remote control The following buttons are performed using SET button. 10 STILL ADV button ( , ) (Page 73) 11 INDEX buttons ( , ) (Page 75) 12 STOP button ( ) (Page 62) 13 FF/ button ( ) (Page 62...

Operating Instructions
Page 16
...1 meter away from it. • The AC adapter may make some noise when you are shot in the DVCPRO HD mode on a P2 card while using it . • Keep metal objects (such as necklaces and hairpins) away from the AC adapter. • Operation of included battery Recharging time Continuous recording...recordable time reduces if you touch the battery in the direction shown below. • You cannot charge the battery if the DC cord is being used or charged. Shortcircuiting may occur across the terminals, causing the battery to heat up its charge in the camerarecorder, and then store it again....
...1 meter away from it. • The AC adapter may make some noise when you are shot in the DVCPRO HD mode on a P2 card while using it . • Keep metal objects (such as necklaces and hairpins) away from the AC adapter. • Operation of included battery Recharging time Continuous recording...recordable time reduces if you touch the battery in the direction shown below. • You cannot charge the battery if the DC cord is being used or charged. Shortcircuiting may occur across the terminals, causing the battery to heat up its charge in the camerarecorder, and then store it again....

Operating Instructions
Page 17
If a conversion plug is required, consult with your dealer as to which one is to be used. 17 An AC plug adapter may be operated at a voltage in the range of 100-240V AC. Removal 1 Set the POWER switch to OFF, and ...
If a conversion plug is required, consult with your dealer as to which one is to be used. 17 An AC plug adapter may be operated at a voltage in the range of 100-240V AC. Removal 1 Set the POWER switch to OFF, and ...

Operating Instructions
Page 18
Attaching the shoulder strap Attach the shoulder strap and use . Screw 18 Adjusting the hand strap Adjust the hand strap to detach it. Attaching the lens hood • Turn the lens hood clockwise and fix ...in position with the screw. • Be sure to attach the lens hood cap to protect the lens when not in use it as a precaution against dropping the camera. 20 mm or more 20 mm or more Detaching and attaching the lens hood Detaching the lens hood...
Attaching the shoulder strap Attach the shoulder strap and use . Screw 18 Adjusting the hand strap Adjust the hand strap to detach it. Attaching the lens hood • Turn the lens hood clockwise and fix ...in position with the screw. • Be sure to attach the lens hood cap to protect the lens when not in use it as a precaution against dropping the camera. 20 mm or more 20 mm or more Detaching and attaching the lens hood Detaching the lens hood...
Operating Instructions
Page 19
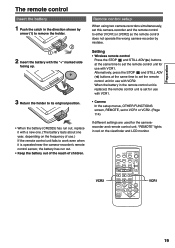
..., press the STOP ( ) and STILL ADV ( ) buttons at the same time to set to VCR1 or VCR2. (Page 114) If different settings are used for use .) If the remote control unit fails to work even when it with VCR1. ZOOM MENU SET ITEM VCR1 19 Setting • Wireless remote control Press...VOL + Preparation The remote control Insert the battery 1 Push the catch in the remote control unit is replaced, the remote control unit is set for use with VCR1. • Camera In the setup menus, OTHER FUNCTIONS screen, REMOTE, set the remote control unit for the camerarecorder and remote control unit,...
..., press the STOP ( ) and STILL ADV ( ) buttons at the same time to set to VCR1 or VCR2. (Page 114) If different settings are used for use .) If the remote control unit fails to work even when it with VCR1. ZOOM MENU SET ITEM VCR1 19 Setting • Wireless remote control Press...VOL + Preparation The remote control Insert the battery 1 Push the catch in the remote control unit is replaced, the remote control unit is set for use with VCR1. • Camera In the setup menus, OTHER FUNCTIONS screen, REMOTE, set the remote control unit for the camerarecorder and remote control unit,...
Operating Instructions
Page 21
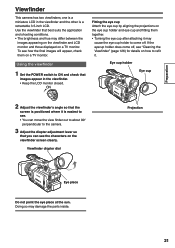
... diopter adjustment lever so that images appear in the viewfinder and the other is easiest to refit it is a retractable 3.5-inch LCD. Using the viewfinder 1 Set the POWER switch to ON and check that you can move the view finder out to about 90°... Viewfinder" (page 126) for details on a TV monitor. one is a miniature LCD in the viewfinder. • Keep the LCD monitor closed. Use the viewfinder that best suits the application and shooting conditions. • The brightness and hue may damage the parts inside. 21 Preparation View...
... diopter adjustment lever so that images appear in the viewfinder and the other is easiest to refit it is a retractable 3.5-inch LCD. Using the viewfinder 1 Set the POWER switch to ON and check that you can move the view finder out to about 90°... Viewfinder" (page 126) for details on a TV monitor. one is a miniature LCD in the viewfinder. • Keep the LCD monitor closed. Use the viewfinder that best suits the application and shooting conditions. • The brightness and hue may damage the parts inside. 21 Preparation View...
Operating Instructions
Page 22
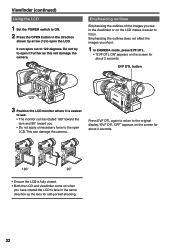
Viewfinder (continued) Using the LCD 1 Set the POWER switch to ON. 2 Press the OPEN button in the same direction as this will damage the camera. Press EVF DTL ...
Viewfinder (continued) Using the LCD 1 Set the POWER switch to ON. 2 Press the OPEN button in the same direction as this will damage the camera. Press EVF DTL ...
Operating Instructions
Page 23
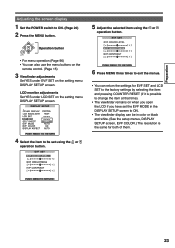
... the remote control. (Page 15) 3 Viewfinder adjustments Set YES under LCD SET on the setting menu DISPLAY SETUP screen. 5 Adjust the selected item using the or operation button. 23 LCD monitor adjustments Set YES under EVF SET on when you open the LCD if you have set... using the or operation button. 6 Press MENU three times to exit the menus. • You can be in color or black and white. (See the setup ...
... the remote control. (Page 15) 3 Viewfinder adjustments Set YES under LCD SET on the setting menu DISPLAY SETUP screen. 5 Adjust the selected item using the or operation button. 23 LCD monitor adjustments Set YES under EVF SET on when you open the LCD if you have set... using the or operation button. 6 Press MENU three times to exit the menus. • You can be in color or black and white. (See the setup ...
Operating Instructions
Page 24
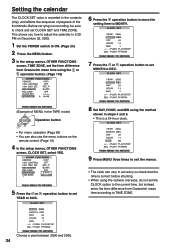
... to ON. (Page 20) 2 Press the MENU button. 3 In the setup menus, OTHER FUNCTIONS screen, TIME ZONE, set the time difference from Greenwich mean time using the or operation button. (Page 116) 6 Press the operation button to move the setting item to MONTH. 7 Press the or operation button to set MONTH... time according to TIME ZONE. Choose a year between 2000 and 2030. 24 Setting the calendar The CLOCK SET value is correct before shooting. • When using the method shown in steps 4 and 5. • This is a 24-hour clock. 9 Press MENU three times to exit the menus. • The clock can ...
... to ON. (Page 20) 2 Press the MENU button. 3 In the setup menus, OTHER FUNCTIONS screen, TIME ZONE, set the time difference from Greenwich mean time using the or operation button. (Page 116) 6 Press the operation button to move the setting item to MONTH. 7 Press the or operation button to set MONTH... time according to TIME ZONE. Choose a year between 2000 and 2030. 24 Setting the calendar The CLOCK SET value is correct before shooting. • When using the method shown in steps 4 and 5. • This is a 24-hour clock. 9 Press MENU three times to exit the menus. • The clock can ...

Operating Instructions
Page 25
... button P2 TAPE Do not operate the MEDIA switch when the power is lighted red. Shooting Basic shooting operations (P2 card) P2 Preparing to shoot using a P2 card 1 Switch the MEDIA switch to "P2". 2 Set the POWER switch to ON. (Page 20) 3 Lift up the viewfinder and open the... START/STOP button (Red) on the POWER switch to start shooting. • Press again to return to the camera to the shooting standby mode. • Use the handle START/STOP button to make it ON again.
... button P2 TAPE Do not operate the MEDIA switch when the power is lighted red. Shooting Basic shooting operations (P2 card) P2 Preparing to shoot using a P2 card 1 Switch the MEDIA switch to "P2". 2 Set the POWER switch to ON. (Page 20) 3 Lift up the viewfinder and open the... START/STOP button (Red) on the POWER switch to start shooting. • Press again to return to the camera to the shooting standby mode. • Use the handle START/STOP button to make it ON again.


