
DMRE75V User Guide
Page 3
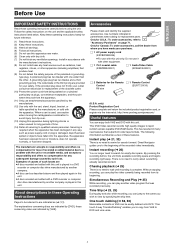
...or table specified by [VHS]. Keep these operating instructions handy for long periods of the recorded video immediately. Only for the Remote ∏ 1 Remote Control Control (EUR7721X10) R6 size (U.S.A. By pressing the recording button, the unit finds available recording space and begins recording right away. ... DVD Video recorder records high quality images to "Accessory Purchases" on or pinched particularly at : http://www.prodreg.com/panasonic/ Useful features You can be referred to DVD and vice versa. 3 This has resulted in parentheses when asking for replacement...
...or table specified by [VHS]. Keep these operating instructions handy for long periods of the recorded video immediately. Only for the Remote ∏ 1 Remote Control Control (EUR7721X10) R6 size (U.S.A. By pressing the recording button, the unit finds available recording space and begins recording right away. ... DVD Video recorder records high quality images to "Accessory Purchases" on or pinched particularly at : http://www.prodreg.com/panasonic/ Useful features You can be referred to DVD and vice versa. 3 This has resulted in parentheses when asking for replacement...
DMRE75V User Guide
Page 4
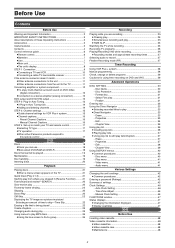
...Captions 16 STEP 4 Set up to match your TV and remote control 17 ≥Selecting TV type 17 ≥TV operation 17 ≥When other Panasonic products respond to this remote control 17 DVD Discs 18 ≥Discs you can use 18... Before Use Warning and Important Information 2 IMPORTANT SAFETY INSTRUCTIONS 3 About descriptions in these Operating Instructions 3 Accessories 3 Useful features 3 Contents 4 Control reference guide 6 ≥Remote control 6 ≥Batteries 7 ≥Use 7 ≥Main unit 7 ≥The unit's display 8 STEP 1 Connection 9 ≥Connecting ...
...Captions 16 STEP 4 Set up to match your TV and remote control 17 ≥Selecting TV type 17 ≥TV operation 17 ≥When other Panasonic products respond to this remote control 17 DVD Discs 18 ≥Discs you can use 18... Before Use Warning and Important Information 2 IMPORTANT SAFETY INSTRUCTIONS 3 About descriptions in these Operating Instructions 3 Accessories 3 Useful features 3 Contents 4 Control reference guide 6 ≥Remote control 6 ≥Batteries 7 ≥Use 7 ≥Main unit 7 ≥The unit's display 8 STEP 1 Connection 9 ≥Connecting ...
DMRE75V User Guide
Page 6
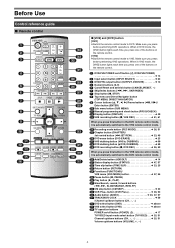
...(13)VHS recording button (¥, VHS REC l 51, 61 When you press this button in the DVD remote control mode, it is automatically switched to the VHS remote control mode. (14)Recording mode button (REC MODE l 26, 51 (15)Chapter button (CHAPTER)/ Jet rewind ...down buttons (CH, W, X l 25, 51 Volume up /down buttons (VOLUME, r, s) 6 Make sure you press before performing DVD operations. Before Use Control reference guide ∫ Remote control (1) (2) (3) (4) (5) (6) (7) (8) (9) DVD/VHS POWER TV POWER INPUT SELECT TV/VIDEO CH VOLUME (34) DVD/VHS OUTPUT VHS DVD TRACKING/V-LOCK (...
...(13)VHS recording button (¥, VHS REC l 51, 61 When you press this button in the DVD remote control mode, it is automatically switched to the VHS remote control mode. (14)Recording mode button (REC MODE l 26, 51 (15)Chapter button (CHAPTER)/ Jet rewind ...down buttons (CH, W, X l 25, 51 Volume up /down buttons (VOLUME, r, s) 6 Make sure you press before performing DVD operations. Before Use Control reference guide ∫ Remote control (1) (2) (3) (4) (5) (6) (7) (8) (9) DVD/VHS POWER TV POWER INPUT SELECT TV/VIDEO CH VOLUME (34) DVD/VHS OUTPUT VHS DVD TRACKING/V-LOCK (...

DMRE75V User Guide
Page 7
...heat or expose to flame. ≥take apart or short circuit. ≥attempt to standby mode or vice versa. Remove if the remote control is still consuming a small amount of power. [B] Remote control signal sensor l above [C] S-Video input terminal (S-VIDEO IN l 62 [D] L2 input terminals (L2 l 62 [E] Display l 8...and new batteries. ≥use rechargeable type batteries. Before Use ∫ Batteries ≥Insert so the poles (i and j) match those in the remote control. ≥Do not use different types at a maximum range of 7 m (23 feet) directly in front of the unit. ≥Keep ...
...heat or expose to flame. ≥take apart or short circuit. ≥attempt to standby mode or vice versa. Remove if the remote control is still consuming a small amount of power. [B] Remote control signal sensor l above [C] S-Video input terminal (S-VIDEO IN l 62 [D] L2 input terminals (L2 l 62 [E] Display l 8...and new batteries. ≥use rechargeable type batteries. Before Use ∫ Batteries ≥Insert so the poles (i and j) match those in the remote control. ≥Do not use different types at a maximum range of 7 m (23 feet) directly in front of the unit. ≥Keep ...

DMRE75V User Guide
Page 12
... COMPONENT VIDEO OUT (480P/480I) OPTICAL DVD/VHS COMMON OUT R - When you increase the volume level of this case, press [DVD/VHS OUTPUT] on the remote controller to play back DVD audio, reduce it when playback is finished. A large amount of coding digital signals developed by this side facing up. (Do not...
... COMPONENT VIDEO OUT (480P/480I) OPTICAL DVD/VHS COMMON OUT R - When you increase the volume level of this case, press [DVD/VHS OUTPUT] on the remote controller to play back DVD audio, reduce it when playback is finished. A large amount of coding digital signals developed by this side facing up. (Do not...

DMRE75V User Guide
Page 17
... does not allow control of your TV, this remote control is not compatible with your TV. ∫ When other Panasonic products respond to this remote control Change the remote control code on the main unit and on the remote control (the two must match) if you place other Panasonic products close together....with [3, 4] and press [2, 1]. [4] Select "TV Type" with [3, 4] and press [ENTER]. Before Use STEP 4 Set up to match your TV and remote control ∫ Selecting TV type You do not have to change the TV volume. Use "1", the factory set . [7] Press [ENTER]. ∫ When the following ...
... does not allow control of your TV, this remote control is not compatible with your TV. ∫ When other Panasonic products respond to this remote control Change the remote control code on the main unit and on the remote control (the two must match) if you place other Panasonic products close together....with [3, 4] and press [2, 1]. [4] Select "TV Type" with [3, 4] and press [ENTER]. Before Use STEP 4 Set up to match your TV and remote control ∫ Selecting TV type You do not have to change the TV volume. Use "1", the factory set . [7] Press [ENTER]. ∫ When the following ...

DMRE75V User Guide
Page 40
...Some options require different operations. Slide show (Display only) Audio channel [RAM] [VCD] Select the audio channel. (l 23) PBC [VCD] (l 63) Playback control on/off Indicates whether menu play . ≥You can change . [A] Sound track/Subtitle language ENG: FRA: DEU: ITA: ESP: NLD: English French German Italian... VHS REC REC MODE DVD REC ADD/DLT [RAM] [DVD-R] [DVD-A] [DVD-VC]HA[PCTERDD]VD[EVRACSE D] D[UMBBPING3] Remote control only DISPLAY menus contain information about the disc or unit. screen instructions and the instructions described later. ∫ When you press [ENTER].
...Some options require different operations. Slide show (Display only) Audio channel [RAM] [VCD] Select the audio channel. (l 23) PBC [VCD] (l 63) Playback control on/off Indicates whether menu play . ≥You can change . [A] Sound track/Subtitle language ENG: FRA: DEU: ITA: ESP: NLD: English French German Italian... VHS REC REC MODE DVD REC ADD/DLT [RAM] [DVD-R] [DVD-A] [DVD-VC]HA[PCTERDD]VD[EVRACSE D] D[UMBBPING3] Remote control only DISPLAY menus contain information about the disc or unit. screen instructions and the instructions described later. ∫ When you press [ENTER].

DMRE75V User Guide
Page 42
... the settings are not possible unless you enter a password. (l 43) Preparation ≥Press [DVD]. Play and changes to change is locked. SETUP Off Timer 6 hr Remote Control Code Set Code 1 DVD/VHS Output Automatic (1) Menus Channel Set Up Auto Clock Setting Manual Clock Setting (2) Items Disc Time Zone Adjust 0 (3) Options Video Audio...
... the settings are not possible unless you enter a password. (l 43) Preparation ≥Press [DVD]. Play and changes to change is locked. SETUP Off Timer 6 hr Remote Control Code Set Code 1 DVD/VHS Output Automatic (1) Menus Channel Set Up Auto Clock Setting Manual Clock Setting (2) Items Disc Time Zone Adjust 0 (3) Options Video Audio...

DMRE75V User Guide
Page 43
... Plus+ CH Setting (l 15) ∫ Set Up Off Timer Select how long the unit remains on when it is not being used. [2 hr] [6 hr] [Off] Remote Control Code (l 17) [Set Code 1] [Set Code 2] [Set Code 3] DVD / VHS Output (l 12) Select how to switch the output from the DVD/VHS COMMON output terminal...
... Plus+ CH Setting (l 15) ∫ Set Up Off Timer Select how long the unit remains on when it is not being used. [2 hr] [6 hr] [Off] Remote Control Code (l 17) [Set Code 1] [Set Code 2] [Set Code 3] DVD / VHS Output (l 12) Select how to switch the output from the DVD/VHS COMMON output terminal...

DMRE75V User Guide
Page 46
... to correspond to the new time zone. ∫ To return to a few hours in April and ending at 2 a.m. SETUP Channel Set Up Off Timer 6 hr Remote Control Code Set Code 1 DVD/VHS Output Automatic Auto Clock Setting Manual Clock Setting Disc Time Zone Adjust 0 Video Re-initialize Settings Audio Display TV Screen...
... to correspond to the new time zone. ∫ To return to a few hours in April and ending at 2 a.m. SETUP Channel Set Up Off Timer 6 hr Remote Control Code Set Code 1 DVD/VHS Output Automatic Auto Clock Setting Manual Clock Setting Disc Time Zone Adjust 0 Video Re-initialize Settings Audio Display TV Screen...

DMRE75V User Guide
Page 48
[[VHS]] Before Use VHS Inserting video cassette The surface from which you can see a roll of tape should face up, Insert a video cassette. ≥This unit is automatically turned on. ∫ To eject a video cassette ≥You can eject a video cassette when the unit is in standby mode. It switches back to standby once it ejects the video cassette. For main unit. ≥Press [
[[VHS]] Before Use VHS Inserting video cassette The surface from which you can see a roll of tape should face up, Insert a video cassette. ≥This unit is automatically turned on. ∫ To eject a video cassette ≥You can eject a video cassette when the unit is in standby mode. It switches back to standby once it ejects the video cassette. For main unit. ≥Press [

DMRE75V User Guide
Page 65
Cannot record on the disc. ≥The disc may be a problem with the disc. Please check the disc. You cannot operate the unit while it is full. No disc. ≥You haven't inserted a disc. Please change the disc. ≥There may be full. Page - - ∫ DVD On the TV Cannot finish recording completely. ≥The program was copy-guarded. ≥The disc may be dirty or scratched. Disc is recovering ("SLF CHECK" appears on the status of titles exceeded. ≥Create space by erasing any unwanted titles. [RAM] ≥Use a new disc. [RAM] [DVD-R] Error has ...
Cannot record on the disc. ≥The disc may be a problem with the disc. Please check the disc. You cannot operate the unit while it is full. No disc. ≥You haven't inserted a disc. Please change the disc. ≥There may be full. Page - - ∫ DVD On the TV Cannot finish recording completely. ≥The program was copy-guarded. ≥The disc may be dirty or scratched. Disc is recovering ("SLF CHECK" appears on the status of titles exceeded. ≥Create space by erasing any unwanted titles. [RAM] ≥Use a new disc. [RAM] [DVD-R] Error has ...

DMRE75V User Guide
Page 66
...time of MP3 are erased. ≥If you repeat recording or editing 200 times or more , the recording or editing of frames at the remote control sensor on . ≥The unit may become louder especially when finalizing a DVD-R. ≥Poor reception due to standby. Compared to the actual...the standby mode. ≥Insert the AC power supply cord securely into a known active AC outlet. ≥This is dirty or damaged. The remote control doesn't work. Displays The display is activated. Wait until "U14" disappears. ≥One of the DVD-R is reduced and then recording or ...
...time of MP3 are erased. ≥If you repeat recording or editing 200 times or more , the recording or editing of frames at the remote control sensor on . ≥The unit may become louder especially when finalizing a DVD-R. ≥Poor reception due to standby. Compared to the actual...the standby mode. ≥Insert the AC power supply cord securely into a known active AC outlet. ≥This is dirty or damaged. The remote control doesn't work. Displays The display is activated. Wait until "U14" disappears. ≥One of the DVD-R is reduced and then recording or ...


