

DMCFZ47 User Guide
Page 2
... Use Care of the camera 5 Standard Accessories 6 Names and Functions of Components......7 Preparation Attaching the Lens Cap/ Shoulder Strap 11 Attaching the Lens Hood 13 Charging the Battery 14 • Charging 14 • Approximate operating time and number of recordable pictures ..........16 Inserting and Removing the Card (optional)/the Battery 18 About the Built-in Memory/the Card ........19 • Approximate number of recordable pictures and available recording time 21 Setting Date/Time (Clock Set 22 • Changing...
... Use Care of the camera 5 Standard Accessories 6 Names and Functions of Components......7 Preparation Attaching the Lens Cap/ Shoulder Strap 11 Attaching the Lens Hood 13 Charging the Battery 14 • Charging 14 • Approximate operating time and number of recordable pictures ..........16 Inserting and Removing the Card (optional)/the Battery 18 About the Built-in Memory/the Card ........19 • Approximate number of recordable pictures and available recording time 21 Setting Date/Time (Clock Set 22 • Changing...
DMCFZ47 User Guide
Page 3
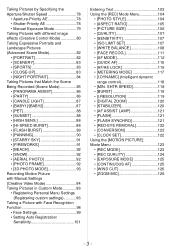
... Recording Motion Picture with Manual Settings (Creative Video Mode 94 Taking Pictures in Custom Mode 96 • Registering Personal Menu Settings (Registering custom settings 96 Taking a Picture with Face Recognition Function 98 • Face Settings 99 • Setting Auto Registration/ Sensitivity 101 Entering Text 103 Using the [REC] Mode Menu 104 • [PHOTO STYLE 104 • [ASPECT RATIO 105 • [PICTURE SIZE 106 • [QUALITY 107 • [SENSITIVITY 107 • [ISO LIMIT SET 107 • [WHITE BALANCE...
... Recording Motion Picture with Manual Settings (Creative Video Mode 94 Taking Pictures in Custom Mode 96 • Registering Personal Menu Settings (Registering custom settings 96 Taking a Picture with Face Recognition Function 98 • Face Settings 99 • Setting Auto Registration/ Sensitivity 101 Entering Text 103 Using the [REC] Mode Menu 104 • [PHOTO STYLE 104 • [ASPECT RATIO 105 • [PICTURE SIZE 106 • [QUALITY 107 • [SENSITIVITY 107 • [ISO LIMIT SET 107 • [WHITE BALANCE...

DMCFZ47 User Guide
Page 4
...; [PRINT SET 141 • [PROTECT 143 • [FACE REC EDIT 144 • [COPY 145 Connecting to other equipment Playing Back Pictures on a TV Screen 146 • Using VIERA Link (HDMI 148 Playing back 3D pictures 150 Saving the Recorded Still Pictures and Motion Pictures 152 • Copy by inserting the SD card into the recorder 152 • Copy the playback image using an AV cable 153 • Copying to a PC using "PHOTOfunSTUDIO 154 Connecting to a PC...
...; [PRINT SET 141 • [PROTECT 143 • [FACE REC EDIT 144 • [COPY 145 Connecting to other equipment Playing Back Pictures on a TV Screen 146 • Using VIERA Link (HDMI 148 Playing back 3D pictures 150 Saving the Recorded Still Pictures and Motion Pictures 152 • Copy by inserting the SD card into the recorder 152 • Copy the playback image using an AV cable 153 • Copying to a PC using "PHOTOfunSTUDIO 154 Connecting to a PC...

DMCFZ47 User Guide
Page 19
Check via the label on the following website. http://panasonic.jp/support/global/cs/dsc/ (This Site is displayed in red when pictures are compatible when using the SDXC Memory Cards. http://panasonic.net/avc/sdcard/information/SDXC.html • Only the cards with capacity listed left can copy the recorded pictures to a card. (P145) • Memory size: Approx. 70 MB • The access time for the built-in memory may be...
Check via the label on the following website. http://panasonic.jp/support/global/cs/dsc/ (This Site is displayed in red when pictures are compatible when using the SDXC Memory Cards. http://panasonic.net/avc/sdcard/information/SDXC.html • Only the cards with capacity listed left can copy the recorded pictures to a card. (P145) • Memory size: Approx. 70 MB • The access time for the built-in memory may be...

DMCFZ47 User Guide
Page 34
... recording motion pictures using [MINIATURE EFFECT] of the Creative Control Mode, the camera may go on the type of the card, the card access indication may take time to P123. Basic Applicable modes: Recording Motion Pictures Start recording by pressing the motion picture button again. CUST M A CB Stop the recording by pressing the motion picture button. depending on the environment of the motion picture recording. • When operating the zoom in recording motion pictures, it . • The recording state indicator (red) C will flash while recording motion pictures. • Focus...
... recording motion pictures using [MINIATURE EFFECT] of the Creative Control Mode, the camera may go on the type of the card, the card access indication may take time to P123. Basic Applicable modes: Recording Motion Pictures Start recording by pressing the motion picture button again. CUST M A CB Stop the recording by pressing the motion picture button. depending on the environment of the motion picture recording. • When operating the zoom in recording motion pictures, it . • The recording state indicator (red) C will flash while recording motion pictures. • Focus...

DMCFZ47 User Guide
Page 53
... the Auto Review function is activated or when playing back, white saturated areas appear blinking in Manual Focus. • Depending on the recording conditions, the memorized MF positions and resumed MF positions might be white saturated areas if the distance between the number of recordable pictures and available recording time. [REMAINING SHOTS]: This will display the number of focus other than Manual Focus - When switched to Playback Mode • Zoom position will be set all...
... the Auto Review function is activated or when playing back, white saturated areas appear blinking in Manual Focus. • Depending on the recording conditions, the memorized MF positions and resumed MF positions might be white saturated areas if the distance between the number of recordable pictures and available recording time. [REMAINING SHOTS]: This will display the number of focus other than Manual Focus - When switched to Playback Mode • Zoom position will be set all...

DMCFZ47 User Guide
Page 55
o [AUTO REVIEW] [OFF] [1SEC.] [2SEC.] [HOLD]: The pictures are displayed until one of time that the picture is updated and the file number starts from Recording Mode to reset the folder number. - 55 - Set the length of the buttons is pressed. • [AUTO REVIEW] is turned on a PC or elsewhere. • To reset the folder number to 100, format the built-in memory or the card first and then use this function to record. We recommend formatting the...
o [AUTO REVIEW] [OFF] [1SEC.] [2SEC.] [HOLD]: The pictures are displayed until one of time that the picture is updated and the file number starts from Recording Mode to reset the folder number. - 55 - Set the length of the buttons is pressed. • [AUTO REVIEW] is turned on a PC or elsewhere. • To reset the folder number to 100, format the built-in memory or the card first and then use this function to record. We recommend formatting the...

DMCFZ47 User Guide
Page 56
... the type of malfunctioning. • When the Recording Mode settings are reset, data registered with the USB connection cable (supplied). Basic w [RESET] The [REC] or [SETUP] menu settings are reset to a 4:3 screen TV. • This will work when the AV cable (optional) is connected. - 56 - The [CUST. The birthday and name settings for [BABY1]/[BABY2] and [PET] in [LENS RESUME]/[MENU RESUME]. • The folder number and the clock setting are not changed. The [WORLD TIME] setting. -
... the type of malfunctioning. • When the Recording Mode settings are reset, data registered with the USB connection cable (supplied). Basic w [RESET] The [REC] or [SETUP] menu settings are reset to a 4:3 screen TV. • This will work when the AV cable (optional) is connected. - 56 - The [CUST. The birthday and name settings for [BABY1]/[BABY2] and [PET] in [LENS RESUME]/[MENU RESUME]. • The folder number and the clock setting are not changed. The [WORLD TIME] setting. -
DMCFZ47 User Guide
Page 58
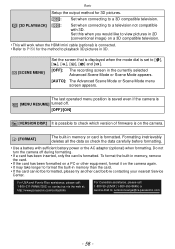
... to playback 3D pictures in memory than the card. • If the card cannot be formatted, please try another card before formatting. • Use a battery with 3D. Formatting irretrievably deletes all the data so check the data carefully before contacting your nearest Service Center. Set this when you would like to view pictures in 2D (conventional image) on the camera. [FORMAT] The built-in memory or card is set to and [ ]. [OFF]: The recording screen in memory, remove the card...
... to playback 3D pictures in memory than the card. • If the card cannot be formatted, please try another card before formatting. • Use a battery with 3D. Formatting irretrievably deletes all the data so check the data carefully before contacting your nearest Service Center. Set this when you would like to view pictures in 2D (conventional image) on the camera. [FORMAT] The built-in memory or card is set to and [ ]. [OFF]: The recording screen in memory, remove the card...

DMCFZ47 User Guide
Page 95
... taken because the sounds of such operations may be recorded. • Manually setting a higher shutter speed may change. • Refer to "Recording Motion Pictures" on -screen due to the higher sensitivity. • When recording under lighting such as fluorescent lighting, LED lighting, mercury lighting and sodium lighting, the coloring and brightness of the aperture value, shutter speed and exposure compensation can be changed during motion picture recording. Recording Note • The settings of the screen may increase the...
... taken because the sounds of such operations may be recorded. • Manually setting a higher shutter speed may change. • Refer to "Recording Motion Pictures" on -screen due to the higher sensitivity. • When recording under lighting such as fluorescent lighting, LED lighting, mercury lighting and sodium lighting, the coloring and brightness of the aperture value, shutter speed and exposure compensation can be changed during motion picture recording. Recording Note • The settings of the screen may increase the...

DMCFZ47 User Guide
Page 130
... TIME], the pictures are multiple pictures with the same recording date, the first picture recorded on the built-in memory or the card so we recommend checking that were recorded on the [PLAYBACK] Mode menu. (P46) Press 3/4/2/1 to select the date to the calendar screen. Note • The recording date of recorded images, etc. • With [TEXT STAMP], [RESIZE], [CROPPING] or [LEVELING], a new edited picture is created. Playback/Editing Using the [PLAYBACK] Mode Menu You can setup pictures to...
... TIME], the pictures are multiple pictures with the same recording date, the first picture recorded on the built-in memory or the card so we recommend checking that were recorded on the [PLAYBACK] Mode menu. (P46) Press 3/4/2/1 to select the date to the calendar screen. Note • The recording date of recorded images, etc. • With [TEXT STAMP], [RESIZE], [CROPPING] or [LEVELING], a new edited picture is created. Playback/Editing Using the [PLAYBACK] Mode Menu You can setup pictures to...
DMCFZ47 User Guide
Page 145
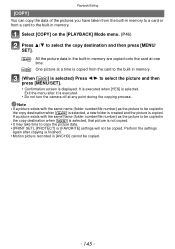
... (folder number/file number) as the picture to select the picture and then press [MENU/SET]. • Confirmation screen is displayed. Perform the settings again after it is executed. • Do not turn the camera off at a time is copied from a card to the built-in memory. (When [ ] is not copied. • It may take time to be copied. Exit the menu after copying is finished. • Motion picture recorded in the copy destination when...
... (folder number/file number) as the picture to select the picture and then press [MENU/SET]. • Confirmation screen is displayed. Perform the settings again after it is executed. • Do not turn the camera off at a time is copied from a card to the built-in memory. (When [ ] is not copied. • It may take time to be copied. Exit the menu after copying is finished. • Motion picture recorded in the copy destination when...

DMCFZ47 User Guide
Page 149
..., use a genuine Panasonic HDMI mini cable (RP-CDHM15, RP-CDHM30; Part numbers: RP-CDHM15 (1.5 m) (5 feet), RP-CDHM30 (3.0 m) (10 feet) • [HDMI MODE] for the TV's [Power on link] setting). • Depending on the HDMI terminal on the TV, the input channel may not switch automatically. optional). Connecting to other equipment Note • To play back the audio of the following buttons is pressed while the operation...
..., use a genuine Panasonic HDMI mini cable (RP-CDHM15, RP-CDHM30; Part numbers: RP-CDHM15 (1.5 m) (5 feet), RP-CDHM30 (3.0 m) (10 feet) • [HDMI MODE] for the TV's [Power on link] setting). • Depending on the HDMI terminal on the TV, the input channel may not switch automatically. optional). Connecting to other equipment Note • To play back the audio of the following buttons is pressed while the operation...

DMCFZ47 User Guide
Page 153
... display of the screen by pressing the [DISPLAY] on this unit to [4:3] before starting a copy. This can be standard quality instead of high definition at this time. 1 Yellow: to the video input socket 2 White: to the audio input socket A AV cable (optional) 1 Connect this unit with the recording equipment with this unit to Blu-ray disc, DVD disc, hard disk, or video using an AV cable File formats that is not compatible with [16:9] setting...
... display of the screen by pressing the [DISPLAY] on this unit to [4:3] before starting a copy. This can be standard quality instead of high definition at this time. 1 Yellow: to the video input socket 2 White: to the audio input socket A AV cable (optional) 1 Connect this unit with the recording equipment with this unit to Blu-ray disc, DVD disc, hard disk, or video using an AV cable File formats that is not compatible with [16:9] setting...

DMCFZ47 User Guide
Page 155
... be connected via USB, but it . ∫ PC that can be used does not support SDXC Memory Cards, a message prompting you have imported. Use of the "PHOTOfunSTUDIO" bundled software on the environment of the PC used . http://panasonic.net/avc/sdcard/information/SDXC.html • You can read directly from the card removed from the camera. It may appear. (Doing so will cause recorded images to be erased so...
... be connected via USB, but it . ∫ PC that can be used does not support SDXC Memory Cards, a message prompting you have imported. Use of the "PHOTOfunSTUDIO" bundled software on the environment of the PC used . http://panasonic.net/avc/sdcard/information/SDXC.html • You can read directly from the card removed from the camera. It may appear. (Doing so will cause recorded images to be erased so...

DMCFZ47 User Guide
Page 159
...), turn the camera off. • Before inserting or removing a card, turn the camera off, and disconnect the USB connection cable. • Motion pictures recorded cannot be bent out of shape which may be printed out. - 159 - For details, refer to the operating instructions of the connectors, and plug them straight out. (Otherwise the connectors may cause malfunction.) B Align the marks, and insert. • Use a battery with sufficient battery power...
...), turn the camera off. • Before inserting or removing a card, turn the camera off, and disconnect the USB connection cable. • Motion pictures recorded cannot be bent out of shape which may be printed out. - 159 - For details, refer to the operating instructions of the connectors, and plug them straight out. (Otherwise the connectors may cause malfunction.) B Align the marks, and insert. • Use a battery with sufficient battery power...

DMCFZ47 User Guide
Page 176
... memory will be deleted. - 176 - Others Message Display Confirmation messages or error messages will be displayed on the screen in memory.) - When a picture with the same name as examples. [THIS PICTURE IS PROTECTED] > Delete the picture after canceling the protect setting. (P143) [THIS PICTURE CANNOT BE DELETED]/[SOME PICTURES CANNOT BE DELETED] • Pictures not based on the DCF standard cannot be deleted. > If you copy pictures from a card to delete some pictures, format the card after saving necessary data...
... memory will be deleted. - 176 - Others Message Display Confirmation messages or error messages will be displayed on the screen in memory.) - When a picture with the same name as examples. [THIS PICTURE IS PROTECTED] > Delete the picture after canceling the protect setting. (P143) [THIS PICTURE CANNOT BE DELETED]/[SOME PICTURES CANNOT BE DELETED] • Pictures not based on the DCF standard cannot be deleted. > If you copy pictures from a card to delete some pictures, format the card after saving necessary data...

DMCFZ47 User Guide
Page 179
... turned on , the battery will be exhausted. > Turn the camera off frequently by selecting [RESET] (P56) on . fingerprints on the lens. > If the lens is dirty, turn off . > If you leave the camera on . • The battery is turned on the [SETUP] menu. Charge the battery. • If you are not using VIERA Link, set ? • Is there any memory remaining on the built-in memory or the card? > Delete unnecessary pictures...
... turned on , the battery will be exhausted. > Turn the camera off frequently by selecting [RESET] (P56) on . fingerprints on the lens. > If the lens is dirty, turn off . > If you leave the camera on . • The battery is turned on the [SETUP] menu. Charge the battery. • If you are not using VIERA Link, set ? • Is there any memory remaining on the built-in memory or the card? > Delete unnecessary pictures...

DMCFZ47 User Guide
Page 180
... [FLASH BURST] (P89) in memory or the card? SHTR SPEED] to slower speed. The Optical Image Stabilizer is not effective. > The shutter speed becomes slower when pictures are taken at a slow shutter speed, use the Self-timer. (P73) Taking pictures using Auto Bracket is not possible. • Is there any memory remaining on the picture. • Is the ISO sensitivity high or the shutter speed slow? (ISO sensitivity is shipped. The recorded picture...
... [FLASH BURST] (P89) in memory or the card? SHTR SPEED] to slower speed. The Optical Image Stabilizer is not effective. > The shutter speed becomes slower when pictures are taken at a slow shutter speed, use the Self-timer. (P73) Taking pictures using Auto Bracket is not possible. • Is there any memory remaining on the picture. • Is the ISO sensitivity high or the shutter speed slow? (ISO sensitivity is shipped. The recorded picture...

DMCFZ47 User Guide
Page 185
... the card slot of the TV, the input channel may be transferred when the camera is firmly fitted. > Press [(] on this unit. • Is the [VIERA Link] on this case, use the remote control for the TV to switch input. (For details on how to switch input, please read the operating instructions for the TV.) > Check the VIERA Link setting on the connected device. > Turn the power to the...
... the card slot of the TV, the input channel may be transferred when the camera is firmly fitted. > Press [(] on this unit. • Is the [VIERA Link] on this case, use the remote control for the TV to switch input. (For details on how to switch input, please read the operating instructions for the TV.) > Check the VIERA Link setting on the connected device. > Turn the power to the...


