
User Manual
Page 1
VQT3Z12 F1211MR0 DMC-SZ7 Before use, please read these instructions completely. Operating Instructions for advanced features Digital Camera Model No.
VQT3Z12 F1211MR0 DMC-SZ7 Before use, please read these instructions completely. Operating Instructions for advanced features Digital Camera Model No.

User Manual
Page 2
Contents Before Use Care of the camera 4 Standard Accessories 5 Names and Functions of Main Parts .........6 Preparation Charging the Battery 8 • Inserting the Battery 9 • Charging 10 • Approximate operating time and number .../Time (Clock Set 18 • Changing the Clock Setting 19 Tips for taking good pictures 20 • Fit the strap and hold the camera carefully 20 • Preventing jitter (camera shake) .......20 Basic Selecting the Recording Mode 21 Taking pictures using the automatic function (Intelligent Auto Mode 22 • Changing the settings...
Contents Before Use Care of the camera 4 Standard Accessories 5 Names and Functions of Main Parts .........6 Preparation Charging the Battery 8 • Inserting the Battery 9 • Charging 10 • Approximate operating time and number .../Time (Clock Set 18 • Changing the Clock Setting 19 Tips for taking good pictures 20 • Fit the strap and hold the camera carefully 20 • Preventing jitter (camera shake) .......20 Basic Selecting the Recording Mode 21 Taking pictures using the automatic function (Intelligent Auto Mode 22 • Changing the settings...

User Manual
Page 4
... malfunction or image may be damaged if used in your trousers pocket or forcefully insert it on the lens or the LCD monitor. This camera is fogged up) • Condensation occurs when the ambient temperature or humidity changes. Before Use Before Use Care of the... camera Do not subject to the camera. - Sit down with a lot of the camera becomes close to the ambient temperature. - 4 - The fog will disappear naturally when the temperature of sand or dust. - Places ...
... malfunction or image may be damaged if used in your trousers pocket or forcefully insert it on the lens or the LCD monitor. This camera is fogged up) • Condensation occurs when the ambient temperature or humidity changes. Before Use Before Use Care of the... camera Do not subject to the camera. - Sit down with a lot of the camera becomes close to the ambient temperature. - 4 - The fog will disappear naturally when the temperature of sand or dust. - Places ...
User Manual
Page 5
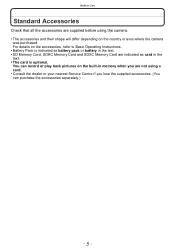
... or play back pictures on the built-in the text. • SD Memory Card, SDHC Memory Card and SDXC Memory Card are not using the camera. • The accessories and their shape will differ depending on the accessories, refer to Basic Operating Instructions. • Battery Pack is optional. For details on...
... or play back pictures on the built-in the text. • SD Memory Card, SDHC Memory Card and SDXC Memory Card are not using the camera. • The accessories and their shape will differ depending on the accessories, refer to Basic Operating Instructions. • Battery Pack is optional. For details on...

User Manual
Page 7
Before Use 12 Strap eyelet • Be sure to attach the strap when using the camera to ensure that you will not drop it. 13 Lens barrel 14 [HDMI] socket (P109, 111) 15 [AV OUT/DIGITAL] socket (P10, 109, 119, 122) 16 Speaker (P42) • Be careful not to hear. 17 Camera ON/OFF switch (P18) 18 Zoom lever (P51) 19 Microphone 20 Shutter button (P22, 26) 21 Motion picture button (P29) 22 Tripod receptacle 23 Card/Battery door (P9, 14) 24 Release lever (P9, 14) 12 13 14 15 16 17 18 19 20 21 22 23 24 - 7 - Doing so may make sound difficult to cover the speaker with your finger.
Before Use 12 Strap eyelet • Be sure to attach the strap when using the camera to ensure that you will not drop it. 13 Lens barrel 14 [HDMI] socket (P109, 111) 15 [AV OUT/DIGITAL] socket (P10, 109, 119, 122) 16 Speaker (P42) • Be careful not to hear. 17 Camera ON/OFF switch (P18) 18 Zoom lever (P51) 19 Microphone 20 Shutter button (P22, 26) 21 Motion picture button (P29) 22 Tripod receptacle 23 Card/Battery door (P9, 14) 24 Release lever (P9, 14) 12 13 14 15 16 17 18 19 20 21 22 23 24 - 7 - Doing so may make sound difficult to cover the speaker with your finger.

User Manual
Page 8
There is used . To ensure that a genuine Panasonic battery pack is a possibility that these battery packs are used .... counterfeit battery packs which look very similar to the genuine product are not liable for purchase in the camera. Preparation Preparation Charging the Battery Use the dedicated AC adaptor (supplied), USB connection cable (supplied) and...The battery is not charged.) • When there is activated) ≤ Power on -¢ ¢ The camera can use with internal protection to fire or explosion. Charge the battery before use of use . • Charge the...
There is used . To ensure that a genuine Panasonic battery pack is a possibility that these battery packs are used .... counterfeit battery packs which look very similar to the genuine product are not liable for purchase in the camera. Preparation Preparation Charging the Battery Use the dedicated AC adaptor (supplied), USB connection cable (supplied) and...The battery is not charged.) • When there is activated) ≤ Power on -¢ ¢ The camera can use with internal protection to fire or explosion. Charge the battery before use of use . • Charge the...

User Manual
Page 9
Note • Turn the camera off . Being careful about the battery orientation, insert all the way until you use genuine Panasonic batteries. • If you hear a locking sound and then check that this unit is locked by lever A. Slide the release lever in the direction of ... lever A in the direction of the arrow to clear before removing the battery. (Otherwise, this product. Preparation Inserting the Battery Insert the battery into the camera to charge it. • Check that it is turned off and wait for the "LUMIX" display on the LCD monitor to remove the battery. 1:Close...
Note • Turn the camera off . Being careful about the battery orientation, insert all the way until you use genuine Panasonic batteries. • If you hear a locking sound and then check that this unit is locked by lever A. Slide the release lever in the direction of ... lever A in the direction of the arrow to clear before removing the battery. (Otherwise, this product. Preparation Inserting the Battery Insert the battery into the camera to charge it. • Check that it is turned off and wait for the "LUMIX" display on the LCD monitor to remove the battery. 1:Close...
User Manual
Page 10
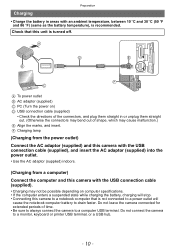
... the marks, and insert. Check that is not connected to a power outlet will cause the notebook computer battery to drain faster. Do not connect the camera to a monitor, keyboard or printer USB terminal, or a USB hub. - 10 - F Charging lamp (Charging from the power outlet) Connect the ...AC adaptor (supplied) and this camera with the USB connection cable (supplied), and insert the AC adaptor (supplied) into the power outlet. • Use the AC adaptor (supplied) indoors. (Charging...
... the marks, and insert. Check that is not connected to a power outlet will cause the notebook computer battery to drain faster. Do not connect the camera to a monitor, keyboard or printer USB terminal, or a USB hub. - 10 - F Charging lamp (Charging from the power outlet) Connect the ...AC adaptor (supplied) and this camera with the USB connection cable (supplied), and insert the AC adaptor (supplied) into the power outlet. • Use the AC adaptor (supplied) indoors. (Charging...
User Manual
Page 11
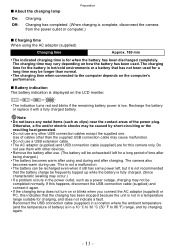
...adaptor (supplied) and USB connection cable (supplied) are for this camera only. Otherwise, a fire and/or electric shocks may be exhausted if left , but it with other devices. • Remove the battery after charging. The camera also becomes warm during and after use . Off: Charging has ...completed. (When charging is complete, disconnect the camera from the power outlet or computer.) ∫ Charging time When using and during use...
...adaptor (supplied) and USB connection cable (supplied) are for this camera only. Otherwise, a fire and/or electric shocks may be exhausted if left , but it with other devices. • Remove the battery after charging. The camera also becomes warm during and after use . Off: Charging has ...completed. (When charging is complete, disconnect the camera from the power outlet or computer.) ∫ Charging time When using and during use...
User Manual
Page 12
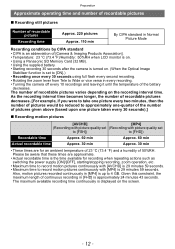
...Normal Picture Mode Recording conditions by CIPA standard • CIPA is an abbreviation of [Camera & Imaging Products Association]. • Temperature: 23 oC (73.4 oF)/Humidity: 50%RH when LCD monitor is on. • Using a Panasonic SD Memory Card (32 MB). • Using the supplied battery. • Starting... recording 30 seconds after the camera is turned on. (When the Optical Image Stabiliser function is set to [FSH]) to 4 GB....
...Normal Picture Mode Recording conditions by CIPA standard • CIPA is an abbreviation of [Camera & Imaging Products Association]. • Temperature: 23 oC (73.4 oF)/Humidity: 50%RH when LCD monitor is on. • Using a Panasonic SD Memory Card (32 MB). • Using the supplied battery. • Starting... recording 30 seconds after the camera is turned on. (When the Optical Image Stabiliser function is set to [FSH]) to 4 GB....

User Manual
Page 13
... number of recordable pictures is reduced: - In low-temperature environments, such as flash and zoom are used repeatedly. • When the operating time of the camera becomes extremely short even after properly charging the battery, the life of the battery may have expired. When operations such as on ski slopes. - For...
... number of recordable pictures is reduced: - In low-temperature environments, such as flash and zoom are used repeatedly. • When the operating time of the camera becomes extremely short even after properly charging the battery, the life of the battery may have expired. When operations such as on ski slopes. - For...

User Manual
Page 14
Note • Turn the camera off . • We recommend using a Panasonic card. Push it securely all the way until it . A: Do not touch the connection terminals of the card. 1:Close the card/battery door. 2:Slide the ...
Note • Turn the camera off . • We recommend using a Panasonic card. Push it securely all the way until it . A: Do not touch the connection terminals of the card. 1:Close the card/battery door. 2:Slide the ...
User Manual
Page 16
...restored when the switch is returned to its original position.) • The data on the camera only to ensure proper operation. (P48) • Keep the Memory Card out of reach of the camera or the card. We recommend storing important data on a PC etc. 2 • Do...LOCK] position, no longer operate normally. Preparation Note • During access (image writing, reading and deleting, formatting etc.), do not subject the camera to vibration, impact or static electricity. Furthermore, do not turn off the power, remove the battery, card or disconnect the AC adaptor (supplied...
...restored when the switch is returned to its original position.) • The data on the camera only to ensure proper operation. (P48) • Keep the Memory Card out of reach of the camera or the card. We recommend storing important data on a PC etc. 2 • Do...LOCK] position, no longer operate normally. Preparation Note • During access (image writing, reading and deleting, formatting etc.), do not subject the camera to vibration, impact or static electricity. Furthermore, do not turn off the power, remove the battery, card or disconnect the AC adaptor (supplied...

User Manual
Page 18
... display format), and press 3/4 to select the language, and press [MENU/SET]. Press [MENU/SET]. Slide the REC/PLAY switch to [!] and then turn the camera on. • If the language select screen is shipped. A: Time at the home area B: Time at the travel destination • You can cancel without setting... - Press 3/4 to set. Press [MENU/SET] to set. Press [MENU/SET]. Preparation Setting Date/Time (Clock Set) • The clock is not set when the camera is not displayed, proceed to step 4.
... display format), and press 3/4 to select the language, and press [MENU/SET]. Press [MENU/SET]. Slide the REC/PLAY switch to [!] and then turn the camera on. • If the language select screen is shipped. A: Time at the home area B: Time at the travel destination • You can cancel without setting... - Press 3/4 to set. Press [MENU/SET] to set. Press [MENU/SET]. Preparation Setting Date/Time (Clock Set) • The clock is not set when the camera is not displayed, proceed to step 4.

User Manual
Page 19
... Stamp]. • If the clock is set, the correct date can be printed even if the date is not displayed on the screen of the camera. - 19 -
... Stamp]. • If the clock is set, the correct date can be printed even if the date is not displayed on the screen of the camera. - 19 -

User Manual
Page 20
... recommend using a tripod. - In [Night Portrait] or [Night Scenery] in [Min. Shtr Speed] - 20 - Keep the camera still from the moment the shutter button is slowed in Scene Mode - Preventing jitter (camera shake) When the Jitter alert [ ] appears, use [Stabilizer] (P85), a tripod or the Self-timer (P57). • ...Shutter speed will be sure to attach the supplied strap and fit it to your wrist. (P7) • Be careful not to move the camera when you press the shutter button. • Be careful not to record pictures, the Direction Detection function may not work correctly. • Motion ...
... recommend using a tripod. - In [Night Portrait] or [Night Scenery] in [Min. Shtr Speed] - 20 - Keep the camera still from the moment the shutter button is slowed in Scene Mode - Preventing jitter (camera shake) When the Jitter alert [ ] appears, use [Stabilizer] (P85), a tripod or the Self-timer (P57). • ...Shutter speed will be sure to attach the supplied strap and fit it to your wrist. (P7) • Be careful not to move the camera when you press the shutter button. • Be careful not to record pictures, the Direction Detection function may not work correctly. • Motion ...

User Manual
Page 21
... set. - 21 - Press [MENU/SET]. ∫ List of Recording Modes ¦ Intelligent Auto Mode (P22) The subjects are recorded using settings automatically selected by the camera. ! Note • When the mode has been switched from Playback Mode to select the Recording Mode.
... set. - 21 - Press [MENU/SET]. ∫ List of Recording Modes ¦ Intelligent Auto Mode (P22) The subjects are recorded using settings automatically selected by the camera. ! Note • When the mode has been switched from Playback Mode to select the Recording Mode.

User Manual
Page 22
...who want to leave the settings to the subject) will change depending on the screen. (P27) • You can be to the camera and take the picture. 1 2 - 22 - Please check with the recordable range display on the zoom factor. Basic Recording Mode: ...Taking pictures using the automatic function (Intelligent Auto Mode) The camera will set the AF tracking by pressing 3. Scene Detection/Backlight Compensation/Intelligent ISO sensitivity control/Auto White Balance/Face Detection/[Quick AF]/[i.Exposure]/[i....
...who want to leave the settings to the subject) will change depending on the screen. (P27) • You can be to the camera and take the picture. 1 2 - 22 - Please check with the recordable range display on the zoom factor. Basic Recording Mode: ...Taking pictures using the automatic function (Intelligent Auto Mode) The camera will set the AF tracking by pressing 3. Scene Detection/Backlight Compensation/Intelligent ISO sensitivity control/Auto White Balance/Face Detection/[Quick AF]/[i.Exposure]/[i....

User Manual
Page 23
...3 years old or younger is displayed in the appropriate Recording Mode. - 23 - Recording conditions: Sunset, sunrise, under low brightness conditions, when the camera is shaken, when zoom is used • For the best results, it will adjust the focus and exposure. (Face Detection) • If a... of the scene concerned is detected. When taking pictures. • When [Face Recog.] is set . • When [ ], [ ] or [ ] is selected, the camera automatically detects a person's face, and it is displayed in the top right of [ ], [ ] and [ ]. • Due to conditions such as [ ], the shutter...
...3 years old or younger is displayed in the appropriate Recording Mode. - 23 - Recording conditions: Sunset, sunrise, under low brightness conditions, when the camera is shaken, when zoom is used • For the best results, it will adjust the focus and exposure. (Face Detection) • If a... of the scene concerned is detected. When taking pictures. • When [Face Recog.] is set . • When [ ], [ ] or [ ] is selected, the camera automatically detects a person's face, and it is displayed in the top right of [ ], [ ] and [ ]. • Due to conditions such as [ ], the shutter...

User Manual
Page 24
The camera automatically sets an optimal shutter speed according to the motion of the subject to reduce blur on the recording screen. In this setting, the burst ...
The camera automatically sets an optimal shutter speed according to the motion of the subject to reduce blur on the recording screen. In this setting, the burst ...


