
CQC5403U User Guide
Page 2
...; After installation and wiring, you to potential dangers resulting 1 system. use this manual. If an infant ingests a battery or insulation film, please seek immediate medical attention. ❑ Protect the Deck Mechanism. If the product needs to be ingested, so keep them out of the... N G Safety Information L I S ■ Read the operating instructions for the unit and all exposed wires to prevent short circuiting. 2 CQ-C5403U/C5303U Panasonic assumes no sound) or in an abnormal state (has foreign objects in the vehicle chassis to attach or wire the product, first check where the...
...; After installation and wiring, you to potential dangers resulting 1 system. use this manual. If an infant ingests a battery or insulation film, please seek immediate medical attention. ❑ Protect the Deck Mechanism. If the product needs to be ingested, so keep them out of the... N G Safety Information L I S ■ Read the operating instructions for the unit and all exposed wires to prevent short circuiting. 2 CQ-C5403U/C5303U Panasonic assumes no sound) or in an abnormal state (has foreign objects in the vehicle chassis to attach or wire the product, first check where the...

CQC5403U User Guide
Page 5
... Carefully pack and send prepaid, adequately insured and preferably in Puerto Rico Panasonic Puerto Rico, Inc. We 4 know this manual represent model CQ-C5403U unless otherwise specified. Features Models Pre-amp output voltage/impedance Subwoofer output voltage/impedance CQ-C5403U 4 V/60 Ω 4 V/60 Ω CQ-C5303U 2.5 V/200 Ω 2.5 V/200 Ω Customer Services Directory U.S.A. purchase Parts and Accessories...
... Carefully pack and send prepaid, adequately insured and preferably in Puerto Rico Panasonic Puerto Rico, Inc. We 4 know this manual represent model CQ-C5403U unless otherwise specified. Features Models Pre-amp output voltage/impedance Subwoofer output voltage/impedance CQ-C5403U 4 V/60 Ω 4 V/60 Ω CQ-C5303U 2.5 V/200 Ω 2.5 V/200 Ω Customer Services Directory U.S.A. purchase Parts and Accessories...
CQC5403U User Guide
Page 8
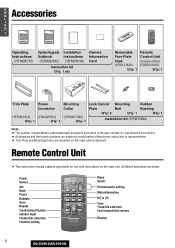
...; Trim Plate and Mounting Collar are mounted on the main unit at shipment. Remote Control Unit ¡ This instruction manual explains operations for maintenance and service. ¡ Accessories and their parts numbers are subject to modification without prior notice due to [9] Tune Track/file selection Fast forward/fast reverse Display 8 CQ-C5403U/C5303U
...; Trim Plate and Mounting Collar are mounted on the main unit at shipment. Remote Control Unit ¡ This instruction manual explains operations for maintenance and service. ¡ Accessories and their parts numbers are subject to modification without prior notice due to [9] Tune Track/file selection Fast forward/fast reverse Display 8 CQ-C5403U/C5303U
CQC5403U User Guide
Page 11
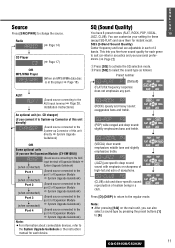
... type by pressing the preset buttons [1] to the regular mode. Press [D] (DISP) to return to [6]. 11 CQ-C5403U/C5303U Note: ¡ After pressing [SQ] on sharpness of high-hat and echo of saxophone. (CLUB) club...in a club. Source Press [SRC/PWR] to the System Upgrade Guidebook or the instruction manual for each device. CD changer) (if you connect it to System-up Connector of this unit directly) (Sound...[SQ] to the AUX input terminal a Page 28, Installation Instructions) An optional unit (ex. Radio (a Page 14) CD Player (a Page 17) OR MP3/WMA Player (When an MP3/WMA data disc is in each...
... type by pressing the preset buttons [1] to the regular mode. Press [D] (DISP) to return to [6]. 11 CQ-C5403U/C5303U Note: ¡ After pressing [SQ] on sharpness of high-hat and echo of saxophone. (CLUB) club...in a club. Source Press [SRC/PWR] to the System Upgrade Guidebook or the instruction manual for each device. CD changer) (if you connect it to System-up Connector of this unit directly) (Sound...[SQ] to the AUX input terminal a Page 28, Installation Instructions) An optional unit (ex. Radio (a Page 14) CD Player (a Page 17) OR MP3/WMA Player (When an MP3/WMA data disc is in each...

CQC5403U User Guide
Page 15
... sequentially scanned for more than 2 sec- Auto Preset Memory (APM) With this operation, a station can be manually stored in each band. onds. 6 stations with good receiving conditions can be automatically stored in signal strength will be preset to each of the preset buttons from [1] to [6]. 15 CQ-C5403U/C5303U Preset Station Calling q Select a band...
... sequentially scanned for more than 2 sec- Auto Preset Memory (APM) With this operation, a station can be manually stored in each band. onds. 6 stations with good receiving conditions can be automatically stored in signal strength will be preset to each of the preset buttons from [1] to [6]. 15 CQ-C5403U/C5303U Preset Station Calling q Select a band...
CQC5403U User Guide
Page 23
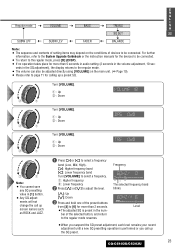
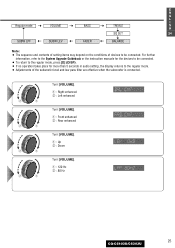
Level ¡When you call up the SQ preset. 23 CQ-C5403U/C5303U Turn [VOLUME]. q : Up w : Down w q Turn [VOLUME]. q: Higher frequency w: Lower frequency w Press [}] or [{] to adjust the level. [}]: Up [{]: Down e Press and hold..., press [D] (DISP). ¡ If no operation takes place for calling up a preset SQ. For further information, refer to the System Upgrade Guidebook or the instruction manuals for the devices to be connected. q : Up w : Down w q Turn [VOLUME]. Frequency The selected frequency band blinks. E N G L I Regular mode VOLUME BASS TREBLE S H...
Level ¡When you call up the SQ preset. 23 CQ-C5403U/C5303U Turn [VOLUME]. q : Up w : Down w q Turn [VOLUME]. q: Higher frequency w: Lower frequency w Press [}] or [{] to adjust the level. [}]: Up [{]: Down e Press and hold..., press [D] (DISP). ¡ If no operation takes place for calling up a preset SQ. For further information, refer to the System Upgrade Guidebook or the instruction manuals for the devices to be connected. q : Up w : Down w q Turn [VOLUME]. Frequency The selected frequency band blinks. E N G L I Regular mode VOLUME BASS TREBLE S H...
CQC5403U User Guide
Page 25
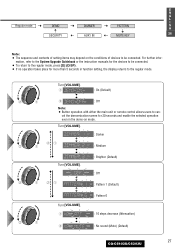
... is connected. q : Front enhanced w : Rear enhanced w q Turn [VOLUME]. Turn [VOLUME]. q : 120 Hz w : 80 Hz w q 25 CQ-C5403U/C5303U q : Right enhanced w : Left enhanced w q Turn [VOLUME]. For further information, refer to the System Upgrade Guidebook or the instruction manuals for the devices to be connected. ¡ To return to the regular mode, press [D] (DISP). ¡...
... is connected. q : Front enhanced w : Rear enhanced w q Turn [VOLUME]. Turn [VOLUME]. q : 120 Hz w : 80 Hz w q 25 CQ-C5403U/C5303U q : Right enhanced w : Left enhanced w q Turn [VOLUME]. For further information, refer to the System Upgrade Guidebook or the instruction manuals for the devices to be connected. ¡ To return to the regular mode, press [D] (DISP). ¡...
CQC5403U User Guide
Page 27
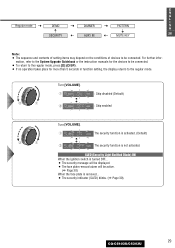
q w : Pattern 6 : 10 steps decrease (Attenuation) : No sound (Mute) (Default) 27 CQ-C5403U/C5303U E N G L I Regular mode DEMO DIMMER PATTERN S H SECURITY AUX1 IN MUTE KEY 216 Note: ¡ The sequence and contents of setting items may depend on mode. q : ... wq w q : Medium Turn [VOLUME]. : Brighter (Default) : Off w q wq : Pattern 1 (Default) w q Turn [VOLUME]. For further infor- mation, refer to the System Upgrade Guidebook or the instruction manuals for the devices to can-
q w : Pattern 6 : 10 steps decrease (Attenuation) : No sound (Mute) (Default) 27 CQ-C5403U/C5303U E N G L I Regular mode DEMO DIMMER PATTERN S H SECURITY AUX1 IN MUTE KEY 216 Note: ¡ The sequence and contents of setting items may depend on mode. q : ... wq w q : Medium Turn [VOLUME]. : Brighter (Default) : Off w q wq : Pattern 1 (Default) w q Turn [VOLUME]. For further infor- mation, refer to the System Upgrade Guidebook or the instruction manuals for the devices to can-
CQC5403U User Guide
Page 29
q The security function is activated. (Default) w The security function is removed... ¡ The security indicator (SLED) blinks. (a Page 30) 29 CQ-C5403U/C5303U q w : Skip disabled (Default) : Skip enabled w q Turn [VOLUME]. SLED (Security Light Emitted Diode) ON When the ignition switch is turned... depend on the conditions of devices to the regular mode. w q Turn [VOLUME]. mation, refer to the System Upgrade Guidebook or the instruction manuals for the devices to be connected. ¡ To return to the regular mode, press [D] (DISP). ¡ If no operation takes place ...
q The security function is activated. (Default) w The security function is removed... ¡ The security indicator (SLED) blinks. (a Page 30) 29 CQ-C5403U/C5303U q w : Skip disabled (Default) : Skip enabled w q Turn [VOLUME]. SLED (Security Light Emitted Diode) ON When the ignition switch is turned... depend on the conditions of devices to the regular mode. w q Turn [VOLUME]. mation, refer to the System Upgrade Guidebook or the instruction manuals for the devices to be connected. ¡ To return to the regular mode, press [D] (DISP). ¡ If no operation takes place ...
CQC5403U User Guide
Page 37
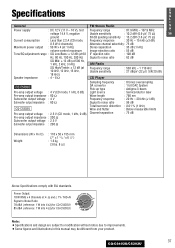
... Signal to noise ratio AM Radio : 100 dB : 62 dB SQ High/Treble: ± 12 dB (at 4 Ω and ≤ 1% THD+N Signal to Noise Ratio: 78 dBA (reference: 1 W into 4 Ω)(for CQ-C5403U) 85 dBA (reference: 1 W into 4 Ω)(for CQ-C5303U) Note: ¡Specifications... (±1 dB) Subwoofer output impedance : 60 Ω CQ-C5303U Pre-amp output voltage : 2.5 V (CD mode, 1 kHz, 0 dB) Pre-amp output impedance : 200 Ω Subwoofer output voltage : 2.5 V Signal to improvements. ¡Some figures and illustrations in this manual may be different from your product. 37 CQ-C5403U/C5303U
... Signal to noise ratio AM Radio : 100 dB : 62 dB SQ High/Treble: ± 12 dB (at 4 Ω and ≤ 1% THD+N Signal to Noise Ratio: 78 dBA (reference: 1 W into 4 Ω)(for CQ-C5403U) 85 dBA (reference: 1 W into 4 Ω)(for CQ-C5303U) Note: ¡Specifications... (±1 dB) Subwoofer output impedance : 60 Ω CQ-C5303U Pre-amp output voltage : 2.5 V (CD mode, 1 kHz, 0 dB) Pre-amp output impedance : 200 Ω Subwoofer output voltage : 2.5 V Signal to improvements. ¡Some figures and illustrations in this manual may be different from your product. 37 CQ-C5403U/C5303U


