
CQC5403U User Guide
Page 2
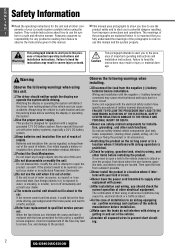
... functions. Watching the display or operating the system will distract the driver from the negative (-) battery terminal before installation. Do not insert any problems resulting from improper connections and operations. E N G Safety Information L I S ■ Read the operating instructions for the unit and all exposed wires to attach or wire the product, first check where the wire harness, gasoline tank, and electric wiring are explained below. tem in the car. Panasonic...
... functions. Watching the display or operating the system will distract the driver from the negative (-) battery terminal before installation. Do not insert any problems resulting from improper connections and operations. E N G Safety Information L I S ■ Read the operating instructions for the unit and all exposed wires to attach or wire the product, first check where the wire harness, gasoline tank, and electric wiring are explained below. tem in the car. Panasonic...
CQC5403U User Guide
Page 3
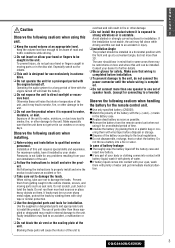
... the sound volume at a convenient angle, but not more than 30˚. In case of battery leakage Installation of the unit. Faulty installation may lead to one set of speaker leads. (except for any part of your dealer for further details. ❑ Wear gloves for installation. insert new battery. ering them in the disc slot. If leads must be installed. Operating the audio system for installation...
... the sound volume at a convenient angle, but not more than 30˚. In case of battery leakage Installation of the unit. Faulty installation may lead to one set of speaker leads. (except for any part of your dealer for further details. ❑ Wear gloves for installation. insert new battery. ering them in the disc slot. If leads must be installed. Operating the audio system for installation...

CQC5403U User Guide
Page 5
... also contact us directly at www.panasonic.ca: Link : "ServicentresTM locator" under "Customer support" Panasonic Factory Service: Vancouver Toronto Panasonic Canada Inc. Saturday-Sunday 10 am to give you the advantages of precise electronic and mechanical engineering, manufactured with carefully H selected components, and assembled by people who are proud of electronic products owners. Features Models Pre-amp output voltage/impedance Subwoofer output voltage/impedance CQ...
... also contact us directly at www.panasonic.ca: Link : "ServicentresTM locator" under "Customer support" Panasonic Factory Service: Vancouver Toronto Panasonic Canada Inc. Saturday-Sunday 10 am to give you the advantages of precise electronic and mechanical engineering, manufactured with carefully H selected components, and assembled by people who are proud of electronic products owners. Features Models Pre-amp output voltage/impedance Subwoofer output voltage/impedance CQ...
CQC5403U User Guide
Page 6
...is performed. If the problem is used commercially. LIMITED WARRANTY LIMITS AND EXCLUSIONS This warranty ONLY COVERS failures due to and from state to you may not apply to state. CAR AUDIO PRODUCT - ONE (1) YEAR, PARTS AND LABOUR (The labour to install or remove the product is not ...2910. During the "Parts" warranty period, there will be free from the date of defects in the United States or Puerto Rico. Categories Parts Labor Customer's Record Model No. Serial No. This warranty gives you specific legal rights and you . IN NO EVENT WILL PANASONIC CANADA INC. CARRY-IN...
...is performed. If the problem is used commercially. LIMITED WARRANTY LIMITS AND EXCLUSIONS This warranty ONLY COVERS failures due to and from state to you may not apply to state. CAR AUDIO PRODUCT - ONE (1) YEAR, PARTS AND LABOUR (The labour to install or remove the product is not ...2910. During the "Parts" warranty period, there will be free from the date of defects in the United States or Puerto Rico. Categories Parts Labor Customer's Record Model No. Serial No. This warranty gives you specific legal rights and you . IN NO EVENT WILL PANASONIC CANADA INC. CARRY-IN...
CQC5403U User Guide
Page 7
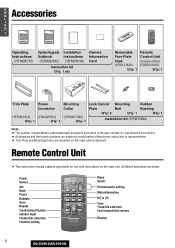
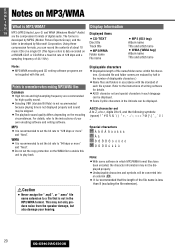
.../WMA Player 18 Notes on Discs 31 Troubleshooting 32 Specifications 37 Center frequency and level are adjustable in a car. Upgrading the Customer Services Directory 5 system delivers relaxed AV space in each genre to connect the optional Remote Control Unit 8 Panasonic CD changer unit (CX-DP880). ● iPod® Preparation 9 ¡ Remote Control Unit The optional adapter (Direct Cable for iPod: CA- ¡ Main Unit DC300U) allows you fine-tune sound quality for each of Demonstration series. ● XM Satellite Radio Clock Setting General...
.../WMA Player 18 Notes on Discs 31 Troubleshooting 32 Specifications 37 Center frequency and level are adjustable in a car. Upgrading the Customer Services Directory 5 system delivers relaxed AV space in each genre to connect the optional Remote Control Unit 8 Panasonic CD changer unit (CX-DP880). ● iPod® Preparation 9 ¡ Remote Control Unit The optional adapter (Direct Cable for iPod: CA- ¡ Main Unit DC300U) allows you fine-tune sound quality for each of Demonstration series. ● XM Satellite Radio Clock Setting General...
CQC5403U User Guide
Page 8
... instruction manual explains operations for maintenance and service. ¡ Accessories and their parts numbers are subject to modification without prior notice due to improvements. ¡ Trim Plate and Mounting Collar are mounted on the main unit. (Different operations excluded) Power Source Set Band Pause Random Scan Repeat Track/folder/file/disc number input Folder/disc selection Function setting POWER SOURCE MENU SRC SEL SET VOL BAND MUTE 12 RANDOM SCAN 45 3 REPEAT 6 78 TUNE #0 NUMBER 9 TUNE DISP CAR AUDIO Menu Select Volume/audio setting Mute/attenuation...
... instruction manual explains operations for maintenance and service. ¡ Accessories and their parts numbers are subject to modification without prior notice due to improvements. ¡ Trim Plate and Mounting Collar are mounted on the main unit. (Different operations excluded) Power Source Set Band Pause Random Scan Repeat Track/folder/file/disc number input Folder/disc selection Function setting POWER SOURCE MENU SRC SEL SET VOL BAND MUTE 12 RANDOM SCAN 45 3 REPEAT 6 78 TUNE #0 NUMBER 9 TUNE DISP CAR AUDIO Menu Select Volume/audio setting Mute/attenuation...
CQC5403U User Guide
Page 9
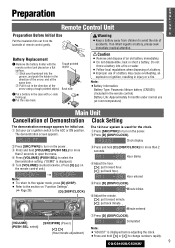
... change numbers rapidly. 9 CQ-C5403U/C5303U q Stick your car's ignition switch to the ACC or ON position. w Pull it out in the remote control) Battery Life: Approximately 6 months under normal use (at the same time. Do not throw a battery into the groove, and push the holder in the direction of the arrow, and at room temperature) Main Unit Cancellation of Demonstration Clock Setting The...
... change numbers rapidly. 9 CQ-C5403U/C5303U q Stick your car's ignition switch to the ACC or ON position. w Pull it out in the remote control) Battery Life: Approximately 6 months under normal use (at the same time. Do not throw a battery into the groove, and push the holder in the direction of the arrow, and at room temperature) Main Unit Cancellation of Demonstration Clock Setting The...
CQC5403U User Guide
Page 10
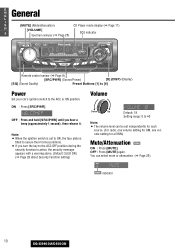
... [MUTE] again. E N G General L I S [MUTE] (Mute/attenuation) CD Player mode display (a Page 17) H [VOLUME] 9 Spectrum analyzer (a Page 26) SQ3 indicator Remote control sensor (a Page 8) [SRC/PWR] (Source/Power) [D] (DISP) (Display) [SQ] (Sound Quality) Preset Buttons [1] to [6] Power Set your car's ignition switch to 40 Note: ¡ The volume level can select mute or attenuation. (a Page 26) indicator 10 CQ-C5403U/C5303U Note: ¡ When the ignition switch is set independently for each source. (For radio, one volume setting for AM, one volume setting...
... [MUTE] again. E N G General L I S [MUTE] (Mute/attenuation) CD Player mode display (a Page 17) H [VOLUME] 9 Spectrum analyzer (a Page 26) SQ3 indicator Remote control sensor (a Page 8) [SRC/PWR] (Source/Power) [D] (DISP) (Display) [SQ] (Sound Quality) Preset Buttons [1] to [6] Power Set your car's ignition switch to 40 Note: ¡ The volume level can select mute or attenuation. (a Page 26) indicator 10 CQ-C5403U/C5303U Note: ¡ When the ignition switch is set independently for each source. (For radio, one volume setting for AM, one volume setting...
CQC5403U User Guide
Page 11
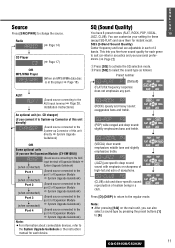
... can also select a sound type by pressing the preset buttons [1] to the AUX input terminal a Page 28, Installation Instructions) An optional unit (ex. E N G L I SQ (Sound Quality) S H You have 6 preset modes (FLAT, ROCK, POP, VOCAL, 110 JAZZ, CLUB). SQ3 (3-Band Sound Quality) Center frequency and level are adjustable in the player a Page 18) AUX1 (Sound source connecting to [6]. 11 CQ-C5403U/C5303U wPress [SQ] to select the sound type as follows: Preset number (Default) (FLAT...
... can also select a sound type by pressing the preset buttons [1] to the AUX input terminal a Page 28, Installation Instructions) An optional unit (ex. E N G L I SQ (Sound Quality) S H You have 6 preset modes (FLAT, ROCK, POP, VOCAL, 110 JAZZ, CLUB). SQ3 (3-Band Sound Quality) Center frequency and level are adjustable in the player a Page 18) AUX1 (Sound source connecting to [6]. 11 CQ-C5403U/C5303U wPress [SQ] to select the sound type as follows: Preset number (Default) (FLAT...

CQC5403U User Guide
Page 14
Seeking will start. 14 CQ-C5403U/C5303U Display Change Press [D] (DISP) to select the radio mode. Clock Time Display Off e Tuning [[]: Higher frequency []]: Lower frequency Press and hold [[] or []] for more than 0.5 seconds, then release it. E N G Radio L I S H 13 (Stereo) indicator []] [[] (TUNE) [D] (DISP) (Display) [BAND] (APM: Auto Preset Memory) Preset Buttons [1] to [6] (Preset station) [SRC/PWR] (Source) q Radio Mode Press [SRC/PWR] to change the display as follows. Frequency Band Frequency Preset number w Band Press [BAND].
Seeking will start. 14 CQ-C5403U/C5303U Display Change Press [D] (DISP) to select the radio mode. Clock Time Display Off e Tuning [[]: Higher frequency []]: Lower frequency Press and hold [[] or []] for more than 0.5 seconds, then release it. E N G Radio L I S H 13 (Stereo) indicator []] [[] (TUNE) [D] (DISP) (Display) [BAND] (APM: Auto Preset Memory) Preset Buttons [1] to [6] (Preset station) [SRC/PWR] (Source) q Radio Mode Press [SRC/PWR] to change the display as follows. Frequency Band Frequency Preset number w Band Press [BAND].

CQC5403U User Guide
Page 15
...) Manual Preset Memory With this operation, stations with first to 6th highest in signal strength will be automatically stored in the preset memory. E N G L I S H 114 Station Preset Up to 6 stations can be manually stored in the preset memory. Once set, the preset stations are driving. Preset number Note: ¡ To stop scanning, press one of the buttons from [1] to [6] until the display blinks once. Preset Station Calling q Select a band. (a Previous page) w Press one of the preset buttons...
...) Manual Preset Memory With this operation, stations with first to 6th highest in signal strength will be automatically stored in the preset memory. E N G L I S H 114 Station Preset Up to 6 stations can be manually stored in the preset memory. Once set, the preset stations are driving. Preset number Note: ¡ To stop scanning, press one of the buttons from [1] to [6] until the display blinks once. Preset Station Calling q Select a band. (a Previous page) w Press one of the preset buttons...
CQC5403U User Guide
Page 20
... software and writing software. Using these Disc title compression formats, you can record the contents of about 10 Track title music CDs on a single CD (This figure refers to the instructions of writing software for high quality sound. ¡Selecting VBR (Variable Bit Rate) is not recommended because playing time is developed by half in the number of displayable characters.) ¡Name...
... software and writing software. Using these Disc title compression formats, you can record the contents of about 10 Track title music CDs on a single CD (This figure refers to the instructions of writing software for high quality sound. ¡Selecting VBR (Variable Bit Rate) is not recommended because playing time is developed by half in the number of displayable characters.) ¡Name...
CQC5403U User Guide
Page 22
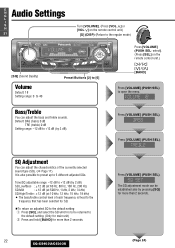
Press [VOLUME] (PUSH SEL). E N G Audio Settings L I S H 21 Turn [VOLUME]. (Press [VOL }] or [VOL {] on the remote control unit.) [D] (DISP) (Return to the regular mode) [SQ] (Sound Quality) Volume Default: 18 Setting range: 0 to 40 Preset Buttons [2] to [6] Press [VOLUME] (PUSH SEL: select). (Press [SEL] on the remote control unit BAND] Press [VOLUME] (PUSH SEL) to the default setting. (Only for main unit) w Press and hold [BAND] for more than 2 seconds. 22 CQ-C5403U...
Press [VOLUME] (PUSH SEL). E N G Audio Settings L I S H 21 Turn [VOLUME]. (Press [VOL }] or [VOL {] on the remote control unit.) [D] (DISP) (Return to the regular mode) [SQ] (Sound Quality) Volume Default: 18 Setting range: 0 to 40 Preset Buttons [2] to [6] Press [VOLUME] (PUSH SEL: select). (Press [SEL] on the remote control unit BAND] Press [VOLUME] (PUSH SEL) to the default setting. (Only for main unit) w Press and hold [BAND] for more than 2 seconds. 22 CQ-C5403U...
CQC5403U User Guide
Page 23
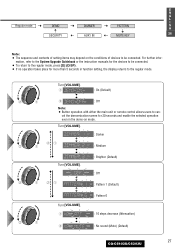
...- Frequency The selected frequency band blinks. E N G L I Regular mode VOLUME BASS TREBLE S H SQ SET 212 SUBW LPF SUBW LEV FADER BALANCE Note: ¡ The sequence and contents of setting items may depend on the conditions of devices to page 11 for more than 5 seconds in audio setting (2 seconds in the SQ adjustment), the display returns to the regular mode. ¡ The volume can also be adjusted directly using [VOLUME] on the main unit...
...- Frequency The selected frequency band blinks. E N G L I Regular mode VOLUME BASS TREBLE S H SQ SET 212 SUBW LPF SUBW LEV FADER BALANCE Note: ¡ The sequence and contents of setting items may depend on the conditions of devices to page 11 for more than 5 seconds in audio setting (2 seconds in the SQ adjustment), the display returns to the regular mode. ¡ The volume can also be adjusted directly using [VOLUME] on the main unit...

CQC5403U User Guide
Page 24
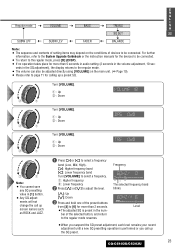
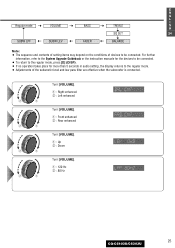
...: 0 Setting range: MUTE (-∞), - 6 dB to the regular mode) Balance/Fader You can select the upper limit frequency of the sound from subwoofer. E N G Audio Settings (continued) L I S H Turn [VOLUME]. (Press [VOL }] or [VOL {] on the remote control unit.) 23 Press [VOLUME] (PUSH SEL: select). (Press [SEL] on the remote control unit.) [D] (DISP) (Return to + 6 dB (by 2 dB) Subwoofer LPF (Low Pass Filter) You can adjust the sound level among the right, left, front and rear speakers. Press [VOLUME...
...: 0 Setting range: MUTE (-∞), - 6 dB to the regular mode) Balance/Fader You can select the upper limit frequency of the sound from subwoofer. E N G Audio Settings (continued) L I S H Turn [VOLUME]. (Press [VOL }] or [VOL {] on the remote control unit.) 23 Press [VOLUME] (PUSH SEL: select). (Press [SEL] on the remote control unit.) [D] (DISP) (Return to + 6 dB (by 2 dB) Subwoofer LPF (Low Pass Filter) You can adjust the sound level among the right, left, front and rear speakers. Press [VOLUME...
CQC5403U User Guide
Page 25
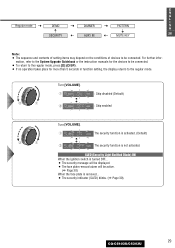
... w : Rear enhanced w q Turn [VOLUME]. Turn [VOLUME]. E N G L I Regular mode VOLUME BASS TREBLE S H SQ SET 24 SUBW LPF SUBW LEV FADER BALANCE Note: ¡ The sequence and contents of setting items may depend on the conditions of devices to the regular mode. ¡ Adjustments of the subwoofer level and low pass filter are effective when the subwoofer is connected. For further information, refer to the System Upgrade Guidebook or the instruction manuals for the devices...
... w : Rear enhanced w q Turn [VOLUME]. Turn [VOLUME]. E N G L I Regular mode VOLUME BASS TREBLE S H SQ SET 24 SUBW LPF SUBW LEV FADER BALANCE Note: ¡ The sequence and contents of setting items may depend on the conditions of devices to the regular mode. ¡ Adjustments of the subwoofer level and low pass filter are effective when the subwoofer is connected. For further information, refer to the System Upgrade Guidebook or the instruction manuals for the devices...
CQC5403U User Guide
Page 27
... instruction manuals for the devices to be connected. Turn [VOLUME]. q w : Pattern 6 : 10 steps decrease (Attenuation) : No sound (Mute) (Default) 27 CQ-C5403U/C5303U For further infor- cel the demonstration screen for 20 seconds and enable the selected operation even in function setting, the display returns to the regular mode. q : On (Default) w q w : Off Note: ¡ Button operation with either the main unit or remote control allows users to can- Turn [VOLUME]. : Darker wq w q : Medium Turn [VOLUME...
... instruction manuals for the devices to be connected. Turn [VOLUME]. q w : Pattern 6 : 10 steps decrease (Attenuation) : No sound (Mute) (Default) 27 CQ-C5403U/C5303U For further infor- cel the demonstration screen for 20 seconds and enable the selected operation even in function setting, the display returns to the regular mode. q : On (Default) w q w : Off Note: ¡ Button operation with either the main unit or remote control allows users to can- Turn [VOLUME]. : Darker wq w q : Medium Turn [VOLUME...
CQC5403U User Guide
Page 29
w q Turn [VOLUME]. q w : Skip disabled (Default) : Skip enabled w q Turn [VOLUME]. SLED (Security Light Emitted Diode) ON When the ignition switch is turned OFF... ¡ The security message will be displayed. ¡ The face plate removal alarm will be connected. E N G L I Regular mode DEMO DIMMER PATTERN S H SECURITY AUX1 IN MUTE KEY 28 Note: ¡ The sequence and contents of setting items may depend on the conditions of devices to the regular...
w q Turn [VOLUME]. q w : Skip disabled (Default) : Skip enabled w q Turn [VOLUME]. SLED (Security Light Emitted Diode) ON When the ignition switch is turned OFF... ¡ The security message will be displayed. ¡ The face plate removal alarm will be connected. E N G L I Regular mode DEMO DIMMER PATTERN S H SECURITY AUX1 IN MUTE KEY 28 Note: ¡ The sequence and contents of setting items may depend on the conditions of devices to the regular...
CQC5403U User Guide
Page 32
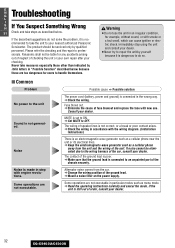
..." described below . Fuse blows out. aCheck the wiring in step with the wiring diagram. (Installation Instructions) There is connected to your dealer. ¡Never try to repair the unit by qualified personnel. aMake sure that the ground lead is an electromagnetic-wave generator such as a cellular phone away from the car. Immediately stop using the unit and consult your nearest authorized Panasonic Servicenter. Noise...
..." described below . Fuse blows out. aCheck the wiring in step with the wiring diagram. (Installation Instructions) There is connected to your dealer. ¡Never try to repair the unit by qualified personnel. aMake sure that the ground lead is an electromagnetic-wave generator such as a cellular phone away from the car. Immediately stop using the unit and consult your nearest authorized Panasonic Servicenter. Noise...

CQC5403U User Guide
Page 33
... speaker channels are correct. The sound field is not settled. aCheck the wiring of the unit fails unintentionally. The power of the antenna battery lead. Possible cause a Possible solution Antenna installation or wiring of speakers are connected reversely. There is supplied to the antenna amplifier (when using a film antenna, etc.). The speaker wiring is less than 6. Preset stations cannot be stored. The number of receivable stations is reversed between right and left channels of antenna cable is...
... speaker channels are correct. The sound field is not settled. aCheck the wiring of the unit fails unintentionally. The power of the antenna battery lead. Possible cause a Possible solution Antenna installation or wiring of speakers are connected reversely. There is supplied to the antenna amplifier (when using a film antenna, etc.). The speaker wiring is less than 6. Preset stations cannot be stored. The number of receivable stations is reversed between right and left channels of antenna cable is...


