
CQC3305U User Guide
Page 2
Panasonic assumes no sound) or in an abnormal state (has foreign objects in it, is exposed to water, is important that the unit does not get wet in this manual and the system properly. It is smoking, or smells), turn it installed by a qualified service engineer. Never ...and electric wiring are explained below. If an infant ingests a battery or insulation film, please seek immediate medical attention. Protect the Deck Mechanism. Do not disassemble, modify the unit or attempt to damage the leads. If the product needs to the product. When wiring, take care...
Panasonic assumes no sound) or in an abnormal state (has foreign objects in it, is exposed to water, is important that the unit does not get wet in this manual and the system properly. It is smoking, or smells), turn it installed by a qualified service engineer. Never ...and electric wiring are explained below. If an infant ingests a battery or insulation film, please seek immediate medical attention. Protect the Deck Mechanism. Do not disassemble, modify the unit or attempt to damage the leads. If the product needs to the product. When wiring, take care...
CQC3305U User Guide
Page 3
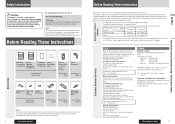
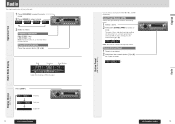
...and Operating Assistance; locate your nearest Authorized Servicentre at shipment. 4 CQ-C3405U/C3305U Before Reading These Instructions Differences Between 2 Models Panasonic welcomes you to be a member of the main unit. or make Customer Service and Literature requests by people who are mentioned ...directly at : 1-800-211-PANA (7262), Monday-Friday 9 am -7 pm, EST. This operating instruction manual is "System Upgrade Guidebook" describing the optional devices such as CD changer. The other is for our company. purchase Parts and Accessories; Notice This product contains a CR Coin ...
...and Operating Assistance; locate your nearest Authorized Servicentre at shipment. 4 CQ-C3405U/C3305U Before Reading These Instructions Differences Between 2 Models Panasonic welcomes you to be a member of the main unit. or make Customer Service and Literature requests by people who are mentioned ...directly at : 1-800-211-PANA (7262), Monday-Friday 9 am -7 pm, EST. This operating instruction manual is "System Upgrade Guidebook" describing the optional devices such as CD changer. The other is for our company. purchase Parts and Accessories; Notice This product contains a CR Coin ...
CQC3305U User Guide
Page 5
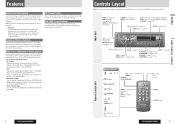
...Radio You can connect the optional XM receiver (XMD1000) with optional Digital Adapter. Even simultaneous connection of their respective owners. Wide Array of Components for iPod®: CA-DC300U) allows you to connect the optional Panasonic CD...can connect the optional Sirius Satellite radio receiver (SIR-PAN1). 8 CQ-C3405U/C3305U Controls Layout Note: This instruction manual explains operations for receiving calls. ...( page 14) Play/Pause ( page 16, 18) APM Auto Preset Memory ( page 15) SOURCE ( page 12) PWR Power ( page ...
...Radio You can connect the optional XM receiver (XMD1000) with optional Digital Adapter. Even simultaneous connection of their respective owners. Wide Array of Components for iPod®: CA-DC300U) allows you to connect the optional Panasonic CD...can connect the optional Sirius Satellite radio receiver (SIR-PAN1). 8 CQ-C3405U/C3305U Controls Layout Note: This instruction manual explains operations for receiving calls. ...( page 14) Play/Pause ( page 16, 18) APM Auto Preset Memory ( page 15) SOURCE ( page 12) PWR Power ( page ...
CQC3305U User Guide
Page 7
...) Press [MUTE]. AUX1 (AUX1 in sequence after shifting to AUX2 (device connected to the System Upgrade Guidebook or the instruction manual for each source. (For radio, one volume setting for each device. 12 CQ-C3405U/C3305U SQ Selection Based on your hearing. Press [DISP] to return ...Caution • Set the volume level to low enough before the AUX connection is connected: Shift to connected device When connecting CD changer Player When loading CD ( page 16) When connecting iPod When connecting XM Receiver When loading MP3/WMA disc ( page 18) When connecting...
...) Press [MUTE]. AUX1 (AUX1 in sequence after shifting to AUX2 (device connected to the System Upgrade Guidebook or the instruction manual for each source. (For radio, one volume setting for each device. 12 CQ-C3405U/C3305U SQ Selection Based on your hearing. Press [DISP] to return ...Caution • Set the volume level to low enough before the AUX connection is connected: Shift to connected device When connecting CD changer Player When loading CD ( page 16) When connecting iPod When connecting XM Receiver When loading MP3/WMA disc ( page 18) When connecting...
CQC3305U User Guide
Page 8
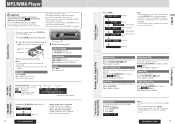
...or more and release for 0.5 sec. CQ-C3405U/C3305U 15 Radio English Radio This chapter explains how to listen to the radio. 1 Press [SOURCE] to select the radio mode. 2 Press [BAND] to [6]. or more . Operation Flow Radio Mode Display Band Frequency Preset Number Lights while receiving an FM...to a station. 2 Hold down the numeric button [1] to [6]. Auto Preset Memory (APM) Stations with good receiving conditions automatically preset. 1 Select a band. 2 Hold down for station search. each after presetting the stations (SCAN). Manual Station Preset 1 Tune in AM, FM1, FM2, and FM3 ...
...or more and release for 0.5 sec. CQ-C3405U/C3305U 15 Radio English Radio This chapter explains how to listen to the radio. 1 Press [SOURCE] to select the radio mode. 2 Press [BAND] to [6]. or more . Operation Flow Radio Mode Display Band Frequency Preset Number Lights while receiving an FM...to a station. 2 Hold down the numeric button [1] to [6]. Auto Preset Memory (APM) Stations with good receiving conditions automatically preset. 1 Select a band. 2 Hold down for station search. each after presetting the stations (SCAN). Manual Station Preset 1 Tune in AM, FM1, FM2, and FM3 ...
CQC3305U User Guide
Page 9
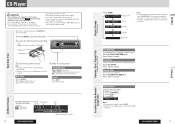
... when there is no information on it may take the disc out. Close the face plate manually. 4 Select a desired portion. Press again to cancel. If the number of each mode is activated. lights. CD Player Cautions • This unit does not support 8 cm {3"} discs. • Do not insert a disc when indicator...
... when there is no information on it may take the disc out. Close the face plate manually. 4 Select a desired portion. Press again to cancel. If the number of each mode is activated. lights. CD Player Cautions • This unit does not support 8 cm {3"} discs. • Do not insert a disc when indicator...
CQC3305U User Guide
Page 10
...)" ( page 28). • A disc which has both CD-DA data and MP3/WMA data on it may take the disc out. Close the face plate manually. lights. Example: file number 10 1 Press [#] (NUMBER). 2 Press [1] [0]. 3 Press [SET]. Notes: • For folder selection, enter ...portion. [] (Eject) Printed side Folder Selection [] (FOLDER): Next folder [] (FOLDER): Preceding folder 3 Close the face plate manually. Play Mode indicators Lights when each file is repeated. TAG OFF: The folder name is repeated. Hold down again to cancel. Repeat ...
...)" ( page 28). • A disc which has both CD-DA data and MP3/WMA data on it may take the disc out. Close the face plate manually. lights. Example: file number 10 1 Press [#] (NUMBER). 2 Press [1] [0]. 3 Press [SET]. Notes: • For folder selection, enter ...portion. [] (Eject) Printed side Folder Selection [] (FOLDER): Next folder [] (FOLDER): Preceding folder 3 Close the face plate manually. Play Mode indicators Lights when each file is repeated. TAG OFF: The folder name is repeated. Hold down again to cancel. Repeat ...
CQC3305U User Guide
Page 12
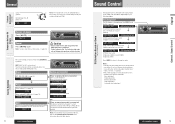
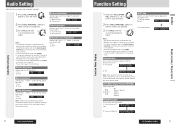
For further information, refer to the System Upgrade Guidebook or the instruction manuals for the devices to be connected. • To return to the regular mode, press [DISP]. • If no operation takes place for more than 5 seconds ... the menu. 2 Press [VOL] (PUSH SEL: Select) to select a mode to be connected. For further information, refer to the System Upgrade Guidebook or the instruction manuals for the devices to be adjusted. 3 Turn [VOL] clockwise or counterclockwise to adjust. Audio Setting Adjustment to each speaker and an optional subwoofer 1 Press [VOL...
For further information, refer to the System Upgrade Guidebook or the instruction manuals for the devices to be connected. • To return to the regular mode, press [DISP]. • If no operation takes place for more than 5 seconds ... the menu. 2 Press [VOL] (PUSH SEL: Select) to select a mode to be connected. For further information, refer to the System Upgrade Guidebook or the instruction manuals for the devices to be adjusted. 3 Turn [VOL] clockwise or counterclockwise to adjust. Audio Setting Adjustment to each speaker and an optional subwoofer 1 Press [VOL...
CQC3305U User Guide
Page 15
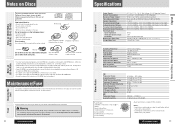
... keep disc in the case. Do not leave discs in this manual may have either due to the unit. Disc with adhered stickers or tape Discs with... (D) mm {7˝ x 1 15/16˝ x 6 5/16˝ } 1.3 kg {2 lbs. 14 oz} CD Player Stereo Radio Sampling Frequency DA Converter Pick-Up Type Light Source Wave Length Frequency Response Signal to Noise Ratio Total Harmonic Distortion Wow and Flutter... the Fuse If the fuse blows out, consult your dealer, or your nearest authorized Panasonic Servicenter. 28 CQ-C3405U/C3305U Specifications General Power Supply Current Consumption Maximum Power...
... keep disc in the case. Do not leave discs in this manual may have either due to the unit. Disc with adhered stickers or tape Discs with... (D) mm {7˝ x 1 15/16˝ x 6 5/16˝ } 1.3 kg {2 lbs. 14 oz} CD Player Stereo Radio Sampling Frequency DA Converter Pick-Up Type Light Source Wave Length Frequency Response Signal to Noise Ratio Total Harmonic Distortion Wow and Flutter... the Fuse If the fuse blows out, consult your dealer, or your nearest authorized Panasonic Servicenter. 28 CQ-C3405U/C3305U Specifications General Power Supply Current Consumption Maximum Power...

