
CQ5109U User Guide
Page 2
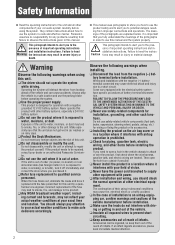
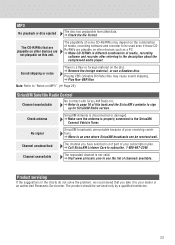
... installation. Do not insert any problems resulting from the negative (-) battery terminal before operating the system. q In the case of installation to an airbag-equipping car, confirm warnings and cautions of the pictographs are located. Safety Information n Read the operating instructions for the unit and all exposed wires to prevent short circuiting. q The driver should always pay attention to your exact time and location...
... installation. Do not insert any problems resulting from the negative (-) battery terminal before operating the system. q In the case of installation to an airbag-equipping car, confirm warnings and cautions of the pictographs are located. Safety Information n Read the operating instructions for the unit and all exposed wires to prevent short circuiting. q The driver should always pay attention to your exact time and location...
CQ5109U User Guide
Page 3
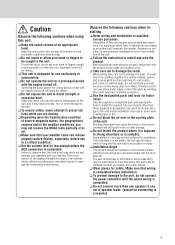
... AUX connection is unstable. q Set the volume level to preset stations while you may fall down while driving and this can receive properly before driving, especially, before installation. For maximum safety, have it installed by winding them with the front end up at a convenient angle, but not more than one speaker to the unit, do not get your hand or fingers caught in moving parts...
... AUX connection is unstable. q Set the volume level to preset stations while you may fall down while driving and this can receive properly before driving, especially, before installation. For maximum safety, have it installed by winding them with the front end up at a convenient angle, but not more than one speaker to the unit, do not get your hand or fingers caught in moving parts...
CQ5109U User Guide
Page 4
...: This device complies with Part 15 of the FCC Rules for Radio Receiver. Operation is subject to the condition that this device may void the user's authority to this device. NOAA Weather Radio Brochure 1 3. Any unauthorized changes or modifications to operate this equipment may not cause harmful interference. The following applies only in the U.S.A. REFER SERVICING TO QUALIFIED PERSONNEL. Installation hardware 1 set (a page 30) 4 Operating Instructions...
...: This device complies with Part 15 of the FCC Rules for Radio Receiver. Operation is subject to the condition that this device may void the user's authority to this device. NOAA Weather Radio Brochure 1 3. Any unauthorized changes or modifications to operate this equipment may not cause harmful interference. The following applies only in the U.S.A. REFER SERVICING TO QUALIFIED PERSONNEL. Installation hardware 1 set (a page 30) 4 Operating Instructions...
CQ5109U User Guide
Page 5
... Instruction Books online for details. If non-rechargeable batteries are included, they are for lost time, cost of having someone remove or re-install an installed unit if applicable, travel to acts of Purchase 5 THERE ARE NO EXPRESS WARRANTIES EXCEPT AS LISTED UNDER "LIMITED WARRANTY COVERAGE". The items listed are not exclusive, but are not warranted. Code No. or make Customer Service...
... Instruction Books online for details. If non-rechargeable batteries are included, they are for lost time, cost of having someone remove or re-install an installed unit if applicable, travel to acts of Purchase 5 THERE ARE NO EXPRESS WARRANTIES EXCEPT AS LISTED UNDER "LIMITED WARRANTY COVERAGE". The items listed are not exclusive, but are not warranted. Code No. or make Customer Service...
CQ5109U User Guide
Page 6
... time power on Clock adjustment Clock Display at Power Off General 10 Source selection Power Volume Mute Sound Controls 11 SQ (Sound Quality) Audio modes (Bass/Treble/Balance/Fader) Radio 12 Band Frequency adjustment Preset station selection Auto preset memory (APM) Manual preset memory Display Change Tuning in a weather band station CD/MP3 Player 14 Pause Track/File selection Folder selection (MP3) Disc loading/ejection Display change Scan, repeat, random SiriusXM Satellite Radio Control........16 Connecting SiriusXM tuner Getting started Band selection Channel selection Channel unlocking...
... time power on Clock adjustment Clock Display at Power Off General 10 Source selection Power Volume Mute Sound Controls 11 SQ (Sound Quality) Audio modes (Bass/Treble/Balance/Fader) Radio 12 Band Frequency adjustment Preset station selection Auto preset memory (APM) Manual preset memory Display Change Tuning in a weather band station CD/MP3 Player 14 Pause Track/File selection Folder selection (MP3) Disc loading/ejection Display change Scan, repeat, random SiriusXM Satellite Radio Control........16 Connecting SiriusXM tuner Getting started Band selection Channel selection Channel unlocking...

CQ5109U User Guide
Page 7
... the following Sirius or XM satellite radio components: Sirius receiver (SIRPAN1/SC-C1) Sirius Interface Adaptor (CA-PANSC1U/CA-LSR01U) XM receiver (XMD1000/CNP2000UC) XM Adapter Cable (XMDPAN110/CNPPAN1) About SiriusXM Everything worth listening to this unit without any difficulty. For more information, visit www. Features Front AUX terminal Your mobile audio player and other devices are connectable to is on SiriusXM Satellite Radio service or tuner activation please call...
... the following Sirius or XM satellite radio components: Sirius receiver (SIRPAN1/SC-C1) Sirius Interface Adaptor (CA-PANSC1U/CA-LSR01U) XM receiver (XMD1000/CNP2000UC) XM Adapter Cable (XMDPAN110/CNPPAN1) About SiriusXM Everything worth listening to this unit without any difficulty. For more information, visit www. Features Front AUX terminal Your mobile audio player and other devices are connectable to is on SiriusXM Satellite Radio service or tuner activation please call...
CQ5109U User Guide
Page 9
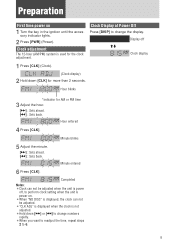
... PM time 3 Adjust the hour. [d] : Sets ahead. [s] : Sets back. Clock Display at Power Off Press [DISP] to change numbers rapidly. ¡When you want to readjust the time, repeat steps 2 to 6. 9 Minute blinks 5 Adjust the minute. [d] : Sets ahead. [s] : Sets back. Display off , to perform clock setting when the unit is power on 1 Turn the key in the ignition until the accessory indicator lights. 2 Press [PWR] (Power). Hour blinks *Indicator for the clock adjustment...
... PM time 3 Adjust the hour. [d] : Sets ahead. [s] : Sets back. Clock Display at Power Off Press [DISP] to change numbers rapidly. ¡When you want to readjust the time, repeat steps 2 to 6. 9 Minute blinks 5 Adjust the minute. [d] : Sets ahead. [s] : Sets back. Display off , to perform clock setting when the unit is power on 1 Turn the key in the ignition until the accessory indicator lights. 2 Press [PWR] (Power). Hour blinks *Indicator for the clock adjustment...
CQ5109U User Guide
Page 10
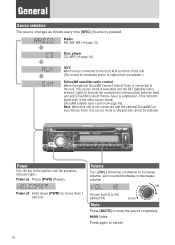
... sound of connected device is output from car speaker.) SiriusXM satellite radio control When the optional SiriusXM Connect Vehicle Tuner is connected to this unit, this source mode is selectable and the SAT (Satellite radio) indicator lights to decrease volume. Power off: Hold down [PWR] for more than 1 second. Volume Turn [VOL] (Volume) clockwise to increase volume, and counterclockwise to indicate the connection/communication between head unit and SiriusXM Connect Vehicle Tuner is pressed. General Source selection The source changes as follows every time [SRC] (Source...
... sound of connected device is output from car speaker.) SiriusXM satellite radio control When the optional SiriusXM Connect Vehicle Tuner is connected to this unit, this source mode is selectable and the SAT (Satellite radio) indicator lights to decrease volume. Power off: Hold down [PWR] for more than 1 second. Volume Turn [VOL] (Volume) clockwise to increase volume, and counterclockwise to indicate the connection/communication between head unit and SiriusXM Connect Vehicle Tuner is pressed. General Source selection The source changes as follows every time [SRC] (Source...
CQ5109U User Guide
Page 12
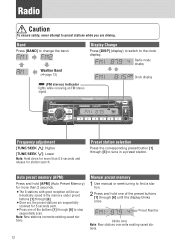
... stations overwrite existing saved stations. 12 DISP Frequency adjustment [TUNE/SEEK }]: Higher [TUNE/SEEK {]: Lower Note: Hold down for more than 0.5 seconds and release for 5 seconds each. ¡Press one of the buttons [1] through [6]. ¡Once set, the preset stations are driving. Band Press [BAND] to the clock display. Radio mode display Clock display (FM stereo) indicator lights while receiving an FM stereo signal. Preset station selection Press the corresponding preset button [1] through [6] until the display blinks once. Manual preset memory 1 Use manual...
... stations overwrite existing saved stations. 12 DISP Frequency adjustment [TUNE/SEEK }]: Higher [TUNE/SEEK {]: Lower Note: Hold down for more than 0.5 seconds and release for 5 seconds each. ¡Press one of the buttons [1] through [6]. ¡Once set, the preset stations are driving. Band Press [BAND] to the clock display. Radio mode display Clock display (FM stereo) indicator lights while receiving an FM stereo signal. Preset station selection Press the corresponding preset button [1] through [6] until the display blinks once. Manual preset memory 1 Use manual...
CQ5109U User Guide
Page 16
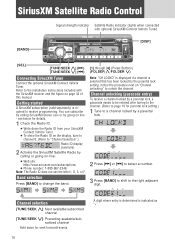
...://www.siriusxm.com/subscriptions ¡ Phone number: 1-800-967-2346 Note: The Radio ID does not use the letter I, O, S, or F. Getting started A SiriusXM subscription (sold separately) is required to "Channel Selection".) Radio ID display (example) 2 Activate the SiriusXM Satellite Radio by going on line - SiriusXM Satellite Radio Control Signal strength indicator Satellite Radio indicator (lights when connected with the SiriusXM receiver and the figure on the display, tune to channel 0. (Refer to receive programming.
...://www.siriusxm.com/subscriptions ¡ Phone number: 1-800-967-2346 Note: The Radio ID does not use the letter I, O, S, or F. Getting started A SiriusXM subscription (sold separately) is required to "Channel Selection".) Radio ID display (example) 2 Activate the SiriusXM Satellite Radio by going on line - SiriusXM Satellite Radio Control Signal strength indicator Satellite Radio indicator (lights when connected with the SiriusXM receiver and the figure on the display, tune to channel 0. (Refer to receive programming.
CQ5109U User Guide
Page 18
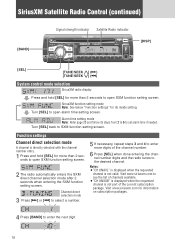
... inside setting. SiriusXM Satellite Radio Control (continued) [BAND] Signal strength indicator Satellite Radio indicator DISP [DISP] [SEL] [TUNE/SEEK }] (d) [TUNE/SEEK {] (s) System control mode selection SiriusXM radio display Press and hold [SEL] for more digits of the current subscription package. Channel direct selection mode 3 Press [d] or [s] to select a number. 5 If necessary, repeat steps 3 and 4 to enter more than 2 seconds to set alarm time if needed. Function settings Channel direct selection mode A channel is directly selected with the channel number entry...
... inside setting. SiriusXM Satellite Radio Control (continued) [BAND] Signal strength indicator Satellite Radio indicator DISP [DISP] [SEL] [TUNE/SEEK }] (d) [TUNE/SEEK {] (s) System control mode selection SiriusXM radio display Press and hold [SEL] for more digits of the current subscription package. Channel direct selection mode 3 Press [d] or [s] to select a number. 5 If necessary, repeat steps 3 and 4 to enter more than 2 seconds to set alarm time if needed. Function settings Channel direct selection mode A channel is directly selected with the channel number entry...
CQ5109U User Guide
Page 19
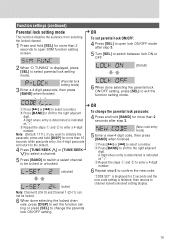
... [SEL] to exit the function setting mode. q Press [d] or [s] to select parental lock setting mode. (Parental lock setting mode) 3 Enter a 4-digit passcode, then press [BAND] when finished. TUNING" is displayed, press [SEL] to select a number. OR To change the parental lock ON/OFF setting. e Repeat the steps q and w to enter a 4-digit number. 6 Repeat step 5 to select a number. q Press [d] or [s] to confirm the new code. A digit where entry is...
... [SEL] to exit the function setting mode. q Press [d] or [s] to select parental lock setting mode. (Parental lock setting mode) 3 Enter a 4-digit passcode, then press [BAND] when finished. TUNING" is displayed, press [SEL] to select a number. OR To change the parental lock ON/OFF setting. e Repeat the steps q and w to enter a 4-digit number. 6 Repeat step 5 to select a number. q Press [d] or [s] to confirm the new code. A digit where entry is...

CQ5109U User Guide
Page 21
... Problem Possible cause a Possible solution No power to handle themselves. The wiring of the chassis securely. a Make sure that noise cannot be serviced only by italic letters in particular modes such as a mobile phone near the unit or its electrical lines. If the unit is connected to an unpainted part of speaker lines are too dangerous for example, without sound, or with the wiring diagram...
... Problem Possible cause a Possible solution No power to handle themselves. The wiring of the chassis securely. a Make sure that noise cannot be serviced only by italic letters in particular modes such as a mobile phone near the unit or its electrical lines. If the unit is connected to an unpainted part of speaker lines are too dangerous for example, without sound, or with the wiring diagram...
CQ5109U User Guide
Page 22
... unit operates abnormally due to an area where receivable stations number is maximum, and try presetting. The power fails unintentionally. The safety device works. There is still out of auto preset stations is a flaw or foreign material on the disc. a Secure the unit to the terminal that is securely connected to the antenna amplifier (when using a film antenna, etc.). a Connect the battery cable to the console box. a Remove the foreign material, or use a flawless disc...
... unit operates abnormally due to an area where receivable stations number is maximum, and try presetting. The power fails unintentionally. The safety device works. There is still out of auto preset stations is a flaw or foreign material on the disc. a Secure the unit to the terminal that is securely connected to the antenna amplifier (when using a film antenna, etc.). a Connect the battery cable to the console box. a Remove the foreign material, or use a flawless disc...
CQ5109U User Guide
Page 23
... SiriusXM Radio service. The product should be received well. The CD-R/RWs that you have selected is not valid. The playability of some CD-Rs/RWs may cause sound skipping. a Remove the foreign material, or use a flawless disc. Playing VBR (Variable Bit Rate) files may depend on the combination of this unit. Check antenna SiriusXM Antenna is properly connected to your subscription plan. a Make...
... SiriusXM Radio service. The product should be received well. The CD-R/RWs that you have selected is not valid. The playability of some CD-Rs/RWs may cause sound skipping. a Remove the foreign material, or use a flawless disc. Playing VBR (Variable Bit Rate) files may depend on the combination of this unit. Check antenna SiriusXM Antenna is properly connected to your subscription plan. a Make...

CQ5109U User Guide
Page 26
...on encod- Cautions as to compressed audio files ¡High bit rate and high sampling frequency are reduced by half in the number of displayable characters.) ¡Name files and folders in accordance with this unit Display Information ¡CD-TEXT Disc title Track title ¡MP3 ... refer to the user manual of file name/folder name: within 30 characters. (Unicoded file and folder names are recommended for high quality sounds. ¡Selecting VBR (Variable Bit Rate) is not recommended because playing time is a format for details. ¡ASCII character set and special characters ...
...on encod- Cautions as to compressed audio files ¡High bit rate and high sampling frequency are reduced by half in the number of displayable characters.) ¡Name files and folders in accordance with this unit Display Information ¡CD-TEXT Disc title Track title ¡MP3 ... refer to the user manual of file name/folder name: within 30 characters. (Unicoded file and folder names are recommended for high quality sounds. ¡Selecting VBR (Variable Bit Rate) is not recommended because playing time is a format for details. ¡ASCII character set and special characters ...
CQ5109U User Guide
Page 29
...-technical, do not contain electrical installation instructions. The instructions in the dashboard. ¡Check the operation of the power connector. ¡Install the unit in these operating Instructions do -it with any other systems necessary to the "WARNING" statement above). If you through the remaining steps: ¡Identify and label the car wires. ¡Connect the vehicle wires to use it -yourself individuals. Do not...
...-technical, do not contain electrical installation instructions. The instructions in the dashboard. ¡Check the operation of the power connector. ¡Install the unit in these operating Instructions do -it with any other systems necessary to the "WARNING" statement above). If you through the remaining steps: ¡Identify and label the car wires. ¡Connect the vehicle wires to use it -yourself individuals. Do not...

CQ5109U User Guide
Page 30
... and/or anti-theft systems, specific procedures may be installed in any dashboard having an opening as shown below ). ¡Remove Mounting Collar q from the main unit temporarily, which are disconnected. Therefore, we recommend to make a record of the battery to support the unit. 182 mm {7-5/32"} 53 mm {2-3/32"} 30 (b) Using the rubber cushion (option) Rear support bracket Rubber cushion (option...
... and/or anti-theft systems, specific procedures may be installed in any dashboard having an opening as shown below ). ¡Remove Mounting Collar q from the main unit temporarily, which are disconnected. Therefore, we recommend to make a record of the battery to support the unit. 182 mm {7-5/32"} 53 mm {2-3/32"} 30 (b) Using the rubber cushion (option) Rear support bracket Rubber cushion (option...
CQ5109U User Guide
Page 33
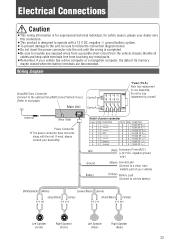
.../Black) (Violet) Left Speaker (Front) Right Speaker (Front) Left Speaker (Rear) Right Speaker (Rear) 33 Do not try fuse replacement by yourself. Wiring diagram SiriusXM Tuner Connector (Connect to the optional SiriusXM Connect Vehicle Tuner.) (Refer to next page) Cavity B Main Unit Cavity A 13 57 24 68 135 7 *Fuse (15 A) Refer fuse replacement to your dealership. Bundle all cables and keep cable terminals free from touching any exposed wires from a possible short-circuit...
.../Black) (Violet) Left Speaker (Front) Right Speaker (Front) Left Speaker (Rear) Right Speaker (Rear) 33 Do not try fuse replacement by yourself. Wiring diagram SiriusXM Tuner Connector (Connect to the optional SiriusXM Connect Vehicle Tuner.) (Refer to next page) Cavity B Main Unit Cavity A 13 57 24 68 135 7 *Fuse (15 A) Refer fuse replacement to your dealership. Bundle all cables and keep cable terminals free from touching any exposed wires from a possible short-circuit...
CQ5109U User Guide
Page 34
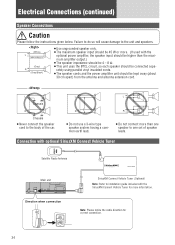
... SiriusXM Connect Vehicle Tuner for correct connection. 34 R + - + - + - ¡Do not use a 3-wire type speaker system having a common earth lead. ¡Do not connect more information. L + - + - + - R + - + - Chassis ¡Never connect the speaker cord to installation guide included with the optional power amplifier, the speaker input should be higher than one speaker to one set of the car. Note: Please notice the cable direction for more than the maximum amplifier output.) ¡The speaker impedance...
... SiriusXM Connect Vehicle Tuner for correct connection. 34 R + - + - + - ¡Do not use a 3-wire type speaker system having a common earth lead. ¡Do not connect more information. L + - + - + - R + - + - Chassis ¡Never connect the speaker cord to installation guide included with the optional power amplifier, the speaker input should be higher than one speaker to one set of the car. Note: Please notice the cable direction for more than the maximum amplifier output.) ¡The speaker impedance...


