Operating Instructions
Page 2
...car audio system carefully before installing the product. If you to potential dangers resulting from the negative (-) battery terminal before watching the display or operating the system. ❑ Use the proper power supply. FAILURE TO FOLLOW THE PROCEDURE MAY LEAD TO THE UNINTENDED ACTIVATION OF... the unit and all exposed wires to prevent short circuiting. 2 CQ-C7205U/C7105U When the fuse blows out, eliminate the cause and have specific procedures of their using this manual and the system properly. Panasonic assumes no sound) or in an abnormal state (has foreign objects...
...car audio system carefully before installing the product. If you to potential dangers resulting from the negative (-) battery terminal before watching the display or operating the system. ❑ Use the proper power supply. FAILURE TO FOLLOW THE PROCEDURE MAY LEAD TO THE UNINTENDED ACTIVATION OF... the unit and all exposed wires to prevent short circuiting. 2 CQ-C7205U/C7105U When the fuse blows out, eliminate the cause and have specific procedures of their using this manual and the system properly. Panasonic assumes no sound) or in an abnormal state (has foreign objects...
Operating Instructions
Page 9
... 22 ¡MP3/WMA/AAC Player 24 ¡Audio Setting 28 ¡Function Setting (Security Function Setting etc.) 29 ¡Display Setting 30 ¡Customize the Display (Customize Function) 31 ¡Troubleshooting 33 ¡Error Display Messages 37 ¡Notes on Discs 38 ¡Maintenance/Fuse 38 ¡Specifications 39 CQ-C7205U/C7105U 9 As Needed
... 22 ¡MP3/WMA/AAC Player 24 ¡Audio Setting 28 ¡Function Setting (Security Function Setting etc.) 29 ¡Display Setting 30 ¡Customize the Display (Customize Function) 31 ¡Troubleshooting 33 ¡Error Display Messages 37 ¡Notes on Discs 38 ¡Maintenance/Fuse 38 ¡Specifications 39 CQ-C7205U/C7105U 9 As Needed

Operating Instructions
Page 10
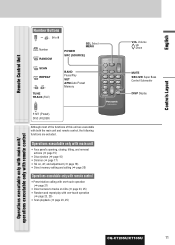
... (a page 21) DISP Display DISC (a System Upgrade (a page 17) Guidebook, page 8, 10) FOLDER (a page 24) LIST (a System Upgrade Guidebook, page 12) BAND (a page 20) Release (a page 14) y / 5 Pause/Play D·M Direct Memory (a page 20) (a page 22, 24) APM Auto Preset Memory (a page 21) Disc slot When Face Plate Opens 10 CQ-C7205U/C7105U
... (a page 21) DISP Display DISC (a System Upgrade (a page 17) Guidebook, page 8, 10) FOLDER (a page 24) LIST (a System Upgrade Guidebook, page 12) BAND (a page 20) Release (a page 14) y / 5 Pause/Play D·M Direct Memory (a page 20) (a page 22, 24) APM Auto Preset Memory (a page 21) Disc slot When Face Plate Opens 10 CQ-C7205U/C7105U
Operating Instructions
Page 11
..., 25) VOL Volume }:Up {:Down MUTE SBC-SW Super Bass Control-Subwoofer DISP Display Operations executable only with main unit/ operations executable only with both the main unit and remote control, the following functions are executable with remote control CQ-C7205U/C7105U 11 Operations executable only with main unit ¡ Face panel's opening...
..., 25) VOL Volume }:Up {:Down MUTE SBC-SW Super Bass Control-Subwoofer DISP Display Operations executable only with main unit/ operations executable only with both the main unit and remote control, the following functions are executable with remote control CQ-C7205U/C7105U 11 Operations executable only with main unit ¡ Face panel's opening...

Operating Instructions
Page 12
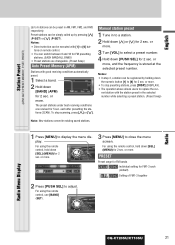
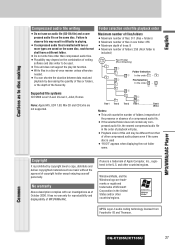
...CQ-C7205U/C7105U Cautions ¡Remove and dispose of infants. or more . 4 Press []] or [[] to display the DISPLAY menu. 6 Press [PUSH SEL] to select "DEMONSTRATION". Preparation Before Initial Use Pull the insulation film out from the backside of remote control gently. Note: Battery Information: Battery Type: Panasonic... control) Battery Life: Approximately 6 months under normal use [BAND] (SET). 7 Press [MENU] to display the menu display. Preparation Cancellation of demonstration screen For the first use, the following screen may apply. For using a tough pointed object.
...CQ-C7205U/C7105U Cautions ¡Remove and dispose of infants. or more . 4 Press []] or [[] to display the DISPLAY menu. 6 Press [PUSH SEL] to select "DEMONSTRATION". Preparation Before Initial Use Pull the insulation film out from the backside of remote control gently. Note: Battery Information: Battery Type: Panasonic... control) Battery Life: Approximately 6 months under normal use [BAND] (SET). 7 Press [MENU] to display the menu display. Preparation Cancellation of demonstration screen For the first use, the following screen may apply. For using a tough pointed object.

Operating Instructions
Page 13
... : Adjusting hours q : Forward w : Backward 6 Press [PUSH SEL], and the menu screen resumes. or more . 2 Press []] or [[] to display the DISPLAY menu. 3 Turn [VOL] to display the menu display. For using the remote control, hold down [SEL] (MENU) for 2 sec. Using Subwoofer ¡ Subwoofer level adjustment (a page 28) ¡ Subwoofer... to close the menu screen. For using the remote control, hold down [SEL] (MENU) for 2 sec. CQ-C7205U/C7105U 13 Clock adjustment For using the remote control, use [}] or [{]. 4 Press [PUSH SEL], and the clock adjustment screen appears.
... : Adjusting hours q : Forward w : Backward 6 Press [PUSH SEL], and the menu screen resumes. or more . 2 Press []] or [[] to display the DISPLAY menu. 3 Turn [VOL] to display the menu display. For using the remote control, hold down [SEL] (MENU) for 2 sec. Using Subwoofer ¡ Subwoofer level adjustment (a page 28) ¡ Subwoofer... to close the menu screen. For using the remote control, hold down [SEL] (MENU) for 2 sec. CQ-C7205U/C7105U 13 Clock adjustment For using the remote control, use [}] or [{]. 4 Press [PUSH SEL], and the clock adjustment screen appears.

Operating Instructions
Page 15
... the monitor. ¡ This unit memorizes individual volume levels for 1 sec. English Open/Eject Press [uOPEN]. Use caution not to off the power. Tilt The display angle changes among 4 levels as follows every time you hold down range can be set to catch your finger or hand in the face plate... FMs) ¡ The volume is not adjustable while an error or the menu screen is already loaded, the disc will automatically be specified. (a page 29) CQ-C7205U/C7105U 15 Temporary Volume Off (Down) MUTE (ATT: ATTENUATION) When a disc is present on it while it down ) Press [MUTE].
... the monitor. ¡ This unit memorizes individual volume levels for 1 sec. English Open/Eject Press [uOPEN]. Use caution not to off the power. Tilt The display angle changes among 4 levels as follows every time you hold down range can be set to catch your finger or hand in the face plate... FMs) ¡ The volume is not adjustable while an error or the menu screen is already loaded, the disc will automatically be specified. (a page 29) CQ-C7205U/C7105U 15 Temporary Volume Off (Down) MUTE (ATT: ATTENUATION) When a disc is present on it while it down ) Press [MUTE].

Operating Instructions
Page 17
... follows every time you hold down [MENU] (DIM: DIMMER) for 2 sec. CQ-C7205U/C7105U 17 Brighter (default) Medium Darker Note: This setting is pressed. Note: The graphic pattern and still image are selectable. (a page 30) At power-on: Mode Display OFF All displays disappear in 5 seconds. Folder hierarchy (Compressed Audio Player mode only.) Ordinary...
... follows every time you hold down [MENU] (DIM: DIMMER) for 2 sec. CQ-C7205U/C7105U 17 Brighter (default) Medium Darker Note: This setting is pressed. Note: The graphic pattern and still image are selectable. (a page 30) At power-on: Mode Display OFF All displays disappear in 5 seconds. Folder hierarchy (Compressed Audio Player mode only.) Ordinary...

Operating Instructions
Page 18
... influence mentioned above causes distortion to display "SOUND QUALITY MENU". 2 Press [PUSH SEL]. The targeted SQ preset appears. Note: If [PUSH SEL] is adjustable in the category name after adjustment. SQ changeover The SQ category is changed every time [SQ] (Sound Quality) is activated. 18 CQ-C7205U/C7105U Lights when SQ is pressed...
... influence mentioned above causes distortion to display "SOUND QUALITY MENU". 2 Press [PUSH SEL]. The targeted SQ preset appears. Note: If [PUSH SEL] is adjustable in the category name after adjustment. SQ changeover The SQ category is changed every time [SQ] (Sound Quality) is activated. 18 CQ-C7205U/C7105U Lights when SQ is pressed...

Operating Instructions
Page 20
Frequency Radio Mode Display Preset Number Lights while receiving an FM stereo signal. w Hold down for users to register applicable frequencies on the monitor. You can be executed with [1] ... is turned off during receiving a broadcasting station via D·M, the unit starts again receiving the broadcasting station via D·M by turning on the unit. 20 CQ-C7205U/C7105U Note: If the unit is present on D.M (Direct Memory). Operation Flow Radio This chapter explains how to listen to the radio. 1 Press [SOURCE] to...
Frequency Radio Mode Display Preset Number Lights while receiving an FM stereo signal. w Hold down for users to register applicable frequencies on the monitor. You can be executed with [1] ... is turned off during receiving a broadcasting station via D·M, the unit starts again receiving the broadcasting station via D·M by turning on the unit. 20 CQ-C7205U/C7105U Note: If the unit is present on D.M (Direct Memory). Operation Flow Radio This chapter explains how to listen to the radio. 1 Press [SOURCE] to...
Operating Instructions
Page 21
...[PUSH SEL] to adjust. Manual station preset 1 Tune in AM, FM1, FM2, and FM3 respectively. or more . 3 Press [MENU] to display the menu display. For using the remote control, hold down [SEL] (MENU) for 2 sec. English Station Preset (APM: AUTO PRESET MEMORY, P·SET: ...station with [1] to select a preset number. 4 Hold down [SEL] (MENU) for FM1-3 each after presetting the stations (SCAN). Radio Radio Menu Display CQ-C7205U/C7105U 21 Notes: ¡ Direct selection can be simply called up by holding down the numeric button [1] to [6] for 2 sec. or more ...
...[PUSH SEL] to adjust. Manual station preset 1 Tune in AM, FM1, FM2, and FM3 respectively. or more . 3 Press [MENU] to display the menu display. For using the remote control, hold down [SEL] (MENU) for 2 sec. English Station Preset (APM: AUTO PRESET MEMORY, P·SET: ...station with [1] to select a preset number. 4 Hold down [SEL] (MENU) for FM1-3 each after presetting the stations (SCAN). Radio Radio Menu Display CQ-C7205U/C7105U 21 Notes: ¡ Direct selection can be simply called up by holding down the numeric button [1] to [6] for 2 sec. or more ...

Operating Instructions
Page 22
...When a disc is already loaded, press [SOURCE] to select the CD mode. 1 Press [uOPEN] to eject the disc. or more. ¡ "NO TEXT" is displayed when there is no information on CD/CD Media (CD-ROM, CD-R, CD-RW)" (a page 38). ¡ This unit does not support a MIX mode CD... face plate closes automatically, and the unit recognizes the disc and starts playing automatically, too. Play Mode indicators Lights when each mode is loaded. 22 CQ-C7205U/C7105U CD Player Cautions ¡ This unit does not support 8 cm (3") discs. ¡ Do not use irregularly shaped discs. (a page 38) ¡ Do ...
...When a disc is already loaded, press [SOURCE] to select the CD mode. 1 Press [uOPEN] to eject the disc. or more. ¡ "NO TEXT" is displayed when there is no information on CD/CD Media (CD-ROM, CD-R, CD-RW)" (a page 38). ¡ This unit does not support a MIX mode CD... face plate closes automatically, and the unit recognizes the disc and starts playing automatically, too. Play Mode indicators Lights when each mode is loaded. 22 CQ-C7205U/C7105U CD Player Cautions ¡ This unit does not support 8 cm (3") discs. ¡ Do not use irregularly shaped discs. (a page 38) ¡ Do ...
Operating Instructions
Page 23
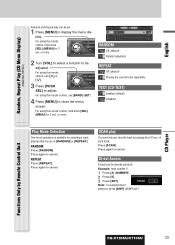
...REPEAT Press [REPEAT]. of [RANDOM] or [REPEAT]. CD Player Functions Only by playing first 10-sec. English Random, Repeat Play (CD Menu Display) (RANDOM, REPEAT) Random and Repeat play You can be adjusted. or more . RANDOM : Off (default) : Random playback REPEAT : Off ...to select a function to display the menu display. Press [SCAN]. Press again to close the menu screen. Press again to cancel. Note: To suspend direct selection, press [DISP] (DISPLAY). Direct Access A track can find your favorite track by Remote Control Unit CQ-C7205U/C7105U 23 For using ...
...REPEAT Press [REPEAT]. of [RANDOM] or [REPEAT]. CD Player Functions Only by playing first 10-sec. English Random, Repeat Play (CD Menu Display) (RANDOM, REPEAT) Random and Repeat play You can be adjusted. or more . RANDOM : Off (default) : Random playback REPEAT : Off ...to select a function to display the menu display. Press [SCAN]. Press again to close the menu screen. Press again to cancel. Note: To suspend direct selection, press [DISP] (DISPLAY). Direct Access A track can find your favorite track by Remote Control Unit CQ-C7205U/C7105U 23 For using ...
Operating Instructions
Page 24
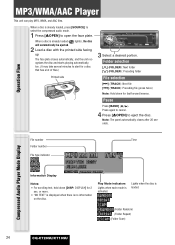
...(TRACK): Next file [6] (TRACK): Preceding file (press twice) Note: Hold down [DISP: DISPLAY] for fast forward/reverse. File number Time Folder number File type indicator Compressed Audio Player Mode Display Information Display Notes: ¡ For scrolling text, hold down for 2 sec. Note: The panel automatically... more. ¡ "NO TEXT" is displayed when there is activated. Play Mode indicators Lights when each mode is no information on the disc. When a disc is loaded. (Folder Random) (Folder Repeat) (Folder Scan) 24 CQ-C7205U/C7105U MP3/WMA/AAC Player This unit can...
...(TRACK): Next file [6] (TRACK): Preceding file (press twice) Note: Hold down [DISP: DISPLAY] for fast forward/reverse. File number Time Folder number File type indicator Compressed Audio Player Mode Display Information Display Notes: ¡ For scrolling text, hold down for 2 sec. Note: The panel automatically... more. ¡ "NO TEXT" is displayed when there is activated. Play Mode indicators Lights when each mode is no information on the disc. When a disc is loaded. (Folder Random) (Folder Repeat) (Folder Scan) 24 CQ-C7205U/C7105U MP3/WMA/AAC Player This unit can...
Operating Instructions
Page 25
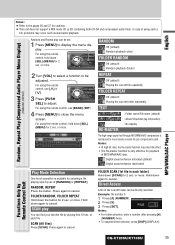
...remote control, hold down [SCAN] for 2 sec. TEXT : Folder name/File name (default) : Album/Title/Artist (tag information) : No display RE-MASTER The high-range signal lost through MP3/WMA/AAC compression is available for cautions. ¡ This unit does not support a MIX mode ... more . Notes: ¡ For folder selection, enter a number after pressing [#] (NUMBER) twice. ¡ To suspend direct selection, press [DISP] (DISPLAY). MP3/WMA/AAC Player CQ-C7205U/C7105U 25 For using the remote control, use [}] or [{]. 3 Press [PUSH SEL] to adjust. Notes: ¡ At high bit rates, the Re...
...remote control, hold down [SCAN] for 2 sec. TEXT : Folder name/File name (default) : Album/Title/Artist (tag information) : No display RE-MASTER The high-range signal lost through MP3/WMA/AAC compression is available for cautions. ¡ This unit does not support a MIX mode ... more . Notes: ¡ For folder selection, enter a number after pressing [#] (NUMBER) twice. ¡ To suspend direct selection, press [DISP] (DISPLAY). MP3/WMA/AAC Player CQ-C7205U/C7105U 25 For using the remote control, use [}] or [{]. 3 Press [PUSH SEL] to adjust. Notes: ¡ At high bit rates, the Re...

Operating Instructions
Page 26
.... ¡ Be sure to be used. ¡ Undisplayable characters and symbols will be convert- * ed into an asterisk ( ). 26 CQ-C7205U/C7105U ASCII character set the bit rate to files other encoders are not playable. ¡ Files encoded using Apple Lossless Encoder are not playable.... Audio Coding) is a format for high quality sounds. ¡ Selecting VBR (Variable Bit Rate) is not recommended because playing time is not displayed properly and sound may be skipped. ¡ The playback sound quality differs depending on the encoding circumstances. Compression method MPEG 1 audio layer 3 ...
.... ¡ Be sure to be used. ¡ Undisplayable characters and symbols will be convert- * ed into an asterisk ( ). 26 CQ-C7205U/C7105U ASCII character set the bit rate to files other encoders are not playable. ¡ Files encoded using Apple Lossless Encoder are not playable.... Audio Coding) is a format for high quality sounds. ¡ Selecting VBR (Variable Bit Rate) is not recommended because playing time is not displayed properly and sound may be skipped. ¡ The playback sound quality differs depending on the encoding circumstances. Compression method MPEG 1 audio layer 3 ...
Operating Instructions
Page 27
It has no warranty for reproducibility and displayability of Apple Computer, Inc., registered in the U.S. Windows Media, and the Windows logo are not supported. qy 6 r 7 Tree 1 Tree 2 8 Tree 3 t y Tree 4 Tree 8 (Max.) Notes: ¡ ... MP3/WMA/AAC. iTunes is prohibited by decreasing the quantity of files or folders, or the depth of the hierarchy. MP3/WMA/AAC Player Common CQ-C7205U/C7105U 27 No warranty Above description complies with two or more types are saved on the same disc, each format shall have a different folder. ¡...
It has no warranty for reproducibility and displayability of Apple Computer, Inc., registered in the U.S. Windows Media, and the Windows logo are not supported. qy 6 r 7 Tree 1 Tree 2 8 Tree 3 t y Tree 4 Tree 8 (Max.) Notes: ¡ ... MP3/WMA/AAC. iTunes is prohibited by decreasing the quantity of files or folders, or the depth of the hierarchy. MP3/WMA/AAC Player Common CQ-C7205U/C7105U 27 No warranty Above description complies with two or more types are saved on the same disc, each format shall have a different folder. ¡...

Operating Instructions
Page 28
... Fader adjustment (Setting range: R (rear) 15 to F (front) 15 and Center, Default: Center) q : Front enhanced w : Rear enhanced AUDIO Menu Display VOLUME Main volume adjustment (Setting range: 0 to 40, Default: 18) q : Up w : Down SUB WOOFER Subwoofer level adjustment (Setting range : mute (-&#...display the AUDIO menu display. Audio Setting Adjustment to each speaker and an optional subwoofer 1 Press [PUSH SEL: SELECT] to avoid causing sound distortion. HPF High Pass Filter (Setting range: Filter OFF, 90 Hz, 135 Hz, 180 Hz, 225 Hz, Default: Filter OFF) q : Up w : Down 28 CQ-C7205U...
... Fader adjustment (Setting range: R (rear) 15 to F (front) 15 and Center, Default: Center) q : Front enhanced w : Rear enhanced AUDIO Menu Display VOLUME Main volume adjustment (Setting range: 0 to 40, Default: 18) q : Up w : Down SUB WOOFER Subwoofer level adjustment (Setting range : mute (-&#...display the AUDIO menu display. Audio Setting Adjustment to each speaker and an optional subwoofer 1 Press [PUSH SEL: SELECT] to avoid causing sound distortion. HPF High Pass Filter (Setting range: Filter OFF, 90 Hz, 135 Hz, 180 Hz, 225 Hz, Default: Filter OFF) q : Up w : Down 28 CQ-C7205U...

Operating Instructions
Page 29
...is used) Lights when disactivated. or more . English Function Setting Adjustment to display on (Default) : Amplifier off (Default) : Volume down by 10 steps : Volume down by 5 steps 2 Press []] or [[] to display the FUNCTION menu. or more . BUILT-IN AMP You can toggle the ...: Amplifier on the FUNCTION menu 1 Press [MENU] to display the menu display. For using the remote control, use [}] or [{]. 4 Press [PUSH SEL] to be adjusted. For using the remote control, hold down [SEL] (MENU) for 2 sec. Audio Setting, Function Setting FUNCTION Menu Display CQ-C7205U/C7105U 29
...is used) Lights when disactivated. or more . English Function Setting Adjustment to display on (Default) : Amplifier off (Default) : Volume down by 10 steps : Volume down by 5 steps 2 Press []] or [[] to display the FUNCTION menu. or more . BUILT-IN AMP You can toggle the ...: Amplifier on the FUNCTION menu 1 Press [MENU] to display the menu display. For using the remote control, use [}] or [{]. 4 Press [PUSH SEL] to be adjusted. For using the remote control, hold down [SEL] (MENU) for 2 sec. Audio Setting, Function Setting FUNCTION Menu Display CQ-C7205U/C7105U 29

Operating Instructions
Page 30
.... For using the remote control, use [}] or [{]. 4 Press [PUSH SEL] to close the menu screen. PLETE" appears. (a page 32) Display Setting Adjustment to display on the display. [[] : Adjusting minutes []] : Adjusting hours q : Forward w : Backward 30 CQ-C7205U/C7105U Notes: ¡ The graphic pattern and still image are changeable. (a page 31) ¡ If corrupted data is selected...
.... For using the remote control, use [}] or [{]. 4 Press [PUSH SEL] to close the menu screen. PLETE" appears. (a page 32) Display Setting Adjustment to display on the display. [[] : Adjusting minutes []] : Adjusting hours q : Forward w : Backward 30 CQ-C7205U/C7105U Notes: ¡ The graphic pattern and still image are changeable. (a page 31) ¡ If corrupted data is selected...


