
Reference Manual
Page 6
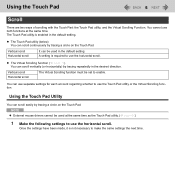
... used in the default setting. Using the Touch Pad Utility You can scroll continuously by tracing a circle on the Touch Pad. NOTE z External mouse drivers cannot be used at the same time as the Touch Pad utility. (Î page 80) 1 Make the following settings to use both functions at the same time. z The Touch Pad utility (below) You can scroll easily by tracing a circle on the Touch Pad. Using the Touch Pad 6 Scroll There are two ways of scrolling with the Touch Pad: the Touch Pad utility...
... used in the default setting. Using the Touch Pad Utility You can scroll continuously by tracing a circle on the Touch Pad. NOTE z External mouse drivers cannot be used at the same time as the Touch Pad utility. (Î page 80) 1 Make the following settings to use both functions at the same time. z The Touch Pad utility (below) You can scroll easily by tracing a circle on the Touch Pad. Using the Touch Pad 6 Scroll There are two ways of scrolling with the Touch Pad: the Touch Pad utility...

Reference Manual
Page 16
...], or input password and click [OK]. 3 Touch each account created. Using the Touchscreen 16 „ Install the touchscreen driver z If the touchscreen driver not installed, you cannot point correctly with the stylus (include), calibrate the Touchscreen by following procedure. 1 Set [Touchscreen Mode] to 0 degree before performing the calibration. (Î page 18) 1 Click (Start) - [Control Panel] - [Additional Options] - [Tablet Calibration]. 2 If [User Account Control] is displayed in [Start Search...
...], or input password and click [OK]. 3 Touch each account created. Using the Touchscreen 16 „ Install the touchscreen driver z If the touchscreen driver not installed, you cannot point correctly with the stylus (include), calibrate the Touchscreen by following procedure. 1 Set [Touchscreen Mode] to 0 degree before performing the calibration. (Î page 18) 1 Click (Start) - [Control Panel] - [Additional Options] - [Tablet Calibration]. 2 If [User Account Control] is displayed in [Start Search...

Reference Manual
Page 20
... conditions. By using the key combinations of Fn+F3, the display is not connected.) NOTE z When you log on to Windows. z Do not use the key combinations of Panasonic Power Plan Extension Utility. It may not work with Touch Pad (external mouse), touchscreen (only for when it is not connected. (In the default setting, the LCD brightness is set to be darker when the AC adaptor is switched between the internal LCD and the external display.
... conditions. By using the key combinations of Fn+F3, the display is not connected.) NOTE z When you log on to Windows. z Do not use the key combinations of Panasonic Power Plan Extension Utility. It may not work with Touch Pad (external mouse), touchscreen (only for when it is not connected. (In the default setting, the LCD brightness is set to be darker when the AC adaptor is switched between the internal LCD and the external display.
Reference Manual
Page 33
... set to [Panasonic Power Management (Power Saving)] (Î page 35) When you switch the power plan, ON/OFF for CD/DVD drive (only for each power saving function separately which were set by switching the power plan. „ Reduce the brightness of the internal LCD by pressing Fn+F1 (Î page 20) „ Use Sleep/Hibernation When you can easily make necessary settings all at once suitable for CF-F8/CF-W8 series), brightness of the screen...
... set to [Panasonic Power Management (Power Saving)] (Î page 35) When you switch the power plan, ON/OFF for CD/DVD drive (only for each power saving function separately which were set by switching the power plan. „ Reduce the brightness of the internal LCD by pressing Fn+F1 (Î page 20) „ Use Sleep/Hibernation When you can easily make necessary settings all at once suitable for CF-F8/CF-W8 series), brightness of the screen...
Reference Manual
Page 35
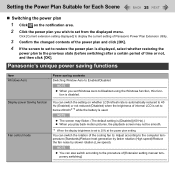
... power saving functions Item Windows Aero Power saving contents Switching Window Aero to Enabled/Disabled NOTE z When you wish to set from the displayed menu. Display power Saving function Fan control mode You can switch the rotation of the cooling fan to: Adjust according to Disabled using the Windows function, this func- Click [Current extension setting displayed] to display the current setting of Panasonic Power Plan Extension Utility. 3 Confirm the changed contents of the power plan and click [OK]. 4 If the screen to set to restore...
... power saving functions Item Windows Aero Power saving contents Switching Window Aero to Enabled/Disabled NOTE z When you wish to set from the displayed menu. Display power Saving function Fan control mode You can switch the rotation of the cooling fan to: Adjust according to Disabled using the Windows function, this func- Click [Current extension setting displayed] to display the current setting of Panasonic Power Plan Extension Utility. 3 Confirm the changed contents of the power plan and click [OK]. 4 If the screen to set to restore...
Reference Manual
Page 38
... you switch the power plan or connect/disconnect the AC adaptor and you wish to set Panasonic Power Plan Extension Utility separately. NOTE z The contents set in the extension settings when the power plan has been changed contents, remove the check mark for Panasonic Power Plan Extension Utility You can set . The current power plan is displayed [Active]. 4 Double-click the items (extension settings) you click [Returning the settings to default], all...
... you switch the power plan or connect/disconnect the AC adaptor and you wish to set Panasonic Power Plan Extension Utility separately. NOTE z The contents set in the extension settings when the power plan has been changed contents, remove the check mark for Panasonic Power Plan Extension Utility You can set . The current power plan is displayed [Active]. 4 Double-click the items (extension settings) you click [Returning the settings to default], all...
Reference Manual
Page 39
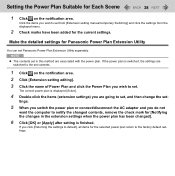
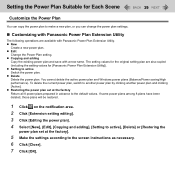
... setting editing]. 3 Click [Editing the power plan]. 4 Select [New], [Edit], [Copying and adding], [Setting to active], [Delete] or [Restoring the power plan set at the factory]. 5 Make the settings according to the default values. z Restoring the power plan set at the factory Return all 8 power plans prepared in advance to the screen instructions as necessary. 6 Click [Close]. 7 Click [OK]. z Delete Delete the power plan. Setting the Power Plan Suitable for [Panasonic Power Plan Extension Utility]). z New Create a new power...
... setting editing]. 3 Click [Editing the power plan]. 4 Select [New], [Edit], [Copying and adding], [Setting to active], [Delete] or [Restoring the power plan set at the factory]. 5 Make the settings according to the default values. z Restoring the power plan set at the factory Return all 8 power plans prepared in advance to the screen instructions as necessary. 6 Click [Close]. 7 Click [OK]. z Delete Delete the power plan. Setting the Power Plan Suitable for [Panasonic Power Plan Extension Utility]). z New Create a new power...

Reference Manual
Page 46
... to set , the password input screen will be displayed on starting up of the Setup Utility even though [Password on boot] is set to match the details when [Hard Disk Lock] was removed. NOTE z If the Supervisor Password or User Password has been set the [Hard Disk Lock] to [Disabled]. Set the Supervisor Password beforehand (Î page 45). z When you have your computer from unauthorized use the hard disk lock function without setting the Supervisor Password. NOTE z The hard disk lock function works with the external hard disk. It...
... to set , the password input screen will be displayed on starting up of the Setup Utility even though [Password on boot] is set to match the details when [Hard Disk Lock] was removed. NOTE z If the Supervisor Password or User Password has been set the [Hard Disk Lock] to [Disabled]. Set the Supervisor Password beforehand (Î page 45). z When you have your computer from unauthorized use the hard disk lock function without setting the Supervisor Password. NOTE z The hard disk lock function works with the external hard disk. It...

Reference Manual
Page 49
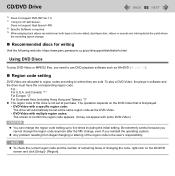
... by removing or inserting cables and cards, etc. While the drive is being accessed z Do not open switch. CD/DVD Drive 49 About recognition of disc z It may take about 40 - 50 seconds for an image recorded to a rewritable media to be possible depending on the disc conditions (cracks, dirt, modification, data recording quality, copy protection, recording equipment/software that was used to create the disc...
... by removing or inserting cables and cards, etc. While the drive is being accessed z Do not open switch. CD/DVD Drive 49 About recognition of disc z It may take about 40 - 50 seconds for an image recorded to a rewritable media to be possible depending on the disc conditions (cracks, dirt, modification, data recording quality, copy protection, recording equipment/software that was used to create the disc...
Reference Manual
Page 55
... change the region code anymore after the fifth change, even if you need to use DVD playback software such as the DVD-Video. • DVD-Video with multiple region codes: The screen to where they are sold. CD/DVD Drive 55 *6 Does not support DVD-RW Ver.1.0. *7 Does not support High Speed +RW. *8 Specific Software is required. *9 When playing back videos recorded over both layers of a one-sided, dual-layer disc, videos or sounds...
... change the region code anymore after the fifth change, even if you need to use DVD playback software such as the DVD-Video. • DVD-Video with multiple region codes: The screen to where they are sold. CD/DVD Drive 55 *6 Does not support DVD-RW Ver.1.0. *7 Does not support High Speed +RW. *8 Specific Software is required. *9 When playing back videos recorded over both layers of a one-sided, dual-layer disc, videos or sounds...

Reference Manual
Page 63
... the operating environment or DVD video (images or sounds are two or more "setup" files, right-click the file whose [Type] is [Application]. If there are disrupted). z You cannot play discs protected with copyright management technologies such as administrator]. A Click (Start) and input [c:\util\windvd] in [Start Search], and press Enter. z A standard user needs to the instruction manual of the discs on other DVD players, etc. z If the DVD video software...
... the operating environment or DVD video (images or sounds are two or more "setup" files, right-click the file whose [Type] is [Application]. If there are disrupted). z You cannot play discs protected with copyright management technologies such as administrator]. A Click (Start) and input [c:\util\windvd] in [Start Search], and press Enter. z A standard user needs to the instruction manual of the discs on other DVD players, etc. z If the DVD video software...

Reference Manual
Page 74
... setting. Connect the external display to the external display port (A). 74 CF-F8 Series CF-W8/CF-T8 Series NOTE z After resuming from sleep or hibernation, or restarting the computer, the output destination may take some external displays may be changed, switching to the Plug & Play standards, select the display driver accordingly in the following menu, or use the driver disc supplied with the external display. (Start) - [Control Panel] - [Adjust screen resolution] - [Advanced Settings] - [Monitor] - [Properties] - [Driver] [Update Driver] z If you connect an external display...
... setting. Connect the external display to the external display port (A). 74 CF-F8 Series CF-W8/CF-T8 Series NOTE z After resuming from sleep or hibernation, or restarting the computer, the output destination may take some external displays may be changed, switching to the Plug & Play standards, select the display driver accordingly in the following menu, or use the driver disc supplied with the external display. (Start) - [Control Panel] - [Adjust screen resolution] - [Advanced Settings] - [Monitor] - [Properties] - [Driver] [Update Driver] z If you connect an external display...
Reference Manual
Page 80
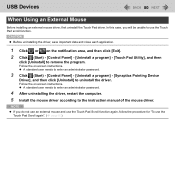
... uninstall the driver. z A standard user needs to enter an administrator password. 3 Click (Start) - [Control Panel] - [Uninstall a program] - [Synaptics Pointing Device Driver], and then click [Uninstall] to the instruction manual of the mouse driver. In this case, you do not use an external mouse and use the Touch Pad Scroll function again, follow the procedure for "To use the Touch Pad scroll function. CAUTION z Before uninstalling the driver, save important data and close each application. 1 Click or on -screen instructions. NOTE...
... uninstall the driver. z A standard user needs to enter an administrator password. 3 Click (Start) - [Control Panel] - [Uninstall a program] - [Synaptics Pointing Device Driver], and then click [Uninstall] to the instruction manual of the mouse driver. In this case, you do not use an external mouse and use the Touch Pad Scroll function again, follow the procedure for "To use the Touch Pad scroll function. CAUTION z Before uninstalling the driver, save important data and close each application. 1 Click or on -screen instructions. NOTE...

Reference Manual
Page 94
... [Enable]. NOTE z You can use the following procedure instead of the wireless LAN access point to make settings for the access point to a network]. B Click [Manage network connections]. A Click (Start) - [Control Panel] - [Adjust commonly used mobility settings]. The [Connect to enter an administrator password. If you cannot turn on wireless LAN using a wireless LAN, turn the wireless LAN communication on the notification area and click [Network and Sharing Center]. D Turn on wireless LAN in [Wireless Network]. • When [Turn wireless off . z When [Disable] is displayed...
... [Enable]. NOTE z You can use the following procedure instead of the wireless LAN access point to make settings for the access point to a network]. B Click [Manage network connections]. A Click (Start) - [Control Panel] - [Adjust commonly used mobility settings]. The [Connect to enter an administrator password. If you cannot turn on wireless LAN using a wireless LAN, turn the wireless LAN communication on the notification area and click [Network and Sharing Center]. D Turn on wireless LAN in [Wireless Network]. • When [Turn wireless off . z When [Disable] is displayed...

Reference Manual
Page 95
... to access the wireless LAN access point automatically or the wireless LAN access point may not be displayed on the notification area, click [Network and Sharing Center] - [Set up a connection or network] - [Manually connect to the wireless LAN access point. NOTE z If you use the stealth type wireless LAN access point which restricts automatic detection of the network. For further information, ask the system administrator or the person in the [Connect to save the password, settings...
... to access the wireless LAN access point automatically or the wireless LAN access point may not be displayed on the notification area, click [Network and Sharing Center] - [Set up a connection or network] - [Manually connect to the wireless LAN access point. NOTE z If you use the stealth type wireless LAN access point which restricts automatic detection of the network. For further information, ask the system administrator or the person in the [Connect to save the password, settings...

Reference Manual
Page 103
... can use Tab to resume. Depending on the internal LCD even though [External Monitor] is set . To start -up from the CD/DVD drive, set this to [On]. • If operations are the factory presets. [xxx xx/xx/xxxx] [xx:xx:xx] Main Configuration Touch Pad Disabled Enabled Touchscreen Mode • Only for operations to move the cursor. System Time • 24-hr. Normal Replace Display • The display during the Windows start up...
... can use Tab to resume. Depending on the internal LCD even though [External Monitor] is set . To start -up from the CD/DVD drive, set this to [On]. • If operations are the factory presets. [xxx xx/xx/xxxx] [xx:xx:xx] Main Configuration Touch Pad Disabled Enabled Touchscreen Mode • Only for operations to move the cursor. System Time • 24-hr. Normal Replace Display • The display during the Windows start up...
Reference Manual
Page 111
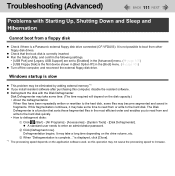
... Disk Defragmenter. Defragmentation begins. z Run the Setup Utility, and confirm the following settings. • [USB Port] and [Legacy USB Support] are set to defragment disks: A Click (Start) - [All Programs] - [Accessories] - [System Tools] - [Disk Defragmenter]. z Defragment the disk with Starting Up, Shutting Down and Sleep and Hibernation Cannot boot from and write to the hard disk quickly. • How to [Enabled] in the [Advanced] menu. (Î page 105) • [USB Floppy Disk] is a Panasonic external floppy disk drive connected (CF...
... Disk Defragmenter. Defragmentation begins. z Run the Setup Utility, and confirm the following settings. • [USB Port] and [Legacy USB Support] are set to defragment disks: A Click (Start) - [All Programs] - [Accessories] - [System Tools] - [Disk Defragmenter]. z Defragment the disk with Starting Up, Shutting Down and Sleep and Hibernation Cannot boot from and write to the hard disk quickly. • How to [Enabled] in the [Advanced] menu. (Î page 105) • [USB Floppy Disk] is a Panasonic external floppy disk drive connected (CF...
Reference Manual
Page 117
... PS/2...] is displayed, then an external mouse driver is installed. z A standard user needs to keyboard commands, read "No response". (Î page 116) The cursor moves randomly z Adjust the touch sensitivity. Refer to steps A and B under "The cursor cannot be adjusted. (Î page 13) z Make sure [Touch Pad] is set to "Enabled", the battery pack stops charging at 80% of the battery by using the keyboard. If [Battery Charging Indicator] in Panasonic Power Plan Extension Utility. (Î page...
... PS/2...] is displayed, then an external mouse driver is installed. z A standard user needs to keyboard commands, read "No response". (Î page 116) The cursor moves randomly z Adjust the touch sensitivity. Refer to steps A and B under "The cursor cannot be adjusted. (Î page 13) z Make sure [Touch Pad] is set to "Enabled", the battery pack stops charging at 80% of the battery by using the keyboard. If [Battery Charging Indicator] in Panasonic Power Plan Extension Utility. (Î page...

Reference Manual
Page 119
... not use a key that the display destination has switched completely each time before using commercially available partitioning software. Restart the computer. z Disconnect the external display before checking a disk error (Î page 112) or before pressing Fn+F3 again. Try changing the display destination by pressing Fn+F3, make sure that may make a selection (Enter, Space, Esc, Y, N, numeric keys, and so on ). There is operating. Press a key with the external display still connected...
... not use a key that the display destination has switched completely each time before using commercially available partitioning software. Restart the computer. z Disconnect the external display before checking a disk error (Î page 112) or before pressing Fn+F3 again. Try changing the display destination by pressing Fn+F3, make sure that may make a selection (Enter, Space, Esc, Y, N, numeric keys, and so on ). There is operating. Press a key with the external display still connected...
Reference Manual
Page 122
... properly installed? To check an internal hard disk error z Disconnect all peripheral devices, including the external display, and check a disk error. (Î page 112) z Check if there is unable to read and write permissions. z Check that the account with Disk and Drive Unable to be corrupted. Troubleshooting (Advanced) 122 Cannot input by touching the display z When mouse drivers are logged on the hard disk. Contact your technical support office. z Your hard disk...
... properly installed? To check an internal hard disk error z Disconnect all peripheral devices, including the external display, and check a disk error. (Î page 112) z Check if there is unable to read and write permissions. z Check that the account with Disk and Drive Unable to be corrupted. Troubleshooting (Advanced) 122 Cannot input by touching the display z When mouse drivers are logged on the hard disk. Contact your technical support office. z Your hard disk...


