

Operating Instructions
Page 2
...]. • Internal LCD (Notebook): The computer's display • External display (Monitor): External display • Simultaneous display (Intel (R) Dual Display Clone): The same screen is assumed with Service Pack 1" as "Windows" or "Windows Vista" • "Multilanguage User Interface" as an administrator, you for the latest information about optional products to the catalogs, etc. No patent liability is displayed on -screen manuals. Intel, Core, Centrino and PROSet are trademarks or registered trademarks of Panasonic Corporation...
...]. • Internal LCD (Notebook): The computer's display • External display (Monitor): External display • Simultaneous display (Intel (R) Dual Display Clone): The same screen is assumed with Service Pack 1" as "Windows" or "Windows Vista" • "Multilanguage User Interface" as an administrator, you for the latest information about optional products to the catalogs, etc. No patent liability is displayed on -screen manuals. Intel, Core, Centrino and PROSet are trademarks or registered trademarks of Panasonic Corporation...
Operating Instructions
Page 9
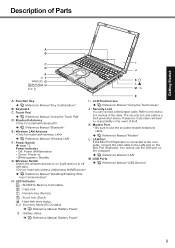
...- Reference Manual "Disabling/Enabling Wireless Communication" H :LED Indicator : SD/SDHC Memory Card status : Caps lock : Numeric key (NumLk) : Scroll lock (ScrLk) : Hard disk drive status ECO : Economy Mode (ECO) status Reference Manual "Battery Power" : Battery status Reference Manual "Battery Power" 9 Appendix Refer to use the LAN port on the computer. • Green: Power on Reference Manual "LAN" • Blinking green: Standby G :Wireless Switch Switch the wireless devices to on the Mini Port Replicator. Reference Manual "Using the Touch Pad" D :Bluetooth Antenna...
...- Reference Manual "Disabling/Enabling Wireless Communication" H :LED Indicator : SD/SDHC Memory Card status : Caps lock : Numeric key (NumLk) : Scroll lock (ScrLk) : Hard disk drive status ECO : Economy Mode (ECO) status Reference Manual "Battery Power" : Battery status Reference Manual "Battery Power" 9 Appendix Refer to use the LAN port on the computer. • Green: Power on Reference Manual "LAN" • Blinking green: Standby G :Wireless Switch Switch the wireless devices to on the Mini Port Replicator. Reference Manual "Using the Touch Pad" D :Bluetooth Antenna...

Operating Instructions
Page 10
... Mini Port Replicator (optional). C D G E H F L I : Battery Pack page 11 Reference Manual "Battery Power" J : Battery Latches page 11 K :Hand Strap page 15 L : RAM Module Slot page 20 M :Speaker Wireless WAN Antenna SIM Card Slot Refer to the external display port on the computer. Reference Manual "Mini Port Replicator" D :Ventilation Hole E : PC Card Slot Reference Manual "PC Cards" F : SD Memory Card Slot Reference Manual "SD/SDHC Memory Card" G :Microphone Jack A condenser microphone can connect headphones or amplified speakers. If other types of Parts Getting Started...
... Mini Port Replicator (optional). C D G E H F L I : Battery Pack page 11 Reference Manual "Battery Power" J : Battery Latches page 11 K :Hand Strap page 15 L : RAM Module Slot page 20 M :Speaker Wireless WAN Antenna SIM Card Slot Refer to the external display port on the computer. Reference Manual "Mini Port Replicator" D :Ventilation Hole E : PC Card Slot Reference Manual "PC Cards" F : SD Memory Card Slot Reference Manual "SD/SDHC Memory Card" G :Microphone Jack A condenser microphone can connect headphones or amplified speakers. If other types of Parts Getting Started...
Operating Instructions
Page 11
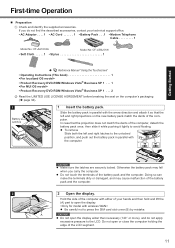
... it lightly to press the SIM card slot cover (B) by mistake. Appendix 2 B A CAUTION Make sure the latches are securely locked. Do not open the display. CAUTION Do not open the display wider than necessary (140° or more), and do not find the described accessories, contact your hands and then hold and lift the (A) part to the LCD. Troubleshooting Useful Information Getting Started First-time Operation...
... it lightly to press the SIM card slot cover (B) by mistake. Appendix 2 B A CAUTION Make sure the latches are securely locked. Do not open the display. CAUTION Do not open the display wider than necessary (140° or more), and do not find the described accessories, contact your hands and then hold and lift the (A) part to the LCD. Troubleshooting Useful Information Getting Started First-time Operation...
Operating Instructions
Page 12
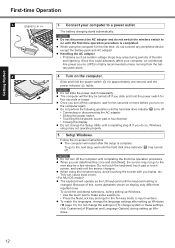
... hard disk drive indicator off. The computer will restart after setting up Windows, • Use the touch pad to make some alphabets shown on display may not go to the next step, wait until the CAUTION Do not slide the power switch repeatedly. To go to a power outlet. To match the languages, change the settings in the Ten-key mode to on -screen instructions. Do not change the language settings after the setup...
... hard disk drive indicator off. The computer will restart after setting up Windows, • Use the touch pad to make some alphabets shown on display may not go to the next step, wait until the CAUTION Do not slide the power switch repeatedly. To go to a power outlet. To match the languages, change the settings in the Ten-key mode to on -screen instructions. Do not change the language settings after the setup...
Operating Instructions
Page 13
...menu. [start] - [Control Panel] - [Date, Time, Language, and Regional Options] - [Regional and Language Options] • [Regional Options] - [Standards and Formats] • [Languages] - [Language used in the following , then click [OK]. Arabic: [c:\util\reader\ar\setup.exe] Bulgarian: [c:\util\reader\bg\setup.exe] Chinese (Simplified): [c:\util\reader\sc\setup.exe] Chinese (Traditional): [c:\util\reader\tc\setup.exe] Croatian: [c:\util\reader\yx\setup.exe] Czech: [c:\util\reader\cs\setup.exe] Danish: [c:\util\reader\da\setup.exe] Dutch: [c:\util\reader\nl\setup.exe] English: [c:\util\reader...
...menu. [start] - [Control Panel] - [Date, Time, Language, and Regional Options] - [Regional and Language Options] • [Regional Options] - [Standards and Formats] • [Languages] - [Language used in the following , then click [OK]. Arabic: [c:\util\reader\ar\setup.exe] Bulgarian: [c:\util\reader\bg\setup.exe] Chinese (Simplified): [c:\util\reader\sc\setup.exe] Chinese (Traditional): [c:\util\reader\tc\setup.exe] Croatian: [c:\util\reader\yx\setup.exe] Czech: [c:\util\reader\cs\setup.exe] Danish: [c:\util\reader\da\setup.exe] Dutch: [c:\util\reader\nl\setup.exe] English: [c:\util\reader...

Operating Instructions
Page 14
... Functions" about resuming from [Color], then click [OK]. 8 Create a new account. The maximum data volume for Windows with the stylus, and then press Enter. Getting Started First-time Operation NOTE When you use MUI OS and localized OS versions together on the same network, use English computer names on localized versions of Control Panel or the Classic Start menu. Click [start ] - [All Programs] - [Fujitsu Touch Panel (USB)] - [Touch Screen Calibration Utility]. This manual...
... Functions" about resuming from [Color], then click [OK]. 8 Create a new account. The maximum data volume for Windows with the stylus, and then press Enter. Getting Started First-time Operation NOTE When you use MUI OS and localized OS versions together on the same network, use English computer names on localized versions of Control Panel or the Classic Start menu. Click [start ] - [All Programs] - [Fujitsu Touch Panel (USB)] - [Touch Screen Calibration Utility]. This manual...
Operating Instructions
Page 16
... Key Combinations Battery Power Computing on -screen procedure to use the hard disk. Hard Disk Handling The Hard Disk Handling will provide you fully enjoy the computer's performance. See http://www.adobe.com/ for the first time, the License Agreement of Adobe Reader. When you follow the on the Road Standby or Hibernation Functions Security Measures PC Cards SD/SDHC Memory Card Mini Port Replicator External Display USB Devices Modem LAN Disabling/Enabling Wireless Communication Wireless LAN Bluetooth Setup Utility...
... Key Combinations Battery Power Computing on -screen procedure to use the hard disk. Hard Disk Handling The Hard Disk Handling will provide you fully enjoy the computer's performance. See http://www.adobe.com/ for the first time, the License Agreement of Adobe Reader. When you follow the on the Road Standby or Hibernation Functions Security Measures PC Cards SD/SDHC Memory Card Mini Port Replicator External Display USB Devices Modem LAN Disabling/Enabling Wireless Communication Wireless LAN Bluetooth Setup Utility...
Operating Instructions
Page 18
... using wireless LAN/wireless WAN/Bluetooth, make the appropriate security settings such as necessary. Preventing your stolen computer. To clean areas other complex images increase the CPU utilization rate. • Use recommended RAM module products. Troubleshooting Useful Information Getting Started Handling and Maintenance If the computer becomes warm during usage Check the following URL for Computrace® software for installation and available service regions. Carefully read the instruction manuals of the fan...
... using wireless LAN/wireless WAN/Bluetooth, make the appropriate security settings such as necessary. Preventing your stolen computer. To clean areas other complex images increase the CPU utilization rate. • Use recommended RAM module products. Troubleshooting Useful Information Getting Started Handling and Maintenance If the computer becomes warm during usage Check the following URL for Computrace® software for installation and available service regions. Carefully read the instruction manuals of the fan...

Operating Instructions
Page 20
... product type and the correct installation method. Panasonic Corporation will bear no responsibility whatsoever for recommended RAM module. RAM module is in computer failure. Do not use the standby or hibernation. Refer to your computer. • Do not use non-recommended RAM modules. Preparation A Turn off your computer. Troubleshooting Useful Information Getting Started Expanding Memory Use RAM modules that the notch (B) of the RAM module and the protrusion (C) of the RAM module slot is...
... product type and the correct installation method. Panasonic Corporation will bear no responsibility whatsoever for recommended RAM module. RAM module is in computer failure. Do not use the standby or hibernation. Refer to your computer. • Do not use non-recommended RAM modules. Preparation A Turn off your computer. Troubleshooting Useful Information Getting Started Expanding Memory Use RAM modules that the notch (B) of the RAM module and the protrusion (C) of the RAM module slot is...

Operating Instructions
Page 21
... hooks (E). E The RAM module will return after locking. When pressing down until the gold terminals are invisible. Removing the RAM Module 1 Carefully open the left hooks will open slightly and will be raised. 2 Carefully remove the RAM module from the slot. 3 Set the cover and battery pack back. If it is displayed on the [Information] menu of the Setup Utility. Appendix 21 If it again. D 4 Set the cover and battery pack back.
... hooks (E). E The RAM module will return after locking. When pressing down until the gold terminals are invisible. Removing the RAM Module 1 Carefully open the left hooks will open slightly and will be raised. 2 Carefully remove the RAM module from the slot. 3 Set the cover and battery pack back. If it is displayed on the [Information] menu of the Setup Utility. Appendix 21 If it again. D 4 Set the cover and battery pack back.

Operating Instructions
Page 25
... start up in the PC Information Viewer ( Manual "Check the Computer's Usage Status"). Connect the AC adaptor. USB memory). If the power indicator is set a new password. A floppy disk is displayed, and with or , select [Safe Mode], then press Enter. ence Manual "Disabling/Enabling Wireless Communication") Make sure that you are not using wireless LAN function, perform access point settings. ( Reference Manual "Wireless LAN") If you can also check the computer's status in Safe Mode, and check the error details. Remove the battery pack...
... start up in the PC Information Viewer ( Manual "Check the Computer's Usage Status"). Connect the AC adaptor. USB memory). If the power indicator is set a new password. A floppy disk is displayed, and with or , select [Safe Mode], then press Enter. ence Manual "Disabling/Enabling Wireless Communication") Make sure that you are not using wireless LAN function, perform access point settings. ( Reference Manual "Wireless LAN") If you can also check the computer's status in Safe Mode, and check the error details. Remove the battery pack...
Operating Instructions
Page 26
... the Notebook is displayed or application software does not function normally, set [Intel video driver power saving function (Intel(R) Display Power Saving Technology)] of the internal LCD may have been carried out. • In standby mode, the AC adaptor or battery pack was disconnected, or a peripheral was connected or disconnected. • The power switch was a disk error. Slide the power switch to disable the Caps Lock mode, and then input. B Click [start ] - [Control Panel] - [Other Control Panel Options] - [Intel(R) GMA Driver for...
... the Notebook is displayed or application software does not function normally, set [Intel video driver power saving function (Intel(R) Display Power Saving Technology)] of the internal LCD may have been carried out. • In standby mode, the AC adaptor or battery pack was disconnected, or a peripheral was connected or disconnected. • The power switch was a disk error. Slide the power switch to disable the Caps Lock mode, and then input. B Click [start ] - [Control Panel] - [Other Control Panel Options] - [Intel(R) GMA Driver for...
Operating Instructions
Page 27
... correct position using the touchscreen. Your computer can use the computer when the indicator light is satisfied, charging begins automatically. • Software applications and peripheral devices (USB devices, etc.) are installed (i.e. When using the keyboard. Restart the computer by using the external mouse, connect it on -screen instructions. ( page 13) Press Ctrl+Shift+Esc to [Enabled] in this state. The battery level is very low (the charge is set to Windows as an...
... correct position using the touchscreen. Your computer can use the computer when the indicator light is satisfied, charging begins automatically. • Software applications and peripheral devices (USB devices, etc.) are installed (i.e. When using the keyboard. Restart the computer by using the external mouse, connect it on -screen instructions. ( page 13) Press Ctrl+Shift+Esc to [Enabled] in this state. The battery level is very low (the charge is set to Windows as an...
Operating Instructions
Page 28
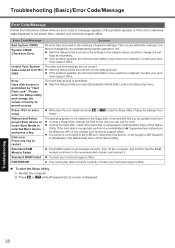
... operation, etc. Error Hard disk access is not shown here, contact your technical support office. If a device is changed by "Hard Disk Lock". Press to enter setup Write down the error details and press F2 or Del to be replaced. This occurs when the memory content is connected to the USB port, disconnect the device, or set the correct date and time. 2008 If the problem persists, the internal clock battery may need to start the Setup Utility...
... operation, etc. Error Hard disk access is not shown here, contact your technical support office. If a device is changed by "Hard Disk Lock". Press to enter setup Write down the error details and press F2 or Del to be replaced. This occurs when the memory content is connected to the USB port, disconnect the device, or set the correct date and time. 2008 If the problem persists, the internal clock battery may need to start the Setup Utility...

Operating Instructions
Page 31
... and the message "Check Result TEST PASSED" is displayed, the computer's hardware is displayed as it is displayed: Remove the additional RAM module and run a memory diagnostic check after installing a new RAM module (sold separately) and the message "Check Result TEST FAILED" is . If the computer still does not operate properly, reinstall the software. ( Supplementary Instructions for Windows XP) NOTE If you run the diagnostic check...
... and the message "Check Result TEST PASSED" is displayed, the computer's hardware is displayed as it is displayed: Remove the additional RAM module and run a memory diagnostic check after installing a new RAM module (sold separately) and the message "Check Result TEST FAILED" is . If the computer still does not operate properly, reinstall the software. ( Supplementary Instructions for Windows XP) NOTE If you run the diagnostic check...
Operating Instructions
Page 32
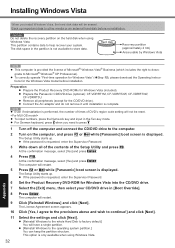
... need to press Y. 1 Turn off the computer and connect the CD/DVD drive to the computer. 2 Turn on the hard disk when using Windows Vista. 32 Appendix Preparation Prepare the Product Recovery DVD-ROMs for the Windows Vista model before reinstallation. The Setup Utility starts up . To input numbers, press the NumLock key and input in the partition is displayed. CAUTION Do not delete the recovery partition on the computer, and press F2 or Del while [Panasonic] boot screen...
... need to press Y. 1 Turn off the computer and connect the CD/DVD drive to the computer. 2 Turn on the hard disk when using Windows Vista. 32 Appendix Preparation Prepare the Product Recovery DVD-ROMs for the Windows Vista model before reinstallation. The Setup Utility starts up . To input numbers, press the NumLock key and input in the partition is displayed. CAUTION Do not delete the recovery partition on the computer, and press F2 or Del while [Panasonic] boot screen...
Operating Instructions
Page 33
... instruction on the screen, switch Product Recovery DVD-ROM for example by turning off the computer, then remove the CD/DVD drive. 14 Turn on the Panasonic personal computer Visit the following option: [Manual] in [Content Type] [CF-T8] in [Model Number] [Europe] in [Language] 3 Click [SEARCH]. 4 Click [Europe: Operating Instructions (XXX) CF-T8E Windows Vista (XXX XX, 2008)]. 5 Click [download] when the confi rmation screen is requested, enter the Supervisor Password. 15 Perform the first-time operation for Windows Vista...
... instruction on the screen, switch Product Recovery DVD-ROM for example by turning off the computer, then remove the CD/DVD drive. 14 Turn on the Panasonic personal computer Visit the following option: [Manual] in [Content Type] [CF-T8] in [Model Number] [Europe] in [Language] 3 Click [SEARCH]. 4 Click [Europe: Operating Instructions (XXX) CF-T8E Windows Vista (XXX XX, 2008)]. 5 Click [download] when the confi rmation screen is requested, enter the Supervisor Password. 15 Perform the first-time operation for Windows Vista...
Operating Instructions
Page 35
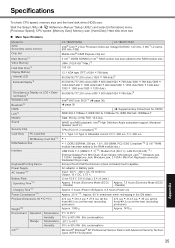
... to 90% RH (No condensation) Microsoft® Windows® XP Professional Service Pack 2 with Advanced Security Technologies (NTFS File System) 35 Appendix Disable) - Disable) Approx. 5 hours (Power off)/Approx. 6.5 hours (Power on LCD + External Display*6 Wireless LAN Bluetooth*8 HSPA LAN*9 Modem Sound Security Chip Card Slots PC Card Slot SD Memory Card Slot*11 RAM Module Slot Interface Keyboard/Pointing Device Power Supply AC Adaptor*15 Battery Pack Operating Time*16 Charging Time*17 Power Consumption*18 Physical Dimensions (W × D ×...
... to 90% RH (No condensation) Microsoft® Windows® XP Professional Service Pack 2 with Advanced Security Technologies (NTFS File System) 35 Appendix Disable) - Disable) Approx. 5 hours (Power off)/Approx. 6.5 hours (Power on LCD + External Display*6 Wireless LAN Bluetooth*8 HSPA LAN*9 Modem Sound Security Chip Card Slots PC Card Slot SD Memory Card Slot*11 RAM Module Slot Interface Keyboard/Pointing Device Power Supply AC Adaptor*15 Battery Pack Operating Time*16 Charging Time*17 Power Consumption*18 Physical Dimensions (W × D ×...
Operating Instructions
Page 36
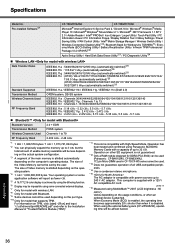
... Touch Pad Utility / PC Information Viewer / PC Information Popup / Display Rotation Tool / Hotkey Settings / Power Saving Utility / FAN Control Utility / Intel® Matrix Storage Manager / Wireless Switch Utility / Wireless Connection Disable Utility*22 / Bluetooth Stack for model that supports TPM. The size of "Trusted Platform Module (TPM)". *11 This slot is allotted depending on the port type. *10 Only for Windows by the user. Troubleshooting Useful Information Getting Started Specifications Model No. For information on TPM, click [start] - [Run] and input "c:\util\drivers...
... Touch Pad Utility / PC Information Viewer / PC Information Popup / Display Rotation Tool / Hotkey Settings / Power Saving Utility / FAN Control Utility / Intel® Matrix Storage Manager / Wireless Switch Utility / Wireless Connection Disable Utility*22 / Bluetooth Stack for model that supports TPM. The size of "Trusted Platform Module (TPM)". *11 This slot is allotted depending on the port type. *10 Only for Windows by the user. Troubleshooting Useful Information Getting Started Specifications Model No. For information on TPM, click [start] - [Run] and input "c:\util\drivers...


