

Brochure
Page 2
... large-capacity 5,400 mAh battery comes included, to give you around 6 hours of speedy and intuitive camera work. *picture simulated 1 Triple Manual Rings Focus, zoom and iris rings are also designed for both multifunctional versatility and easy operation. This provides an operation to -recognize layout. ... the lens barrel. Slide-Retractable LCD Touch Panel This versatile LCD serves as a high-definition, 1,152,000 dot monitor and menu-setting touch panel. Featuring a Wide-Angle/High-Powered Zoom Lens and High-Sensitivity BSI Type 3MOS Sensors, This Stylish AVCCAM Includes the Smooth...
... large-capacity 5,400 mAh battery comes included, to give you around 6 hours of speedy and intuitive camera work. *picture simulated 1 Triple Manual Rings Focus, zoom and iris rings are also designed for both multifunctional versatility and easy operation. This provides an operation to -recognize layout. ... the lens barrel. Slide-Retractable LCD Touch Panel This versatile LCD serves as a high-definition, 1,152,000 dot monitor and menu-setting touch panel. Featuring a Wide-Angle/High-Powered Zoom Lens and High-Sensitivity BSI Type 3MOS Sensors, This Stylish AVCCAM Includes the Smooth...

Brochure
Page 4
... MOS image sensors have an effective pixel count of speedy, intuitive camera work. 5-Axis Hybrid Hand-Shake Correction The AG-AC90 features 5-Axis Hybrid OIS (Optical Image Stabilizer/hand-shake correction). Panasonic's unique Nano Surface Coating minimizes ghosts and flaring, and the high-speed F1.5 (at a glance. • ... range up to a maximum speed of 1/2000 sec. • White Balance: Allows selection of ATW/3200K/5600K and two manual settings (A/B). • iA Mode: The AG-AC90 detects the shooting conditions and automatically switches to enable the kind of 2,680,000 pixels.
... MOS image sensors have an effective pixel count of speedy, intuitive camera work. 5-Axis Hybrid Hand-Shake Correction The AG-AC90 features 5-Axis Hybrid OIS (Optical Image Stabilizer/hand-shake correction). Panasonic's unique Nano Surface Coating minimizes ghosts and flaring, and the high-speed F1.5 (at a glance. • ... range up to a maximum speed of 1/2000 sec. • White Balance: Allows selection of ATW/3200K/5600K and two manual settings (A/B). • iA Mode: The AG-AC90 detects the shooting conditions and automatically switches to enable the kind of 2,680,000 pixels.
Operating Instructions Basic
Page 11
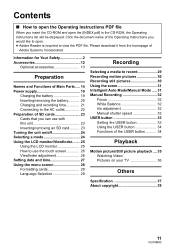
...a mode 24 Using the LCD monitor/Viewfinder........25 Using the LCD monitor 25 How to use the touch screen 26 Viewfinder adjustment 26 Setting date and time 27 Using the menu screen 28 Formatting cards 29 Language Selection 29 Recording Selecting a media to record 29 Recording motion... pictures 30 Recording still pictures 30 Using the zoom 31 Intelligent Auto Mode/Manual Mode ..... 31 Manual Recording 32 Focus 32 White Balance 32 Iris adjustment 32 Manual shutter speed 33 USER button 33 Setting the USER button 33 Using the USER button 34 Functions of the USER button ...
...a mode 24 Using the LCD monitor/Viewfinder........25 Using the LCD monitor 25 How to use the touch screen 26 Viewfinder adjustment 26 Setting date and time 27 Using the menu screen 28 Formatting cards 29 Language Selection 29 Recording Selecting a media to record 29 Recording motion... pictures 30 Recording still pictures 30 Using the zoom 31 Intelligent Auto Mode/Manual Mode ..... 31 Manual Recording 32 Focus 32 White Balance 32 Iris adjustment 32 Manual shutter speed 33 USER button 33 Setting the USER button 33 Using the USER button 34 Functions of the USER button ...

Operating Instructions Basic
Page 31
...Z99.The value gets larger when zoomed in, and the value gets smaller when zoomed out. 99 is displayed in the Manual Mode. ≥ The modes appropriate for the condition are set just by rotating the ring. A side: Wide-angle recording (zoom out) B side: Close-up recording (zoom ...in the Intelligent Auto Mode. 31 VQT4M90 T W T W A B Zoom lever/Sub zoom lever T side: Close-up recording (zoom in) A Zoom ring Recording Intelligent Auto Mode/Manual Mode MANU ...
...Z99.The value gets larger when zoomed in, and the value gets smaller when zoomed out. 99 is displayed in the Manual Mode. ≥ The modes appropriate for the condition are set just by rotating the ring. A side: Wide-angle recording (zoom out) B side: Close-up recording (zoom ...in the Intelligent Auto Mode. 31 VQT4M90 T W T W A B Zoom lever/Sub zoom lever T side: Close-up recording (zoom in) A Zoom ring Recording Intelligent Auto Mode/Manual Mode MANU ...

Operating Instructions Basic
Page 33
... F USER6 button G USER7 button ≥ The USER button number and currently set other USER buttons, repeat steps 2-3. 4 Touch [EXIT] to complete the setting. 33 VQT4M90 Manual shutter speed Adjust the shutter speed when recording fast-moving subjects. ≥ Switch to Manual Mode. (l 31) 1 Touch the LCD monitor to display the operation icons and...
... F USER6 button G USER7 button ≥ The USER button number and currently set other USER buttons, repeat steps 2-3. 4 Touch [EXIT] to complete the setting. 33 VQT4M90 Manual shutter speed Adjust the shutter speed when recording fast-moving subjects. ≥ Switch to Manual Mode. (l 31) 1 Touch the LCD monitor to display the operation icons and...
Operating Instructions Advanced
Page 3
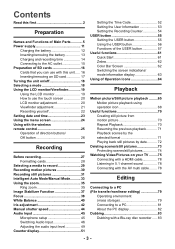
... 19 Using the LCD monitor 19 How to use the touch screen 20 LCD monitor adjustment 20 Viewfinder adjustment 21 Recording yourself 22 Setting date and time 23 Using the menu screen 24 Using with the wireless remote control 25 Operation of direction buttons/ OK button 26...Balance 40 Iris adjustment 42 Manual shutter speed 44 Audio Input 45 Microphone setup 45 Switching Audio Input 46 Adjusting the audio input level 49 Counter display 51 Setting the Time Code 52 Setting the User Information 53 Setting the Recording Counter 54 USER button 55 Setting the USER button 55 Using...
... 19 Using the LCD monitor 19 How to use the touch screen 20 LCD monitor adjustment 20 Viewfinder adjustment 21 Recording yourself 22 Setting date and time 23 Using the menu screen 24 Using with the wireless remote control 25 Operation of direction buttons/ OK button 26...Balance 40 Iris adjustment 42 Manual shutter speed 44 Audio Input 45 Microphone setup 45 Switching Audio Input 46 Adjusting the audio input level 49 Counter display 51 Setting the Time Code 52 Setting the User Information 53 Setting the Recording Counter 54 USER button 55 Setting the USER button 55 Using...

Operating Instructions Advanced
Page 33
... in the Intelligent Auto Mode. Recording Intelligent Auto Mode/Manual Mode MANU iA/MANU switch Slide the switch to change the Intelligent Auto Mode/Manual Mode. ≥ MNL is displayed in the Manual Mode. ≥ The following modes appropriate for the condition are set just by pointing the unit to what you want to...
... in the Intelligent Auto Mode. Recording Intelligent Auto Mode/Manual Mode MANU iA/MANU switch Slide the switch to change the Intelligent Auto Mode/Manual Mode. ≥ MNL is displayed in the Manual Mode. ≥ The following modes appropriate for the condition are set just by pointing the unit to what you want to...

Operating Instructions Advanced
Page 34
Record pictures in the following situations. If so, manually adjust these settings. (l 38, 40) Automatic White Balance The illustration shows the range over which Automatic White Balance functions. 1) The effective range of the subject etc.,...sunset 3 000K 6) 9) Candlelight If the Automatic White Balance is not functioning normally, adjust the White Balance manually. (l 40) 7) 2 000K 8) Auto Focus 9) The unit focuses automatically. ≥ Auto Focus does not work correctly in the Manual Focus Mode. (l 38) j Recording distant and close-up objects at the same time j Recording a ...
Record pictures in the following situations. If so, manually adjust these settings. (l 38, 40) Automatic White Balance The illustration shows the range over which Automatic White Balance functions. 1) The effective range of the subject etc.,...sunset 3 000K 6) 9) Candlelight If the Automatic White Balance is not functioning normally, adjust the White Balance manually. (l 40) 7) 2 000K 8) Auto Focus 9) The unit focuses automatically. ≥ Auto Focus does not work correctly in the Manual Focus Mode. (l 38) j Recording distant and close-up objects at the same time j Recording a ...

Operating Instructions Advanced
Page 38
... infinite when the FOCUS A/M/¶ button is pressed and held. ≥ To return to Auto Focus, either press the FOCUS A/M/¶ button or set to Intelligent Auto Mode by switching the iA/MANU switch. ≥ When the distance to the subject approaches within 1 m (3.3 feet) approx., the...182; button C Focus ring 1 Press the FOCUS A/M/¶ button to switch to Manual Focus. ≥ It will switch to MF from AF. 2 Adjust the focus by rotating the focus ring. ≥ The focus value can be set from MF00 (focus distance: approximately 3.5 cm (1.4 q)) to a non-displayed focus value. &#...
... infinite when the FOCUS A/M/¶ button is pressed and held. ≥ To return to Auto Focus, either press the FOCUS A/M/¶ button or set to Intelligent Auto Mode by switching the iA/MANU switch. ≥ When the distance to the subject approaches within 1 m (3.3 feet) approx., the...182; button C Focus ring 1 Press the FOCUS A/M/¶ button to switch to Manual Focus. ≥ It will switch to MF from AF. 2 Adjust the focus by rotating the focus ring. ≥ The focus value can be set from MF00 (focus distance: approximately 3.5 cm (1.4 q)) to a non-displayed focus value. &#...

Operating Instructions Advanced
Page 39
Utilizing the USER button When performing Manual Focus, Push AF can be used by setting the USER button. (l 55) ≥ Please refer to page 55 for details about setting the USER button. - 39 - ∫ Focus Assist When the FOCUS ASSIST button is pressed once more, the settings are canceled. ≥ The red display does not appear on the images actually recorded. ≥ The red display does not appear on TV. The in-focus area is displayed in red. ≥ When it is pressed, Focus Assist can be set.
Utilizing the USER button When performing Manual Focus, Push AF can be used by setting the USER button. (l 55) ≥ Please refer to page 55 for details about setting the USER button. - 39 - ∫ Focus Assist When the FOCUS ASSIST button is pressed once more, the settings are canceled. ≥ The red display does not appear on the images actually recorded. ≥ The red display does not appear on TV. The in-focus area is displayed in red. ≥ When it is pressed, Focus Assist can be set.

Operating Instructions Advanced
Page 40
... switching the iA/ MANU switch. ≥ ATW and ATW Lock can also be set. (l 41) * Only displayed when Manual Mode is in use. ≥ To return to auto setting, either set to ATW or set to Intelligent Auto Mode by pressing the W.B. It will automatically adjust in accordance to ... recording scenes can adjust the White Balance manually. button. If so, you can be set to the USER button. (l 55) - 40 - button W.B. Mode ATW ATW Lock P3.2k* P5.6k* Ach* Bch* Settings It will lock the setting for outdoors Setting in accordance with the recording condition. Recording...
... switching the iA/ MANU switch. ≥ ATW and ATW Lock can also be set. (l 41) * Only displayed when Manual Mode is in use. ≥ To return to auto setting, either set to ATW or set to Intelligent Auto Mode by pressing the W.B. It will automatically adjust in accordance to ... recording scenes can adjust the White Balance manually. button. If so, you can be set to the USER button. (l 55) - 40 - button W.B. Mode ATW ATW Lock P3.2k* P5.6k* Ach* Bch* Settings It will lock the setting for outdoors Setting in accordance with the recording condition. Recording...

Operating Instructions Advanced
Page 41
..., the Black Balance adjustment is touched, it will switch to complete the setting. - 41 - MENU : [CAMERA SETUP] # [COLOR TEMP A ch] or [COLOR TEMP B ch] 2 Touch / to adjust settings of the lens. 2 Press the W.B. ∫ To set the White Balance in accordance to Manual Mode. (l 33) 1 Select the menu. Perform this after adjusting the White...
..., the Black Balance adjustment is touched, it will switch to complete the setting. - 41 - MENU : [CAMERA SETUP] # [COLOR TEMP A ch] or [COLOR TEMP B ch] 2 Touch / to adjust settings of the lens. 2 Press the W.B. ∫ To set the White Balance in accordance to Manual Mode. (l 33) 1 Select the menu. Perform this after adjusting the White...

Operating Instructions Advanced
Page 43
...will brighten the image on the screen to compensate the backlight. MENU : [CAMERA SETUP] # [AUTO IRIS LEVEL] 2 Touch / to adjust settings. 3 Touch [EXIT] to page 55 for spotlight. Utilizing the USER button It is convenient to use following functions of the USER button when it...) Effect Switches to automatic iris control to prevent getting dark when a backlight is set to Manual Iris. ≥ Please refer to complete the setting. This will allow to automatic iris control for details about setting the USER button. ∫ Adjusting brightness during the Auto Iris Mode ≥ Switch...
...will brighten the image on the screen to compensate the backlight. MENU : [CAMERA SETUP] # [AUTO IRIS LEVEL] 2 Touch / to adjust settings. 3 Touch [EXIT] to page 55 for spotlight. Utilizing the USER button It is convenient to use following functions of the USER button when it...) Effect Switches to automatic iris control to prevent getting dark when a backlight is set to Manual Iris. ≥ Please refer to complete the setting. This will allow to automatic iris control for details about setting the USER button. ∫ Adjusting brightness during the Auto Iris Mode ≥ Switch...

Operating Instructions Advanced
Page 44
... speed Adjust the shutter speed when recording fast-moving subjects. ≥ Switch to Manual Mode. (l 33) 1 Touch the LCD monitor to display the operation icons and touch SHTR . (l 64) 2 Touch / to adjust settings. ≥ When [AUTO] is touched, the shutter speed is shining very bright, or highly reflective. ≥ During normal playback... faster. ≥ You may appear on the screen. Shutter speed: 1/60 to 1/2000 ≥ It will be 1/30 to 1/2000 when [AUTO SLOW SHTR] is set to [ON]. (l 93) ≥ It will be 1/50 to 1/2000 (1/24 to 1/2000 when [AUTO SLOW SHTR] is...
... speed Adjust the shutter speed when recording fast-moving subjects. ≥ Switch to Manual Mode. (l 33) 1 Touch the LCD monitor to display the operation icons and touch SHTR . (l 64) 2 Touch / to adjust settings. ≥ When [AUTO] is touched, the shutter speed is shining very bright, or highly reflective. ≥ During normal playback... faster. ≥ You may appear on the screen. Shutter speed: 1/60 to 1/2000 ≥ It will be 1/30 to 1/2000 when [AUTO SLOW SHTR] is set to [ON]. (l 93) ≥ It will be 1/50 to 1/2000 (1/24 to 1/2000 when [AUTO SLOW SHTR] is...

Operating Instructions Advanced
Page 57
... ATW ATW Lock Digital Zoom Histogram Recording Check Last Scene Delete Menu Push AF It can be temporary changed to Auto Focus when it is set to Manual Focus. (l 38) Press and hold the USER button, or touch and hold the USER button icon in the recording screen. ≥ It will be... canceled when the button is released. ≥ The focus position set by the Push AF will return to standard Auto Iris Mode ( ) when it is canceled. (l 42...
... ATW ATW Lock Digital Zoom Histogram Recording Check Last Scene Delete Menu Push AF It can be temporary changed to Auto Focus when it is set to Manual Focus. (l 38) Press and hold the USER button, or touch and hold the USER button icon in the recording screen. ≥ It will be... canceled when the button is released. ≥ The focus position set by the Push AF will return to standard Auto Iris Mode ( ) when it is canceled. (l 42...

Operating Instructions Advanced
Page 62
..., by checking the luminance level of the object, when recording same object in %. Zebra 1 # Zebra 2* # Marker* # setting canceled * It is not displayed when the [ZEBRA DETECT 2]/[MARKER] is set to [OFF]. (l 96) Zebra display: Parts where white saturation (color saturation) is likely to record the color bar screen. ...- 62 - It will be displayed as 99% when it is over 99%. ≥ You can record an image with little white saturation if you manually adjust the...
..., by checking the luminance level of the object, when recording same object in %. Zebra 1 # Zebra 2* # Marker* # setting canceled * It is not displayed when the [ZEBRA DETECT 2]/[MARKER] is set to [OFF]. (l 96) Zebra display: Parts where white saturation (color saturation) is likely to record the color bar screen. ...- 62 - It will be displayed as 99% when it is over 99%. ≥ You can record an image with little white saturation if you manually adjust the...

Operating Instructions Advanced
Page 84
... for recording as a cinema with high dynamic range - 84 - Camera Setup ≥ Switch to manual mode. (l 33) MENU : [CAMERA SETUP] # desired setting [CUSTOMIZE SCENE] [SCENE1]/[SCENE2]/[SCENE3]/[SCENE4]/[SCENE5]/[SCENE6] Preferred camera setting information can be saved to each scene file. Menu Using the Menu Refer to page 24 for recording as a cinema...
... for recording as a cinema with high dynamic range - 84 - Camera Setup ≥ Switch to manual mode. (l 33) MENU : [CAMERA SETUP] # desired setting [CUSTOMIZE SCENE] [SCENE1]/[SCENE2]/[SCENE3]/[SCENE4]/[SCENE5]/[SCENE6] Preferred camera setting information can be saved to each scene file. Menu Using the Menu Refer to page 24 for recording as a cinema...

Operating Instructions Advanced
Page 91
...frame with an interval, and is recorded as a short time motion picture. If so, manually adjust these settings. (l 38, 40) [PRE-REC] It will be changed. ≥ [TC MODE] is set to [NDF] and [TCG] is set to recording screen. - 91 - j If you turn the unit off j If you... change the mode j After 3 hours have passed j Press the MENU button ≥ Video from approximately 3 seconds prior to manual mode. (l 33) [OFF]: Cancel the setting. [1 SECOND]/[10 SECONDS]/[30 SECONDS]/[1 MINUTE]/[2 MINUTES]: Change the recording interval. ≥ appears on the screen. ≥ Aim the unit...
...frame with an interval, and is recorded as a short time motion picture. If so, manually adjust these settings. (l 38, 40) [PRE-REC] It will be changed. ≥ [TC MODE] is set to [NDF] and [TCG] is set to recording screen. - 91 - j If you turn the unit off j If you... change the mode j After 3 hours have passed j Press the MENU button ≥ Video from approximately 3 seconds prior to manual mode. (l 33) [OFF]: Cancel the setting. [1 SECOND]/[10 SECONDS]/[30 SECONDS]/[1 MINUTE]/[2 MINUTES]: Change the recording interval. ≥ appears on the screen. ≥ Aim the unit...
Operating Instructions Advanced
Page 95
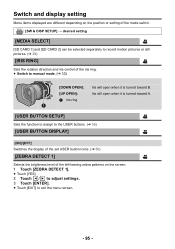
... 55) [USER BUTTON DISPLAY] [ON]/[OFF] Switches the display of the set USER button icons. (l 56) [ZEBRA DETECT 1] Selects the brightness level of the left-leaning zebra patterns on the position or setting of the iris ring. ≥ Switch to manual mode. (l 33) A B [DOWN OPEN]: [UP OPEN...]: 1 Iris ring Iris will open when it is turned toward B. Switch and display setting Menu items displayed are different depending on the ...
... 55) [USER BUTTON DISPLAY] [ON]/[OFF] Switches the display of the set USER button icons. (l 56) [ZEBRA DETECT 1] Selects the brightness level of the left-leaning zebra patterns on the position or setting of the iris ring. ≥ Switch to manual mode. (l 33) A B [DOWN OPEN]: [UP OPEN...]: 1 Iris ring Iris will open when it is turned toward B. Switch and display setting Menu items displayed are different depending on the ...

Operating Instructions Advanced
Page 105
... 51) PRE-REC PRE-REC (l 91) Interval recording (l 91) ¥/; (Red) Recording ; (Green) Recording pause //// Intelligent Auto Mode (l 33) MNL Manual Mode (l 33) Remaining battery power (l 14) / (White) Recording to card possible (motion picture) / (Green) Card is being recognized (motion picture) R ...5X Digital zoom (l 59) +3dB / +6dB / Bass setting (l 94) LOW CUT (AG-AC90PJ) NOV 15 2012 Date indication 15:30:00 Time indication (l 23) (AG-AC90P) 11 15 2012 15:30:00 Date indication Time indication (l 23) (AG-AC90PX) 2012 11 15 15:30:00 Date indication Time indication...
... 51) PRE-REC PRE-REC (l 91) Interval recording (l 91) ¥/; (Red) Recording ; (Green) Recording pause //// Intelligent Auto Mode (l 33) MNL Manual Mode (l 33) Remaining battery power (l 14) / (White) Recording to card possible (motion picture) / (Green) Card is being recognized (motion picture) R ...5X Digital zoom (l 59) +3dB / +6dB / Bass setting (l 94) LOW CUT (AG-AC90PJ) NOV 15 2012 Date indication 15:30:00 Time indication (l 23) (AG-AC90P) 11 15 2012 15:30:00 Date indication Time indication (l 23) (AG-AC90PX) 2012 11 15 15:30:00 Date indication Time indication...


