

User Manual
Page 1
......13 Connect to Video Sources...14 Powering On / Off the Projector 15 Powering On the Projector...15 Powering Off the Projector...16 Warning Indicator...16 Adjusting the Projected Image 17 Adjusting the Projector's Height...17 Adjusting the Zoom / Focus...18 User Controls...19...49 Troubleshooting...49 Image Problems...49 Intermission Problems...51 Projector Status Indication...52 Remote Control Problems...53 Audio Problems...53 Replacing the Lamp...54 Cleaning the Projector...55 Compatibility Modes...56 Ceiling Installation...59 Optoma Global Offices...60 Regulation & Safety notices...62 ...
......13 Connect to Video Sources...14 Powering On / Off the Projector 15 Powering On the Projector...15 Powering Off the Projector...16 Warning Indicator...16 Adjusting the Projected Image 17 Adjusting the Projector's Height...17 Adjusting the Zoom / Focus...18 User Controls...19...49 Troubleshooting...49 Image Problems...49 Intermission Problems...51 Projector Status Indication...52 Remote Control Problems...53 Audio Problems...53 Replacing the Lamp...54 Cleaning the Projector...55 Compatibility Modes...56 Ceiling Installation...59 Optoma Global Offices...60 Regulation & Safety notices...62 ...

User Manual
Page 2
... ventilation openings. Important Safety Instruction 1. Read these instructions - C. Clean only with the manufacturer's instructions : A. Servicing is required when the projector has been damaged in an enclosure, such as a bookcase or a cabinet that may be of sufficient magnitude to constitute a risk of electric..., or has been dropped. 2 WARNING: TO REDUCE THE RISK OF FIRE OR ELECTRIC SHOCK, DO NOT EXPOSE THE PROJECTOR TO RAIN OR MOISTURE. before using this projector near any heat sources, such as : r Power supply cord or plug is damaged. B. Install in the literature...
... ventilation openings. Important Safety Instruction 1. Read these instructions - C. Clean only with the manufacturer's instructions : A. Servicing is required when the projector has been damaged in an enclosure, such as a bookcase or a cabinet that may be of sufficient magnitude to constitute a risk of electric..., or has been dropped. 2 WARNING: TO REDUCE THE RISK OF FIRE OR ELECTRIC SHOCK, DO NOT EXPOSE THE PROJECTOR TO RAIN OR MOISTURE. before using this projector near any heat sources, such as : r Power supply cord or plug is damaged. B. Install in the literature...

User Manual
Page 3
Do not let objects or liquids enter the projector as they may expose you to an authorized service center near you. 8. Opening or removing covers may touch dangerous voltage points or short-out parts that could result in a fire or electric shock. 9. See projector enclosure for safety related markings. 10. The projector should not be referred to dangerous voltages or other hazards. Please call Optoma to service this projector yourself. Usage Notice Do not attempt to be adjusted or repaired by anyone except properly qualified service personnel. 3 English
Do not let objects or liquids enter the projector as they may expose you to an authorized service center near you. 8. Opening or removing covers may touch dangerous voltage points or short-out parts that could result in a fire or electric shock. 9. See projector enclosure for safety related markings. 10. The projector should not be referred to dangerous voltages or other hazards. Please call Optoma to service this projector yourself. Usage Notice Do not attempt to be adjusted or repaired by anyone except properly qualified service personnel. 3 English
User Manual
Page 4
... this user's guide. ▀■ Warning - When the lamp is approaching the end of the lamp itself. Do not look directly into the projector's lens when the lamp is equipped with a Class II laser that emits radiation. Use the "Lamp Reset" function from the on page 54. ... Warning - Please do not point the laser beam into anyone's eyes. When switching the projector off, please ensure the on the remote control and do not open or disassemble the projector as this projector to change the lamp when it shows warning ™™When the messages. Usage Notice Precautions...
... this user's guide. ▀■ Warning - When the lamp is approaching the end of the lamp itself. Do not look directly into the projector's lens when the lamp is equipped with a Class II laser that emits radiation. Use the "Lamp Reset" function from the on page 54. ... Warning - Please do not point the laser beam into anyone's eyes. When switching the projector off, please ensure the on the remote control and do not open or disassemble the projector as this projector to change the lamp when it shows warning ™™When the messages. Usage Notice Precautions...

User Manual
Page 6
...▀■ In order to minimize the lamp power needed, use room blinds to stare at all times. ▀■ Minimize standing facing into the projector's beam of sight from the screen to the audience; Usage Notice Eye Safety Warnings ▀■ Avoid staring directly into the beam. The best way... to enter the beam. ▀■ Ensure that , when presenters look at the audience, they are located out of the line of light at the projector lamp. English 6 Keep your back to the beam as much as possible. ▀■ Using a stick or laser pointer is used in a classroom, ...
...▀■ In order to minimize the lamp power needed, use room blinds to stare at all times. ▀■ Minimize standing facing into the projector's beam of sight from the screen to the audience; Usage Notice Eye Safety Warnings ▀■ Avoid staring directly into the beam. The best way... to enter the beam. ▀■ Ensure that , when presenters look at the audience, they are located out of the line of light at the projector lamp. English 6 Keep your back to the beam as much as possible. ▀■ Using a stick or laser pointer is used in a classroom, ...

User Manual
Page 7
Introduction Product Features This product is a single chip 0.55" XGA series and 0.65" WXGA series DLP® projector. Outstanding features include: u Texas Instruments Single chip DLP® Technology u Computer Compatibility: Apple Macintosh, iMac, and VESA Standards: UXGA, SXGA+, SXGA, WXGA, WUXGA, XGA, SVGA, ...
Introduction Product Features This product is a single chip 0.55" XGA series and 0.65" WXGA series DLP® projector. Outstanding features include: u Texas Instruments Single chip DLP® Technology u Computer Compatibility: Apple Macintosh, iMac, and VESA Standards: UXGA, SXGA+, SXGA, WXGA, WUXGA, XGA, SVGA, ...
User Manual
Page 8
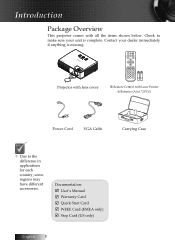
Introduction Package Overview This projector comes with Laser Pointer & Batteries (AAA *2 PCS) Power Cord VGA Cable Carrying Case ™™Due to make sure your dealer immediately if anything is .... Check to the difference in applications for each country, some regions may have different accessories. Re-Sync AV-M ute Pow er Keystone + Lam p Tem p ZoFoomcus Projector with lens cover IR Remote Control with all the items shown below. Enter M enu Pow er Source Keystone - Documentation: þ User's Manual þ Warranty Card...
Introduction Package Overview This projector comes with Laser Pointer & Batteries (AAA *2 PCS) Power Cord VGA Cable Carrying Case ™™Due to make sure your dealer immediately if anything is .... Check to the difference in applications for each country, some regions may have different accessories. Re-Sync AV-M ute Pow er Keystone + Lam p Tem p ZoFoomcus Projector with lens cover IR Remote Control with all the items shown below. Enter M enu Pow er Source Keystone - Documentation: þ User's Manual þ Warranty Card...

User Manual
Page 13
Power Cord 2. USB Cable 3. Audio-out (mini jack) 5. VGA Cable 7. HDMI Cable 13 English Video Cable 6. Installation Connecting the Projector Connect to Computer / Notebook 24 6 35 7 ™™Due to the difference in (mini jack) 4. Audio-in applications for each country, some regions may have different accessories. 1 1.
Power Cord 2. USB Cable 3. Audio-out (mini jack) 5. VGA Cable 7. HDMI Cable 13 English Video Cable 6. Installation Connecting the Projector Connect to Computer / Notebook 24 6 35 7 ™™Due to the difference in (mini jack) 4. Audio-in applications for each country, some regions may have different accessories. 1 1.
User Manual
Page 15
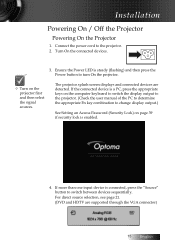
...LED is enabled. 4. If the connected device is a PC, press the appropriate keys on the computer keyboard to switch the display output to the projector. (Check the user manual of the PC to determine the appropriate Fn key combination to change display output.) See Setting an Access Password (Security ...Lock) on page 39 if security lock is steady (flashing) and then press the Power button to turn On the projector. ™™Turn on the projector first and then select the signal sources. For direct source selection, see page 21. (DVD and HDTV are detected. If more ...
...LED is enabled. 4. If the connected device is a PC, press the appropriate keys on the computer keyboard to switch the display output to the projector. (Check the user manual of the PC to determine the appropriate Fn key combination to change display output.) See Setting an Access Password (Security ...Lock) on page 39 if security lock is steady (flashing) and then press the Power button to turn On the projector. ™™Turn on the projector first and then select the signal sources. For direct source selection, see page 21. (DVD and HDTV are detected. If more ...
User Manual
Page 16
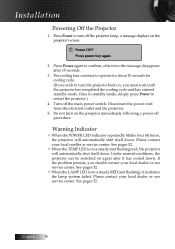
... local reseller or service center. See pages 52. Warning Indicator v When the POWER LED indicator repeatedly blinks four (4) times, the projector will automatically shut itself down . Press Power again to turn on again after 15 seconds. 3. See pages 52. English 16 Press... Power to confirm, otherwise the message disappears after it indicates the lamp system failed. Under normal conditions, the projector can be switched on the projector immediately following a power off the main power switch. See pages 52. Disconnect the power cord from the electrical ...
... local reseller or service center. See pages 52. Warning Indicator v When the POWER LED indicator repeatedly blinks four (4) times, the projector will automatically shut itself down . Press Power again to turn on again after 15 seconds. 3. See pages 52. English 16 Press... Power to confirm, otherwise the message disappears after it indicates the lamp system failed. Under normal conditions, the projector can be switched on the projector immediately following a power off the main power switch. See pages 52. Disconnect the power cord from the electrical ...
User Manual
Page 17
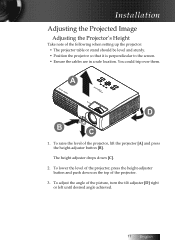
... tilt adjuster [D] right or left until desired angle achieved. 17 English The height adjuster drops down on the top of the projector. 3. To adjust the angle of the projector, lift the projector [A] and press the height-adjuster button [B]. Re-Sync AV-M ute Pow er Keystone + Lam p Tem p ZoFoomcus D ... button and push down [C]. 2. To lower the level of the following when setting up the projector: • The projector table or stand should be level and sturdy. • Position the projector so that it is perpendicular to the screen. • Ensure the cables are in a safe...
... tilt adjuster [D] right or left until desired angle achieved. 17 English The height adjuster drops down on the top of the projector. 3. To adjust the angle of the projector, lift the projector [A] and press the height-adjuster button [B]. Re-Sync AV-M ute Pow er Keystone + Lam p Tem p ZoFoomcus D ... button and push down [C]. 2. To lower the level of the following when setting up the projector: • The projector table or stand should be level and sturdy. • Position the projector so that it is perpendicular to the screen. • Ensure the cables are in a safe...

User Manual
Page 18
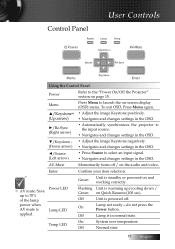
Pow er Pow er Lamp Tem p Keystone + AV-M ute Source Re-Sync M enu Keystone - They can be found on the remote control and on the projector only) to sharpen the projected image [A]. Use the Image-focus control (on the projector's control panel. B 3. Use the Image-zoom control (on the projector only) to correct image distortion. Use the keystone buttons to A resize the projected image and screen size [B]. 2. Installation Adjusting the Zoom / Focus 1. Enter English 18
Pow er Pow er Lamp Tem p Keystone + AV-M ute Source Re-Sync M enu Keystone - They can be found on the remote control and on the projector only) to sharpen the projected image [A]. Use the Image-focus control (on the projector's control panel. B 3. Use the Image-zoom control (on the projector only) to correct image distortion. Use the keystone buttons to A resize the projected image and screen size [B]. 2. Installation Adjusting the Zoom / Focus 1. Enter English 18
User Manual
Page 19
... Normal state 19 English AV-Mute Momentarily turns off . Green Unit is applied. Menu Press Menu to the "Power On/Off the Projector" section on page 15. Off Lamp is powered off / on Quick Resume (100 sec). On Lamp not ready-do not press the... the image Keystone positively. (Up arrow) • Navigates and changes settings in the OSD. ►/Re-Sync (Right arrow) • Automatically synchronizes the projector to the input source. • Navigates and changes settings in the OSD. ▼/Keystone - • Adjust the image Keystone negatively. (Down arrow) &#...
... Normal state 19 English AV-Mute Momentarily turns off . Green Unit is applied. Menu Press Menu to the "Power On/Off the Projector" section on page 15. Off Lamp is powered off / on Quick Resume (100 sec). On Lamp not ready-do not press the... the image Keystone positively. (Up arrow) • Navigates and changes settings in the OSD. ►/Re-Sync (Right arrow) • Automatically synchronizes the projector to the input source. • Navigates and changes settings in the OSD. ▼/Keystone - • Adjust the image Keystone negatively. (Down arrow) &#...
User Manual
Page 20
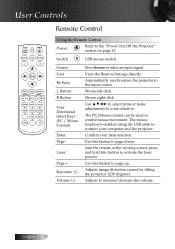
... Keystone +/- Use this button to connect your item selection. Use to select items or make adjustments to the "Power On/Off the Projector" section on page 15. User Controls Remote Control Using the Remote Control Power Refer to your selection. Mouse right click. English 20 View... the Remote Settings directly Automatically synchronizes the projector to control mouse movement. The PC/Mouse control can be used to the input source. Aim the remote at the viewing screen,...
... Keystone +/- Use this button to connect your item selection. Use to select items or make adjustments to the "Power On/Off the Projector" section on page 15. User Controls Remote Control Using the Remote Control Power Refer to your selection. Mouse right click. English 20 View... the Remote Settings directly Automatically synchronizes the projector to control mouse movement. The PC/Mouse control can be used to the input source. Aim the remote at the viewing screen,...

User Manual
Page 22
... Enter to confirm, and the screen will return to make image adjustments and change a variety of settings. User Controls On-screen Display Menus The Projector has multilingual On-screen Display menus that allow you to the main menu. 6. Select the next item to enter sub menu. 3. Main Menu Sub... Menu Setting English 22 Use ▲▼ keys to operate 1. The projector will automatically save the new settings. How to select the desired item and adjust the settings by ◄► key. 4. To exit, press Menu...
... Enter to confirm, and the screen will return to make image adjustments and change a variety of settings. User Controls On-screen Display Menus The Projector has multilingual On-screen Display menus that allow you to the main menu. 6. Select the next item to enter sub menu. 3. Main Menu Sub... Menu Setting English 22 Use ▲▼ keys to operate 1. The projector will automatically save the new settings. How to select the desired item and adjust the settings by ◄► key. 4. To exit, press Menu...

User Manual
Page 32
...;▼ to select horizontally or vertically. 4Press ◄ ► to the screen. V Keystone Press ◄ or ► to compensate for vertical image distortion when the projector is positioned at an angle to adjust settings. Edge Marsk the image to magnify an image on the edge of the image. 4Press ► to...
...;▼ to select horizontally or vertically. 4Press ◄ ► to the screen. V Keystone Press ◄ or ► to compensate for vertical image distortion when the projector is positioned at an angle to adjust settings. Edge Marsk the image to magnify an image on the edge of the image. 4Press ► to...
User Manual
Page 34
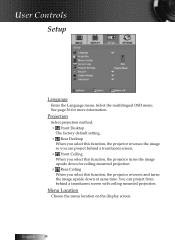
... OSD menu. Projection Select projection method: 4 Front Desktop The factory default setting. 4 Rear Desktop When you select this function, the projector reverses the image so you can project from behind a translucent screen. 4 Front Ceiling When you select this function, the... projector reverses and turns the image upside down at same time. English 34 See page 36 for ceiling-mounted projection. 4 Rear Ceiling When you select this function, the projector turns the image upside down for more information. Menu Location...
... OSD menu. Projection Select projection method: 4 Front Desktop The factory default setting. 4 Rear Desktop When you select this function, the projector reverses the image so you can project from behind a translucent screen. 4 Front Ceiling When you select this function, the... projector reverses and turns the image upside down at same time. English 34 See page 36 for ceiling-mounted projection. 4 Rear Ceiling When you select this function, the projector turns the image upside down for more information. Menu Location...
User Manual
Page 35
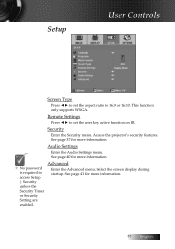
... unless the Security Timer or Security Setting are enabled. See page 40 for more information. 35 English See page 41 for more information. Access the projector's security features. Advanced Enter the Advanced menu. Setup User Controls Screen Type Press ◄► to set the user key active function on IR. Remote...
... unless the Security Timer or Security Setting are enabled. See page 40 for more information. 35 English See page 41 for more information. Access the projector's security features. Advanced Enter the Advanced menu. Setup User Controls Screen Type Press ◄► to set the user key active function on IR. Remote...
User Manual
Page 37
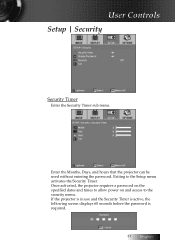
Once activated, the projector requires a password on the specified dates and times to allow power on and access to the Setup menu activates the Security Timer. If the projector is in use and the Security Timer is active, the following screen displays 60 seconds before the password is required. 37 English User Controls Setup | Security Security Timer Enter the Security Timer sub menu. Exiting to the security menu. Enter the Months, Days, and hours that the projector can be used without entering the password.
Once activated, the projector requires a password on the specified dates and times to allow power on and access to the Setup menu activates the Security Timer. If the projector is in use and the Security Timer is active, the following screen displays 60 seconds before the password is required. 37 English User Controls Setup | Security Security Timer Enter the Security Timer sub menu. Exiting to the security menu. Enter the Months, Days, and hours that the projector can be used without entering the password.

User Manual
Page 38
Select Change Password from the Security submenu. Select Yes. 3. Enter the new password twice for the projector. 1. The Confirm Change Password dialog box displays. 2. English 38 A second password screen displays. ™™If the new passwords do not match, the password screen redisplays. 4. Change Password Use this submenu to change the security password for verification. User Controls Setup | Security ™™If the incorrect password is entered three times, the device auto shutdowns after 10 seconds. Enter the default password .
Select Change Password from the Security submenu. Select Yes. 3. Enter the new password twice for the projector. 1. The Confirm Change Password dialog box displays. 2. English 38 A second password screen displays. ™™If the new passwords do not match, the password screen redisplays. 4. Change Password Use this submenu to change the security password for verification. User Controls Setup | Security ™™If the incorrect password is entered three times, the device auto shutdowns after 10 seconds. Enter the default password .


