

User Manual
Page 1
...Remote Controller 9 Installation Connecting the Projector 10 Powering On/Off the Projector 11 Powering On the Projector 11 Powering Off the Projector 12 Adjusting the Projected Image 13 Adjusting the Projector Height 13 Adjusting the Projector Zoom/Focus 14 Adjusting Projection ...Image Size 14 User Controls Panel Control & Remote Control 15 On-Screen Display Menus 18 How to Operate 18 Menu Tree ...19 Picture ...20 Image ...22 System ...24 Display ...25 Appendices Troubleshooting 27 Changing the Lamp...
...Remote Controller 9 Installation Connecting the Projector 10 Powering On/Off the Projector 11 Powering On the Projector 11 Powering Off the Projector 12 Adjusting the Projected Image 13 Adjusting the Projector Height 13 Adjusting the Projector Zoom/Focus 14 Adjusting Projection ...Image Size 14 User Controls Panel Control & Remote Control 15 On-Screen Display Menus 18 How to Operate 18 Menu Tree ...19 Picture ...20 Image ...22 System ...24 Display ...25 Appendices Troubleshooting 27 Changing the Lamp...
User Manual
Page 2
...popping sound. Warning- Warning- To replace the lamp, follow all warnings, precautions and maintenance as this happens, the projector will detect the life of its life, it shows warning messages. Warning- After changing a new lamp, please reset the lamp life from OSD menu. This product will ...not turn back on the projector first and then the signal sources. Warning- Warning- Before switching off the product, please...
...popping sound. Warning- Warning- To replace the lamp, follow all warnings, precautions and maintenance as this happens, the projector will detect the life of its life, it shows warning messages. Warning- After changing a new lamp, please reset the lamp life from OSD menu. This product will ...not turn back on the projector first and then the signal sources. Warning- Warning- Before switching off the product, please...
User Manual
Page 11
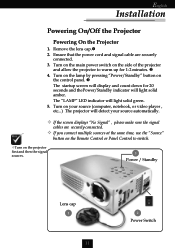
Remove the lens cap.Œ 2. The “LAMP” LED indicator will detect your source (computer, notebook, or video player , etc...) The projector will light solid green. 5. Ensure that the power cord and signal cable are securely connected. v If you connect multiple sources at...source automatically. vTurn on the control panel. Ž The startup screen will display and count down for 1-2 minutes. 4. Turn on the lamp by pressing “Power/Standby” button on the projector first and then the signal sources. 3 Power / Standby Lens cap 1 11 2 Power Switch
Remove the lens cap.Œ 2. The “LAMP” LED indicator will detect your source (computer, notebook, or video player , etc...) The projector will light solid green. 5. Ensure that the power cord and signal cable are securely connected. v If you connect multiple sources at...source automatically. vTurn on the control panel. Ž The startup screen will display and count down for 1-2 minutes. 4. Turn on the lamp by pressing “Power/Standby” button on the projector first and then the signal sources. 3 Power / Standby Lens cap 1 11 2 Power Switch
User Manual
Page 12
.... You will see a message “Fan Fail” on the on the projector, you want to turn off the lamp?” on the on -screen display. The projector will see a message “Power off the projector lamp. 2. Press the “Power/Standby” button again to turn on -screen... message “Over Temperature” on the on -screen display. v When the “LAMP” indicator flashes green for about 30 seconds. Under normal conditions, the projector can turn on the projector immediately following a power off the main power switch on again for about 10 seconds, you should...
.... You will see a message “Fan Fail” on the on the projector, you want to turn off the lamp?” on the on -screen display. The projector will see a message “Power off the projector lamp. 2. Press the “Power/Standby” button again to turn on -screen... message “Over Temperature” on the on -screen display. v When the “LAMP” indicator flashes green for about 30 seconds. Under normal conditions, the projector can turn on the projector immediately following a power off the main power switch on again for about 10 seconds, you should...
User Manual
Page 24
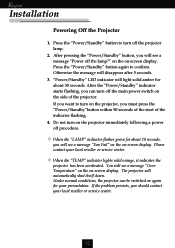
... displayed. Choose “On” to select your prefered language. Bulb 4 Lamp Hour : Displays the cumulative lamp operating time. 4 Lamp Reminding : Choose this feature to hide warning message when the changing lamp message is available. 24 The message will search other signals when current input signal... is lost signal”, after “Source” button is pressed. Auto Image When select “On”, the projector will show or to display ...
... displayed. Choose “On” to select your prefered language. Bulb 4 Lamp Hour : Displays the cumulative lamp operating time. 4 Lamp Reminding : Choose this feature to hide warning message when the changing lamp message is available. 24 The message will search other signals when current input signal... is lost signal”, after “Source” button is pressed. Auto Image When select “On”, the projector will show or to display ...
User Manual
Page 27
... or Panel Control. 4 If you use a PC: If the resolution of connectors are experiencing trouble with the projector, refer to reset the resolution. For Windows 3.x: 1. If the projector is still not projecting the whole image, you will also need to the following . Refer to change the monitor... Ensure the pins of your local reseller or service center. Please refer to the “Changing the lamp” section. 4 Make sure you are not crooked or broken. 4 Check if the projection lamp has been securely installed. English Appendices Troubleshooting If you have removed the lens cap and the...
... or Panel Control. 4 If you use a PC: If the resolution of connectors are experiencing trouble with the projector, refer to reset the resolution. For Windows 3.x: 1. If the projector is still not projecting the whole image, you will also need to the following . Refer to change the monitor... Ensure the pins of your local reseller or service center. Please refer to the “Changing the lamp” section. 4 Make sure you are not crooked or broken. 4 Check if the projection lamp has been securely installed. English Appendices Troubleshooting If you have removed the lens cap and the...
User Manual
Page 29
...147;Display” to full screen with 4:3 default setting. To replace the lamp, follow the procedures in the “Changing the Lamp”. 29 Problem : The screen is outstretched when displaying 16:9 DVD. The projector itself will automatically detect 16:9 DVD and adjust the aspect ratio by referring...need to adjust the aspect ratio by digitization to adjust the projection. Problem : Lamp burns out or makes a popping sound 4 When the lamp reaches its end of focus 4 Adjust the Focus Ring on the projector lens. 4 Make sure the projection screen is between the required distance 3.74ft.(1....
...147;Display” to full screen with 4:3 default setting. To replace the lamp, follow the procedures in the “Changing the Lamp”. 29 Problem : The screen is outstretched when displaying 16:9 DVD. The projector itself will automatically detect 16:9 DVD and adjust the aspect ratio by referring...need to adjust the aspect ratio by digitization to adjust the projection. Problem : Lamp burns out or makes a popping sound 4 When the lamp reaches its end of focus 4 Adjust the Focus Ring on the projector lens. 4 Make sure the projection screen is between the required distance 3.74ft.(1....

User Manual
Page 30
The bulb may fail soon ! Remove the cover. 7. Lamp Changing Procedure: 1. Allow the projector to cool down at least 30 minutes before changing lamp! 2 4 1 3 Warning : To reduce the risk of personal injury, do not drop the lamp module or touch the lamp bulb. Use screwdriver to the projector by pressing the Power/ Standby button. 2. It will...
The bulb may fail soon ! Remove the cover. 7. Lamp Changing Procedure: 1. Allow the projector to cool down at least 30 minutes before changing lamp! 2 4 1 3 Warning : To reduce the risk of personal injury, do not drop the lamp module or touch the lamp bulb. Use screwdriver to the projector by pressing the Power/ Standby button. 2. It will...


