
User Manual
Page 1
... Features 4 Package Overview 5 Product Overview 6 Main Unit ...6 Control Panel 7 Connection Ports 8 Wireless Remote Control 9 Installation Connecting the Projector 10 Powering On/Off the Projector 11 Powering On the Projector 11 Powering Off the Projector 12 Adjusting the Projected Image 13 Adjusting the Projector's Height 13 Adjusting the Projector's Zoom/Focus 14 User Controls Control Panel & Remote Control 15 Onscreen Display Menus 18 How to Operate 18 Menu Tree ...19 Picture ...20 Image ...22 System ...24 Display ...25 Appendices Troubleshooting 26 Replacing the Lamp 29 1
... Features 4 Package Overview 5 Product Overview 6 Main Unit ...6 Control Panel 7 Connection Ports 8 Wireless Remote Control 9 Installation Connecting the Projector 10 Powering On/Off the Projector 11 Powering On the Projector 11 Powering Off the Projector 12 Adjusting the Projected Image 13 Adjusting the Projector's Height 13 Adjusting the Projector's Zoom/Focus 14 User Controls Control Panel & Remote Control 15 Onscreen Display Menus 18 How to Operate 18 Menu Tree ...19 Picture ...20 Image ...22 System ...24 Display ...25 Appendices Troubleshooting 26 Replacing the Lamp 29 1

User Manual
Page 2
... "Replacing the Lamp." This product self-detects the life cycle of its life, it displays warning messages. Warning- Warning- Turn on until the lamp module has been replaced. English Usage Notice Precautions Follow all warnings, precautions, and maintenance procedures as recommended in this product to rain or moisture. After installing a new lamp, reset the lamp life using the onscreen menu. To prevent the risk of fire or electric shock, do not open...
... "Replacing the Lamp." This product self-detects the life cycle of its life, it displays warning messages. Warning- Warning- Turn on until the lamp module has been replaced. English Usage Notice Precautions Follow all warnings, precautions, and maintenance procedures as recommended in this product to rain or moisture. After installing a new lamp, reset the lamp life using the onscreen menu. To prevent the risk of fire or electric shock, do not open...
User Manual
Page 4
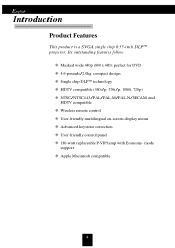
Its outstanding features follow: Masked wide 480p (800 x 480); perfect for DVD 4.6-pounds/2.0kg compact design Single chip DLPTM technology HDTV compatible (480i/p, 576i/p, 1080i, 720p) NTSC/NTSC4.43/PAL/PAL-M/PAL-N/SECAM, and HDTV compatible Wireless remote control User-friendly multilingual on-screen display menu Advanced keystone correction User-friendly control panel 180-watt replaceable P-VIP lamp with Economy- mode support Apple Macintosh compatible 4 English Introduction Product Features This product is a SVGA single chip 0.55-inch DLPTM projector.
Its outstanding features follow: Masked wide 480p (800 x 480); perfect for DVD 4.6-pounds/2.0kg compact design Single chip DLPTM technology HDTV compatible (480i/p, 576i/p, 1080i, 720p) NTSC/NTSC4.43/PAL/PAL-M/PAL-N/SECAM, and HDTV compatible Wireless remote control User-friendly multilingual on-screen display menu Advanced keystone correction User-friendly control panel 180-watt replaceable P-VIP lamp with Economy- mode support Apple Macintosh compatible 4 English Introduction Product Features This product is a SVGA single chip 0.55-inch DLPTM projector.

User Manual
Page 5
Check to the difference in applications for YPbPr Wireless Remote Controller S-Video Cable Composite Video Cable Power Cord Battery x 2 User's Manual/ Warranty Card Carrying Case Due to make sure your unit is complete, contact your dealer immediately. Projector Unit D-15 to RCA Adapter for each country, some regions may have different accessories. Lens Cap SCART RGB Connector (For European Use Only) 5 English Introduction Package Overview This projector comes with all the items shown below.
Check to the difference in applications for YPbPr Wireless Remote Controller S-Video Cable Composite Video Cable Power Cord Battery x 2 User's Manual/ Warranty Card Carrying Case Due to make sure your unit is complete, contact your dealer immediately. Projector Unit D-15 to RCA Adapter for each country, some regions may have different accessories. Lens Cap SCART RGB Connector (For European Use Only) 5 English Introduction Package Overview This projector comes with all the items shown below.
User Manual
Page 11
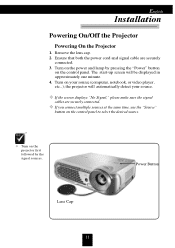
... source. Power Button Lens Cap 11 If you connect multiple sources at the same time, use the "Source" button on the control panel. the projector will be displayed in approximately one minute. 4. If the screen displays "No Signal," please make sure the signal cables are securely connected. 3. The start-up screen will automatically detect your source (computer, notebook, or video player , etc...); Turn on the power and lamp by the signal sources. Remove the lens cap. 2. Ensure that both the power cord and signal cable...
... source. Power Button Lens Cap 11 If you connect multiple sources at the same time, use the "Source" button on the control panel. the projector will be displayed in approximately one minute. 4. If the screen displays "No Signal," please make sure the signal cables are securely connected. 3. The start-up screen will automatically detect your source (computer, notebook, or video player , etc...); Turn on the power and lamp by the signal sources. Remove the lens cap. 2. Ensure that both the power cord and signal cable...
User Manual
Page 12
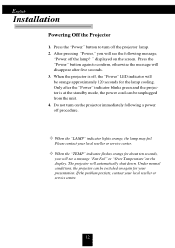
... "Power," you will see a message "Fan Fail" or "Over Temperature"on the projector immediately following message, "Power off , the "Power" LED indicator will see the following a power off the projector lamp. 2. When the "LAMP" indicator lights orange, the lamp may fail. When the projector is at the standby mode, the power cord can be switched on the screen. Do not turn off procedure. English Installation Powering Off the Projector 1. When the "TEMP" indicator flashes orange for the lamp cooling. The projector will disappear after the "Power" indicator blinks green...
... "Power," you will see a message "Fan Fail" or "Over Temperature"on the projector immediately following message, "Power off , the "Power" LED indicator will see the following a power off the projector lamp. 2. When the "LAMP" indicator lights orange, the lamp may fail. When the projector is at the standby mode, the power cord can be switched on the screen. Do not turn off procedure. English Installation Powering Off the Projector 1. When the "TEMP" indicator flashes orange for the lamp cooling. The projector will disappear after the "Power" indicator blinks green...
User Manual
Page 13
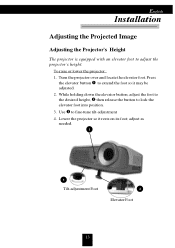
...; Press the elevator button to lock the elevator foot into position. 3. Use to adjust the projector's height. English Installation Adjusting the Projected Image Adjusting the Projector's Height The projector is equipped with an elevator foot to fine-tune tilt-adjustment 4. adjust as needed. 1 3 Tilt-adjustment Foot 2 Elevator Foot 13 To raise or lower the projector : 1. Turn the projector over and locate the elevator foot. Lower the projector so it may...
...; Press the elevator button to lock the elevator foot into position. 3. Use to adjust the projector's height. English Installation Adjusting the Projected Image Adjusting the Projector's Height The projector is equipped with an elevator foot to fine-tune tilt-adjustment 4. adjust as needed. 1 3 Tilt-adjustment Foot 2 Elevator Foot 13 To raise or lower the projector : 1. Turn the projector over and locate the elevator foot. Lower the projector so it may...

User Manual
Page 15
.... Re-Sync 4 Automatically synchronizes the projector with remote control and control panel. Freeze 4 "Freeze" pauses the screen image, press "Freeze" again to restore the displayed image. Control Panel Remote Control Using the Remote Control Power 4 "Power" turns on page 11~ 12 for more details. Hide 4 "Hide" immediately turns the screen black. English User Controls Control Panel & Remote Control There are two ways for you to the "Powering On/Off the Projector" section on the projector's lamp. Refer to control the functions: with the input source...
.... Re-Sync 4 Automatically synchronizes the projector with remote control and control panel. Freeze 4 "Freeze" pauses the screen image, press "Freeze" again to restore the displayed image. Control Panel Remote Control Using the Remote Control Power 4 "Power" turns on page 11~ 12 for more details. Hide 4 "Hide" immediately turns the screen black. English User Controls Control Panel & Remote Control There are two ways for you to the "Powering On/Off the Projector" section on the projector's lamp. Refer to control the functions: with the input source...
User Manual
Page 16
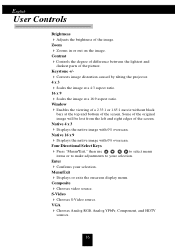
... onscreen display menu. S-Video 4 Chooses S-Video source. English User Controls Brightness 4 Adjusts the brightness of the screen. Some of the original image will be lost from the left and right edges of the image. Native 16 x 9 4 Displays the native image with 0% overscan. Enter 4 Confirms your selection. VGA 4 Chooses Analog RGB, Analog YPbPr, Component, and HDTV sources. 16 Keystone +/- 4 Corrects image distortion caused by tilting the projector. 4 x 3 4 Scales the image...
... onscreen display menu. S-Video 4 Chooses S-Video source. English User Controls Brightness 4 Adjusts the brightness of the screen. Some of the original image will be lost from the left and right edges of the image. Native 16 x 9 4 Displays the native image with 0% overscan. Enter 4 Confirms your selection. VGA 4 Chooses Analog RGB, Analog YPbPr, Component, and HDTV sources. 16 Keystone +/- 4 Corrects image distortion caused by tilting the projector. 4 x 3 4 Scales the image...
User Manual
Page 17
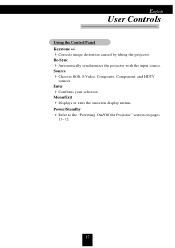
Source 4 Chooses RGB, S-Video, Composite, Component, and HDTV sources. Menu/Exit 4 Displays or exits the onscreen display menus. Power/Standby 4 Refer to the "Powering On/Off the Projector" section on pages 11~ 12. 17 Enter 4 Confirms your selection. English User Controls Using the Control Panel Keystone +/4 Corrects image distortion caused by tilting the projector. Re-Sync 4 Automatically synchronizes the projector with the input source.
Source 4 Chooses RGB, S-Video, Composite, Component, and HDTV sources. Menu/Exit 4 Displays or exits the onscreen display menus. Power/Standby 4 Refer to the "Powering On/Off the Projector" section on pages 11~ 12. 17 Enter 4 Confirms your selection. English User Controls Using the Control Panel Keystone +/4 Corrects image distortion caused by tilting the projector. Re-Sync 4 Automatically synchronizes the projector with the input source.
User Manual
Page 18
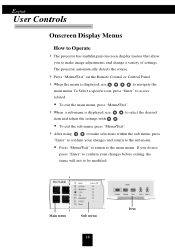
... Display Menus How to Operate 4 The projector has multilingual onscreen display menus that allow you do not press "Enter" to confirm your changes and return to the sub menu. Press "Menu/Exit" to return to access related. To Select a specific icon, press "Enter" to the main menu. The projector automatically detects the source. 4 Press "Menu/Exit" on the Remote Control or Control Panel. 4 When the menu is displayed, use...
... Display Menus How to Operate 4 The projector has multilingual onscreen display menus that allow you do not press "Enter" to confirm your changes and return to the sub menu. Press "Menu/Exit" to return to access related. To Select a specific icon, press "Enter" to the main menu. The projector automatically detects the source. 4 Press "Menu/Exit" on the Remote Control or Control Panel. 4 When the menu is displayed, use...
User Manual
Page 19
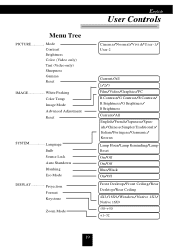
Menu Tree PICTURE Mode Contrast Brightness Color (Video only) Tint (Video only) Sharpness Gamma Reset IMAGE White Peaking Color Temp Image Mode Advanced Adjustment Reset SYSTEM Language Bulb Source Lock Auto Shutdown Blanking Eco Mode DISPLAY Projection Format Keystone Zoom Mode English User Controls Cinema/Normal/Vivid/User-1/ User-2 Current/All 1/2/3 Film/Video/Graphics/PC R Contrast/G Contrast/B Contrast/ R Brightness/G Brightness/ B Brightness Current/All English/French/Japanese/Spanish/Chinese(Simple)(Traditional)/ Italian/Portugese/Germanic/ Korean Lamp Hour/Lamp Reminding/Lamp ...
Menu Tree PICTURE Mode Contrast Brightness Color (Video only) Tint (Video only) Sharpness Gamma Reset IMAGE White Peaking Color Temp Image Mode Advanced Adjustment Reset SYSTEM Language Bulb Source Lock Auto Shutdown Blanking Eco Mode DISPLAY Projection Format Keystone Zoom Mode English User Controls Cinema/Normal/Vivid/User-1/ User-2 Current/All 1/2/3 Film/Video/Graphics/PC R Contrast/G Contrast/B Contrast/ R Brightness/G Brightness/ B Brightness Current/All English/French/Japanese/Spanish/Chinese(Simple)(Traditional)/ Italian/Portugese/Germanic/ Korean Lamp Hour/Lamp Reminding/Lamp ...
User Manual
Page 20
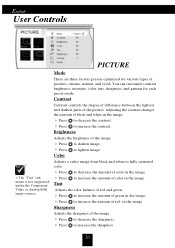
... English User Controls The "Tint" sub menu is not supported under the Component Video or Analog RGB input sources. Adjusting the contrast changes the amount of color in the image. 4 Press to decrease the contrast. 4 Press to increase the contrast. to decrease the sharpness. You can customize contrast, brightness, intensity, color, tint, sharpness, and gamma for various types of the picture. Contrast Contrast controls...
... English User Controls The "Tint" sub menu is not supported under the Component Video or Analog RGB input sources. Adjusting the contrast changes the amount of color in the image. 4 Press to decrease the contrast. 4 Press to increase the contrast. to decrease the sharpness. You can customize contrast, brightness, intensity, color, tint, sharpness, and gamma for various types of the picture. Contrast Contrast controls...
User Manual
Page 22
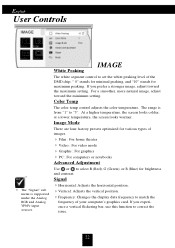
... computers or notebooks Advanced Adjustment Use or to select R (Red), G (Green), or B (Blue) for maximum peaking. If you experience a vertical flickering bar, use this function to match the frequency of your computer's graphics card. English User Controls The "Signal" sub menu is from "1" to set the white peaking level of the DMD chip. For a smoother, more natural image, adjust toward the maximum setting. At a higher temperature, the screen looks colder;
... computers or notebooks Advanced Adjustment Use or to select R (Red), G (Green), or B (Blue) for maximum peaking. If you experience a vertical flickering bar, use this function to match the frequency of your computer's graphics card. English User Controls The "Signal" sub menu is from "1" to set the white peaking level of the DMD chip. For a smoother, more natural image, adjust toward the maximum setting. At a higher temperature, the screen looks colder;
User Manual
Page 24
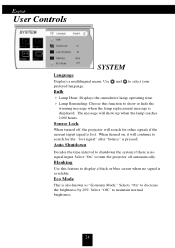
... projector will search for the "lost . Use and to show up when the lamp reaches 2,000 hours. Auto Shutdown Decides the time interval to search for other signals if the current input signal is lost signal" after "Source" is no signal is available. English User Controls SYSTEM Language Displays a multilingual menu. When turned on, it will show or hide the warning message when the lamp replacement message is also known as "Economy Mode...
... projector will search for the "lost . Use and to show up when the lamp reaches 2,000 hours. Auto Shutdown Decides the time interval to search for other signals if the current input signal is lost signal" after "Source" is no signal is available. English User Controls SYSTEM Language Displays a multilingual menu. When turned on, it will show or hide the warning message when the lamp replacement message is also known as "Economy Mode...
User Manual
Page 25
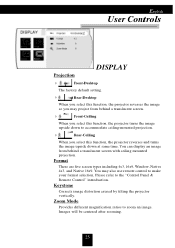
... to accommodate ceiling-mounted projection. 4 Rear-Ceiling When you may also use remote control to make your format selection. Zoom Mode Provides different magnification ratios to the "Control Panel & Remote Control" introduction. You can display an image from behind a translucent screen with ceiling mounted projection. English User Controls Projection DISPLAY 4 Front-Desktop The factory default setting. 4 Rear-Desktop When you select this function, the projector reverses the image so you select this function, the projector turns the image upside down at same time.
... to accommodate ceiling-mounted projection. 4 Rear-Ceiling When you may also use remote control to make your format selection. Zoom Mode Provides different magnification ratios to the "Control Panel & Remote Control" introduction. You can display an image from behind a translucent screen with ceiling mounted projection. English User Controls Projection DISPLAY 4 Front-Desktop The factory default setting. 4 Rear-Desktop When you select this function, the projector reverses the image so you select this function, the projector turns the image upside down at same time.
User Manual
Page 26
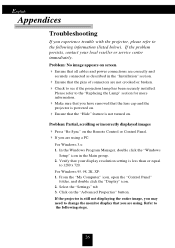
... the projection lamp has been securely installed. Problem: Partial, scrolling or incorrectly displayed images 4 Press "Re-Sync" on the Remote Control or Control Panel. 4 If you are using a PC: For Windows 3.x: 1. Verify that you have removed that the lens cap and the projector is powered on . Please refer to the "Replacing the Lamp" section for more information. 4 Make sure that you are using . From the "My Computer" icon, open the "Control Panel" folder...
... the projection lamp has been securely installed. Problem: Partial, scrolling or incorrectly displayed images 4 Press "Re-Sync" on the Remote Control or Control Panel. 4 If you are using a PC: For Windows 3.x: 1. Verify that you have removed that the lens cap and the projector is powered on . Please refer to the "Replacing the Lamp" section for more information. 4 Make sure that you are using . From the "My Computer" icon, open the "Control Panel" folder...
User Manual
Page 27
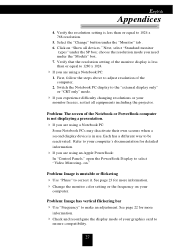
... "Video Mirroring- Each has a different way to make an adjustment. Next, select "Standard monitor types" under the "Monitor" tab . 6. on." Problem: The screen of the computer. 2. choose the resolution mode you are using an Apple PowerBook: In "Control Panels," open the PowerBook Display to correct it. See page 22 for detailed information. 4 If you need under the "Models" box. 7. Select the "Change" button under...
... "Video Mirroring- Each has a different way to make an adjustment. Next, select "Standard monitor types" under the "Monitor" tab . 6. on." Problem: The screen of the computer. 2. choose the resolution mode you are using an Apple PowerBook: In "Control Panels," open the PowerBook Display to correct it. See page 22 for detailed information. 4 If you need under the "Models" box. 7. Select the "Change" button under...
User Manual
Page 28
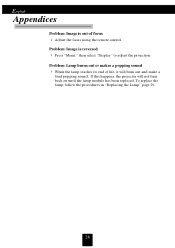
English Appendices Problem: Image is reversed. 4 Press "Menu," then select "Display" to adjust the projection. If this happens, the projector will burn out and make a loud popping sound. Problem: Image is out of life, it will not turn back on until the lamp module has been replaced. Problem: Lamp burns out or makes a popping sound 4 When the lamp reaches its end of focus 4 Adjust the focus using the remote control. To replace the lamp, follow the procedures in "Replacing the Lamp" page 29. 28
English Appendices Problem: Image is reversed. 4 Press "Menu," then select "Display" to adjust the projection. If this happens, the projector will burn out and make a loud popping sound. Problem: Image is out of life, it will not turn back on until the lamp module has been replaced. Problem: Lamp burns out or makes a popping sound 4 When the lamp reaches its end of focus 4 Adjust the focus using the remote control. To replace the lamp, follow the procedures in "Replacing the Lamp" page 29. 28
User Manual
Page 29
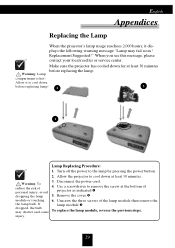
... power cord. 4. Allow it displays the following warning message "Lamp may shatter and cause injury. Turn off the power to the lamp by pressing the power button. 2. Remove the cover. 6. Unscrew the three screws of projector as indicated. 5. Make sure the projector has cooled down for at least 30 minutes. 3. Replacement Suggested !" If dropped, the bulb may fail soon ! Allow the projector to cool down at least 30 minutes before replacing lamp! 2 3 1 Warning...
... power cord. 4. Allow it displays the following warning message "Lamp may shatter and cause injury. Turn off the power to the lamp by pressing the power button. 2. Remove the cover. 6. Unscrew the three screws of projector as indicated. 5. Make sure the projector has cooled down for at least 30 minutes. 3. Replacement Suggested !" If dropped, the bulb may fail soon ! Allow the projector to cool down at least 30 minutes before replacing lamp! 2 3 1 Warning...


