

Optoma_GT750_Datasheet
Page 1
... 3 Standard Accessories Lamp: TBD Remote: TBD Mount: TBD Case: TBD www.optoma.com © Copyright 2011 Optoma Technology, Inc. Two HDMI, VGA, S-video, Composite, Stereo RCA Audio-in, Stereo Audio-out & RS-232 ...Optoma's GT750. Designed for 3D viewing Features DLP® Link™ 120Hz 3D-capable display technology, or RF 3D technology options Bright at any time. Gaming Projector Pre-Launch Datasheet - GT750 - GT750 The Ultimate Gaming Projector Unlock the full experience locked in 20 Languages I/O Connectors Two HDMI, VGA-In, S-video, Composite Video...
... 3 Standard Accessories Lamp: TBD Remote: TBD Mount: TBD Case: TBD www.optoma.com © Copyright 2011 Optoma Technology, Inc. Two HDMI, VGA, S-video, Composite, Stereo RCA Audio-in, Stereo Audio-out & RS-232 ...Optoma's GT750. Designed for 3D viewing Features DLP® Link™ 120Hz 3D-capable display technology, or RF 3D technology options Bright at any time. Gaming Projector Pre-Launch Datasheet - GT750 - GT750 The Ultimate Gaming Projector Unlock the full experience locked in 20 Languages I/O Connectors Two HDMI, VGA-In, S-video, Composite Video...
User Guide
Page 1
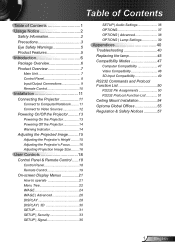
... the Projector 11 Connect to Computer/Notebook......... 11 Connect to Video Sources 12 Powering On/Off the Projector..........13 Powering On the Projector 13 Powering off the projector 14... Warning Indicator 14 Adjusting the Projected Image..........15 Adjusting the Projector's Height ........ 15 Adjusting the Projector...40 Replacing the lamp 45 Compatibility Modes 47 Computer Compatibility 47 Video Compatibility 48 3D input Compatibility 49 RS232 Commands and Protocol ...
... the Projector 11 Connect to Computer/Notebook......... 11 Connect to Video Sources 12 Powering On/Off the Projector..........13 Powering On the Projector 13 Powering off the projector 14... Warning Indicator 14 Adjusting the Projected Image..........15 Adjusting the Projector's Height ........ 15 Adjusting the Projector...40 Replacing the lamp 45 Compatibility Modes 47 Computer Compatibility 47 Video Compatibility 48 3D input Compatibility 49 RS232 Commands and Protocol ...

User Guide
Page 11
Installation Connecting the Projector Connect to Computer/Notebook 2 34 5 6 Due to the difference in applications for each country, some regions may have different accessories. (*) Optional accessory 1 VGA / YPbPr HDMI 1 HDMI 2 S-VIDEO 3D SYNC VIDEO AUDIO-OUT Out (5V) RS-232 AUDIO-IN-L AUDIO-IN-R R E62405SP 1...Power Cord 2 DVI/HDMI Cable 3...VGA Cable 4 RS232 Cable 5 Audio Input Cable 6 Emitter cable 11 English
Installation Connecting the Projector Connect to Computer/Notebook 2 34 5 6 Due to the difference in applications for each country, some regions may have different accessories. (*) Optional accessory 1 VGA / YPbPr HDMI 1 HDMI 2 S-VIDEO 3D SYNC VIDEO AUDIO-OUT Out (5V) RS-232 AUDIO-IN-L AUDIO-IN-R R E62405SP 1...Power Cord 2 DVI/HDMI Cable 3...VGA Cable 4 RS232 Cable 5 Audio Input Cable 6 Emitter cable 11 English
User Guide
Page 13
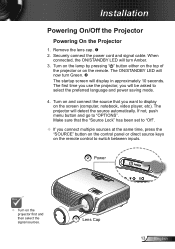
.... When connected, the ON/STANDBY LED will turn Green. The startup screen will now turn Amber. 3. The first time you use the projector, you connect multiple sources at the same time, press the "SOURCE" button on the control panel or direct source keys on the remote control to...select the signal sources. 1 Lens Cap 13 English Turn on the lamp by pressing " " button either on the top of the projector or on the screen (computer, notebook, video player, etc). Turn on and connect the source that the "Source Lock" has been set to "OPTIONS". Installation Powering On/Off the...
.... When connected, the ON/STANDBY LED will turn Green. The startup screen will now turn Amber. 3. The first time you use the projector, you connect multiple sources at the same time, press the "SOURCE" button on the control panel or direct source keys on the remote control to...select the signal sources. 1 Lens Cap 13 English Turn on the lamp by pressing " " button either on the top of the projector or on the screen (computer, notebook, video player, etc). Turn on and connect the source that the "Source Lock" has been set to "OPTIONS". Installation Powering On/Off the...
User Guide
Page 18
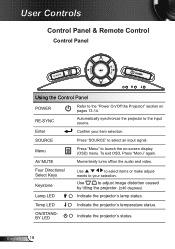
...Directional Select Keys Keystone Lamp LED Use to adjust image distortion caused by tilting the projector. (±40 degrees) Indicate the projector's lamp status. Menu Press "Menu" to the "Power On/Off the Projector" section on pages 13-14. AV MUTE Momentarily turns off/on -screen display (...OSD) menu. Use to select items or make adjust- User Controls Control Panel & Remote Control Control Panel POWER Using the Control Panel POWER RE-SYNC Refer to launch the on the audio and video...
...Directional Select Keys Keystone Lamp LED Use to adjust image distortion caused by tilting the projector. (±40 degrees) Indicate the projector's lamp status. Menu Press "Menu" to the "Power On/Off the Projector" section on pages 13-14. AV MUTE Momentarily turns off/on -screen display (...OSD) menu. Use to select items or make adjust- User Controls Control Panel & Remote Control Control Panel POWER Using the Control Panel POWER RE-SYNC Refer to launch the on the audio and video...

User Guide
Page 20
... from HDMI 1 connector. Press "HDMI 2" to your item selection. Press "HDMI 1" to choose Composite video source. English 20 Source Re-sync Menu HDMI 1 HDMI 2 VGA S-Video Video Four Directional Select Keys Press "Source" to choose S-Video source. Automatically synchronizes the projector to choose source from VGA/SCART/YPbPr connector. Display or exit the on-screen...
... from HDMI 1 connector. Press "HDMI 2" to your item selection. Press "HDMI 1" to choose Composite video source. English 20 Source Re-sync Menu HDMI 1 HDMI 2 VGA S-Video Video Four Directional Select Keys Press "Source" to choose S-Video source. Automatically synchronizes the projector to choose source from VGA/SCART/YPbPr connector. Display or exit the on-screen...
User Guide
Page 23
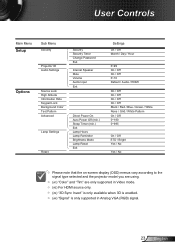
User Controls Main Menu Setup Options Sub Menu Security Projector ID Audio Settings Source Lock High Altitude Information Hide Keypad Lock Background Color Test Pattern Advanced Lamp Settings Reset Security Security Timer Change Password Exit ... Please note that the on-screen display (OSD) menus vary according to the signal type selected and the projector model you are using. (#1) "Color" and "Tint" are only supported in Video mode. (#2) For HDMI source only. (#3) "3D Sync Invert" is only available when 3D is enabled. (#4) "Signal...
User Controls Main Menu Setup Options Sub Menu Security Projector ID Audio Settings Source Lock High Altitude Information Hide Keypad Lock Background Color Test Pattern Advanced Lamp Settings Reset Security Security Timer Change Password Exit ... Please note that the on-screen display (OSD) menus vary according to the signal type selected and the projector model you are using. (#1) "Color" and "Tint" are only supported in Video mode. (#2) For HDMI source only. (#3) "3D Sync Invert" is only available when 3D is enabled. (#4) "Signal...
User Guide
Page 51
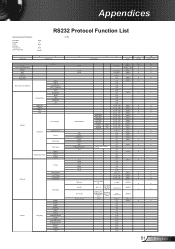
... n ~XX230 n ~XX400 n ~XX405 n ~XX231 n ~XX70 n Pass P P P P P P P P P P P P P P P P P P P P P P P P P P P P P CR carriage return Fail F F F F F F F F F F F F F F F F F F F F F F F F F F F F 51 English Appendices Optoma Data and HT Projectors Baud Rate Data Bits Parity Stop Bits Flow Control UART16550 FIFO 9600 8 None 1 None Disable RS232 Protocol Function List GT750 ~ Lead Code Power Power...Source Filters BrilliantColor™ Gamma Color Temp. Color Space HDMI 1 HDMI 2 VGA 1 S-Video Video Format Edge masking Zoom H Image Shift V Image Shift V Keystone 3D Settings SETUP Language ...
... n ~XX230 n ~XX400 n ~XX405 n ~XX231 n ~XX70 n Pass P P P P P P P P P P P P P P P P P P P P P P P P P P P P P CR carriage return Fail F F F F F F F F F F F F F F F F F F F F F F F F F F F F 51 English Appendices Optoma Data and HT Projectors Baud Rate Data Bits Parity Stop Bits Flow Control UART16550 FIFO 9600 8 None 1 None Disable RS232 Protocol Function List GT750 ~ Lead Code Power Power...Source Filters BrilliantColor™ Gamma Color Temp. Color Space HDMI 1 HDMI 2 VGA 1 S-Video Video Format Edge masking Zoom H Image Shift V Image Shift V Keystone 3D Settings SETUP Language ...
User Guide
Page 52
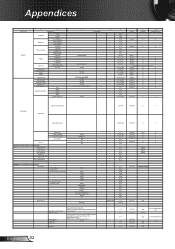
... n P F Sleep Timer (min) n=000-995 ~XX107 n P F Lamp Hour Lamp Reminder Brightness Mode Lamp Reset Reset Information from Projector Automatically when: Standby Mode Warming up Cooling Down Out of Range Lamp Fail Thermal Switch Error Fan Lock Over Temperature Lamp Hours Running Out READ... Source Commands d = Firmware Version e = Display mode Model Name On/Off Bright/STD Yes No Yes No Off\On None VGA1 S-Video Video HDMI1 HDMI2 None Presentation Bright Cinema User(1) ISF Day / Blackboard ISF Night / Classroom Game 3D Depends Input Source Commands Software Version Display ...
... n P F Sleep Timer (min) n=000-995 ~XX107 n P F Lamp Hour Lamp Reminder Brightness Mode Lamp Reset Reset Information from Projector Automatically when: Standby Mode Warming up Cooling Down Out of Range Lamp Fail Thermal Switch Error Fan Lock Over Temperature Lamp Hours Running Out READ... Source Commands d = Firmware Version e = Display mode Model Name On/Off Bright/STD Yes No Yes No Off\On None VGA1 S-Video Video HDMI1 HDMI2 None Presentation Bright Cinema User(1) ISF Day / Blackboard ISF Night / Classroom Game 3D Depends Input Source Commands Software Version Display ...


