

Optoma_GT750_Datasheet
Page 1
... experience locked in 20 Languages I/O Connectors Two HDMI, VGA-In, S-video, Composite Video, Stereo RCA Audio-In, Stereo Audio-out, VESA 3D port & RS-232 Projection Options Front or Rear Projection, Ceiling Mount, Table Top Weight 6.6 lbs (3.kg) Power Supply AC Input 100-240V, 50-60Hz, Auto-Switching Operating Temperature 41 to 104°F (5 to change at 3000 ANSI lumens with a high contrast ratio of Texas Instruments. Projecting images of their respective owners. All specifications...
... experience locked in 20 Languages I/O Connectors Two HDMI, VGA-In, S-video, Composite Video, Stereo RCA Audio-In, Stereo Audio-out, VESA 3D port & RS-232 Projection Options Front or Rear Projection, Ceiling Mount, Table Top Weight 6.6 lbs (3.kg) Power Supply AC Input 100-240V, 50-60Hz, Auto-Switching Operating Temperature 41 to 104°F (5 to change at 3000 ANSI lumens with a high contrast ratio of Texas Instruments. Projecting images of their respective owners. All specifications...
User Guide
Page 1
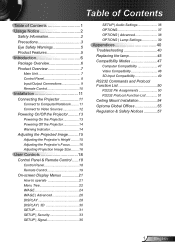
... the Projector 13 Powering off the projector 14 Warning Indicator 14 Adjusting the Projected Image..........15 Adjusting the Projector's Height ........ 15 Adjusting the Projector's Focus.......... 16 Adjusting Projection Image Size......... 16 User Controls 18 Control Panel & Remote Control.......18 Control Panel 18 Remote Control 19 On-screen Display Menus 21 How to operate 21 Menu Tree 22 IMAGE 24 IMAGE | Advanced 26 DISPLAY 28 DISPLAY | 3D 30 SETUP 31 SETUP | Security 33 SETUP | Signal 35 SETUP | Audio Settings 36 OPTIONS 37 OPTIONS | Advanced 38 OPTIONS | Lamp Settings...
... the Projector 13 Powering off the projector 14 Warning Indicator 14 Adjusting the Projected Image..........15 Adjusting the Projector's Height ........ 15 Adjusting the Projector's Focus.......... 16 Adjusting Projection Image Size......... 16 User Controls 18 Control Panel & Remote Control.......18 Control Panel 18 Remote Control 19 On-screen Display Menus 21 How to operate 21 Menu Tree 22 IMAGE 24 IMAGE | Advanced 26 DISPLAY 28 DISPLAY | 3D 30 SETUP 31 SETUP | Security 33 SETUP | Signal 35 SETUP | Audio Settings 36 OPTIONS 37 OPTIONS | Advanced 38 OPTIONS | Lamp Settings...
User Guide
Page 2
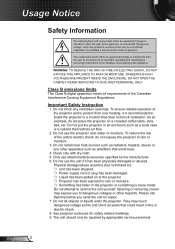
...openings. Do not install near water or moisture. Do not use attachments/accessories specified by appropriate service personnel. Please call Optoma before you to constitute a risk of important operating and maintenance (servicing) instructions in the literature accompanying the appliance. See projector enclosure for repair. 7. Usage Notice Safety Information The lightning flash with dry cloth. 5. WARNING...DANGEROUS HIGH VOLTAGES ARE PRESENT INSIDE THE ENCLOSURE. Only use the unit if it is intended to alert the user to ): Unit has been dropped. Power supply cord or ...
...openings. Do not install near water or moisture. Do not use attachments/accessories specified by appropriate service personnel. Please call Optoma before you to constitute a risk of important operating and maintenance (servicing) instructions in the literature accompanying the appliance. See projector enclosure for repair. 7. Usage Notice Safety Information The lightning flash with dry cloth. 5. WARNING...DANGEROUS HIGH VOLTAGES ARE PRESENT INSIDE THE ENCLOSURE. Only use the unit if it is intended to alert the user to ): Unit has been dropped. Power supply cord or ...

User Guide
Page 3
The bright light may cause electric shock. ▀■ Warning- Reset the "Lamp Reset" function from the on pages 44-45. ▀■ Warning- Follow instructions as recommended in operation. ▀■ Warning- Do not use lens cap when projector is in this user's guide. ▀■ Warning- Please contact your local reseller or service center to change the lamp when it shows warning messages. ▀■ Warning- Laser pointer can cause...
The bright light may cause electric shock. ▀■ Warning- Reset the "Lamp Reset" function from the on pages 44-45. ▀■ Warning- Follow instructions as recommended in operation. ▀■ Warning- Do not use lens cap when projector is in this user's guide. ▀■ Warning- Please contact your local reseller or service center to change the lamp when it shows warning messages. ▀■ Warning- Laser pointer can cause...
User Guide
Page 13
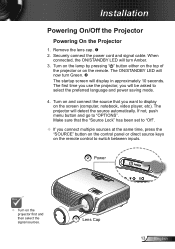
.../STANDBY LED will display in approximately 10 seconds. The first time you use the projector, you connect multiple sources at the same time, press the "SOURCE" button on the control panel or direct source keys on the remote control to select the preferred language and power saving mode. 4. If not, push menu button and go to display on the remote. Remove the lens cap. 2. When connected, the ON/STANDBY LED will turn Green. The startup screen will now turn...
.../STANDBY LED will display in approximately 10 seconds. The first time you use the projector, you connect multiple sources at the same time, press the "SOURCE" button on the control panel or direct source keys on the remote control to select the preferred language and power saving mode. 4. If not, push menu button and go to display on the remote. Remove the lens cap. 2. When connected, the ON/STANDBY LED will turn Green. The startup screen will now turn...
User Guide
Page 14
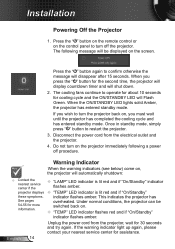
.... projector displays "TEMP" LED indicator is lit red and if "On/Standby" indicator flashes amber. Unplug the power cord from the electrical outlet and the projector. 4. When the ON/STANDBY LED lights solid Amber, the projector has entered standby mode. Disconnect the power cord from the projector, wait for the second time, the projector will display countdown timer and will Flash Green. overheated. Press the " " button on the remote control or on the control panel to turn the projector back on the projector immediately following message...
.... projector displays "TEMP" LED indicator is lit red and if "On/Standby" indicator flashes amber. Unplug the power cord from the electrical outlet and the projector. 4. When the ON/STANDBY LED lights solid Amber, the projector has entered standby mode. Disconnect the power cord from the projector, wait for the second time, the projector will display countdown timer and will Flash Green. overheated. Press the " " button on the remote control or on the control panel to turn the projector back on the projector immediately following message...
User Guide
Page 18
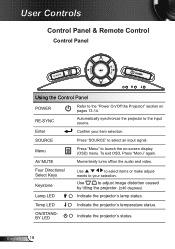
...-14. Use to launch the on-screen display (OSD) menu. ments to the input source. Temp LED Indicate the projector's temperature status. Automatically synchronize the projector to your item selection. ON/STANDBY LED Indicate the projector's status. SOURCE Press "SOURCE" to select items or make adjust- Four Directional Select Keys Keystone Lamp LED Use to select an input signal. Enter Confirm your selection. English 18 User Controls Control Panel & Remote Control Control Panel POWER Using the Control Panel POWER RE-SYNC Refer to the "Power On/Off...
...-14. Use to launch the on-screen display (OSD) menu. ments to the input source. Temp LED Indicate the projector's temperature status. Automatically synchronize the projector to your item selection. ON/STANDBY LED Indicate the projector's status. SOURCE Press "SOURCE" to select items or make adjust- Four Directional Select Keys Keystone Lamp LED Use to select an input signal. Enter Confirm your selection. English 18 User Controls Control Panel & Remote Control Control Panel POWER Using the Control Panel POWER RE-SYNC Refer to the "Power On/Off...
User Guide
Page 19
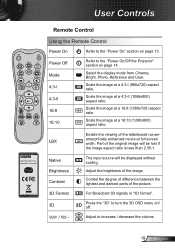
... Broadcast 3D signals in "3D format". User Controls Remote Control Using the Remote Control Power On Refer to increase / decrease the volume. 19 English LBX Enable the viewing of the picture. Native Brightness Contrast 3D Format 3D Vol+ / Vol - Adjust to the "Power On" section on page 13. Scale the image at a 16:10 (1280x800) aspect ratio. The input source will be displayed without scaling. Adjust the brightness...
... Broadcast 3D signals in "3D format". User Controls Remote Control Using the Remote Control Power On Refer to increase / decrease the volume. 19 English LBX Enable the viewing of the picture. Native Brightness Contrast 3D Format 3D Vol+ / Vol - Adjust to the "Power On" section on page 13. Scale the image at a 16:10 (1280x800) aspect ratio. The input source will be displayed without scaling. Adjust the brightness...
User Guide
Page 23
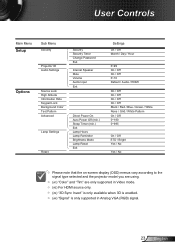
User Controls Main Menu Setup Options Sub Menu Security Projector ID Audio Settings Source Lock High Altitude Information Hide Keypad Lock Background Color Test Pattern Advanced Lamp Settings Reset Security Security Timer Change Password Exit Internal Speaker Mute Volume Audio Input Exit Direct Power On Auto Power Off (min.) Sleep Timer (min.) Exit Lamp Hours Lamp Reminder Brightness Mode Lamp Reset Exit Settings On / Off Month / Day / Hour ʳ 0~99 On / Off On / Off 0~10 Default / Audio / HDMI On / Off On / Off On / Off On / Off Black...
User Controls Main Menu Setup Options Sub Menu Security Projector ID Audio Settings Source Lock High Altitude Information Hide Keypad Lock Background Color Test Pattern Advanced Lamp Settings Reset Security Security Timer Change Password Exit Internal Speaker Mute Volume Audio Input Exit Direct Power On Auto Power Off (min.) Sleep Timer (min.) Exit Lamp Hours Lamp Reminder Brightness Mode Lamp Reset Exit Settings On / Off Month / Day / Hour ʳ 0~99 On / Off On / Off 0~10 Default / Audio / HDMI On / Off On / Off On / Off On / Off Black...
User Guide
Page 29
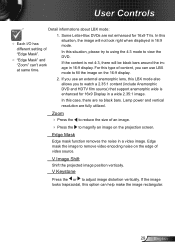
... In this option can 't work at same time. 1. Lamp power and vertical resolution are fully utilized. User Controls Detail informations about LBX mode: Each I/O has different setting of video source. Zoom Press the to reduce the size of content, you to remove video encoding noise on the 16:9 display. 2. Edge Mask Edge mask function removes the noise in a wide 2.35:1 image. V Image Shift Shift the projected image position vertically.
... In this option can 't work at same time. 1. Lamp power and vertical resolution are fully utilized. User Controls Detail informations about LBX mode: Each I/O has different setting of video source. Zoom Press the to reduce the size of content, you to remove video encoding noise on the 16:9 display. 2. Edge Mask Edge mask function removes the noise in a wide 2.35:1 image. V Image Shift Shift the projected image position vertically.
User Guide
Page 31
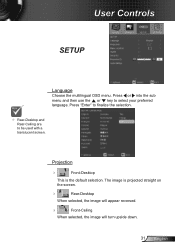
The image is the default selection. Press or into the sub menu and then use the or key to be used with a translucent screen. Projection Front-Desktop This is projected straight on the screen. Rear-Desktop When selected, the image will appear reversed. Front-Ceiling When selected, the image will turn upside down. 31 English Press "Enter" to finalize the selection. Rear-Desktop and Rear-Ceiling are to select your preferred language. User Controls SETUP Language Choose the multilingual OSD menu.
The image is the default selection. Press or into the sub menu and then use the or key to be used with a translucent screen. Projection Front-Desktop This is projected straight on the screen. Rear-Desktop When selected, the image will appear reversed. Front-Ceiling When selected, the image will turn upside down. 31 English Press "Enter" to finalize the selection. Rear-Desktop and Rear-Ceiling are to select your preferred language. User Controls SETUP Language Choose the multilingual OSD menu.

User Guide
Page 33
... new password (4 digits in length) using the number buttons on the projector without password verification. Security On: Choose "On" to use security verification when the turning on the remote to enter your new password and then press " " key to enter your password. Change Password: 1. Once this time has elapsed you will be 4 digits. 3. The password has to be requested to confirm your password again. User Controls SETUP | Security Pass-code default value...
... new password (4 digits in length) using the number buttons on the projector without password verification. Security On: Choose "On" to use security verification when the turning on the remote to enter your new password and then press " " key to enter your password. Change Password: 1. Once this time has elapsed you will be 4 digits. 3. The password has to be requested to confirm your password again. User Controls SETUP | Security Pass-code default value...
User Guide
Page 39
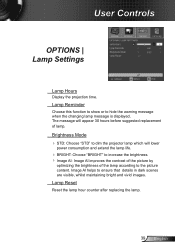
... the lamp life. BRIGHT: Choose "BRIGHT" to the picture content. Brightness Mode STD: Choose "STD" to dim the projector lamp which will appear 30 hours before suggested replacement of the lamp according to increase the brightness. Image AI: Image AI improves the contrast of the picture by optimizing the brightness of lamp. Lamp Reset Reset the lamp hour counter after replacing the lamp. 39 English User Controls OPTIONS | Lamp Settings Lamp Hours Display the projection time. Lamp Reminder...
... the lamp life. BRIGHT: Choose "BRIGHT" to the picture content. Brightness Mode STD: Choose "STD" to dim the projector lamp which will appear 30 hours before suggested replacement of the lamp according to increase the brightness. Image AI: Image AI improves the contrast of the picture by optimizing the brightness of lamp. Lamp Reset Reset the lamp hour counter after replacing the lamp. 39 English User Controls OPTIONS | Lamp Settings Lamp Hours Display the projection time. Lamp Reminder...

User Guide
Page 40
... to change the monitor display you are using a PC: For Windows 95, 98, 2000, XP, Windows 7: 1. If a problem persists, please contact your display resolution setting is lower than or equal to the "Replacing the lamp" section. Make sure you are not bent or broken. Check if the projection lamp has been securely installed. Select the "Settings" tab. 3. If the projector is not turned on the remote. ...
... to change the monitor display you are using a PC: For Windows 95, 98, 2000, XP, Windows 7: 1. If a problem persists, please contact your display resolution setting is lower than or equal to the "Replacing the lamp" section. Make sure you are not bent or broken. Check if the projection lamp has been securely installed. Select the "Settings" tab. 3. If the projector is not turned on the remote. ...

User Guide
Page 42
... small or too large Move the projector closer to or further from the OSD and adjust the projection direction. Appendices Image is out of focus Make sure the lens cap is removed. Adjust the Focus Ring on the remote control or projector panel, go to "DISPLAY Format" and try the different settings. Use of the screen. Press " / " on your DVD player...
... small or too large Move the projector closer to or further from the OSD and adjust the projection direction. Appendices Image is out of focus Make sure the lens cap is removed. Adjust the Focus Ring on the remote control or projector panel, go to "DISPLAY Format" and try the different settings. Use of the screen. Press " / " on your DVD player...
User Guide
Page 43
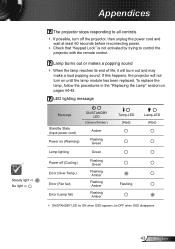
... been replaced. LED lighting message Message Standby State (Input power cord) Power on (Warming) ON/STANDBY LED (Green/Amber) Amber Flashing Green Temp-LED (Red) Lamp-LED (Red) Lamp lighting Green Power off the projector, then unplug the power cord and wait at least 60 seconds before reconnecting power. Check that "Keypad Lock" is not activated by trying to all controls If possible, turn on pages 44-45. Lamp burns out or makes a popping sound When the lamp reaches its end of life, it...
... been replaced. LED lighting message Message Standby State (Input power cord) Power on (Warming) ON/STANDBY LED (Green/Amber) Amber Flashing Green Temp-LED (Red) Lamp-LED (Red) Lamp lighting Green Power off the projector, then unplug the power cord and wait at least 60 seconds before reconnecting power. Check that "Keypad Lock" is not activated by trying to all controls If possible, turn on pages 44-45. Lamp burns out or makes a popping sound When the lamp reaches its end of life, it...
User Guide
Page 44
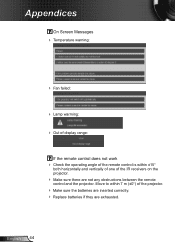
English 44 Appendices On Screen Messages Temperature warning: Fan failed: Lamp warming: Out of display range: If the remote control does not work Check the operating angle of the remote control is within 7 m (±0°) of the IR receivers on the projector. Make sure there are exhausted. Move to within ±15° both horizontally and vertically of one of...
English 44 Appendices On Screen Messages Temperature warning: Fan failed: Lamp warming: Out of display range: If the remote control does not work Check the operating angle of the remote control is within 7 m (±0°) of the IR receivers on the projector. Make sure there are exhausted. Move to within ±15° both horizontally and vertically of one of...
User Guide
Page 46
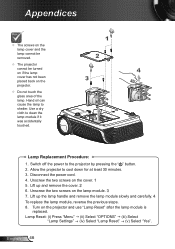
... of the lamp. Lamp Reset: (i) Press "Menu" (ii) Select "OPTIONS" (iii) Select "Lamp Settings" (iv) Select "Lamp Reset" (v) Select "Yes". Disconnect the power cord. 4. English 46 Appendices The screws on the lamp cover and the lamp cannot be removed. The projector cannot be turned on if the lamp cover has not been placed back on the projector and use "Lamp Reset" after the lamp module is replaced. Lift up...
... of the lamp. Lamp Reset: (i) Press "Menu" (ii) Select "OPTIONS" (iii) Select "Lamp Settings" (iv) Select "Lamp Reset" (v) Select "Yes". Disconnect the power cord. 4. English 46 Appendices The screws on the lamp cover and the lamp cannot be removed. The projector cannot be turned on if the lamp cover has not been placed back on the projector and use "Lamp Reset" after the lamp module is replaced. Lift up...
User Guide
Page 51
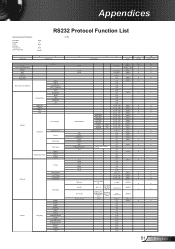
... HT Projectors Baud Rate Data Bits Parity Stop Bits Flow Control UART16550 FIFO 9600 8 None 1 None Disable RS232 Protocol Function List GT750 ~ Lead Code Power Power On with Password Re-sync AV Mute Mute Freeze Unfreeze Zoom Plus Zoom Minus Direct Source Commands X X Projector ID Function Display Mode Brightness Contrast Sharpness Tint Color HDMI 1 HDMI 2 VGA 1 VGA 1 SCART VGA 1 Component S-Video Video Presentation Cinema Bright User Blackboard Classroom 3D Game IMAGE DISPLAY Color Settings Advanced Input Source Filters BrilliantColor™ Gamma Color Temp.
... HT Projectors Baud Rate Data Bits Parity Stop Bits Flow Control UART16550 FIFO 9600 8 None 1 None Disable RS232 Protocol Function List GT750 ~ Lead Code Power Power On with Password Re-sync AV Mute Mute Freeze Unfreeze Zoom Plus Zoom Minus Direct Source Commands X X Projector ID Function Display Mode Brightness Contrast Sharpness Tint Color HDMI 1 HDMI 2 VGA 1 VGA 1 SCART VGA 1 Component S-Video Video Presentation Cinema Bright User Blackboard Classroom 3D Game IMAGE DISPLAY Color Settings Advanced Input Source Filters BrilliantColor™ Gamma Color Temp.
User Guide
Page 52
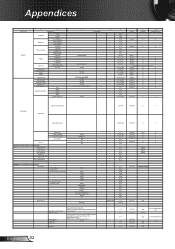
... Advanced Auto Power Off (min) n=0-180 ~XX106 n P F Sleep Timer (min) n=000-995 ~XX107 n P F Lamp Hour Lamp Reminder Brightness Mode Lamp Reset Reset Information from Projector Automatically when: Standby Mode Warming up Cooling Down Out of Range Lamp Fail Thermal Switch Error Fan Lock Over Temperature Lamp Hours Running Out READ/Return Information from projector Information a = Power State b = Lamp Hour c = Input Source Commands d = Firmware Version e = Display mode Model Name On/Off Bright/STD Yes No Yes No Off\On None VGA1 S-Video Video HDMI1 HDMI2...
... Advanced Auto Power Off (min) n=0-180 ~XX106 n P F Sleep Timer (min) n=000-995 ~XX107 n P F Lamp Hour Lamp Reminder Brightness Mode Lamp Reset Reset Information from Projector Automatically when: Standby Mode Warming up Cooling Down Out of Range Lamp Fail Thermal Switch Error Fan Lock Over Temperature Lamp Hours Running Out READ/Return Information from projector Information a = Power State b = Lamp Hour c = Input Source Commands d = Firmware Version e = Display mode Model Name On/Off Bright/STD Yes No Yes No Off\On None VGA1 S-Video Video HDMI1 HDMI2...


