
User's Manual
Page 1
... 11 Connect to Video Sources 12 Powering On/Off the Projector..........13 Powering On the Projector 13 Powering off the projector 14 Warning Indicator 14 Adjusting the Projected Image..........15 Adjusting the Projector's Height ........ 15 Adjusting the Projector's Focus.......... 16 Adjusting Projection Image Size......... 16 User Controls 18 Control Panel & Remote Control.......18 Control Panel 18 Remote Control 19 On-screen Display Menus 21 How to operate 21 Menu Tree 22 IMAGE 24 IMAGE | Advanced 26 DISPLAY 28 DISPLAY | 3D 30 SETUP 31 SETUP | Security 33 SETUP | Signal 35...
... 11 Connect to Video Sources 12 Powering On/Off the Projector..........13 Powering On the Projector 13 Powering off the projector 14 Warning Indicator 14 Adjusting the Projected Image..........15 Adjusting the Projector's Height ........ 15 Adjusting the Projector's Focus.......... 16 Adjusting Projection Image Size......... 16 User Controls 18 Control Panel & Remote Control.......18 Control Panel 18 Remote Control 19 On-screen Display Menus 21 How to operate 21 Menu Tree 22 IMAGE 24 IMAGE | Advanced 26 DISPLAY 28 DISPLAY | 3D 30 SETUP 31 SETUP | Security 33 SETUP | Signal 35...
User's Manual
Page 3
..., the message "Lamp Warning: Lamp life exceeded." To reduce the risk of the lamp itself. Reset the "Lamp Reset" function from the on until the ▀■ Warning- Laser pointer can cause permanent damage to cool down . jector will not turn back on -screen display "OPTIONS | Lamp Settings" menu after replacing the lamp module (refer to change the lamp when it shows warning messages. ▀■ Warning- Do not use lens cap when projector is on...
..., the message "Lamp Warning: Lamp life exceeded." To reduce the risk of the lamp itself. Reset the "Lamp Reset" function from the on until the ▀■ Warning- Laser pointer can cause permanent damage to cool down . jector will not turn back on -screen display "OPTIONS | Lamp Settings" menu after replacing the lamp module (refer to change the lamp when it shows warning messages. ▀■ Warning- Do not use lens cap when projector is on...
User's Manual
Page 13
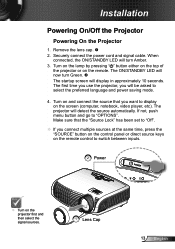
... connect the power cord and signal cable. The first time you use the projector, you will turn Green. The startup screen will detect the source automatically. If not, push menu button and go to display on the remote. When connected, the ON/STANDBY LED will be asked to switch between inputs. 2 Power POWER Turn on the projector first and then select the signal sources. 1 Lens Cap 13 English Turn on and connect the source that the "Source Lock" has been set to...
... connect the power cord and signal cable. The first time you use the projector, you will turn Green. The startup screen will detect the source automatically. If not, push menu button and go to display on the remote. When connected, the ON/STANDBY LED will be asked to switch between inputs. 2 Power POWER Turn on the projector first and then select the signal sources. 1 Lens Cap 13 English Turn on and connect the source that the "Source Lock" has been set to...
User's Manual
Page 14
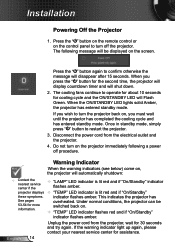
... to restart the projector. 3. The following a power off procedure. If the warning indicator light up again, please contact your nearest service center for more information. Once in standby mode, simply press " " button to operate for about 10 seconds for the second time, the projector will display countdown timer and will Flash Green. overheated. Installation Powering off the projector. Do not turn the projector back on the projector immediately following message will be switched back on...
... to restart the projector. 3. The following a power off procedure. If the warning indicator light up again, please contact your nearest service center for more information. Once in standby mode, simply press " " button to operate for about 10 seconds for the second time, the projector will display countdown timer and will Flash Green. overheated. Installation Powering off the projector. Do not turn the projector back on the projector immediately following message will be switched back on...
User's Manual
Page 18
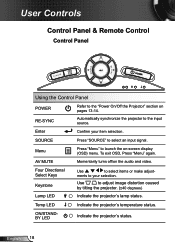
... synchronize the projector to select items or make adjust- Four Directional Select Keys Keystone Lamp LED Use to the input source. ments to your item selection. ON/STANDBY LED Indicate the projector's status. Menu Press "Menu" to the "Power On/Off the Projector" section on pages 13-14. Temp LED Indicate the projector's temperature status. Enter Confirm your selection. To exit OSD, Press "Menu" again. User Controls Control Panel & Remote Control Control Panel POWER Using the Control Panel POWER RE-SYNC Refer to launch the on-screen display (OSD) menu.
... synchronize the projector to select items or make adjust- Four Directional Select Keys Keystone Lamp LED Use to the input source. ments to your item selection. ON/STANDBY LED Indicate the projector's status. Menu Press "Menu" to the "Power On/Off the Projector" section on pages 13-14. Temp LED Indicate the projector's temperature status. Enter Confirm your selection. To exit OSD, Press "Menu" again. User Controls Control Panel & Remote Control Control Panel POWER Using the Control Panel POWER RE-SYNC Refer to launch the on-screen display (OSD) menu.
User's Manual
Page 22
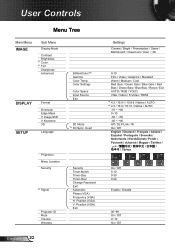
...On / Off 0-12 0-30 0-24 Enable / Disable 00~99 On / Off 0~10 On / Off Color Settings Color Space Input Source Exit 3D Mode #4 3D Sync. Invert Projection Menu Location Security #5 Signal Projector ID Mute Volume Wireless English 22 Security Timer-Month Timer-Day Timer-Hour Change Password Exit Automatic Phase (VGA) Frequency (VGA) H. User Controls Menu Tree Main Menu IMAGE Sub Menu Display Mode Contrast Brightness #1 Color #1 Tint Sharpness Advanced DISPLAY SETUP Format Overscan Edge Mask V Image Shift V Keystone 3D Language BrilliantColor™ Gamma Color Temp. Position (VGA) V.
...On / Off 0-12 0-30 0-24 Enable / Disable 00~99 On / Off 0~10 On / Off Color Settings Color Space Input Source Exit 3D Mode #4 3D Sync. Invert Projection Menu Location Security #5 Signal Projector ID Mute Volume Wireless English 22 Security Timer-Month Timer-Day Timer-Hour Change Password Exit Automatic Phase (VGA) Frequency (VGA) H. User Controls Menu Tree Main Menu IMAGE Sub Menu Display Mode Contrast Brightness #1 Color #1 Tint Sharpness Advanced DISPLAY SETUP Format Overscan Edge Mask V Image Shift V Keystone 3D Language BrilliantColor™ Gamma Color Temp. Position (VGA) V.
User's Manual
Page 23
User Controls Main Menu OPTIONS Sub Menu Source Lock High Altitude Information Hide Keypad Lock Background Color Test Pattern Advanced Lamp Settings Reset Direct Power On Auto Power Off (min) Sleep Timer (min) Exit Lamp Hours Lamp Reminder Brightness Mode Lamp Reset Exit Settings On / Off On / Off On / Off On / Off Black / Red / Blue / Green / White None / Grid / White Pattern On / Off 0-180 0-995 On / Off STD / BRIGHT Yes/No Please note that the on-screen display (OSD) menus...
User Controls Main Menu OPTIONS Sub Menu Source Lock High Altitude Information Hide Keypad Lock Background Color Test Pattern Advanced Lamp Settings Reset Direct Power On Auto Power Off (min) Sleep Timer (min) Exit Lamp Hours Lamp Reminder Brightness Mode Lamp Reset Exit Settings On / Off On / Off On / Off On / Off Black / Red / Blue / Green / White None / Grid / White Pattern On / Off 0-180 0-995 On / Off STD / BRIGHT Yes/No Please note that the on-screen display (OSD) menus...

User's Manual
Page 29
... 16×10 input sources, like widescreen laptops. Native: This format displays the original image without any scaling. AUTO: Automatically selects the appropriate display format. Overscan the image to above description not pixels resolution. Each I/O has different setting of native change to remove video encoding noise on the projection screen. If the image looks trapezoidal, this option can 't work at same time. Edge Mask ...
... 16×10 input sources, like widescreen laptops. Native: This format displays the original image without any scaling. AUTO: Automatically selects the appropriate display format. Overscan the image to above description not pixels resolution. Each I/O has different setting of native change to remove video encoding noise on the projection screen. If the image looks trapezoidal, this option can 't work at same time. Edge Mask ...

User's Manual
Page 33
... number of hours the projector can be requested to switch on the projector without password verification. Enter new password again and press " " to be 4 digits. 3. Change Password First time: 1. The password has to be able to enter your password. Change Password: 1. Security On: Choose "On" to use security verification when the turning on the projector. Off: Choose "Off" to confirm. 33 English User Controls SETUP | Security Pass-code default...
... number of hours the projector can be requested to switch on the projector without password verification. Enter new password again and press " " to be 4 digits. 3. Change Password First time: 1. The password has to be able to enter your password. Change Password: 1. Security On: Choose "On" to use security verification when the turning on the projector. Off: Choose "Off" to confirm. 33 English User Controls SETUP | Security Pass-code default...

User's Manual
Page 38
... message will appear 30 hours before suggested replacement of lamp. When ambient temperature is displayed. Brightness Mode STD: Choose "STD" to dim the projector lamp which will switch to hide the warning message when the changing lamp message is over 35°C in operating, the projector will lower power consumption and extend the lamp life. BRIGHT: Choose "BRIGHT" to increase the brightness. Lamp Reset Reset the lamp hour counter after replacing the lamp. User Controls OPTIONS | Lamp Settings Lamp Hours Display the projection time. Lamp...
... message will appear 30 hours before suggested replacement of lamp. When ambient temperature is displayed. Brightness Mode STD: Choose "STD" to dim the projector lamp which will switch to hide the warning message when the changing lamp message is over 35°C in operating, the projector will lower power consumption and extend the lamp life. BRIGHT: Choose "BRIGHT" to increase the brightness. Lamp Reset Reset the lamp hour counter after replacing the lamp. User Controls OPTIONS | Lamp Settings Lamp Hours Display the projection time. Lamp...
User's Manual
Page 39
...-screen Ensure all the cables and power connections are correctly and securely connected as described in the "Installation" section. Ensure all the pins of connectors are using . Open the "My Computer" icon, the "Control Panel" folder, and then double click on the "Advanced Properties" button. If the projector is still not projecting the whole image, you will also need to change the monitor display...
...-screen Ensure all the cables and power connections are correctly and securely connected as described in the "Installation" section. Ensure all the pins of connectors are using . Open the "My Computer" icon, the "Control Panel" folder, and then double click on the "Advanced Properties" button. If the projector is still not projecting the whole image, you will also need to change the monitor display...
User's Manual
Page 41
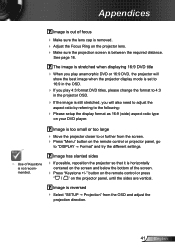
... still stretched, you will also need to adjust the aspect ratio by referring to "DISPLAY Format" and try the different settings. Use of Keystone is not recommended. Image is reversed Select "SETUP Projection" from the screen. Press "Menu" button on the remote control or projector panel, go to the following: Please setup the display format as 16:9 (wide) aspect ratio type...
... still stretched, you will also need to adjust the aspect ratio by referring to "DISPLAY Format" and try the different settings. Use of Keystone is not recommended. Image is reversed Select "SETUP Projection" from the screen. Press "Menu" button on the remote control or projector panel, go to the following: Please setup the display format as 16:9 (wide) aspect ratio type...
User's Manual
Page 42
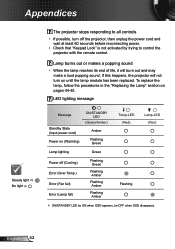
.../STANDBY LED (Green/Amber) Amber Flashing Green Temp-LED (Red) Lamp-LED (Red) Lamp lighting Green Power off the projector, then unplug the power cord and wait at least 60 seconds before reconnecting power. Check that "Keypad Lock" is not activated by trying to control the projector with the remote control. LED lighting message Message Standby State (Input power cord) Power on pages 44-45. Lamp burns out or makes a popping sound When the lamp reaches its end of life, it will not turn off (Cooling) Error (Over Temp...
.../STANDBY LED (Green/Amber) Amber Flashing Green Temp-LED (Red) Lamp-LED (Red) Lamp lighting Green Power off the projector, then unplug the power cord and wait at least 60 seconds before reconnecting power. Check that "Keypad Lock" is not activated by trying to control the projector with the remote control. LED lighting message Message Standby State (Input power cord) Power on pages 44-45. Lamp burns out or makes a popping sound When the lamp reaches its end of life, it will not turn off (Cooling) Error (Over Temp...

User's Manual
Page 43
... Screen Messages Temperature warning: Fan failed: Lamp warming: Out of display range: If the remote control does not work Check the operating angle of the remote control is within 7 m (±0°) of the IR receivers on the projector. Make sure there are exhausted. 43 English Move to within ±15° both horizontally and vertically of one of the projector...
... Screen Messages Temperature warning: Fan failed: Lamp warming: Out of display range: If the remote control does not work Check the operating angle of the remote control is within 7 m (±0°) of the IR receivers on the projector. Make sure there are exhausted. 43 English Move to within ±15° both horizontally and vertically of one of the projector...
User's Manual
Page 45
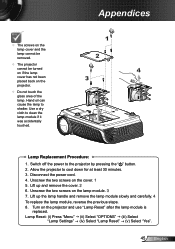
... and remove the cover. 2 6. Hand oil can cause the lamp to the projector by pressing the " " button. 2. Lamp Reset: (i) Press "Menu" (ii) Select "OPTIONS" (iii) Select "Lamp Settings" (iv) Select "Lamp Reset" (v) Select "Yes". 45 English Unscrew the two screws on the projector and use "Lamp Reset" after the lamp module is replaced. Turn on the cover. 1 5. Switch off the power to shatter. Unscrew the two screws on the projector. ...
... and remove the cover. 2 6. Hand oil can cause the lamp to the projector by pressing the " " button. 2. Lamp Reset: (i) Press "Menu" (ii) Select "OPTIONS" (iii) Select "Lamp Settings" (iv) Select "Lamp Reset" (v) Select "Yes". 45 English Unscrew the two screws on the projector and use "Lamp Reset" after the lamp module is replaced. Turn on the cover. 1 5. Switch off the power to shatter. Unscrew the two screws on the projector. ...

User's Manual
Page 51
Appendices ~XX105 1 7E 30 30 31 30 35 20 31 0D Advanced Direct Power On On ~XX105 0 7E 30 30 31 30 35 20 30 0D Off (0/2 for backward compatible) ~XX106 n 7E 30 30 31 30 36 20 a 0D Auto Power Off (min) n = 0 (a=30) ~ 180 (a=31 38 30) step:5 ~XX107 n 7E 30 30 31 30 37 20 a 0D Sleep Timer (min) n = 0 (a=30) ~ 995 (a=39 39 39) step:5 ~XX114 1 7E 30 30 31 31 34 20 31 0D Power Mode(Standby) Eco.(
Appendices ~XX105 1 7E 30 30 31 30 35 20 31 0D Advanced Direct Power On On ~XX105 0 7E 30 30 31 30 35 20 30 0D Off (0/2 for backward compatible) ~XX106 n 7E 30 30 31 30 36 20 a 0D Auto Power Off (min) n = 0 (a=30) ~ 180 (a=31 38 30) step:5 ~XX107 n 7E 30 30 31 30 37 20 a 0D Sleep Timer (min) n = 0 (a=30) ~ 995 (a=39 39 39) step:5 ~XX114 1 7E 30 30 31 31 34 20 31 0D Power Mode(Standby) Eco.(

Datasheet
Page 1
... centerpiece of your home theater. Features DLP® display technology by Texas Instruments Digital and analog connections for gaming and video sources Projects a 120" diagonal image from an approximate throw distance of six feet Supports high definition 1080p signals Bright enough for use in large rooms with ambient lighting Specifications Display Technology 0.65" DC3 DMD DLP® Technology by Texas Instruments Resolution Native WXGA (1280...
... centerpiece of your home theater. Features DLP® display technology by Texas Instruments Digital and analog connections for gaming and video sources Projects a 120" diagonal image from an approximate throw distance of six feet Supports high definition 1080p signals Bright enough for use in large rooms with ambient lighting Specifications Display Technology 0.65" DC3 DMD DLP® Technology by Texas Instruments Resolution Native WXGA (1280...

Brochure
Page 1
... Composite Video Stereo S-Video Audio-Out Power/Stand By Source Keystone Correction Brightness HDMI S-Video Freeze VGA Re-Sync Select Volume Zoom AV Mute Video Menu AC Power RS232 Stereo Kensington Security RCA Lock Bar Audio-In The GT700 provides the ultimate widescreen experience for more information. GT700 FEATURES J DLP® display technology by Texas Instruments J Digital and analog connections for gaming and video sources J Projects a 120" diagonal image from an approximate throw distance of your free time into...
... Composite Video Stereo S-Video Audio-Out Power/Stand By Source Keystone Correction Brightness HDMI S-Video Freeze VGA Re-Sync Select Volume Zoom AV Mute Video Menu AC Power RS232 Stereo Kensington Security RCA Lock Bar Audio-In The GT700 provides the ultimate widescreen experience for more information. GT700 FEATURES J DLP® display technology by Texas Instruments J Digital and analog connections for gaming and video sources J Projects a 120" diagonal image from an approximate throw distance of your free time into...

Brochure
Page 2
... Panel AV Mute Menu Keystone + Source Re-Sync Power/ Standby Four Directional Keys Select Keystone - Power Lamp Temp LED LED LED Optional Accessories Lamp: BL-FP180E Remote Control: BR-3052N Backpack BK-4029 Power Cord (1m): BC-PUPIXY01 Power Cord (11m): BC-PUPIXY11 HDMI Cable (7.5m): BC-HMHMXX08 Composite Cable (1.8m): BC-COCOXX02 VGA Cable (1.8m): BC-VGVGXX02 VGA Cable (5m): BC-VGVGXX05 Component to VGA Adapter Cable: CRVGYX00 Ceiling Mount: BM-5001U 92" Matte White 16:9 Manual Pull-Down Screen: DS-9092PMG+ Specifications Display Technology: Resolution...
... Panel AV Mute Menu Keystone + Source Re-Sync Power/ Standby Four Directional Keys Select Keystone - Power Lamp Temp LED LED LED Optional Accessories Lamp: BL-FP180E Remote Control: BR-3052N Backpack BK-4029 Power Cord (1m): BC-PUPIXY01 Power Cord (11m): BC-PUPIXY11 HDMI Cable (7.5m): BC-HMHMXX08 Composite Cable (1.8m): BC-COCOXX02 VGA Cable (1.8m): BC-VGVGXX02 VGA Cable (5m): BC-VGVGXX05 Component to VGA Adapter Cable: CRVGYX00 Ceiling Mount: BM-5001U 92" Matte White 16:9 Manual Pull-Down Screen: DS-9092PMG+ Specifications Display Technology: Resolution...

ProtocolFunction
Page 4
Appendices ~XX105 1 7E 30 30 31 30 35 20 31 0D Advanced Direct Power On On ~XX105 0 7E 30 30 31 30 35 20 30 0D Off (0/2 for backward compatible) ~XX106 n 7E 30 30 31 30 36 20 a 0D Auto Power Off (min) n = 0 (a=30) ~ 180 (a=31 38 30) step:5 ~XX107 n 7E 30 30 31 30 37 20 a 0D Sleep Timer (min) n = 0 (a=30) ~ 995 (a=39 39 39) step:5 ~XX114 1 7E 30 30 31 31 34 20 31 0D Power Mode(Standby) Eco.(
Appendices ~XX105 1 7E 30 30 31 30 35 20 31 0D Advanced Direct Power On On ~XX105 0 7E 30 30 31 30 35 20 30 0D Off (0/2 for backward compatible) ~XX106 n 7E 30 30 31 30 36 20 a 0D Auto Power Off (min) n = 0 (a=30) ~ 180 (a=31 38 30) step:5 ~XX107 n 7E 30 30 31 30 37 20 a 0D Sleep Timer (min) n = 0 (a=30) ~ 995 (a=39 39 39) step:5 ~XX114 1 7E 30 30 31 31 34 20 31 0D Power Mode(Standby) Eco.(


