

User's Manual
Page 1
...to Computer/Notebook......... 11 Connect to Video Sources 12 Powering On/Off the Projector..........13 Powering On the Projector 13 Powering off the projector 14 Warning Indicator 14 Adjusting the Projected Image..........15 Adjusting the Projector's Height ........ 15 Adjusting the Projector's Focus.......... 16 Adjusting Projection Image Size......... 16 User Controls 18 Control ... 47 RS232 Commands and Protocol Function List 48 RS232 Pin Assignments 48 RS232 Protocol Function List 49 Ceiling Mount Installation 52 Optoma Global Offices 53 Regulation & Safety Notices 55 1 English
...to Computer/Notebook......... 11 Connect to Video Sources 12 Powering On/Off the Projector..........13 Powering On the Projector 13 Powering off the projector 14 Warning Indicator 14 Adjusting the Projected Image..........15 Adjusting the Projector's Height ........ 15 Adjusting the Projector's Focus.......... 16 Adjusting Projection Image Size......... 16 User Controls 18 Control ... 47 RS232 Commands and Protocol Function List 48 RS232 Pin Assignments 48 RS232 Protocol Function List 49 Ceiling Mount Installation 52 Optoma Global Offices 53 Regulation & Safety Notices 55 1 English
User's Manual
Page 2
... appropriate service personnel. Do not install near water or moisture. Please call Optoma before you to protect from over heating, it has been physically damaged or abused. Do not let objects or liquids enter the projector. English 2 DO NOT OPEN THE CABINET. To ensure reliable operation of ... of the Canadian Interference-Causing Equipment Regulations. To reduce the risk of fire and/or electric shock, do not place the projector on to the projector. Projector has been exposed to service the unit yourself. Do not attempt to rain or moisture. Something has fallen in...
... appropriate service personnel. Do not install near water or moisture. Please call Optoma before you to protect from over heating, it has been physically damaged or abused. Do not let objects or liquids enter the projector. English 2 DO NOT OPEN THE CABINET. To ensure reliable operation of ... of the Canadian Interference-Causing Equipment Regulations. To reduce the risk of fire and/or electric shock, do not place the projector on to the projector. Projector has been exposed to service the unit yourself. Do not attempt to rain or moisture. Something has fallen in...
User's Manual
Page 3
.... Do not look into your local reseller or service center to change the lamp when it shows warning messages. ▀■ Warning- This projector will not turn back on . When the lamp is approaching the end of its lifetime, the message "Lamp Warning: Lamp life exceeded." jector...and maintenance as this user's guide. ▀■ Warning- Do not look into or point the laser pointer on your remote control into the projector's lens when the lamp is in this may hurt and damage your eyes. ▀■ Warning- The bright light may cause electric shock. ...
.... Do not look into your local reseller or service center to change the lamp when it shows warning messages. ▀■ Warning- This projector will not turn back on . When the lamp is approaching the end of its lifetime, the message "Lamp Warning: Lamp life exceeded." jector...and maintenance as this user's guide. ▀■ Warning- Do not look into or point the laser pointer on your remote control into the projector's lens when the lamp is in this may hurt and damage your eyes. ▀■ Warning- The bright light may cause electric shock. ...

User's Manual
Page 5
... minimize the lamp power, use room blinds to reduce ambient light levels. Usage Notice Eye Safety Warnings ▀■ Avoid staring/facing directly into the projector beam at all times. Keep your back to the beam as much as possible. ▀■ When...
... minimize the lamp power, use room blinds to reduce ambient light levels. Usage Notice Eye Safety Warnings ▀■ Avoid staring/facing directly into the projector beam at all times. Keep your back to the beam as much as possible. ▀■ When...
User's Manual
Page 6
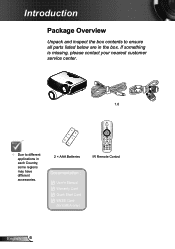
If something is missing, please contact your nearest customer service center. Introduction Package Overview Unpack and inspect the box contents to different applications in the box. Projector with lens cap Power Cord 1.8m VGA Cable 1.8m Due to ensure all parts listed below are in each Country, some regions may have different accessories. 2 × AAA Batteries Documentation : User's Manual Warranty Card Quick Start Card WEEE Card (for EMEA only) HDMI Overscan IR Remote Control English 6
If something is missing, please contact your nearest customer service center. Introduction Package Overview Unpack and inspect the box contents to different applications in the box. Projector with lens cap Power Cord 1.8m VGA Cable 1.8m Due to ensure all parts listed below are in each Country, some regions may have different accessories. 2 × AAA Batteries Documentation : User's Manual Warranty Card Quick Start Card WEEE Card (for EMEA only) HDMI Overscan IR Remote Control English 6
User's Manual
Page 11
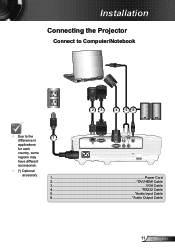
Installation Connecting the Projector Connect to Computer/Notebook 23 4 56 Due to the difference in applications for each country, some regions may have different accessories. (*) Optional accessory 1 VGA-IN / YPbPr / HDMI S-VIDEO VIDEO AUDIO-OUT RS-232 RCA-L RCA-R R E62405SP 1...Power Cord 2 DVI/HDMI Cable 3...VGA Cable 4 RS232 Cable 5 Audio Input Cable 6 Audio Output Cable 11 English
Installation Connecting the Projector Connect to Computer/Notebook 23 4 56 Due to the difference in applications for each country, some regions may have different accessories. (*) Optional accessory 1 VGA-IN / YPbPr / HDMI S-VIDEO VIDEO AUDIO-OUT RS-232 RCA-L RCA-R R E62405SP 1...Power Cord 2 DVI/HDMI Cable 3...VGA Cable 4 RS232 Cable 5 Audio Input Cable 6 Audio Output Cable 11 English
User's Manual
Page 13
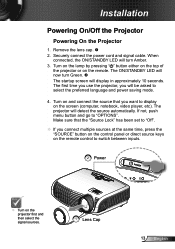
... 3. If not, push menu button and go to select the preferred language and power saving mode. 4. Installation Powering On/Off the Projector Powering On the Projector 1. Remove the lens cap. 2. Securely connect the power cord and signal cable. Make sure that you will detect the ...source automatically. The first time you use the projector, you want to switch between inputs. 2 Power POWER Turn on the remote. Turn on and connect the source that the "Source...
... 3. If not, push menu button and go to select the preferred language and power saving mode. 4. Installation Powering On/Off the Projector Powering On the Projector 1. Remove the lens cap. 2. Securely connect the power cord and signal cable. Make sure that you will detect the ...source automatically. The first time you use the projector, you want to switch between inputs. 2 Power POWER Turn on the remote. Turn on and connect the source that the "Source...
User's Manual
Page 14
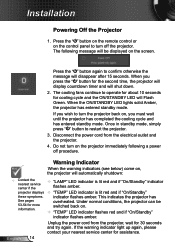
...and if "On/Standby" these symptoms. indicator flashes amber. Warning Indicator When the warning indicators (see below) come on the projector immediately following message will shut down. 2. overheated. projector displays "TEMP" LED indicator is lit red and if "On/Standby" indicator flashes amber. Under normal conditions, ...on . "TEMP" LED indicator flashes red and if "On/Standby" indicator flashes amber. When you must wait until the projector has completed the cooling cycle and has entered standby mode. Unplug the power cord from the electrical outlet and the...
...and if "On/Standby" these symptoms. indicator flashes amber. Warning Indicator When the warning indicators (see below) come on the projector immediately following message will shut down. 2. overheated. projector displays "TEMP" LED indicator is lit red and if "On/Standby" indicator flashes amber. Under normal conditions, ...on . "TEMP" LED indicator flashes red and if "On/Standby" indicator flashes amber. When you must wait until the projector has completed the cooling cycle and has entered standby mode. Unplug the power cord from the electrical outlet and the...
User's Manual
Page 15
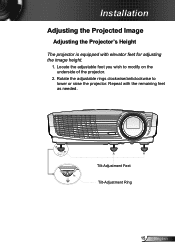
Rotate the adjustable rings clockwise/anticlockwise to modify on the underside of the projector. 2. Repeat with elevator feet for adjusting the image height. 1. Tilt-Adjustment Feet Tilt-Adjustment Ring 15 English Locate the adjustable foot you wish to lower or raise the projector. Installation Adjusting the Projected Image Adjusting the Projector's Height The projector is equipped with the remaining feet as needed.
Rotate the adjustable rings clockwise/anticlockwise to modify on the underside of the projector. 2. Repeat with elevator feet for adjusting the image height. 1. Tilt-Adjustment Feet Tilt-Adjustment Ring 15 English Locate the adjustable foot you wish to lower or raise the projector. Installation Adjusting the Projected Image Adjusting the Projector's Height The projector is equipped with the remaining feet as needed.
User's Manual
Page 16
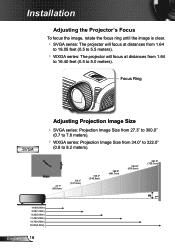
...; WXGA series: Projection Image Size from 1.64 to 16.40 feet (0.5 to 8.2 meters). Installation Adjusting the Projector's Focus To focus the image, rotate the focus ring until the image is clear. SVGA series: The projector will focus at distances from 1.64 to 18.05 feet (0.5 to 5.5 meters). WXGA series: The...
...; WXGA series: Projection Image Size from 1.64 to 16.40 feet (0.5 to 8.2 meters). Installation Adjusting the Projector's Focus To focus the image, rotate the focus ring until the image is clear. SVGA series: The projector will focus at distances from 1.64 to 18.05 feet (0.5 to 5.5 meters). WXGA series: The...
User's Manual
Page 18
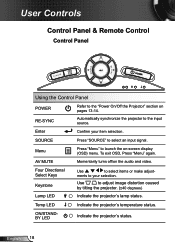
... Directional Select Keys Keystone Lamp LED Use to the input source. English 18 Automatically synchronize the projector to select items or make adjust- Enter Confirm your selection. Temp LED Indicate the projector's temperature status. SOURCE Press "SOURCE" to launch the on-screen display (OSD) menu. ...Menu Press "Menu" to select an input signal. ments to your item selection. Use to the "Power On/Off the Projector" section on the audio and video. To exit OSD, Press "Menu" again. User Controls Control Panel & Remote Control Control Panel POWER...
... Directional Select Keys Keystone Lamp LED Use to the input source. English 18 Automatically synchronize the projector to select items or make adjust- Enter Confirm your selection. Temp LED Indicate the projector's temperature status. SOURCE Press "SOURCE" to launch the on-screen display (OSD) menu. ...Menu Press "Menu" to select an input signal. ments to your item selection. Use to the "Power On/Off the Projector" section on the audio and video. To exit OSD, Press "Menu" again. User Controls Control Panel & Remote Control Control Panel POWER...
User's Manual
Page 19
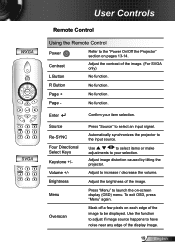
...Using the Remote Control Power Contrast Refer to select an input signal. Press "Source" to the "Power On/Off the Projector" section on pages 13-14. Use the function to adjust if image source happens to your item selection. Adjust image ..., press "Menu" again. Mask off a few pixels on -screen display (OSD) menu. R Button No function. Page - Automatically synchronizes the projector to be displayed. Page + No function. Enter Source Re-SYNC Four Directional Select Keys Keystone +/Volume +/Brightness Menu Overscan Confirm your selection. Adjust ...
...Using the Remote Control Power Contrast Refer to select an input signal. Press "Source" to the "Power On/Off the Projector" section on pages 13-14. Use the function to adjust if image source happens to your item selection. Adjust image ..., press "Menu" again. Mask off a few pixels on -screen display (OSD) menu. R Button No function. Page - Automatically synchronizes the projector to be displayed. Page + No function. Enter Source Re-SYNC Four Directional Select Keys Keystone +/Volume +/Brightness Menu Overscan Confirm your selection. Adjust ...
User's Manual
Page 21
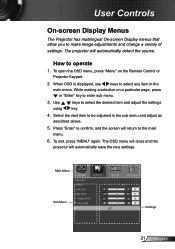
.... To exit, press "MENU" again. Select the next item to be adjusted in the main menu. User Controls On-screen Display Menus The Projector has multilingual On-screen Display menus that allow you to select the desired item and adjust the settings key. 4. Use using keys to make image... adjustments and change a variety of settings. While making a selection on the Remote Control or Projector Keypad. 2 When OSD is displayed, use keys to the main menu. 6. How to enter sub menu. 3. The OSD menu will close and the...
.... To exit, press "MENU" again. Select the next item to be adjusted in the main menu. User Controls On-screen Display Menus The Projector has multilingual On-screen Display menus that allow you to select the desired item and adjust the settings key. 4. Use using keys to make image... adjustments and change a variety of settings. While making a selection on the Remote Control or Projector Keypad. 2 When OSD is displayed, use keys to the main menu. 6. How to enter sub menu. 3. The OSD menu will close and the...
User's Manual
Page 22
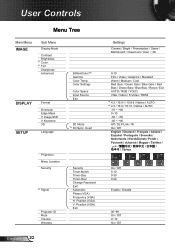
... / Disable 00~99 On / Off 0~10 On / Off Color Settings Color Space Input Source Exit 3D Mode #4 3D Sync. Invert Projection Menu Location Security #5 Signal Projector ID Mute Volume Wireless English 22 Security Timer-Month Timer-Day Timer-Hour Change Password Exit Automatic Phase (VGA) Frequency (VGA) H. Position (VGA) V.
... / Disable 00~99 On / Off 0~10 On / Off Color Settings Color Space Input Source Exit 3D Mode #4 3D Sync. Invert Projection Menu Location Security #5 Signal Projector ID Mute Volume Wireless English 22 Security Timer-Month Timer-Day Timer-Hour Change Password Exit Automatic Phase (VGA) Frequency (VGA) H. Position (VGA) V.
User's Manual
Page 23
... On / Off STD / BRIGHT Yes/No Please note that the on-screen display (OSD) menus vary according to the signal type selected and the projector model you are using. (#1) "Color" and "Tint" are only supported in Video mode. (#2) For SVGA only. (#3) For WXGA only (#4) "3D Sync...
... On / Off STD / BRIGHT Yes/No Please note that the on-screen display (OSD) menus vary according to the signal type selected and the projector model you are using. (#1) "Color" and "Tint" are only supported in Video mode. (#2) For SVGA only. (#3) For WXGA only (#4) "3D Sync...
User's Manual
Page 27
Press to select Red, Green, or Blue for inputs that are not selected. 27 English Use or to enter the sub menu and select which sources you require. Input Source Use this option to finalize the selection. Color Space Select an appropriate color matrix type from AUTO, RGB or YUV. Press "Enter" to enable / disable input sources. The projector will not search for brightness (Gain) and contrast (Bias). User Controls Color Setting Press into the next menu as below and then use or to select item.
Press to select Red, Green, or Blue for inputs that are not selected. 27 English Use or to enter the sub menu and select which sources you require. Input Source Use this option to finalize the selection. Color Space Select an appropriate color matrix type from AUTO, RGB or YUV. Press "Enter" to enable / disable input sources. The projector will not search for brightness (Gain) and contrast (Bias). User Controls Color Setting Press into the next menu as below and then use or to select item.
User's Manual
Page 32
... definition can be set up by menu (range 0~99), and allow user control an individual projector by RS232. Wireless Choose the "On" to turn on . Choose the "Off" to turn mute on the Wireless. Mute Choose the "On" to ... to decrease the volume. Press the to page 48 for the complete list of RS232 commands. Menu Location Choose the menu location on the projector. Rear-Ceiling When selected, the image will not function and...
... definition can be set up by menu (range 0~99), and allow user control an individual projector by RS232. Wireless Choose the "On" to turn on . Choose the "Off" to turn mute on the Wireless. Mute Choose the "On" to ... to decrease the volume. Press the to page 48 for the complete list of RS232 commands. Menu Location Choose the menu location on the projector. Rear-Ceiling When selected, the image will not function and...

User's Manual
Page 33
... First time: 1. Use number button on the remote, then press " " to switch on the projector without password verification. Press " " to input old password. 2. Press " " to set the number of hours the projector can be able to confirm. 4. Enter new password (4 digits in length) using the number buttons ... again and press " " to confirm. 3. Security On: Choose "On" to use security verification when the turning on the projector. Off: Choose "Off" to confirm your password again. User Controls SETUP | Security Pass-code default value is "1234" (first time).
... First time: 1. Use number button on the remote, then press " " to switch on the projector without password verification. Press " " to input old password. 2. Press " " to set the number of hours the projector can be able to confirm. 4. Enter new password (4 digits in length) using the number buttons ... again and press " " to confirm. 3. Security On: Choose "On" to use security verification when the turning on the projector. Off: Choose "Off" to confirm your password again. User Controls SETUP | Security Pass-code default value is "1234" (first time).

User's Manual
Page 34
User Controls If the incorrect password is entered 3 times, the projector will automatically shut down. If you have forgotten your password, please contact your local office for support. English 34
User Controls If the incorrect password is entered 3 times, the projector will automatically shut down. If you have forgotten your password, please contact your local office for support. English 34
User's Manual
Page 35
... signal timing of your computer's graphic card. User Controls SETUP | Signal "Signal" is not automatic, the phase, frequency items will appear for next time projector turns off and on again. H. V. Automatic Automatically selects the singal. Position Press the to move the image left. Press the to move the...
... signal timing of your computer's graphic card. User Controls SETUP | Signal "Signal" is not automatic, the phase, frequency items will appear for next time projector turns off and on again. H. V. Automatic Automatically selects the singal. Position Press the to move the image left. Press the to move the...


