Optoma HD7300 Support and Manuals
Get Help and Manuals for this Optoma item

View All Support Options Below
Free Optoma HD7300 manuals!
Problems with Optoma HD7300?
Ask a Question
Free Optoma HD7300 manuals!
Problems with Optoma HD7300?
Ask a Question
Popular Optoma HD7300 Manual Pages
User Manual - Page 4
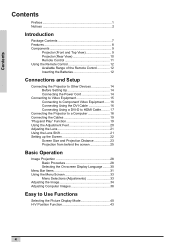
... 10 Remote Control 11 Using the Remote Control 12 Available Range of the Remote Control 12 Inserting the Batteries 12
Connections and Setup
Connecting the Projector to Other Devices 14 Before Setting Up 14 Connecting the Power Cord 14
Connecting to Video Equipment 15 Connecting to Component Video Equipment ...... 16 Connecting Using the...
User Manual - Page 8
.... • 3:2 pull-down enhancement for 480I, 576I and HDTV 1080I signals. • Use of analog conversion. Home theaters using HTPC are possible with previous generation DLP™ projectors.
• The 250W high-output lamp gives high color purity and brightness. Natural images are...
User Manual - Page 14
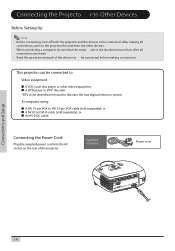
...supplied power cord into the AC socket on the projector first and then the other video equipment. d
or wall.
Connections and Setup
14 Supplied accessory
Power cord
DVI
PC
VIDEO
S-... after all connections are made. • Read the operation manuals of the projector.
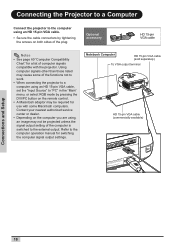
Connecting the Projecto r to Other Devices
Before Setting Up
Note • Before connecting, turn on the rear ...
User Manual - Page 16
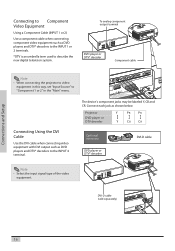
...When connecting the projector to video
equipment in this way, set "Input Source" to describe the new digital television system.
d
down . Connect each jack as shown below.
cooled
or wall.
down . Connections and Setup
Connecting to Component...
ile ha
and near
r ee psl ua fcfiincgi e est object
the ntly
lamp. d down .
DVI-D cable (sold separately)
DVI
PC
Y
Pr/Cr
...
User Manual - Page 18
....tostvilaetnrhdweynheihlaearvereesptslouabfcfjiienccgiet ntohtrleywlcaaomllo.ple.
Connections and Setup
18 Contact your nearest authorized service center or dealer. • Depending on the remote control. • A Macintosh adaptor may not be required for switching the computer signal output settings. Connecting the Projector to a Computer
Connect the projector to the computer using an...
User Manual - Page 25
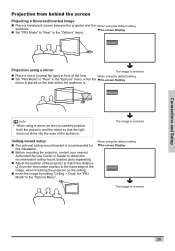
... Mode" to "Rear" in the "Options" menu. When using the default setting.
Ceiling-mount setup
„ The optional ceiling-mount bracket is reversed.
25
TOn-screen Display
The image is recommended for this installation.
„ Before mounting the projector, contact your nearest Authorized Service Center or Dealer to obtain the recommended ceiling-mount bracket (sold...
User Manual - Page 31
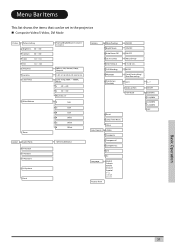
... film Film Mode
Reset
Lamp Timer Reset
Status
Input Source S-Video
Composite
Component 1
Component 2
DVI
Language Factory Reset
PC
English Français Italiano Deutsch Español
0~7
ON/OFF 3:2@60Hz 2:2@50Hz 2:2@50Hz 3:2@60Hz OFF
Basic Operation
31 Menu Bar Items
This list shows the items that can be set in the projector.
User Manual - Page 32
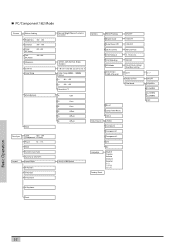
.../Component 1&2 Mode
Picture
Picture Setting
Brightness -50 ~ +50
... Select OSD Timeout OSD Blending PRJ Mode
Deinterlace (480i, 576i only)
Reset
Lamp Timer Reset
Status
Input Source S-Video
Composite
Component 1
Component 2
DVI
Language...English Français Italiano Deutsch Español
ON/OFF ON/OFF ON/OFF Manual/Auto 5. 15. 60 secs ON/OFF Front/Front ceiling/ Rear/Rear ceiling
DCTI...
User Manual - Page 46

..." menu on the menu screen. Source Select
Auto Manual
Select "source select" from the "Options" menu on the menu screen.
Auto Power Off is set to "ON", a warning, "Power OFF in 5 min." Automatic Power Off Function
When set to "ON", the Auto Power Off switches the projector off .
Source Select
This selects the input...
User Manual - Page 48
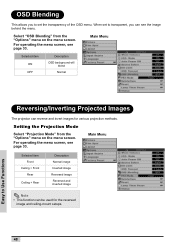
... menu screen. For operating the menu screen, see page 33.
Main Menu
Selected item ON OFF
Description
OSD background will blend
Normal
Reversing/Inverting Projected Images
The projector can be used for various projection methods.
For operating the menu screen, see page 33. Setting the Projection Mode
Select "Projection Mode" from the "Options...
User Manual - Page 51

Main Menu
Easy to Use Functions
Factory reset
This resets all setting to the factory defaults. Main Menu
Screen display during Factory Reset
51 The logo is shown for about the current input signal. Status Screen
The Status screen displays information about 20 seconds, then the projector is reset.
User Manual - Page 56
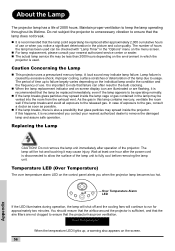
... lamp breaks, there is also a possibility that glass particles may spread inside the lamp cage or gas contained in which the
projector is used can often result in the bulb cracking.
„ When the lamp replacement... on the control panel alerts you contact your nearest authorized service center or sealer. „ The actual lamp service life may be vented into the room from the exhaust vent...
User Manual - Page 60

...Details on how to change display modes can be found in your notebook computer's operation manual. • When this projector receives 640 × 350 VESA format VGA signals, "640 × 400" ...list of modes that are not VESA standards. Appendix
60 Should this projector supports other signals that conform to display images from notebook computers in simultaneous (CRT/LCD)
...
User Manual - Page 61
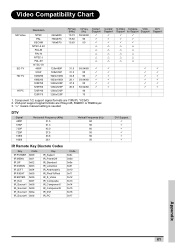
... formats are RGsyncB, RGBHV or RGBCsysc 3. "U" means manual setting is needed
DTV
Signal 480P 576P 720P 720P 1080I 1080I
Horizontal Frequency (kHz) 31.5 31.3 45.0 37.5 33.8 28.1
Vertical Frequency (Hz) 60 50 60 50 60 50
DVI Support 3 3 3 3 3 3
IR Remote Key Discrete Codes
Key
Code
IR POWER 0x00
IR MENU 0x01
IR UP
0x02...
User Manual - Page 62

Troubleshooting
Problem
Check Projector power cord is blurred Picture noise appears. Power to the rear panel of the video equipment. Adjust the "Clock" setting. Cables may be incorrectly connected to the external connected device is not set .
Adjust the "Phase" setting.
No picture
The video signal format of the video equipment is off. Change the input signal...
Optoma HD7300 Reviews
We have not received any reviews for Optoma yet.