
User Manual
Page 1
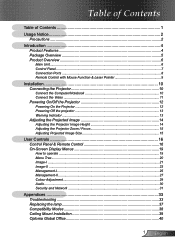
... Connect the Computer/Notebook 10 Connect the Video ...11 Powering On/Off the Projector 12 Powering On the Projector 12 Powering Off the projector 13 Warning Indicator...13 Adjusting the Projected Image 14 Adjusting the Projector Image Height 14 Adjusting the Projector Zoom / Focus 15 Adjusting Projected Image Size 15 User Controls 16 Control Panel... ...27 Colour Adjustment...29 Audio ...30 Security and Network 31 Appendices 33 Troubleshooting 33 Replacing the lamp 37 Compatibility Modes 38 Ceiling Mount Installation 39 Optoma Global Office 40 1 English
... Connect the Computer/Notebook 10 Connect the Video ...11 Powering On/Off the Projector 12 Powering On the Projector 12 Powering Off the projector 13 Warning Indicator...13 Adjusting the Projected Image 14 Adjusting the Projector Image Height 14 Adjusting the Projector Zoom / Focus 15 Adjusting Projected Image Size 15 User Controls 16 Control Panel... ...27 Colour Adjustment...29 Audio ...30 Security and Network 31 Appendices 33 Troubleshooting 33 Replacing the lamp 37 Compatibility Modes 38 Ceiling Mount Installation 39 Optoma Global Office 40 1 English

User Manual
Page 2
...cooling cycle before disconnecting power. Warning- Warning- Turn on until the lamp module has been replaced. Warning- When switching the projector off, please ensure the projector completes its life, it shows warning messages. If this product to maximize the life of the lamp itself. Warning- This ... module (refer to change the lamp when it will detect the life of your eyes. Warning- Warning- Do not look into the projector's lens when the lamp is in this user's guide to rain or moisture. Usage Notice Precautions Follow all changing instructions. Please be...
...cooling cycle before disconnecting power. Warning- Warning- Turn on until the lamp module has been replaced. Warning- When switching the projector off, please ensure the projector completes its life, it shows warning messages. If this product to maximize the life of the lamp itself. Warning- This ... module (refer to change the lamp when it will detect the life of your eyes. Warning- Warning- Do not look into the projector's lens when the lamp is in this user's guide to rain or moisture. Usage Notice Precautions Follow all changing instructions. Please be...
User Manual
Page 4
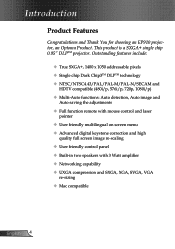
Introduction Product Features Congratulations and Thank You for choosing an EP910 projector, an Optoma Product. Outstanding features include: True SXGA+, 1400 x 1050 addressable pixels Single chip Dark Chip3TM DLPTM technology NTSC/NTSC4.43/PAL/PAL-M/PAL-N/... Networking capability UXGA compression and SXGA, XGA, SVGA, VGA re-sizing Mac compatible English 4 This product is a SXGA+ single chip 0.95" DLPTM projector.
Introduction Product Features Congratulations and Thank You for choosing an EP910 projector, an Optoma Product. Outstanding features include: True SXGA+, 1400 x 1050 addressable pixels Single chip Dark Chip3TM DLPTM technology NTSC/NTSC4.43/PAL/PAL-M/PAL-N/... Networking capability UXGA compression and SXGA, XGA, SVGA, VGA re-sizing Mac compatible English 4 This product is a SXGA+ single chip 0.95" DLPTM projector.
User Manual
Page 5
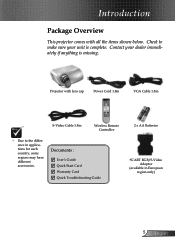
... Warranty Card Quick Troubleshooting Guide 2 x AA Batteries SCART RGB/S-Video Adaptor (available in applications for each country, some regions may have different accessories. Projector with all the items shown below. Check to the difference in European region only) 5 English Introduction Package Overview This...
... Warranty Card Quick Troubleshooting Guide 2 x AA Batteries SCART RGB/S-Video Adaptor (available in applications for each country, some regions may have different accessories. Projector with all the items shown below. Check to the difference in European region only) 5 English Introduction Package Overview This...
User Manual
Page 10
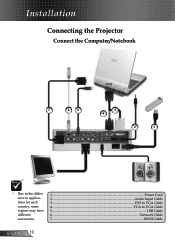
top Box, RGB HDTV receiver S-Video Output 2 1 USB Video Output Due to the difference in applications for each country, some regions may have different accessories. 1...Power Cord 2 Audio Input Cable 3 DVI to VGA Cable 4 VGA to VGA Cable 5...USB Cable 6...Network Cable 7...RS232 Cable English 10 Installation Connecting the Projector Connect the Computer/Notebook RGB 7 65 3 4 DVD Player, Set-
top Box, RGB HDTV receiver S-Video Output 2 1 USB Video Output Due to the difference in applications for each country, some regions may have different accessories. 1...Power Cord 2 Audio Input Cable 3 DVI to VGA Cable 4 VGA to VGA Cable 5...USB Cable 6...Network Cable 7...RS232 Cable English 10 Installation Connecting the Projector Connect the Computer/Notebook RGB 7 65 3 4 DVD Player, Set-
User Manual
Page 12
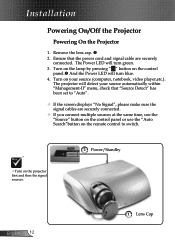
...;rst and then the signal sources. 2 Power/Standby English 12 1 Lens Cap Installation Powering On/Off the Projector Powering On the Projector 1. Turn on your source automatically within "Management-II" menu, check that the power cord and signal cable are securely connected. If you connect multiple ...
...;rst and then the signal sources. 2 Power/Standby English 12 1 Lens Cap Installation Powering On/Off the Projector Powering On the Projector 1. Turn on your source automatically within "Management-II" menu, check that the power cord and signal cable are securely connected. If you connect multiple ...
User Manual
Page 13
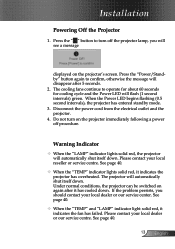
... will automatically shut itself down . Warning Indicator When the "LAMP" indicator lights solid red, the projector will flash (1 second intervals) green. The projector will disappear after it has cooled down. If the problem persists, you will see a message displayed on again... after 5 seconds. 2. Under normal conditions, the projector can be switched on the projector's screen. Disconnect the power cord from the electrical outlet and the projector. 4. See page 40. When the "TEMP" indicator lights solid red, it...
... will automatically shut itself down . Warning Indicator When the "LAMP" indicator lights solid red, the projector will flash (1 second intervals) green. The projector will disappear after it has cooled down. If the problem persists, you will see a message displayed on again... after 5 seconds. 2. Under normal conditions, the projector can be switched on the projector's screen. Disconnect the power cord from the electrical outlet and the projector. 4. See page 40. When the "TEMP" indicator lights solid red, it...
User Manual
Page 14
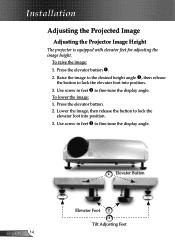
... feet to lock the elevator foot into position. 3. English 14 1 Elevator Button Elevator Foot 2 3 Tilt Adjusting Feet Installation Adjusting the Projected Image Adjusting the Projector Image Height The projector is equipped with elevator feet for adjusting the image height. To raise the image: 1.
... feet to lock the elevator foot into position. 3. English 14 1 Elevator Button Elevator Foot 2 3 Tilt Adjusting Feet Installation Adjusting the Projected Image Adjusting the Projector Image Height The projector is equipped with elevator feet for adjusting the image height. To raise the image: 1.

User Manual
Page 15
....0 x 337.5cm 600.0 x 450.0cm 147.6" x 110.7" 375.0 x 281.3cm 196.88" x 147.66" 500.0 x 375.0cm 29.5' (9.0m) 39.4' (12.0m) 15 English The projector will focus at distances from 4.9 to 39.4 feet (1.5 to zoom in or out. Zoom Lever Focus Ring Adjusting Projection Image Size 36.9" (93.8cm) 30....0 x 93.8cm 98.4" x 73.8" 250.0 x 187.5cm 82.0" x 61.5" 208.3 x 156.2cm Distance 4.9' (1.5m) 9.8' (3.0m) 16.4' (5.0m) This graph is clear. Installation Adjusting the Projector Zoom / Focus You may turn the zoom lever to 12.0 meters).
....0 x 337.5cm 600.0 x 450.0cm 147.6" x 110.7" 375.0 x 281.3cm 196.88" x 147.66" 500.0 x 375.0cm 29.5' (9.0m) 39.4' (12.0m) 15 English The projector will focus at distances from 4.9 to 39.4 feet (1.5 to zoom in or out. Zoom Lever Focus Ring Adjusting Projection Image Size 36.9" (93.8cm) 30....0 x 93.8cm 98.4" x 73.8" 250.0 x 187.5cm 82.0" x 61.5" 208.3 x 156.2cm Distance 4.9' (1.5m) 9.8' (3.0m) 16.4' (5.0m) This graph is clear. Installation Adjusting the Projector Zoom / Focus You may turn the zoom lever to 12.0 meters).

User Manual
Page 16
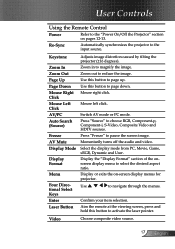
Use tional Select Keys to the "Power On/Off the Projector" section on pages 12-13. Control Panel Remote Control Using the Control Panel Power Refer to navigate through the menus. Source Press "Source" to the input source. Enter Confirm your item selection. Menu Turns the menu On or Off. Re-Sync Automatically synchronizes the projector to select an input signal. English 16 Four Direc- User Controls Control Panel & Remote Control There are two ways for you to control the functions: Remote Control and Control Panel.
Use tional Select Keys to the "Power On/Off the Projector" section on pages 12-13. Control Panel Remote Control Using the Control Panel Power Refer to navigate through the menus. Source Press "Source" to the input source. Enter Confirm your item selection. Menu Turns the menu On or Off. Re-Sync Automatically synchronizes the projector to select an input signal. English 16 Four Direc- User Controls Control Panel & Remote Control There are two ways for you to control the functions: Remote Control and Control Panel.
User Manual
Page 17
.... Zoom in to pause the screen image. Zoom out to the input source. Momentarily turns off the audio and video. Re-Sync Automatically synchronizes the projector to reduce the image. Mouse left click. Select the display mode from PC, Movie, Game, sRGB, Dynamic and User. Aim the remote at the ...click. Use to select the desired aspect ratio. User Controls Using the Remote Control Power Refer to the "Power On/Off the Projector" section on -screen display menus for projector. Switch AV mode or PC mode. Keystone Zoom In Zoom Out Page Up Page Down Mouse Right Click Mouse Left Click AV...
.... Zoom in to pause the screen image. Zoom out to the input source. Momentarily turns off the audio and video. Re-Sync Automatically synchronizes the projector to reduce the image. Mouse left click. Select the display mode from PC, Movie, Game, sRGB, Dynamic and User. Aim the remote at the ...click. Use to select the desired aspect ratio. User Controls Using the Remote Control Power Refer to the "Power On/Off the Projector" section on -screen display menus for projector. Switch AV mode or PC mode. Keystone Zoom In Zoom Out Page Up Page Down Mouse Right Click Mouse Left Click AV...
User Manual
Page 19
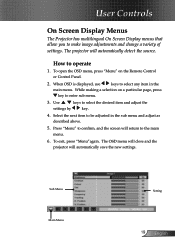
The OSD menu will close and the projector will automatically detect the source. While making a selection on the Remote Control or Control ...press key to select the desired item and adjust the settings by key. 4. Use keys to enter sub menu. 3. The projector will automatically save the new settings. Press "Menu" to confirm, and the screen will return to operate 1. To...adjust as described above. 5. User Controls On Screen Display Menus The Projector has multilingual On Screen Display menus that allow you to make image adjustments and change a variety of settings.
The OSD menu will close and the projector will automatically detect the source. While making a selection on the Remote Control or Control ...press key to select the desired item and adjust the settings by key. 4. Use keys to enter sub menu. 3. The projector will automatically save the new settings. Press "Menu" to confirm, and the screen will return to operate 1. To...adjust as described above. 5. User Controls On Screen Display Menus The Projector has multilingual On Screen Display menus that allow you to make image adjustments and change a variety of settings.
User Manual
Page 27
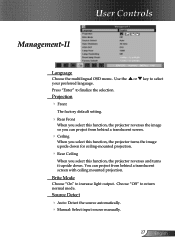
...English Choose "Off" to select Front The factory default setting. Rear Front When you select this function, the projector reverses the image so you can project from behind a translucent screen with ceiling mounted projection. Use the your preferred language. You can...behind a translucent screen. Ceiling When you select this function, the projector turns the image upside down for ceiling-mounted projection. Rear Ceiling When you select this function, the projector reverses and turns it upside down. User Controls Management-II Language Choose the ...
...English Choose "Off" to select Front The factory default setting. Rear Front When you select this function, the projector reverses the image so you can project from behind a translucent screen with ceiling mounted projection. Use the your preferred language. You can...behind a translucent screen. Ceiling When you select this function, the projector turns the image upside down for ceiling-mounted projection. Rear Ceiling When you select this function, the projector reverses and turns it upside down. User Controls Management-II Language Choose the ...
User Manual
Page 28
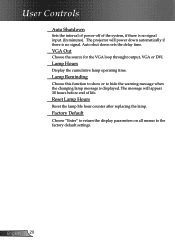
... Default Choose "Enter" to return the display parameters on all menus to hide the warning message when the changing lamp message is no signal. The projector will appear 30 hours before end of the system, if there is displayed. Reset Lamp Hours Reset the lamp life hour counter after replacing the...
... Default Choose "Enter" to return the display parameters on all menus to hide the warning message when the changing lamp message is no signal. The projector will appear 30 hours before end of the system, if there is displayed. Reset Lamp Hours Reset the lamp life hour counter after replacing the...
User Manual
Page 31
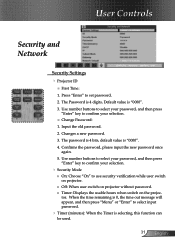
... 2. The password is 4 bits, default value is "0000". 3. tor. Changes a new password. 3. User Controls Security and Network Security Settings Projector ID ■ First Time: 1. Use number buttons to select your password, and then press "Enter" key to confirm your selection. ...buttons to select your password, and then press "Enter" key to use security verification while user switch on projector. ■ Off: When user switch on projector without password. ■ Timer: Displays the usable hours when switch on the projec- Confirms the password, ...
... 2. The password is 4 bits, default value is "0000". 3. tor. Changes a new password. 3. User Controls Security and Network Security Settings Projector ID ■ First Time: 1. Use number buttons to select your password, and then press "Enter" key to confirm your selection. ...buttons to select your password, and then press "Enter" key to use security verification while user switch on projector. ■ Off: When user switch on projector without password. ■ Timer: Displays the usable hours when switch on the projec- Confirms the password, ...
User Manual
Page 32
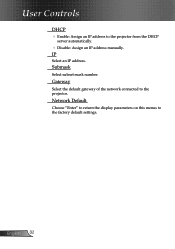
Submask Select subnet mask number. Network Default Choose "Enter" to return the display parameters on this menus to the projector from the DHCP server automatically. Disable: Assign an IP address manually. User Controls DHCP Enable: Assign an IP address to the factory default settings. English 32 Gateway Select the default gateway of the network connected to the projector. IP Select an IP address.
Submask Select subnet mask number. Network Default Choose "Enter" to return the display parameters on this menus to the projector from the DHCP server automatically. Disable: Assign an IP address manually. User Controls DHCP Enable: Assign an IP address to the factory default settings. English 32 Gateway Select the default gateway of the network connected to the projector. IP Select an IP address.

User Manual
Page 33
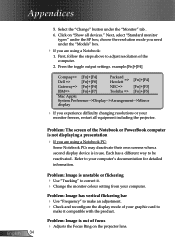
... whole image, you will also need to the "Replacing the lamp" section. Make sure you have removed the lens cap and the projector is switched on. Ensure that your local reseller or service center, see page 40 for details. If the problem persists, please contact... change the monitor display you are correctly and securely connected as described in the Main group. 2. Appendices Troubleshooting If you experience trouble with the projector, refer to the following information. Verify that the "AV Mute" feature is less than or equal to 1600 x 1200. In the Windows ...
... whole image, you will also need to the "Replacing the lamp" section. Make sure you have removed the lens cap and the projector is switched on. Ensure that your local reseller or service center, see page 40 for details. If the problem persists, please contact... change the monitor display you are correctly and securely connected as described in the Main group. 2. Appendices Troubleshooting If you experience trouble with the projector, refer to the following information. Verify that the "AV Mute" feature is less than or equal to 1600 x 1200. In the Windows ...
User Manual
Page 34
... the toggle output settings. Problem: Image is in use. Problem: The screen of focus Adjusts the Focus Ring on "Show all equipment including the projector. Problem: Image has vertical flickering bar Use "Frequency" to be reactivated. Appendices English 34 5. Next, select "Standard monitor types" under the SP box...
... the toggle output settings. Problem: Image is in use. Problem: The screen of focus Adjusts the Focus Ring on "Show all equipment including the projector. Problem: Image has vertical flickering bar Use "Frequency" to be reactivated. Appendices English 34 5. Next, select "Standard monitor types" under the SP box...
User Manual
Page 35
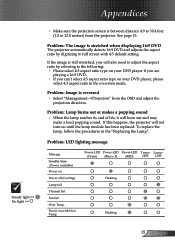
...(1.5 to full screen with Over Temp. To replace the lamp, follow the procedures in the on screen menu. If this happens, the projector will burn out and may make a loud popping sound. See page 15. Problem: The image is reversed Select "Management-->Projection" from ...the projector. Power-LED Power-LED Power-LED Temp- Problem: Image is stretched when displaying 16:9 DVD The projector automatically detects 16:9 DVD and adjusts the aspect ratio by referring to the following: ...
...(1.5 to full screen with Over Temp. To replace the lamp, follow the procedures in the on screen menu. If this happens, the projector will burn out and may make a loud popping sound. See page 15. Problem: The image is reversed Select "Management-->Projection" from ...the projector. Power-LED Power-LED Power-LED Temp- Problem: Image is stretched when displaying 16:9 DVD The projector automatically detects 16:9 DVD and adjusts the aspect ratio by referring to the following: ...
User Manual
Page 37
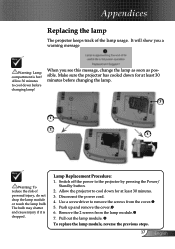
... before changing lamp! Lamp Replacement Procedure: 1. It will show you see this message, change the lamp as soon as possible. Allow the projector to cool down for at least 30 minutes. 3. Pull out the lamp module. To replace the lamp module, reverse the previous... steps. 37 English When you a warning message Warning: Lamp compartment is dropped. Disconnect the power cord. 4. Use a screwdriver to the projector by pressing the Power/ Standby button. 2. Remove the 2 screws from the cover. 5. The bulb may shatter and cause injury if it is...
... before changing lamp! Lamp Replacement Procedure: 1. It will show you see this message, change the lamp as soon as possible. Allow the projector to cool down for at least 30 minutes. 3. Pull out the lamp module. To replace the lamp module, reverse the previous... steps. 37 English When you a warning message Warning: Lamp compartment is dropped. Disconnect the power cord. 4. Use a screwdriver to the projector by pressing the Power/ Standby button. 2. Remove the 2 screws from the cover. 5. The bulb may shatter and cause injury if it is...


