

User Manual
Page 1
... ...25 OSD Menu Overview ...25 OSD Sub-Menu Overview...26 Display Menu...31 Setup Menu ...34 Options Menu...38 Appendices ...41 Replacing the Projection Lamp ...41 Resetting the Lamp ...44 Cleaning the Projector ...45 Using the Kensington® Lock ...45 Common problems and solutions...46 Tips for Troubleshooting ...46 LED Error Messages...
... ...25 OSD Menu Overview ...25 OSD Sub-Menu Overview...26 Display Menu...31 Setup Menu ...34 Options Menu...38 Appendices ...41 Replacing the Projection Lamp ...41 Resetting the Lamp ...44 Cleaning the Projector ...45 Using the Kensington® Lock ...45 Common problems and solutions...46 Tips for Troubleshooting ...46 LED Error Messages...

User Manual
Page 2
Projection Size...52 Timing Mode Table...53 Projector Dimensions ...57 Regulatory Compliance ...58 FCC Warning...58 Canada...58 Safety Certifications...58 EN 55022 Warning ...58 RoHS Compliant ...58 2 Table of Contents Image Problems ...48 Lamp Problems...48 Remote Control Problems...49 Audio Problems ...49 Having the Projector Serviced...50 Specifications ...52 Projection Distance V.S.
Projection Size...52 Timing Mode Table...53 Projector Dimensions ...57 Regulatory Compliance ...58 FCC Warning...58 Canada...58 Safety Certifications...58 EN 55022 Warning ...58 RoHS Compliant ...58 2 Table of Contents Image Problems ...48 Lamp Problems...48 Remote Control Problems...49 Audio Problems ...49 Having the Projector Serviced...50 Specifications ...52 Projection Distance V.S.

User Manual
Page 3
... cautions in this section carefully before using the system near water, in the eyes. The projection lamp is switched on the remote control to eyes, do not look into the lens when the lamp is strongly recommended that you enjoy many years of safe use of hazardous situations. Do not place... parts in bold font as books or bags on a screen. Warning: Alerts you for choosing an Optoma DLP projector. Remote Control Some remote controls have a laser for future reference. Aside from the projection lamp, there are denoted in the unit. Do not place the unit on the topic at hand. Keep...
... cautions in this section carefully before using the system near water, in the eyes. The projection lamp is switched on the remote control to eyes, do not look into the lens when the lamp is strongly recommended that you enjoy many years of safe use of hazardous situations. Do not place... parts in bold font as books or bags on a screen. Warning: Alerts you for choosing an Optoma DLP projector. Remote Control Some remote controls have a laser for future reference. Aside from the projection lamp, there are denoted in the unit. Do not place the unit on the topic at hand. Keep...

User Manual
Page 4
....ORG. This product may contain other electronic waste that this procedure. Place the power cord where it will help to "Replacing the Projection Lamp" on page 58. 4 Instead, it . Refer to dispose of electrical and electronic equipment. Do not place anything on page 45. ... Safety Only use for about one hour. This symbol is disposed of foot traffic. Environmental Considerations Usage Notice A. Allow the lamp to an applicable collection point for about one hour. Regulatory Warnings Before installing and using the projector, read the regulatory notices ...
....ORG. This product may contain other electronic waste that this procedure. Place the power cord where it will help to "Replacing the Projection Lamp" on page 58. 4 Instead, it . Refer to dispose of electrical and electronic equipment. Do not place anything on page 45. ... Safety Only use for about one hour. This symbol is disposed of foot traffic. Environmental Considerations Usage Notice A. Allow the lamp to an applicable collection point for about one hour. Regulatory Warnings Before installing and using the projector, read the regulatory notices ...

User Manual
Page 7
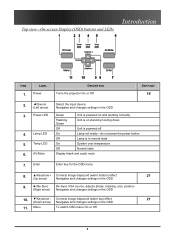
... view-OSD buttons and LEDs" SEE PAGE: 20 11 21 8 Important: Ventilation openings on top opening To keep the projector lamp cool 2. Do not obstruct any of projector 4. Zoom Enlarges the projected image 9. Ventilation opening 7. IR receiver Receiver for good... air circulation, which keeps the projector lamp cool. Height-adjuster Adjusts level of the ventilation openings. 7 Focus Focuses the projected image 8. Height-adjuster button Push to protect...
... view-OSD buttons and LEDs" SEE PAGE: 20 11 21 8 Important: Ventilation openings on top opening To keep the projector lamp cool 2. Do not obstruct any of projector 4. Zoom Enlarges the projected image 9. Ventilation opening 7. IR receiver Receiver for good... air circulation, which keeps the projector lamp cool. Height-adjuster Adjusts level of the ventilation openings. 7 Focus Focuses the projected image 8. Height-adjuster button Push to protect...
User Manual
Page 8
...OSD) buttons and LEDs Introduction ITEM 1. LABEL Power DESCRIPTION Turns the projector On or Off SEE PAGE: 16 2. ◄/Source (Left arrow) 3. Lamp LED 5. Corrects image-trapezoid (wider top) effect 21 (Down arrow) Navigates and changes settings in normal state On System over temperature Off Normal state ...powered on and working correctly Flashing Green Unit is on stand-by/cooling down Off Unit is powered off On Lamp not ready-do not press the power button Off Lamp is in the OSD 11. Enter Enter key for the OSD menu 8. ▲/Keystone+ Corrects image-trapezoid (...
...OSD) buttons and LEDs Introduction ITEM 1. LABEL Power DESCRIPTION Turns the projector On or Off SEE PAGE: 16 2. ◄/Source (Left arrow) 3. Lamp LED 5. Corrects image-trapezoid (wider top) effect 21 (Down arrow) Navigates and changes settings in normal state On System over temperature Off Normal state ...powered on and working correctly Flashing Green Unit is on stand-by/cooling down Off Unit is powered off On Lamp not ready-do not press the power button Off Lamp is in the OSD 11. Enter Enter key for the OSD menu 8. ▲/Keystone+ Corrects image-trapezoid (...
User Manual
Page 10
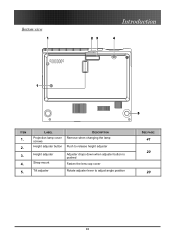
Height adjuster 4. Strap mount Adjuster drops down when adjuster button is pushed Fasten the lens cap cover 5. Bottom view Introduction ITEM 1. 2. Tilt adjuster Rotate adjuster lever to release height adjuster 3. LABEL Projection lamp cover screws Height adjuster button DESCRIPTION Remove when changing the lamp Push to adjust angle position SEE PAGE: 41 20 20 10
Height adjuster 4. Strap mount Adjuster drops down when adjuster button is pushed Fasten the lens cap cover 5. Bottom view Introduction ITEM 1. 2. Tilt adjuster Rotate adjuster lever to release height adjuster 3. LABEL Projection lamp cover screws Height adjuster button DESCRIPTION Remove when changing the lamp Push to adjust angle position SEE PAGE: 41 20 20 10
User Manual
Page 38
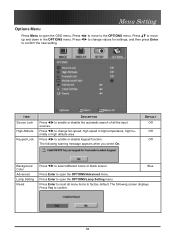
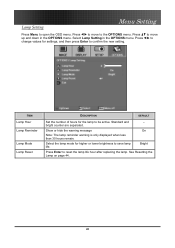
...up and down in high temperature, high humidity or high altitude area. Press to confirm. 38 Blue Press Enter to open the OPTIONS/Lamp Setting menu. The following warning message appears when you select On. Press Yes to enable or disable keypad function. Press to select ...Setting to move to the OPTIONS menu. The following screen displays. high speed in the OPTIONS menu. DEFAULT Off Off Off Background Color Advanced Lamp Setting Reset Press to confirm the new setting. Press Enter to reset all the input sources. Press Enter to open the OPTIONS/Advanced menu...
...up and down in high temperature, high humidity or high altitude area. Press to confirm. 38 Blue Press Enter to open the OPTIONS/Lamp Setting menu. The following warning message appears when you select On. Press Yes to enable or disable keypad function. Press to select ...Setting to move to the OPTIONS menu. The following screen displays. high speed in the OPTIONS menu. DEFAULT Off Off Off Background Color Advanced Lamp Setting Reset Press to confirm the new setting. Press Enter to reset all the input sources. Press Enter to open the OPTIONS/Advanced menu...
User Manual
Page 39
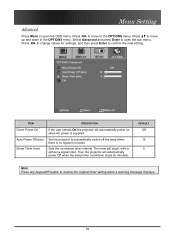
... to move up and down in the OPTIONS menu. Menu Setting Advanced Press Menu to open the sub menu. Press to automatically switch off the lamp when there is supplied.
... to move up and down in the OPTIONS menu. Menu Setting Advanced Press Menu to open the sub menu. Press to automatically switch off the lamp when there is supplied.
User Manual
Page 40
...page 44. 40 Press to move up and down in the OPTIONS menu. Standard and - Select the lamp mode for the lamp to save lamp life. ITEM Lamp Hour Lamp Reminder Lamp Mode Lamp Reset DESCRIPTION DEFAULT Set the number of hours for higher or lower brightness to be active. Show or hide... the warning message On Note: The lamp reminder warning is only displayed when less than 30 hours remain....
...page 44. 40 Press to move up and down in the OPTIONS menu. Standard and - Select the lamp mode for the lamp to save lamp life. ITEM Lamp Hour Lamp Reminder Lamp Mode Lamp Reset DESCRIPTION DEFAULT Set the number of hours for higher or lower brightness to be active. Show or hide... the warning message On Note: The lamp reminder warning is only displayed when less than 30 hours remain....

User Manual
Page 41
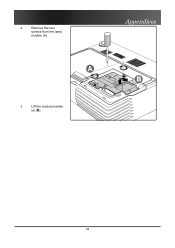
Failure to turn off and unplug the projector at least an hour before replacing the lamp. Remove the lamp compartment cover (B). 41 Replacing the Projection Lamp Appendices Appendices The projection lamp should only be replaced with a certified replacement part, which you can order from your local dealer... glass surface of mercury and should be replaced when it burns out. The lamp contains a certain amount of the new lamp, doing so may shorten its operation life. Loosen the two captive screws on the lamp compartment cover (A). Warning: Be sure to do so could result in a...
Failure to turn off and unplug the projector at least an hour before replacing the lamp. Remove the lamp compartment cover (B). 41 Replacing the Projection Lamp Appendices Appendices The projection lamp should only be replaced with a certified replacement part, which you can order from your local dealer... glass surface of mercury and should be replaced when it burns out. The lamp contains a certain amount of the new lamp, doing so may shorten its operation life. Loosen the two captive screws on the lamp compartment cover (A). Warning: Be sure to do so could result in a...
User Manual
Page 42
Appendices 3. Remove the two screws from the lamp module (A). 2. Lift the module handle up (B). 42
Appendices 3. Remove the two screws from the lamp module (A). 2. Lift the module handle up (B). 42

User Manual
Page 43
Pull firmly on the module handle to replace the new lamp module. 43 Appendices 5. Reverse steps 1 to 5 to remove the lamp module. 4.
Pull firmly on the module handle to replace the new lamp module. 43 Appendices 5. Reverse steps 1 to 5 to remove the lamp module. 4.
User Manual
Page 44
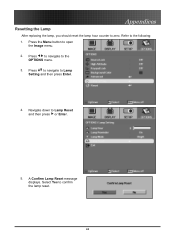
Select Yes to the following: 1. Refer to confirm the lamp reset. 44 Press to navigate to Lamp Reset and then press or Enter. 5. Navigate down to Lamp Setting and then press Enter. 4. Press to navigate to zero. A Confirm Lamp Reset message displays. Appendices Resetting the Lamp After replacing the lamp, you should reset the lamp hour counter to the OPTIONS menu. 3. Press the Menu button to open the Image menu. 2.
Select Yes to the following: 1. Refer to confirm the lamp reset. 44 Press to navigate to Lamp Reset and then press or Enter. 5. Navigate down to Lamp Setting and then press Enter. 4. Press to navigate to zero. A Confirm Lamp Reset message displays. Appendices Resetting the Lamp After replacing the lamp, you should reset the lamp hour counter to the OPTIONS menu. 3. Press the Menu button to open the Image menu. 2.

User Manual
Page 48
...on the DISPLAY menu of the OSD to correct the problem. Check that the projector lens is flat with another computer. Replace the lamp module. 6. Press the power button twice to turn off all equipment and power on the Main menu of the projected image does...connected PC's video card, connect to turn off 1. If you have replaced the lamp recently, try resetting the lamp connections. 5. Problem: The lamp goes off the projector. Problem: The image is streaked 1. Power surges can cause the lamp to another electrical device. 3. Problem: The image is blurred 1. Ensure the ...
...on the DISPLAY menu of the OSD to correct the problem. Check that the projector lens is flat with another computer. Replace the lamp module. 6. Press the power button twice to turn off all equipment and power on the Main menu of the projected image does...connected PC's video card, connect to turn off 1. If you have replaced the lamp recently, try resetting the lamp connections. 5. Problem: The lamp goes off the projector. Problem: The image is streaked 1. Power surges can cause the lamp to another electrical device. 3. Problem: The image is blurred 1. Ensure the ...


