

User Manual
Page 1
1 English Table of Contents Usage Notice Precautions 2 Introduction Product Features 3 Package Overview 4 Product Overview 5 Installation Connecting the Projector to Desktop Computer 8 Connecting the Projector to Portable Computer 9 Connecting the Projector to Other Video Sources 10 Powering On/Off the Projection Display 12 Adjusting the Projected image 14 User Controls Panel Control & Remote Control 16 On-Screen Display Menus 18 Appendices Troubleshooting 22 Changing the Lamp 24 Specifications 25 Compatibility Modes 26
1 English Table of Contents Usage Notice Precautions 2 Introduction Product Features 3 Package Overview 4 Product Overview 5 Installation Connecting the Projector to Desktop Computer 8 Connecting the Projector to Portable Computer 9 Connecting the Projector to Other Video Sources 10 Powering On/Off the Projection Display 12 Adjusting the Projected image 14 User Controls Panel Control & Remote Control 16 On-Screen Display Menus 18 Appendices Troubleshooting 22 Changing the Lamp 24 Specifications 25 Compatibility Modes 26
User Manual
Page 2
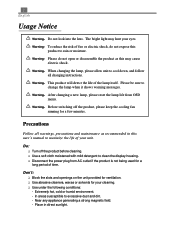
... shows warning messages. To reduce the risk of your cleaning. Warning- Place in this user's manual to maximize the life of fire or electric shock, do not open or disassemble the product as recommended in direct sunlight. After changing a new lamp, please reset the lamp life from AC outlet if the product is not being used for a few minutes. q Disconnect the power plug from OSD menu. q Use under...
... shows warning messages. To reduce the risk of your cleaning. Warning- Place in this user's manual to maximize the life of fire or electric shock, do not open or disassemble the product as recommended in direct sunlight. After changing a new lamp, please reset the lamp life from AC outlet if the product is not being used for a few minutes. q Disconnect the power plug from OSD menu. q Use under...
User Manual
Page 3
... as follows: q True XGA, 1024 x 768 addressable pixels q 5 lbs (2.3 kgs) lightweight compact design q Single chip DMDä technology q SXGA compression and VGA, SVGA resizing q 120 Watts user replaceable UHP lamp q Mac/ NEC PC-98/ FM Towns compatible q NTSC/ PAL/ SECAM compatible q Full function remote control q Real plug & play with auto image function q User friendly Multilingual on-screen display menu q Advanced electronic keystone correction and picture in picture function q Luxurious carrying...
... as follows: q True XGA, 1024 x 768 addressable pixels q 5 lbs (2.3 kgs) lightweight compact design q Single chip DMDä technology q SXGA compression and VGA, SVGA resizing q 120 Watts user replaceable UHP lamp q Mac/ NEC PC-98/ FM Towns compatible q NTSC/ PAL/ SECAM compatible q Full function remote control q Real plug & play with auto image function q User friendly Multilingual on-screen display menu q Advanced electronic keystone correction and picture in picture function q Luxurious carrying...
User Manual
Page 5
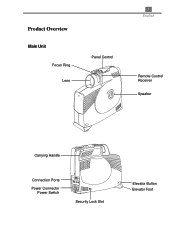
Product Overview Main Unit Focus Ring Lens Panel Control 5 English Remote Control Receiver Speaker Carrying Handle Connection Ports Power Connector Power Switch Security Lock Slot Elevator Button Elevator Foot
Product Overview Main Unit Focus Ring Lens Panel Control 5 English Remote Control Receiver Speaker Carrying Handle Connection Ports Power Connector Power Switch Security Lock Slot Elevator Button Elevator Foot
User Manual
Page 8
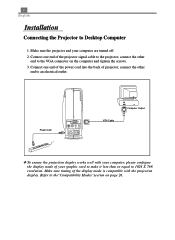
... the projector signal cable to the VGA connector on page 26. connect the other end to the projector; Power Cord VGA Cable Computer Output v To ensure the projection display works well with the projection display. Refer to an electrical outlet. connect the other end to the"Compatibility Modes"section on the computer and tignten the screws. 3. Connect one end of the power cord into the back of your computer are turned off...
... the projector signal cable to the VGA connector on page 26. connect the other end to the projector; Power Cord VGA Cable Computer Output v To ensure the projection display works well with the projection display. Refer to an electrical outlet. connect the other end to the"Compatibility Modes"section on the computer and tignten the screws. 3. Connect one end of the power cord into the back of your computer are turned off...

User Manual
Page 9
Make sure the projector and your notebook are turned off. 2. Connect one end of the power cord into the back of the projector signal cable to an electrical outlet. Connect one end of projector; Power Cord Notebook Output VGA Cable 9 English Connecting the Projector to the VGA connector on the notebook and tignten the screws. 3. connect the other end to the projector; connect the other end to Portable Computer 1.
Make sure the projector and your notebook are turned off. 2. Connect one end of the power cord into the back of the projector signal cable to an electrical outlet. Connect one end of projector; Power Cord Notebook Output VGA Cable 9 English Connecting the Projector to the VGA connector on the notebook and tignten the screws. 3. connect the other end to the projector; connect the other end to Portable Computer 1.
User Manual
Page 12
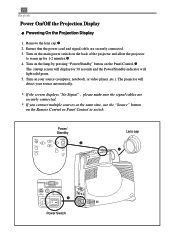
... the projector to switch. The projector will light solid green. 5. Ensure that the power cord and signal cable are securely connected. * If you connect multiple sources at the same time, use the "Source" button on the Panel Control.Ž The startup screen will display for 1-2 minutes. 4. Power/ Standby Ž Lens cap Œ Power Switch Turn on your source automatically. * If the screen displays "No Signal" , please make sure the signal cables are securely connected. 3. Turn on the lamp by pressing "Power/Standby" button on the Remote Control or Panel Control...
... the projector to switch. The projector will light solid green. 5. Ensure that the power cord and signal cable are securely connected. * If you connect multiple sources at the same time, use the "Source" button on the Panel Control.Ž The startup screen will display for 1-2 minutes. 4. Power/ Standby Ž Lens cap Œ Power Switch Turn on your source automatically. * If the screen displays "No Signal" , please make sure the signal cables are securely connected. 3. Turn on the lamp by pressing "Power/Standby" button on the Remote Control or Panel Control...
User Manual
Page 13
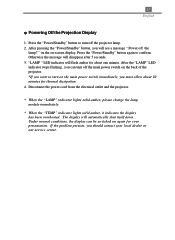
... a message " Power off the lamp? 13 English u Powering Off the Projection Display 1. Disconnect the power cord from the electrical outlet and the projector. * When the "LAMP" indicator lights solid amber; please change the lamp module immediately. * When the "TEMP" indicator lights solid amber, it indicates the display has been overheated. If the problem persists, you will flash amber for about 10 minutes for your local dealer or our service center. After pressing the "Power/Standby" button...
... a message " Power off the lamp? 13 English u Powering Off the Projection Display 1. Disconnect the power cord from the electrical outlet and the projector. * When the "LAMP" indicator lights solid amber; please change the lamp module immediately. * When the "TEMP" indicator lights solid amber, it indicates the display has been overheated. If the problem persists, you will flash amber for about 10 minutes for your local dealer or our service center. After pressing the "Power/Standby" button...
User Manual
Page 15
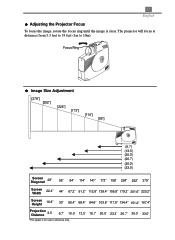
..." 141" 173" 196" 224" 252" 279" Screen 22.4" Width 44" 67.2" 91.2" 112.8" 138.4" 156.8" 179.2" 201.6" 223.2" Screen 16.8" Height 33" 50.4" 68.4" 84.6" 103.8" 117.6" 134.4" 151.2" 167.4" Projection Distance 3.3' 6.7' 10.0' *This graph is clear. 15 English u Adjusting the Projector Focus To focus the image, rotate the focus ring until the image is for user's reference only. 13.3' 16.7' 20.0' 23...
..." 141" 173" 196" 224" 252" 279" Screen 22.4" Width 44" 67.2" 91.2" 112.8" 138.4" 156.8" 179.2" 201.6" 223.2" Screen 16.8" Height 33" 50.4" 68.4" 84.6" 103.8" 117.6" 134.4" 151.2" 167.4" Projection Distance 3.3' 6.7' 10.0' *This graph is clear. 15 English u Adjusting the Projector Focus To focus the image, rotate the focus ring until the image is for user's reference only. 13.3' 16.7' 20.0' 23...
User Manual
Page 16
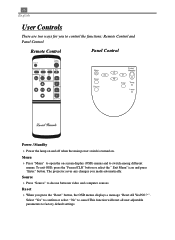
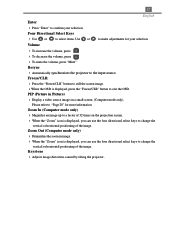
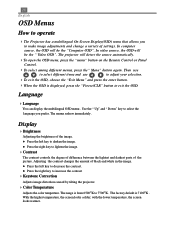
Remote Control Panel Control Power / Standby 4 Power the lamp on and off when the main power switch is turned on -screen display (OSD) menus and to control the functions: Remote Control and Panel Control. The projector saves any changes you press the "Reset" button, the OSD menus displays a message "Reset All Yes/NO ? Reset 4 When you made automatically. ". 16 English User Controls There are two ways for you to switch among different menus. Menu 4 Press "Menu" to open the on . Source 4 Press "Source" to factory default settings. To...
Remote Control Panel Control Power / Standby 4 Power the lamp on and off when the main power switch is turned on -screen display (OSD) menus and to control the functions: Remote Control and Panel Control. The projector saves any changes you press the "Reset" button, the OSD menus displays a message "Reset All Yes/NO ? Reset 4 When you made automatically. ". 16 English User Controls There are two ways for you to switch among different menus. Menu 4 Press "Menu" to open the on . Source 4 Press "Source" to factory default settings. To...
User Manual
Page 17
.... Zoom In (Computer mode only) 4 Magnifies an image up to a factor of 32 times on a small screen. (Computer mode only). PIP (Picture in image. 4 When the "Zoom" icon is displayed, you can use the four directional select keys to change the vertical or horizontal positioning of the image. Zoom Out (Computer mode only) 4 Diminishes the zoom in Picture) 4 Display a video source image on the projection screen. 4 When the "Zoom" icon is displayed, you can use the...
.... Zoom In (Computer mode only) 4 Magnifies an image up to a factor of 32 times on a small screen. (Computer mode only). PIP (Picture in image. 4 When the "Zoom" icon is displayed, you can use the four directional select keys to change the vertical or horizontal positioning of the image. Zoom Out (Computer mode only) 4 Diminishes the zoom in Picture) 4 Display a video source image on the projection screen. 4 When the "Zoom" icon is displayed, you can use the...
User Manual
Page 18
... Temperature Adjusts the color temperture. Display 4Brightness Adjusting the brightness of black and white in the image. In computer source, the OSD will be the "Computer OSD". The projector will detect the source automatically. 4To open the OSD menu, press the "menu" button on the Remote Control or Panel Control. 4To select among different menus, press the" Menu" button again. Adjusting the contrast changes the amount of the image. with the lower temperature, the screen...
... Temperature Adjusts the color temperture. Display 4Brightness Adjusting the brightness of black and white in the image. In computer source, the OSD will be the "Computer OSD". The projector will detect the source automatically. 4To open the OSD menu, press the "menu" button on the Remote Control or Panel Control. 4To select among different menus, press the" Menu" button again. Adjusting the contrast changes the amount of the image. with the lower temperature, the screen...
User Manual
Page 19
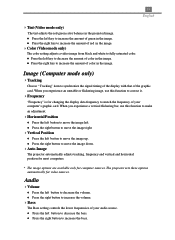
... Bass setting controls the lower frequencies of red in the projected image. l Press the left button to move the image right. 4Vertical Position l Press the left key to synchronize the signal timing of the display with that of color in the image. l Press the right button to move the image up. 19 English 4Tint (Video mode only) The tint adjusts the red-green color balance in the image. 4Color (Video mode only) The color setting adjusts a video image...
... Bass setting controls the lower frequencies of red in the projected image. l Press the left button to move the image right. 4Vertical Position l Press the left key to synchronize the signal timing of the display with that of color in the image. l Press the right button to move the image up. 19 English 4Tint (Video mode only) The tint adjusts the red-green color balance in the image. 4Color (Video mode only) The color setting adjusts a video image...
User Manual
Page 20
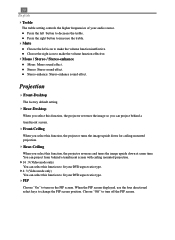
... icon to trun off the PIP screen. l Stereo: Stereo sound effect. l Press the right button to increase the treble. 4Mute l Choose the left button to change the PIP screen position. Projection 4Front-Desktop The factory default setting. 4Rear-Desktop When you select this function, the projector reverses the image so you can project behind a translucent screen with ceiling mounted projection. 416 : 9 (Video mode only) You can select this function...
... icon to trun off the PIP screen. l Stereo: Stereo sound effect. l Press the right button to increase the treble. 4Mute l Choose the left button to change the PIP screen position. Projection 4Front-Desktop The factory default setting. 4Rear-Desktop When you select this function, the projector reverses the image so you can project behind a translucent screen with ceiling mounted projection. 416 : 9 (Video mode only) You can select this function...
User Manual
Page 21
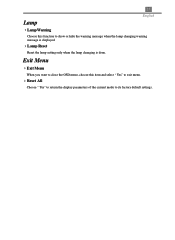
Lamp 21 English 4Lamp Warning Choose this item and select " Yes" to exit menu. 4Reset All Choose " Yes" to return the display parameters of the current mode to show or hide the warning message when the lamp changing warning message is displayed. 4Lamp Reset Reset the lamp setting only when the lamp changing is done. Exit Menu 4Exit Menu When you want to close the OSD menu, choose this function to its factory default settings.
Lamp 21 English 4Lamp Warning Choose this item and select " Yes" to exit menu. 4Reset All Choose " Yes" to return the display parameters of the current mode to show or hide the warning message when the lamp changing warning message is displayed. 4Lamp Reset Reset the lamp setting only when the lamp changing is done. Exit Menu 4Exit Menu When you want to close the OSD menu, choose this function to its factory default settings.
User Manual
Page 22
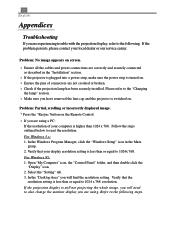
.... 4 Check if the projection lamp has been securely installed. Select the "Setting" tab. 3. In the Windows Program Manager, click the "Windows Setup" icon in the "Installation" section. 4 If the projector is plugged into a power strip, make sure the power strip is switched on the Remote Control. 4 If you are using . Verify that the resolution setting is less than 1024 x 768. Refer to the following . Problem: No image appears on screen. 4 Ensure...
.... 4 Check if the projection lamp has been securely installed. Select the "Setting" tab. 3. In the Windows Program Manager, click the "Windows Setup" icon in the "Installation" section. 4 If the projector is plugged into a power strip, make sure the power strip is switched on the Remote Control. 4 If you are using . Verify that the resolution setting is less than 1024 x 768. Refer to the following . Problem: No image appears on screen. 4 Ensure...

User Manual
Page 23
... of focus 4 Adjust the Focus Ring on the "Advanced Properties " button. 5. Problem: Image is between the required distance 3.3ft.(1m)~ 33ft.(10m) from your computer's documentation for detailed information. 4 If you are using an Apple PowerBook: In Control Panels, open the PowerBook Display to the "external display only" or "CRT only" mode. 4 If you need under the " Models" box. 7. Click on the projector lens. 4 Make sure the projection screen...
... of focus 4 Adjust the Focus Ring on the "Advanced Properties " button. 5. Problem: Image is between the required distance 3.3ft.(1m)~ 33ft.(10m) from your computer's documentation for detailed information. 4 If you are using an Apple PowerBook: In Control Panels, open the PowerBook Display to the "external display only" or "CRT only" mode. 4 If you need under the " Models" box. 7. Click on the projector lens. 4 Make sure the projection screen...
User Manual
Page 24
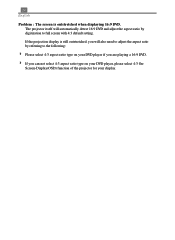
24 English Problem : The screen is still outstretched, you will automatically detect 16:9 DVD and adjust the aspect ratio by referring to full screen with 4:3 default setting. If the projection display is outstretched when displaying 16:9 DVD. The projector itself will also need to adjust the aspect ratio by digitization to the following: 4 Please select 4:3 aspect ratio type on your DVD player if you are playing a 16:9 DVD. 4 If you can not select 4:3 aspect ratio type on your DVD player, please select 4:3 OnScreen-Display(OSD) function of the projector for your display.
24 English Problem : The screen is still outstretched, you will automatically detect 16:9 DVD and adjust the aspect ratio by referring to full screen with 4:3 default setting. If the projection display is outstretched when displaying 16:9 DVD. The projector itself will also need to adjust the aspect ratio by digitization to the following: 4 Please select 4:3 aspect ratio type on your DVD player if you are playing a 16:9 DVD. 4 If you can not select 4:3 aspect ratio type on your DVD player, please select 4:3 OnScreen-Display(OSD) function of the projector for your display.
User Manual
Page 25
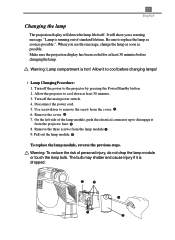
... projector by pressing the Power/Standby button. 2. Remove the cover. 7. Be sure to cool before changing the lamp. Allow it is hot! The bulb may shatter and cause injury if it to replace the lamp as soon as possible. It will detect the lamp life itself. Use screwdriver to cool down at least 30 minutes before changing lamps! 4 Lamp Changing Procedure: 1. Turn off the main power switch. 4. 25 English Changing the lamp...
... projector by pressing the Power/Standby button. 2. Remove the cover. 7. Be sure to cool before changing the lamp. Allow it is hot! The bulb may shatter and cause injury if it to replace the lamp as soon as possible. It will detect the lamp life itself. Use screwdriver to cool down at least 30 minutes before changing lamps! 4 Lamp Changing Procedure: 1. Turn off the main power switch. 4. 25 English Changing the lamp...
User Manual
Page 26
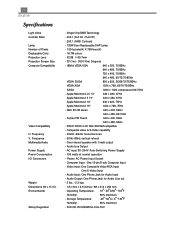
.../72/75/85Hz VESA XGA 1024 x 768, 60/70/75/85Hz SXGA 1280 x 1024 compressed 60/75Hz - Video Input: One Composite Video RCA Input One S-Video Input - Frequency V. Audio Line Output - Audio Output: One Phone Jack for Audio Input - 26 English Specifications Light Valve Contrast Ratio Lamp Number of Pixels Displayable Color Projection Lens Projection Screen Size Computer Compatibility Video Compatibility H. AC input 90~264V Auto-Switching Power Supply - 190 watts at normal operation - Storage Temperature: 80% maximum oo o o -20...
.../72/75/85Hz VESA XGA 1024 x 768, 60/70/75/85Hz SXGA 1280 x 1024 compressed 60/75Hz - Video Input: One Composite Video RCA Input One S-Video Input - Frequency V. Audio Line Output - Audio Output: One Phone Jack for Audio Input - 26 English Specifications Light Valve Contrast Ratio Lamp Number of Pixels Displayable Color Projection Lens Projection Screen Size Computer Compatibility Video Compatibility H. AC input 90~264V Auto-Switching Power Supply - 190 watts at normal operation - Storage Temperature: 80% maximum oo o o -20...


