
User's Manual
Page 2
..., do not expose the projector to rain or moisture. 3. Do not use the projector near any ventilation openings. The recycling of the FCC Rules. IMPORTANT SAFETY INSTRUCTIONS 1. Do not let objects or liquids enter the projector. Do not use near water or moisture. Notice: Shielded cables All connections to other hazards. CLASS 1 LED PRODUCT EYE SAFETY WARNINGS Avoid staring/facing directly...
..., do not expose the projector to rain or moisture. 3. Do not use the projector near any ventilation openings. The recycling of the FCC Rules. IMPORTANT SAFETY INSTRUCTIONS 1. Do not let objects or liquids enter the projector. Do not use near water or moisture. Notice: Shielded cables All connections to other hazards. CLASS 1 LED PRODUCT EYE SAFETY WARNINGS Avoid staring/facing directly...
User's Manual
Page 3
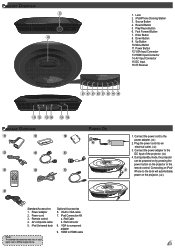
... Connector 8. HDMI to HDMI cable The standard accessories may vary in 11 12 13 14 15 16 PACKAGE OVERVIEW 1 5 7b 2 6 8 3 7a 9 Source Info. iPod/iPhone Docking Station 3. VGA Input Connector 13. Remote control 4. Down Button 9. Power Button 12. Connect the power cord to the DC Input of the projector. () 4. Up Button 10. iPod Universal dock Optional Accessories 6. Source Button 4. Play/Pause Button 6. Connect the power adapter to the power adapter. () 2. Lens 2. DC Input 16. Connecting an...
... Connector 8. HDMI to HDMI cable The standard accessories may vary in 11 12 13 14 15 16 PACKAGE OVERVIEW 1 5 7b 2 6 8 3 7a 9 Source Info. iPod/iPhone Docking Station 3. VGA Input Connector 13. Remote control 4. Down Button 9. Power Button 12. Connect the power cord to the DC Input of the projector. () 4. Up Button 10. iPod Universal dock Optional Accessories 6. Source Button 4. Play/Pause Button 6. Connect the power adapter to the power adapter. () 2. Lens 2. DC Input 16. Connecting an...
User's Manual
Page 4
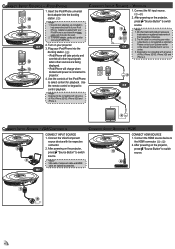
.... Use the remote control or keypad to projector. 4. Designed to 1 help ensure the best fit of iPod, iPhone 2G/3G, iPhone 3GS and iPhone 4. Connect the VGA/Component source device with your Optoma reseller or the relevant manufacturer's service center. 3. Adapters supplied with its respective connector. 2. To remove adapter, gently pull up after removing iPod/iPhone. VIDEO IN 1. Connect the HDMI source device to switch source. 1 2 or 1 1. CONNECT INPUT SOURCE - or CONNECT INPUT SOURCE - VGA/COMPONENT IN VGA 1 2 CONNECT INPUT SOURCE 1. Turn on...
.... Use the remote control or keypad to projector. 4. Designed to 1 help ensure the best fit of iPod, iPhone 2G/3G, iPhone 3GS and iPhone 4. Connect the VGA/Component source device with your Optoma reseller or the relevant manufacturer's service center. 3. Adapters supplied with its respective connector. 2. To remove adapter, gently pull up after removing iPod/iPhone. VIDEO IN 1. Connect the HDMI source device to switch source. 1 2 or 1 1. CONNECT INPUT SOURCE - or CONNECT INPUT SOURCE - VGA/COMPONENT IN VGA 1 2 CONNECT INPUT SOURCE 1. Turn on...

User's Manual
Page 5
... turned off - Switch 4:3/16:9/Auto - Highlight the desired option. ( ) 4. Button Source Source Rewind Fast Forward Play/Pause Enter Enter Down Up Menu Menu Power Mute Aspect Ratio Image Off Info. Toggle Repeat option to control the music or video playback. Mute/Unmute - Press (Menu) to exit the current menu. 5 HOW TO USE THE MENU Main menu Using the Control Panel MEDIA PLAYBACK CONTROL OPERATION Use the keypad or remote control to on /off - Press (Menu) to display...
... turned off - Switch 4:3/16:9/Auto - Highlight the desired option. ( ) 4. Button Source Source Rewind Fast Forward Play/Pause Enter Enter Down Up Menu Menu Power Mute Aspect Ratio Image Off Info. Toggle Repeat option to control the music or video playback. Mute/Unmute - Press (Menu) to exit the current menu. 5 HOW TO USE THE MENU Main menu Using the Control Panel MEDIA PLAYBACK CONTROL OPERATION Use the keypad or remote control to on /off - Press (Menu) to display...

User's Manual
Page 6
...). SOURCE: HDMI, COMPOSITE AV (AV IN), VGA Input signal source Display OSD menu Picture Menu Image Mode: Select image mode (Bright, Cinema, Photo). Contrast: Set the contrast level. Projection: Select projection mode (Front Desktop, Rear Desktop). Mute: Toggle mute option to on/off. Aspect Ratio: Select aspect ratio (4:3, 16:9, Auto). HOW TO USE THE MENU - Signal: Select signal mode (H-Position, V-Position, Clock, Phase) * "Signal" is only available when the source input is VGA. Color Mode: Select color mode (Standard, Extended). Picture Menu Music Menu System Menu...
...). SOURCE: HDMI, COMPOSITE AV (AV IN), VGA Input signal source Display OSD menu Picture Menu Image Mode: Select image mode (Bright, Cinema, Photo). Contrast: Set the contrast level. Projection: Select projection mode (Front Desktop, Rear Desktop). Mute: Toggle mute option to on/off. Aspect Ratio: Select aspect ratio (4:3, 16:9, Auto). HOW TO USE THE MENU - Signal: Select signal mode (H-Position, V-Position, Clock, Phase) * "Signal" is only available when the source input is VGA. Color Mode: Select color mode (Standard, Extended). Picture Menu Music Menu System Menu...

User's Manual
Page 7
... to on /off. Signal: Select signal mode (H-Position, V-Position, Clock, Phase) * "Signal" is only available when the source input is reversed • Select "Source --> System --> Projection" from the screen. Color Mode: Select color mode (Standard, Extended). Image is out of the iPod/iPhone is set to on /off . Audio Problems No sound • Press the Volume + button. (See page 5) COMPATIBILITY MODE Timing Table Mode Resolution V-Sync (Hz) 640x480 60 800x600 60 VGA 1024x768 60 1280x720...
... to on /off. Signal: Select signal mode (H-Position, V-Position, Clock, Phase) * "Signal" is only available when the source input is reversed • Select "Source --> System --> Projection" from the screen. Color Mode: Select color mode (Standard, Extended). Image is out of the iPod/iPhone is set to on /off . Audio Problems No sound • Press the Volume + button. (See page 5) COMPATIBILITY MODE Timing Table Mode Resolution V-Sync (Hz) 640x480 60 800x600 60 VGA 1024x768 60 1280x720...


