
4K500 User Manual
Page 1
DLP® Projector User manual
DLP® Projector User manual
4K500 User Manual
Page 2
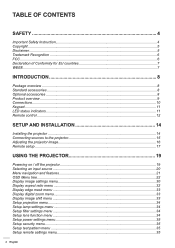
... Keypad...11 LED status indicators...11 Remote control...12 SETUP AND INSTALLATION 14 Installing the projector...14 Connecting sources to the projector 15 Adjusting the projector image...16 Remote setup...17 USING THE PROJECTOR 19 Powering on / off the projector 19 Selecting an input source...20 Menu navigation and features 21 OSD Menu tree...22...
... Keypad...11 LED status indicators...11 Remote control...12 SETUP AND INSTALLATION 14 Installing the projector...14 Connecting sources to the projector 15 Adjusting the projector image...16 Remote setup...17 USING THE PROJECTOR 19 Powering on / off the projector 19 Selecting an input source...20 Menu navigation and features 21 OSD Menu tree...22...
4K500 User Manual
Page 3
Setup projector ID menu...36 Setup 12V trigger menu...36 Setup options menu...36 Setup reset menu...37 Network LAN menu...37 Network control menu...38 Setup network control settings menu 39 Info menu...44 MAINTENANCE 45 Replacing the lamp...45 Installing and cleaning the dust filter 47 ADDITIONAL INFORMATION 48 Compatible resolutions...48 Image size and projection distance 49 Projector dimensions and ceiling mount installation 51 IR remote control codes...52 Troubleshooting...54 Warning indicators...55 Specifications...58 Optoma global offices...59 English 3
Setup projector ID menu...36 Setup 12V trigger menu...36 Setup options menu...36 Setup reset menu...37 Network LAN menu...37 Network control menu...38 Setup network control settings menu 39 Info menu...44 MAINTENANCE 45 Replacing the lamp...45 Installing and cleaning the dust filter 47 ADDITIONAL INFORMATION 48 Compatible resolutions...48 Image size and projection distance 49 Projector dimensions and ceiling mount installation 51 IR remote control codes...52 Troubleshooting...54 Warning indicators...55 Specifications...58 Optoma global offices...59 English 3

4K500 User Manual
Page 4
...Please follow all warnings, precautions and maintenance as amplifiers that emits heat. ‡‡ Do not let objects or liquids enter the projector. They may touch dangerous voltage points and short out parts that could result in fire or electric shock. ‡‡ Do not...radiators, heaters, stoves or any ventilation openings. Please call Optoma before you to protect from over resulting in the atmosphere. As an example, do not expose the projector to persons. The lamp inside . ‡‡ Do not place the projector on an unstable surface. To ensure reliable operation of ...
...Please follow all warnings, precautions and maintenance as amplifiers that emits heat. ‡‡ Do not let objects or liquids enter the projector. They may touch dangerous voltage points and short out parts that could result in fire or electric shock. ‡‡ Do not...radiators, heaters, stoves or any ventilation openings. Please call Optoma before you to protect from over resulting in the atmosphere. As an example, do not expose the projector to persons. The lamp inside . ‡‡ Do not place the projector on an unstable surface. To ensure reliable operation of ...
4K500 User Manual
Page 5
... specifically disclaims any particular purpose. Copyright This publication, including all rights reserved. English 5 To replace the lamp, follow the correct projector orientation installation as described on until the lamp module has been replaced. Neither this publication and to revise this manual, nor any... person of the material contained herein, may affect the projector performance. ‡‡ Use a power strip and or surge protector. The manufacturer reserves the right to make changes from the ...
... specifically disclaims any particular purpose. Copyright This publication, including all rights reserved. English 5 To replace the lamp, follow the correct projector orientation installation as described on until the lamp module has been replaced. Neither this publication and to revise this manual, nor any... person of the material contained herein, may affect the projector performance. ‡‡ Use a power strip and or surge protector. The manufacturer reserves the right to make changes from the ...

4K500 User Manual
Page 6
... receiver is a trademark by the manufacturer could void the user's authority, which can radiate radio frequency energy and, if not installed and used in this projector. This device must accept any interference received, including interference that interference will not occur in the United States and other computing devices must be determined...
... receiver is a trademark by the manufacturer could void the user's authority, which can radiate radio frequency energy and, if not installed and used in this projector. This device must accept any interference received, including interference that interference will not occur in the United States and other computing devices must be determined...
4K500 User Manual
Page 8
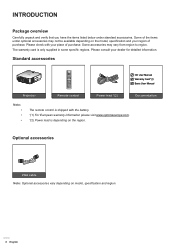
... S-Video HDMI1 HDMI2 123 HDBaseT Video DVI HDMI3 456 BNC YPbPr DisplayPort 3D 7890 CD User Manual Warranty Card*(1) Basic User Manual Projector Remote control Power lead *(2) Documentation Note The remote control is shipped with your dealer for detailed information. Please check with the battery. *(1) For European warranty...
... S-Video HDMI1 HDMI2 123 HDBaseT Video DVI HDMI3 456 BNC YPbPr DisplayPort 3D 7890 CD User Manual Warranty Card*(1) Basic User Manual Projector Remote control Power lead *(2) Documentation Note The remote control is shipped with your dealer for detailed information. Please check with the battery. *(1) For European warranty...
4K500 User Manual
Page 14
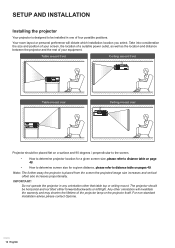
...between the projector and the rest of the projector lamp or the projector itself. Do not operate the projector in one of four possible positions. Note: The further away the projector is ...Table mount rear Ceiling mount rear Projector should be placed flat on a surface and 90 degrees / perpendicular to the screen. ‡‡ How to determine projector location for a given screen ...will dictate which installation location you select. SETUP AND INSTALLATION Installing the projector Your projector is placed from the screen the projected image size increases and vertical offset also...
...between the projector and the rest of the projector lamp or the projector itself. Do not operate the projector in one of four possible positions. Note: The further away the projector is ...Table mount rear Ceiling mount rear Projector should be placed flat on a surface and 90 degrees / perpendicular to the screen. ‡‡ How to determine projector location for a given screen ...will dictate which installation location you select. SETUP AND INSTALLATION Installing the projector Your projector is placed from the screen the projected image size increases and vertical offset also...
4K500 User Manual
Page 15
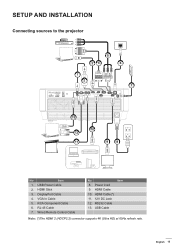
... refresh rate. HDMI Stick 3. DisplayPort Cable 4. English 15 RCA Component Cable 6. Wired Remote Control Cable No 8. Power Cord 9. SETUP AND INSTALLATION Connecting sources to the projector 5 34 6 1 2 RS-232 USB Power Out(5V-1.5A) Service HDMI 1 12V Out A 12V Out B HDMI 2 (HDCP2.2) DisplayPort HDMI 3 VGA/YPbPr RJ-45 HDMI Out Wired...
... refresh rate. HDMI Stick 3. DisplayPort Cable 4. English 15 RCA Component Cable 6. Wired Remote Control Cable No 8. Power Cord 9. SETUP AND INSTALLATION Connecting sources to the projector 5 34 6 1 2 RS-232 USB Power Out(5V-1.5A) Service HDMI 1 12V Out A 12V Out B HDMI 2 (HDCP2.2) DisplayPort HDMI 3 VGA/YPbPr RJ-45 HDMI Out Wired...
4K500 User Manual
Page 16
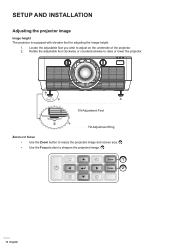
Tilt-Adjustment Feet Tilt-Adjustment Ring Zoom and focus ‡‡ Use the Zoom button to resize the projected image and screen size. 1 ‡‡ Use the Focus button to raise or lower the projector. Rotate the adjustable foot clockwise or counterclockwise to sharpen the projected image. 2 1 2 16 English Locate the adjustable foot you wish to adjust on the underside of the projector. 2. SETUP AND INSTALLATION Adjusting the projector image Image height The projector is equipped with elevator feet for adjusting the image height. 1.
Tilt-Adjustment Feet Tilt-Adjustment Ring Zoom and focus ‡‡ Use the Zoom button to resize the projected image and screen size. 1 ‡‡ Use the Focus button to raise or lower the projector. Rotate the adjustable foot clockwise or counterclockwise to sharpen the projected image. 2 1 2 16 English Locate the adjustable foot you wish to adjust on the underside of the projector. 2. SETUP AND INSTALLATION Adjusting the projector image Image height The projector is equipped with elevator feet for adjusting the image height. 1.
4K500 User Manual
Page 17
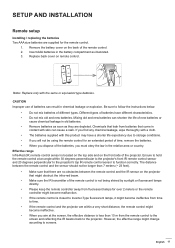
... not be longer than 10 m from batteries that might obstruct the infra-red beam. ‡‡ Make sure the IR transmitter of the projector. If you find any chemical leakage, wipe thoroughly with a cloth. ‡‡ The batteries supplied with this product may have different characteristics....lamps directly. ‡‡ Please keep the remote controller away from time to time. ‡‡ If the remote control and the projector are supplied for the remote control. 1. SETUP AND INSTALLATION Remote setup Installing / replacing the batteries Two AAA size batteries are within 30 ...
... not be longer than 10 m from batteries that might obstruct the infra-red beam. ‡‡ Make sure the IR transmitter of the projector. If you find any chemical leakage, wipe thoroughly with a cloth. ‡‡ The batteries supplied with this product may have different characteristics....lamps directly. ‡‡ Please keep the remote controller away from time to time. ‡‡ If the remote control and the projector are supplied for the remote control. 1. SETUP AND INSTALLATION Remote setup Installing / replacing the batteries Two AAA size batteries are within 30 ...
4K500 User Manual
Page 18
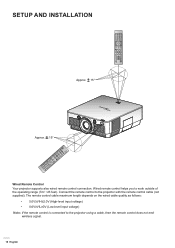
... F2 AV Mute ENTER InSfoo.urce F3 Volume Re-Sync D Zoom ForMmeantuFVrGeAez1eHSD-BVaidsRee4To2eIDBmVHNiodDCteeMo7I513AYlPHlDbDVPMIr8I6D2iHspDlaMyPI93ort 3D 0 Connect the remote control to the projector with the remote control cable (not supplied). Source F3 Volume Re-Sync D Zoom ENTER F1 Mode F2 AV Mute Geometric ...Correction PIP/PBP On Off SETUP AND INSTALLATION Approx. 15° Approx. 15° Wired Remote Control Your projector supports also wired remote control connection. BNC YPbPr DisplayPort 3D 7890 HDBaseT Video DVI HDMI3 456 VGA S-Video HDMI1 HDMI2 ...
... F2 AV Mute ENTER InSfoo.urce F3 Volume Re-Sync D Zoom ForMmeantuFVrGeAez1eHSD-BVaidsRee4To2eIDBmVHNiodDCteeMo7I513AYlPHlDbDVPMIr8I6D2iHspDlaMyPI93ort 3D 0 Connect the remote control to the projector with the remote control cable (not supplied). Source F3 Volume Re-Sync D Zoom ENTER F1 Mode F2 AV Mute Geometric ...Correction PIP/PBP On Off SETUP AND INSTALLATION Approx. 15° Approx. 15° Wired Remote Control Your projector supports also wired remote control connection. BNC YPbPr DisplayPort 3D 7890 HDBaseT Video DVI HDMI3 456 VGA S-Video HDMI1 HDMI2 ...
4K500 User Manual
Page 19
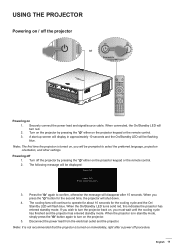
... the message will display in standby mode, simply press the " " button again to turn red. 2. A start up screen will disappear after a power off the projector On Off or Geometric Correction PIP/PBP F1 F2 Mode AV Mute On Off Geometric Correction PIP/PBP F1 Mode F2 AV Mute Info. ID...cycle and the On/ Standby LED will be flashing blue. Press the " " again to operate for about 10 seconds for the second time, the projector will be displayed: Power Off HDBaseT Video DVI HDMI3 456 BNC YPbPr DisplayPort 3D Power Off? 7890 Press power key again. 3. If you must wait...
... the message will display in standby mode, simply press the " " button again to turn red. 2. A start up screen will disappear after a power off the projector On Off or Geometric Correction PIP/PBP F1 F2 Mode AV Mute On Off Geometric Correction PIP/PBP F1 Mode F2 AV Mute Info. ID...cycle and the On/ Standby LED will be flashing blue. Press the " " again to operate for about 10 seconds for the second time, the projector will be displayed: Power Off HDBaseT Video DVI HDMI3 456 BNC YPbPr DisplayPort 3D Power Off? 7890 Press power key again. 3. If you must wait...
4K500 User Manual
Page 20
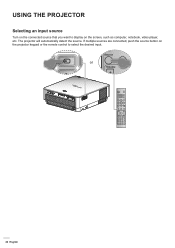
... Off Format Freeze Remote Geometric Correction PIP/PBP F1 F2 ID All Mode AV Mute VGA S-VideENoTER HDMI1 HDMI2 1 2Info. The projector will automatically detect the source. USING THE PROJECTOR F1 Mode F2 AV Mute Selecting an input source ENTER Turn on the connected source that you want to display on the...
... Off Format Freeze Remote Geometric Correction PIP/PBP F1 F2 ID All Mode AV Mute VGA S-VideENoTER HDMI1 HDMI2 1 2Info. The projector will automatically detect the source. USING THE PROJECTOR F1 Mode F2 AV Mute Selecting an input source ENTER Turn on the connected source that you want to display on the...
4K500 User Manual
Page 21
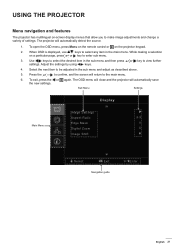
... automatically save the new settings. To open the OSD menu, press Menu on the remote control or on the projector keypad. 2. Adjust the settings by using keys. 4. To exit, press the or again. Sub Menu Settings Display Main Menu Image Settings Aspect ... confirm, and the screen will return to make image adjustments and change a variety of settings. The OSD menu will close and the projector will automatically detect the source. 1. USING THE PROJECTOR Menu navigation and features The projector has multilingual on-screen display menus that allow you to the main menu. 6.
... automatically save the new settings. To open the OSD menu, press Menu on the remote control or on the projector keypad. 2. Adjust the settings by using keys. 4. To exit, press the or again. Sub Menu Settings Display Main Menu Image Settings Aspect ... confirm, and the screen will return to make image adjustments and change a variety of settings. The OSD menu will close and the projector will automatically detect the source. 1. USING THE PROJECTOR Menu navigation and features The projector has multilingual on-screen display menus that allow you to the main menu. 6.
4K500 User Manual
Page 23
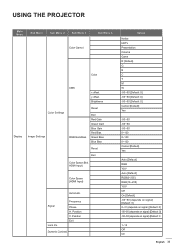
...: 0] 0~31 (depends on signal) [Default: 0] -50~50 (depends on signal) [Default: 0] -50~50 (depends on signal) [Default: 0 1~12 Off On English 23 Position V. USING THE PROJECTOR Main Menu Sub Menu Sub Menu 2 Sub Menu 3 Color Gamut Sub Menu 4 Color Display CMS x offset y offset Brightness Color Settings Image Settings RGB Gain/Bias...
...: 0] 0~31 (depends on signal) [Default: 0] -50~50 (depends on signal) [Default: 0] -50~50 (depends on signal) [Default: 0 1~12 Off On English 23 Position V. USING THE PROJECTOR Main Menu Sub Menu Sub Menu 2 Sub Menu 3 Color Gamut Sub Menu 4 Color Display CMS x offset y offset Brightness Color Settings Image Settings RGB Gain/Bias...

4K500 User Manual
Page 24
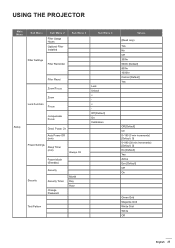
USING THE PROJECTOR Main Menu Sub Menu Sub Menu 2 Sub Menu 3 Brightness Mode UltraDetail Image Settings PureEngine PureColor Display Reset PureMotion PureMotion Demo Aspect Ratio Edge Mask Digital ...
USING THE PROJECTOR Main Menu Sub Menu Sub Menu 2 Sub Menu 3 Brightness Mode UltraDetail Image Settings PureEngine PureColor Display Reset PureMotion PureMotion Demo Aspect Ratio Edge Mask Digital ...
4K500 User Manual
Page 25
USING THE PROJECTOR Main Menu Sub Menu Sub Menu 2 Filter Usage Hours Optional Filter Installed Sub Menu 3 Fitler Settings Filter Reminder Sub Menu 4 Filter Reset Zoom/Focus Zoom ...
USING THE PROJECTOR Main Menu Sub Menu Sub Menu 2 Filter Usage Hours Optional Filter Installed Sub Menu 3 Fitler Settings Filter Reminder Sub Menu 4 Filter Reset Zoom/Focus Zoom ...
4K500 User Manual
Page 26
USING THE PROJECTOR Main Menu Sub Menu Sub Menu 2 Sub Menu 3 IR Function Remote Code F1 Setup Remote Settings [depends on remote] F2 F3 Sub Menu 4 Values On Front Top Off 0~99 Test Pattern LAN Brightness Contrast Sleep Timer CMS Color Temp Gamma Auto Source Projection Lamp Settings Zoom [Default] Focus Lens Iris Test Pattern LAN Brightness Contrast Sleep Timer CMS Color Temp Gamma Auto Source Projection Lamp Settings Zoom Focus [Default] Lens Iris Test Pattern LAN Brightness Contrast Sleep Timer CMS Color Temp 26 English
USING THE PROJECTOR Main Menu Sub Menu Sub Menu 2 Sub Menu 3 IR Function Remote Code F1 Setup Remote Settings [depends on remote] F2 F3 Sub Menu 4 Values On Front Top Off 0~99 Test Pattern LAN Brightness Contrast Sleep Timer CMS Color Temp Gamma Auto Source Projection Lamp Settings Zoom [Default] Focus Lens Iris Test Pattern LAN Brightness Contrast Sleep Timer CMS Color Temp Gamma Auto Source Projection Lamp Settings Zoom Focus [Default] Lens Iris Test Pattern LAN Brightness Contrast Sleep Timer CMS Color Temp 26 English

4K500 User Manual
Page 27
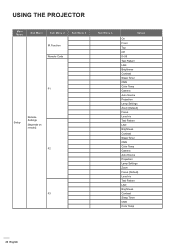
USING THE PROJECTOR Main Menu Sub Menu Sub Menu 2 Sub Menu 3 Remote Settings F3 [depends on remote] Projector ID 12V Trigger 12V Trigger A 12V Trigger B Setup Language Options Menu Settings Menu Location Menu Timer Sub Menu 4 Values Gamma Auto Source Projection Lamp Settings Zoom Focus Lens Iris [Default] 0~99 On Off On Off English [Default] Deutsch Français Italiano Español Português Top left Top right Center [Default] Bottom left Bottom right Off 5sec 10sec [Default] English 27
USING THE PROJECTOR Main Menu Sub Menu Sub Menu 2 Sub Menu 3 Remote Settings F3 [depends on remote] Projector ID 12V Trigger 12V Trigger A 12V Trigger B Setup Language Options Menu Settings Menu Location Menu Timer Sub Menu 4 Values Gamma Auto Source Projection Lamp Settings Zoom Focus Lens Iris [Default] 0~99 On Off On Off English [Default] Deutsch Français Italiano Español Português Top left Top right Center [Default] Bottom left Bottom right Off 5sec 10sec [Default] English 27


