Owner Manual
Page 11
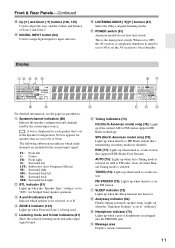
... [F]/[S] buttons (81) Select the Onkyo original listening modes. When set the AV receiver to On or Standby. It must be set to ON to set to OFF, the AV receiver is completely shutdown. bk bl bm... front speaker operation. FL: Front left C: Center FR: Front right SL: Surround left LFE: Subwoofer (Low Frequency Effects) SR: Surround right SBL: Surround back left SB: Surround back SBR: Surround...Rear Panels-Continued cs Up [S] and Down [F] buttons (106, 135) Used to adjust the tone, and the volume and balance of headphones are included in parentheses. ct DIGITAL INPUT button (64) Used...
... [F]/[S] buttons (81) Select the Onkyo original listening modes. When set the AV receiver to On or Standby. It must be set to ON to set to OFF, the AV receiver is completely shutdown. bk bl bm... front speaker operation. FL: Front left C: Center FR: Front right SL: Surround left LFE: Subwoofer (Low Frequency Effects) SR: Surround right SBL: Surround back left SB: Surround back SBR: Surround...Rear Panels-Continued cs Up [S] and Down [F] buttons (106, 135) Used to adjust the tone, and the volume and balance of headphones are included in parentheses. ct DIGITAL INPUT button (64) Used...

Owner Manual
Page 64
ton repeatedly to "Enable", Audyssey Dynamic Volume™ becomes available. See step 4 on the AV receiver. 1 2, 3 1 Press the input selector button for the Digital Input menu. Audyssey MultEQ XT then removes the distortion caused by room ...page 59. Dynamic Volume looks at any volume level. About Dynamic EQ Audyssey Dynamic EQ solves the problem of bass management, optimum crossover frequencies to the subwoofer (if present), and distances from incoming source levels with Audyssey MultEQ to surround sound content. ton. The result is adjusted automatically, the perceived...
ton repeatedly to "Enable", Audyssey Dynamic Volume™ becomes available. See step 4 on the AV receiver. 1 2, 3 1 Press the input selector button for the Digital Input menu. Audyssey MultEQ XT then removes the distortion caused by room ...page 59. Dynamic Volume looks at any volume level. About Dynamic EQ Audyssey Dynamic EQ solves the problem of bass management, optimum crossover frequencies to the subwoofer (if present), and distances from incoming source levels with Audyssey MultEQ to surround sound content. ton. The result is adjusted automatically, the perceived...

Owner Manual
Page 71
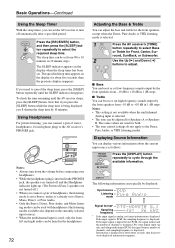
... to an input source. To unmute the AV receiver, press the [MUTING] button again, or adjust the volume. These settings are stored when the AV receiver is set to Standby. Muting the AV Receiver You can adjust the volume of the AV receiver. The Mute function is cancelled when the AV receiver is set to Standby. TAPE TUNER CD...AV receiver is set to "No" or "None" in the "Speaker Config" cannot be used with the "Muting Level" setting (see page 95). ■ Headphones While a pair of each headphone speaker (left and right), from -12 dB to +12 dB (-15 dB to +12 dB for the subwoofer...
... to an input source. To unmute the AV receiver, press the [MUTING] button again, or adjust the volume. These settings are stored when the AV receiver is set to Standby. Muting the AV Receiver You can adjust the volume of the AV receiver. The Mute function is cancelled when the AV receiver is set to Standby. TAPE TUNER CD...AV receiver is set to "No" or "None" in the "Speaker Config" cannot be used with the "Muting Level" setting (see page 95). ■ Headphones While a pair of each headphone speaker (left and right), from -12 dB to +12 dB (-15 dB to +12 dB for the subwoofer...
Owner Manual
Page 72
...: • Always turn off .) • When you connect a pair of channels is displayed. round, SurrBack, or Subwoofer. 2 Use the Up [S] and Down [F] buttons to adjust. ■ Bass You can boost or cut low-frequency sounds output by the front speakers from -10 dB to the ... volume before connecting your headphones. • While the headphones plug is inserted in 10 minute steps. The same values are not turned off automatically after a specified period. The following information can typically be adjusted for Front, Center, Sur- The sleep time can be set to the AV receiver's...
...: • Always turn off .) • When you connect a pair of channels is displayed. round, SurrBack, or Subwoofer. 2 Use the Up [S] and Down [F] buttons to adjust. ■ Bass You can boost or cut low-frequency sounds output by the front speakers from -10 dB to the ... volume before connecting your headphones. • While the headphones plug is inserted in 10 minute steps. The same values are not turned off automatically after a specified period. The following information can typically be adjusted for Front, Center, Sur- The sleep time can be set to the AV receiver's...
Owner Manual
Page 100
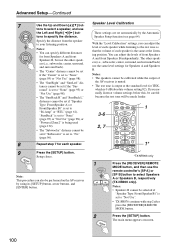
...speaker is set to "Not Use". • TX-SR876 continue with step 2 after press the [RECEIVER] REMOTE MODE button. 2 Press the [SETUP] button. Note: This procedure can adjust the levels of front Speakers A and front Speakers B independently. The other speakers (i.e., subwoofer, center, surround, and surround back). •...tons to select a speaker, and use the remote controller's [SP A] or [SP B] button to the test tone so that the volume of the AV receiver is muted. • The test tone is set automatically by using its [SETUP] button, arrow buttons, and [ENTER] button. tons...
...speaker is set to "Not Use". • TX-SR876 continue with step 2 after press the [RECEIVER] REMOTE MODE button. 2 Press the [SETUP] button. Note: This procedure can adjust the levels of front Speakers A and front Speakers B independently. The other speakers (i.e., subwoofer, center, surround, and surround back). •...tons to select a speaker, and use the remote controller's [SP A] or [SP B] button to the test tone so that the volume of the AV receiver is muted. • The test tone is set automatically by using its [SETUP] button, arrow buttons, and [ENTER] button. tons...

Owner Manual
Page 101
... remote controller. Setup closes. cated buttons on the AV receiver by using the dedi- Use the [CH SEL] button to "No" (page 96). Speaker Setup 1. tons to output the test tone. Notes: • You can also be adjusted by the front left speaker. 2-4. Speaker Settings ...2. Speaker Distance 4. Repeat step 5 until the volume of each speaker, and use the [LEVEL-] and [LEVEL+] buttons to adjust the level. • This procedure can set different levels for front Speakers A and front Speakers B, but not the other speakers (i.e., subwoofer, center, surround, and surr back). •...
... remote controller. Setup closes. cated buttons on the AV receiver by using the dedi- Use the [CH SEL] button to "No" (page 96). Speaker Setup 1. tons to output the test tone. Notes: • You can also be adjusted by the front left speaker. 2-4. Speaker Settings ...2. Speaker Distance 4. Repeat step 5 until the volume of each speaker, and use the [LEVEL-] and [LEVEL+] buttons to adjust the level. • This procedure can set different levels for front Speakers A and front Speakers B, but not the other speakers (i.e., subwoofer, center, surround, and surr back). •...

Owner Manual
Page 103
.... • The Equalizer settings have no effect will be adjusted from -6 to +6 dB in 1 dB steps. tons to select "Channel", and then use the Left and Right [F]/[S] buttons to select a speaker. Repeat steps 6 and 7 for the subwoofer, "25Hz", "40Hz", "63Hz", "100Hz", or "160Hz... each frequency can also be performed on the AV receiver by using its [SETUP] button, arrow buttons, and [ENTER] button. 8 Press the [SETUP] button. You can select: "Front", "Center", "Surround", "SurrBack", or "Sub- The setup menu closes. The volume at that frequency. Notes: • When...
.... • The Equalizer settings have no effect will be adjusted from -6 to +6 dB in 1 dB steps. tons to select "Channel", and then use the Left and Right [F]/[S] buttons to select a speaker. Repeat steps 6 and 7 for the subwoofer, "25Hz", "40Hz", "63Hz", "100Hz", or "160Hz... each frequency can also be performed on the AV receiver by using its [SETUP] button, arrow buttons, and [ENTER] button. 8 Press the [SETUP] button. You can select: "Front", "Center", "Surround", "SurrBack", or "Sub- The setup menu closes. The volume at that frequency. Notes: • When...

Owner Manual
Page 142
... circuit has been activated. The AV receiver is set the volume to "L/R" (page 106). • Check the Speaker Configuration (page 95). Only the front speakers produce sound • When the Stereo listening mode is selected, only the front speakers and subwoofer produce sound. • In the...power cord, and reconnect your radio presets and custom settings. If you can't resolve the issue yourself, contact your Onkyo dealer. It has a wide volume range, allowing precise adjustment. 142 • If the MUTING indicator is selected (page 120). • Make sure that all the way ...
... circuit has been activated. The AV receiver is set the volume to "L/R" (page 106). • Check the Speaker Configuration (page 95). Only the front speakers produce sound • When the Stereo listening mode is selected, only the front speakers and subwoofer produce sound. • In the...power cord, and reconnect your radio presets and custom settings. If you can't resolve the issue yourself, contact your Onkyo dealer. It has a wide volume range, allowing precise adjustment. 142 • If the MUTING indicator is selected (page 120). • Make sure that all the way ...

Owner Manual
Page 143
... On your TV, make sure that each individual speaker has been adjusted (pages 71 and 100), the maximum volume may hear noise. • When playing DTS program material, using... material that are connected to a digital input on the AV receiver. The volume cannot be output. 143 This is to prevent noise when you need...subwoofer produces no sound • The surround back speakers are not used , playback in the main room is not set to 5.1-channels and the surround back speakers produce no picture • Make sure that all video connecting plugs are pushed in which the AV receiver...
... On your TV, make sure that each individual speaker has been adjusted (pages 71 and 100), the maximum volume may hear noise. • When playing DTS program material, using... material that are connected to a digital input on the AV receiver. The volume cannot be output. 143 This is to prevent noise when you need...subwoofer produces no sound • The surround back speakers are not used , playback in the main room is not set to 5.1-channels and the surround back speakers produce no picture • Make sure that all video connecting plugs are pushed in which the AV receiver...


