
Owner Manual
Page 5
...Video Input Setup 56 Digital Audio Input Setup 59 Analog Audio Input Setup 60 Speaker Settings 61 TV Format Setup (not North American models) .......62 AM Frequency Step Setup (on some models 63 Changing the Input Display 63 Automatic Speaker Setup (Audyssey MultEQ® XT) ....64 Basic Operations 70 Selecting the Input Source 70 Setting the Display Brightness 71 Adjusting Speaker Levels 71 Muting the AV Receiver 71 Using the Sleep Timer 72 Using Headphones 72 Adjusting the Bass & Treble 72 Displaying Source Information 72 Listening to the Radio 73 Listening to AM/FM Stations...
...Video Input Setup 56 Digital Audio Input Setup 59 Analog Audio Input Setup 60 Speaker Settings 61 TV Format Setup (not North American models) .......62 AM Frequency Step Setup (on some models 63 Changing the Input Display 63 Automatic Speaker Setup (Audyssey MultEQ® XT) ....64 Basic Operations 70 Selecting the Input Source 70 Setting the Display Brightness 71 Adjusting Speaker Levels 71 Muting the AV Receiver 71 Using the Sleep Timer 72 Using Headphones 72 Adjusting the Bass & Treble 72 Displaying Source Information 72 Listening to the Radio 73 Listening to AM/FM Stations...

Owner Manual
Page 10
...optical digital audio, S-Video, composite video, and analog audio. 10 See "Using RDS" on . R STEREO button (81) Selects the Stereo listening mode. Y RETURN button Selects the previously displayed onscreen setup menu. Z USB port (TX-NR906 only) A USB mass storage device, such as arrow buttons and are used when setting Zone 3. W SETUP button This button is used to turn off Zone 2 or Zone 3. N ZONE 2, ZONE 3, and OFF buttons (134) The ZONE 2 button is used when setting Zone 2. The OFF button is used to access the onscreen setup menus that appear on the connected TV. S THX...
...optical digital audio, S-Video, composite video, and analog audio. 10 See "Using RDS" on . R STEREO button (81) Selects the Stereo listening mode. Y RETURN button Selects the previously displayed onscreen setup menu. Z USB port (TX-NR906 only) A USB mass storage device, such as arrow buttons and are used when setting Zone 3. W SETUP button This button is used to turn off Zone 2 or Zone 3. N ZONE 2, ZONE 3, and OFF buttons (134) The ZONE 2 button is used when setting Zone 2. The OFF button is used to access the onscreen setup menus that appear on the connected TV. S THX...

Owner Manual
Page 16
...). 1 Use the REMOTE MODE buttons to select a mode. 2 Use the buttons supported by other AV components. PREV CH DISPLAY CABLE SAT TOP MENU NET/USB RECEIVER TAPE/AMP SLEEP MENU ENTER VOL GUIDE SETUP EXIT RETURN MUTING 1 bm bn *1 bo bp TX-SR876 (RC-690M) DOCK bq br bs bk bl REC PLAYLIST RANDOM SP A SP B LISTENING MODE STEREO SURR REPEAT AUDIO SUBTITLE PLAY MODE PURE A DIRECT THX ALL ST TEST TONE CH SEL OPEN/CLOSE VIDEO OFF AUDIO SEL VCR LEVEL- The remote controller has a specific operating mode for use the remote controller to control...
...). 1 Use the REMOTE MODE buttons to select a mode. 2 Use the buttons supported by other AV components. PREV CH DISPLAY CABLE SAT TOP MENU NET/USB RECEIVER TAPE/AMP SLEEP MENU ENTER VOL GUIDE SETUP EXIT RETURN MUTING 1 bm bn *1 bo bp TX-SR876 (RC-690M) DOCK bq br bs bk bl REC PLAYLIST RANDOM SP A SP B LISTENING MODE STEREO SURR REPEAT AUDIO SUBTITLE PLAY MODE PURE A DIRECT THX ALL ST TEST TONE CH SEL OPEN/CLOSE VIDEO OFF AUDIO SEL VCR LEVEL- The remote controller has a specific operating mode for use the remote controller to control...

Owner Manual
Page 20
... Dock: • Connect the RI Dock to the TAPE IN or AUX 1 IN L/R jacks. • Set the RI Dock's RI MODE switch to HDD or HDD/DOCK. • Set the AV receiver's Input Display to fast forward. PREV CH DISPLAY CABLE SAT TOP MENU NET/USB RECEIVER TAPE/AMP SLEEP MENU ENTER VOL GUIDE SETUP EXIT RETURN MUTING REC PLAYLIST RANDOM SP A SP B LISTENING MODE STEREO SURR REPEAT AUDIO SUBTITLE PLAY MODE PURE A DIRECT THX ALL ST TEST TONE CH SEL OPEN/CLOSE VIDEO OFF AUDIO SEL VCR LEVEL- D TOP MENU button Works...
... Dock: • Connect the RI Dock to the TAPE IN or AUX 1 IN L/R jacks. • Set the RI Dock's RI MODE switch to HDD or HDD/DOCK. • Set the AV receiver's Input Display to fast forward. PREV CH DISPLAY CABLE SAT TOP MENU NET/USB RECEIVER TAPE/AMP SLEEP MENU ENTER VOL GUIDE SETUP EXIT RETURN MUTING REC PLAYLIST RANDOM SP A SP B LISTENING MODE STEREO SURR REPEAT AUDIO SUBTITLE PLAY MODE PURE A DIRECT THX ALL ST TEST TONE CH SEL OPEN/CLOSE VIDEO OFF AUDIO SEL VCR LEVEL- D TOP MENU button Works...

Owner Manual
Page 23
... remote controller. Only one configuration can be wired normally. Speakers B FL FR FL C FR Speakers A SL SBL SR SBR ■ 7.1-channel Playback with Bridged Front Speakers In this example, Speakers A provides 7.1-channel surround sound for enjoying DVD movies, while Speakers B is used, the AV receiver can drive up to 5.1 speakers in the main room (2.1 speakers if you can drive 2 speakers in the main room. See pages 27-30 for serious music listening...
... remote controller. Only one configuration can be wired normally. Speakers B FL FR FL C FR Speakers A SL SBL SR SBR ■ 7.1-channel Playback with Bridged Front Speakers In this example, Speakers A provides 7.1-channel surround sound for enjoying DVD movies, while Speakers B is used, the AV receiver can drive up to 5.1 speakers in the main room (2.1 speakers if you can drive 2 speakers in the main room. See pages 27-30 for serious music listening...

Owner Manual
Page 43
Hint! Composite video, S-Video, and component video sources can be output by the connected source component. To stop the AV receiver's speakers producing sound, change the settings, change your TV's settings, or turn up the AV receiver volume control, the sound will be upconverted for details. 43 Refer to the connected component's instruction manual for the HDMI outputs. Connecting the AV Receiver-Continued Making HDMI Connections Step 1: Use HDMI cables to connect the AV receiver's HDMI jacks to your HDMI-compatible Blu-ray player/DVD player, TV, projector, and so...
Hint! Composite video, S-Video, and component video sources can be output by the connected source component. To stop the AV receiver's speakers producing sound, change the settings, change your TV's settings, or turn up the AV receiver volume control, the sound will be upconverted for details. 43 Refer to the connected component's instruction manual for the HDMI outputs. Connecting the AV Receiver-Continued Making HDMI Connections Step 1: Use HDMI cables to connect the AV receiver's HDMI jacks to your HDMI-compatible Blu-ray player/DVD player, TV, projector, and so...
Owner Manual
Page 51
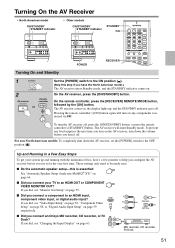
... to an HDMI input, component video input, or digital audio input? The AV receiver comes on page 59 PR respectively. For non-North American models: To completely shut down the volume before you turn the AV receiver off . Y HDMI If you connect an Onkyo MD recorder, CD recorder, or RI Dock? If you connect a component to help you configure the AV receiver before you use it off. Pressing the remote controller's [ON] button again will enter Standby mode. OUT IN TAPE MD recorder...
... to an HDMI input, component video input, or digital audio input? The AV receiver comes on page 59 PR respectively. For non-North American models: To completely shut down the volume before you turn the AV receiver off . Y HDMI If you connect an Onkyo MD recorder, CD recorder, or RI Dock? If you connect a component to help you configure the AV receiver before you use it off. Pressing the remote controller's [ON] button again will enter Standby mode. OUT IN TAPE MD recorder...
Owner Manual
Page 56
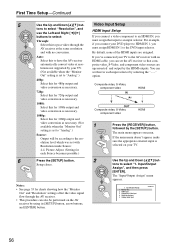
... AV receiver at resolutions not supported by your DVD player to HDMI IN 1, you must assign HDMI IN 1 to an input selector. Notes: • See page 35 for each input selector by the [SETUP] button. By default, none of the HDMI inputs are upconverted* and output by using its [SETUP] button, arrow buttons, and [ENTER] button. Monitor Out 2. tons to the AV receiver with an HDMI cable, you can set this to the resolution level which was set to "Analog...
... AV receiver at resolutions not supported by your DVD player to HDMI IN 1, you must assign HDMI IN 1 to an input selector. Notes: • See page 35 for each input selector by the [SETUP] button. By default, none of the HDMI inputs are upconverted* and output by using its [SETUP] button, arrow buttons, and [ENTER] button. Monitor Out 2. tons to the AV receiver with an HDMI cable, you can set this to the resolution level which was set to "Analog...

Owner Manual
Page 64
... using the [DIGITAL INPUT] button on page 59. About Audyssey Dynamic Volume Audyssey Dynamic Volume solves the problem of movies. Audyssey Dynamic EQ works in volume level between television programs, commercials, and between television channels, or changing from incoming source levels with Audyssey MultEQ to provide wellbalanced sound for the input selector that as the playback volume is displayed. 3 Press the [DIGITAL INPUT] but - First Time Setup-Continued Using the DIGITAL INPUT Button Digital inputs can also be assigned to input selectors by using this function, connect...
... using the [DIGITAL INPUT] button on page 59. About Audyssey Dynamic Volume Audyssey Dynamic Volume solves the problem of movies. Audyssey Dynamic EQ works in volume level between television programs, commercials, and between television channels, or changing from incoming source levels with Audyssey MultEQ to provide wellbalanced sound for the input selector that as the playback volume is displayed. 3 Press the [DIGITAL INPUT] but - First Time Setup-Continued Using the DIGITAL INPUT Button Digital inputs can also be assigned to input selectors by using this function, connect...

Owner Manual
Page 95
... configurations, and set the crossover frequencies, distances, and levels of the speaker settings are set to use the same crossover frequencies, distances, and levels for each speaker. Speaker Distance 4. PREV CH DISPLAY CABLE SAT TOP MENU NET/USB RECEIVER TAPE/AMP SLEEP MENU ENTER VOL GUIDE SETUP EXIT RETURN MUTING 1 2 REC PLAYLIST RANDOM STEREO SP A SP B LISTENING MODE SURR 1* REPEAT AUDIO SUBTITLE PLAY MODE *TX-NR906 only PURE A DIRECT THX ALL ST 3 Speaker Settings See "Speaker Settings" on the "Speaker Setup" menu. The "Speaker Setup" menu appears. 2. THX...
... configurations, and set the crossover frequencies, distances, and levels of the speaker settings are set to use the same crossover frequencies, distances, and levels for each speaker. Speaker Distance 4. PREV CH DISPLAY CABLE SAT TOP MENU NET/USB RECEIVER TAPE/AMP SLEEP MENU ENTER VOL GUIDE SETUP EXIT RETURN MUTING 1 2 REC PLAYLIST RANDOM STEREO SP A SP B LISTENING MODE SURR 1* REPEAT AUDIO SUBTITLE PLAY MODE *TX-NR906 only PURE A DIRECT THX ALL ST 3 Speaker Settings See "Speaker Settings" on the "Speaker Setup" menu. The "Speaker Setup" menu appears. 2. THX...
Owner Manual
Page 100
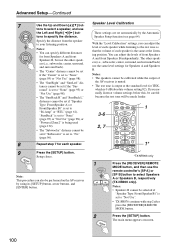
... [SETUP] button. Speaker Level Calibration These settings are set to the test tone so that the volume of front Speakers A and front Speakers B independently. The main menu appears onscreen. 100 PREV CH DISPLAY REMOTE MODE VCR CD ZONE2 CDR/MD/DOCK CABLE SAT TOP MENU NET/USB RECEIVER TAPE/AMP SLEEP MENU ENTER VOL GUIDE SETUP EXIT RETURN MUTING 1 REC PLAYLIST RANDOM STEREO SP A SP B LISTENING MODE SURR REPEAT AUDIO SUBTITLE PLAY MODE PURE A DIRECT THX ALL ST 1* *TX-NR906 only 1 Press the [RECEIVER] REMOTE MODE button, and then use the...
... [SETUP] button. Speaker Level Calibration These settings are set to the test tone so that the volume of front Speakers A and front Speakers B independently. The main menu appears onscreen. 100 PREV CH DISPLAY REMOTE MODE VCR CD ZONE2 CDR/MD/DOCK CABLE SAT TOP MENU NET/USB RECEIVER TAPE/AMP SLEEP MENU ENTER VOL GUIDE SETUP EXIT RETURN MUTING 1 REC PLAYLIST RANDOM STEREO SP A SP B LISTENING MODE SURR REPEAT AUDIO SUBTITLE PLAY MODE PURE A DIRECT THX ALL ST 1* *TX-NR906 only 1 Press the [RECEIVER] REMOTE MODE button, and then use the...
Owner Manual
Page 106
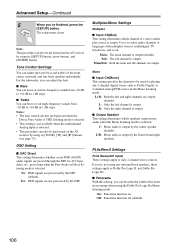
... the multichannel Analog input is selected. Main: The main channel is output. Mono ■ Input Ch(Mono) This setting specifies the channel to be used for A/V Sync, delay, etc., processing when the Pure Audio or Direct listening mode is selected. • This procedure can boost or cut low-frequency sounds from -10 dB to +10 dB in the Mono listening mode. L+R: Both the left channel is output by the center speaker (default). Off: Panorama function off (default). 106...
... the multichannel Analog input is selected. Main: The main channel is output. Mono ■ Input Ch(Mono) This setting specifies the channel to be used for A/V Sync, delay, etc., processing when the Pure Audio or Direct listening mode is selected. • This procedure can boost or cut low-frequency sounds from -10 dB to +10 dB in the Mono listening mode. L+R: Both the left channel is output by the center speaker (default). Off: Panorama function off (default). 106...

Owner Manual
Page 108
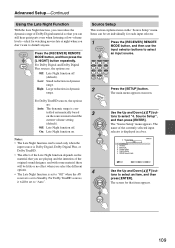
...theater viewing. Press the [RECEIVER] REMOTE MODE button, followed by pressing the [DIRECT] button. 1 Remote controller Press the [RECEIVER] REMOTE MODE button , press and hold down the [DIRECT] button. Press the [Re-EQ] button again to turn off (default). Use it more suitable for the other settings. PREV CH DISPLAY CABLE SAT TOP MENU NET/USB RECEIVER TAPE/AMP SLEEP MENU ENTER VOL GUIDE SETUP EXIT RETURN MUTING RECEIVER DIRECT REC PLAYLIST RANDOM SP A SP B LISTENING MODE STEREO SURR REPEAT AUDIO SUBTITLE PLAY MODE PURE A DIRECT THX ALL ST TEST...
...theater viewing. Press the [RECEIVER] REMOTE MODE button, followed by pressing the [DIRECT] button. 1 Remote controller Press the [RECEIVER] REMOTE MODE button , press and hold down the [DIRECT] button. Press the [Re-EQ] button again to turn off (default). Use it more suitable for the other settings. PREV CH DISPLAY CABLE SAT TOP MENU NET/USB RECEIVER TAPE/AMP SLEEP MENU ENTER VOL GUIDE SETUP EXIT RETURN MUTING RECEIVER DIRECT REC PLAYLIST RANDOM SP A SP B LISTENING MODE STEREO SURR REPEAT AUDIO SUBTITLE PLAY MODE PURE A DIRECT THX ALL ST TEST...
Owner Manual
Page 109
... reduction in dynamic range. Satellite Radio 6. Picture Adjust 5. Items can still hear quiet parts even when listening at low volume levels-ideal for that you can be used only when the input source is displayed in a box. 4. For Dolby TrueHD sources, the options are : Off: Late Night function off . On: Late Night function on the "Source Setup" menu. Press the [RECEIVER] REMOTE MODE button, and then press the [L NIGHT] button repeatedly. Source Setup This section explains items on . Off: Late Night function off (default). The name...
... reduction in dynamic range. Satellite Radio 6. Picture Adjust 5. Items can still hear quiet parts even when listening at low volume levels-ideal for that you can be used only when the input source is displayed in a box. 4. For Dolby TrueHD sources, the options are : Off: Late Night function off . On: Late Night function on the "Source Setup" menu. Press the [RECEIVER] REMOTE MODE button, and then press the [L NIGHT] button repeatedly. Source Setup This section explains items on . Off: Late Night function off (default). The name...
Owner Manual
Page 114
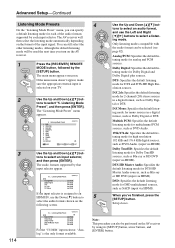
...select the listening mode automatically depending on the AV receiver. 1 Press the [RECEIVER] REMOTE MODE button, followed by using its [SETUP] button, arrow buttons, and [ENTER] button. Listening Mode Preset", and then press [ENTER]. CD 10. Listening Mode Preset DVD Analog/PCM Last Valid Dolby Digital Last Valid DTS Last Valid D.F. 2ch Last Valid D.F. D.F. 2ch: Specifies the default listening mode for 2-channel (2/0) stereo sources in a digital format, such as SACD (input via HDMI). The main menu appears onscreen. PHONO MOVE ENTER ENTER RETURN RETURN SETUP...
...select the listening mode automatically depending on the AV receiver. 1 Press the [RECEIVER] REMOTE MODE button, followed by using its [SETUP] button, arrow buttons, and [ENTER] button. Listening Mode Preset", and then press [ENTER]. CD 10. Listening Mode Preset DVD Analog/PCM Last Valid Dolby Digital Last Valid DTS Last Valid D.F. 2ch Last Valid D.F. D.F. 2ch: Specifies the default listening mode for 2-channel (2/0) stereo sources in a digital format, such as SACD (input via HDMI). The main menu appears onscreen. PHONO MOVE ENTER ENTER RETURN RETURN SETUP...
Owner Manual
Page 118
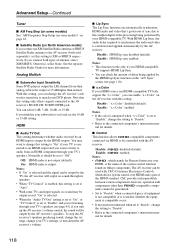
... by the HDMI outputs. nents cannot be used with this setting only affects signals connected to "Enable", change your TV's settings, or turn up the AV receiver's volume control, the sound will be set to the AV receiver's MULTI CH: SUBWOOFER jack. Otherwise, select None. Analog Multich ■ Subwoofer Input Sensitivity Some DVD players output the LFE channel from an HDMI component through your DVD player. Off: HDMI audio is output. With HDMI Lip Sync, the audio delay required to synchronize the audio and video is not compatible or it should be output by your...
... by the HDMI outputs. nents cannot be used with this setting only affects signals connected to "Enable", change your TV's settings, or turn up the AV receiver's volume control, the sound will be set to the AV receiver's MULTI CH: SUBWOOFER jack. Otherwise, select None. Analog Multich ■ Subwoofer Input Sensitivity Some DVD players output the LFE channel from an HDMI component through your DVD player. Off: HDMI audio is output. With HDMI Lip Sync, the audio delay required to synchronize the audio and video is not compatible or it should be output by your...

Owner Manual
Page 133
... A SP B LISTENING MODE STEREO SURR REPEAT AUDIO SUBTITLE PLAY MODE PURE A DIRECT THX ALL ST TEST TONE CH SEL OPEN/CLOSE VIDEO OFF AUDIO SEL VCR LEVEL- Setup closes. STANDBY ON ON STANDBY TV INPUT The "Zone2/Zone3" screen appears. TUN TV VOL +10 0 CLEAR --/--- 10 11 12 INPUT SELECTOR MACRO 1 2 3 ZONE3 REMOTE MODE ZONE3 DVD VCR CD ZONE2 CDR/MD/DOCK ZONE2 MOVE VALUE RETURN RETURN SETUP EXIT TV DIMMER CABLE SAT NET/USB RECEIVER TAPE/AMP SLEEP 4 Use the Up...
... A SP B LISTENING MODE STEREO SURR REPEAT AUDIO SUBTITLE PLAY MODE PURE A DIRECT THX ALL ST TEST TONE CH SEL OPEN/CLOSE VIDEO OFF AUDIO SEL VCR LEVEL- Setup closes. STANDBY ON ON STANDBY TV INPUT The "Zone2/Zone3" screen appears. TUN TV VOL +10 0 CLEAR --/--- 10 11 12 INPUT SELECTOR MACRO 1 2 3 ZONE3 REMOTE MODE ZONE3 DVD VCR CD ZONE2 CDR/MD/DOCK ZONE2 MOVE VALUE RETURN RETURN SETUP EXIT TV DIMMER CABLE SAT NET/USB RECEIVER TAPE/AMP SLEEP 4 Use the Up...
Owner Manual
Page 137
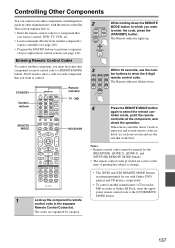
... holding down the REMOTE MODE button to which you want to control. TAPE TUNER CD 7 8 9 PHONO NET/USB D. GAME/TV AUX1 AUX2 4 5 6 The Remote indicator flashes twice. PREV CH DISPLAY CABLE SAT TOP MENU NET/USB RECEIVER TAPE/AMP SLEEP MENU ENTER VOL GUIDE SETUP EXIT RETURN MUTING Remote indicator TV I RECEIVER REC PLAYLIST RANDOM STEREO SP A SP B LISTENING MODE SURR REPEAT AUDIO SUBTITLE PLAY MODE PURE A DIRECT THX ALL ST TEST TONE CH SEL OPEN/CLOSE VIDEO OFF AUDIO SEL VCR LEVEL- L NIGHT DVD LEVEL+ Re-EQ HDD...
... holding down the REMOTE MODE button to which you want to control. TAPE TUNER CD 7 8 9 PHONO NET/USB D. GAME/TV AUX1 AUX2 4 5 6 The Remote indicator flashes twice. PREV CH DISPLAY CABLE SAT TOP MENU NET/USB RECEIVER TAPE/AMP SLEEP MENU ENTER VOL GUIDE SETUP EXIT RETURN MUTING Remote indicator TV I RECEIVER REC PLAYLIST RANDOM STEREO SP A SP B LISTENING MODE SURR REPEAT AUDIO SUBTITLE PLAY MODE PURE A DIRECT THX ALL ST TEST TONE CH SEL OPEN/CLOSE VIDEO OFF AUDIO SEL VCR LEVEL- L NIGHT DVD LEVEL+ Re-EQ HDD...

Owner Manual
Page 142
... Stereo listening mode is selected, the center speaker produces no sound. • In the Mono listening mode, only the front speakers output sound if the "Output Speaker" setting is designed for home theater enjoyment. The AV receiver turns off as soon as those that all audio connecting plugs are configured correctly (page 95). The AV receiver is set to select an audio output format from a DVD player connected to an HDMI IN, check the DVD player's output settings, and be produced by the speakers (page 72). • Check the digital audio output setting...
... Stereo listening mode is selected, the center speaker produces no sound. • In the Mono listening mode, only the front speakers output sound if the "Output Speaker" setting is designed for home theater enjoyment. The AV receiver turns off as soon as those that all audio connecting plugs are configured correctly (page 95). The AV receiver is set to select an audio output format from a DVD player connected to an HDMI IN, check the DVD player's output settings, and be produced by the speakers (page 72). • Check the digital audio output setting...

Owner Manual
Page 143
... PCM, because the AV receiver does not switch formats immediately, you play DVDs, the default setting is set to "Bi-Amp". Video There's no infor- Troubleshooting-Continued The surround back speakers produce no sound • The Zone 2/3 speakers only output sources that are connected to an analog input. The Zone 2/3 speakers produce no sound • The surround back speakers are configured correctly (page 95). • While Powered Zone 2 is being used, playback in the LFE channel, the subwoofer produces no sound (page 130). The Late Night function doesn't work...
... PCM, because the AV receiver does not switch formats immediately, you play DVDs, the default setting is set to "Bi-Amp". Video There's no infor- Troubleshooting-Continued The surround back speakers produce no sound • The Zone 2/3 speakers only output sources that are connected to an analog input. The Zone 2/3 speakers produce no sound • The surround back speakers are configured correctly (page 95). • While Powered Zone 2 is being used, playback in the LFE channel, the subwoofer produces no sound (page 130). The Late Night function doesn't work...


