

Owner Manual
Page 5
...Remote Controller 14 Installing the Batteries 14 Using the Remote Controller 14 About the Remote Controller Modes 15 RECEIVER/TAPE Mode 15 DVD Mode 17 CD/MD/CDR Modes 18 DOCK Mode 19 Connecting Your Speakers 20 Enjoying Home Theater 20 Connecting Your Speakers 21 Bi-amping the Front Speakers 23 Bridging the Front Speakers (TX-SR875...the Power Cords of Other Components (North American and European models only).......42 Connecting Onkyo Components 43 Connecting the Power Cord 43 Turning On the AV Receiver 44 Turning On and Standby 44 First Time Setup 45 Speaker Settings 45 HDMI ...
...Remote Controller 14 Installing the Batteries 14 Using the Remote Controller 14 About the Remote Controller Modes 15 RECEIVER/TAPE Mode 15 DVD Mode 17 CD/MD/CDR Modes 18 DOCK Mode 19 Connecting Your Speakers 20 Enjoying Home Theater 20 Connecting Your Speakers 21 Bi-amping the Front Speakers 23 Bridging the Front Speakers (TX-SR875...the Power Cords of Other Components (North American and European models only).......42 Connecting Onkyo Components 43 Connecting the Power Cord 43 Turning On the AV Receiver 44 Turning On and Standby 44 First Time Setup 45 Speaker Settings 45 HDMI ...

Owner Manual
Page 6
...XT room correction*10 • Easy-to-use onscreen setup menus • IR IN and OUT • Preprogrammed remote controller for use with other AV components, with Learning and Macro functions TX-SR875 Only • 140 watts minimum continuous power per channel, 8 ohm loads, 2 channels driven from 20 Hz ... Direct • 192 kHz/24-bit D/A converters • Powerful and highly accurate 32-bit DSP processing • Re-EQ*6 function • Tone control on all channels *1 THX and Ultra2 are trademarks of DTS, Inc. *4 Neural Surround is a trademark owned by Neural Audio Corporation, THX is a...
...XT room correction*10 • Easy-to-use onscreen setup menus • IR IN and OUT • Preprogrammed remote controller for use with other AV components, with Learning and Macro functions TX-SR875 Only • 140 watts minimum continuous power per channel, 8 ohm loads, 2 channels driven from 20 Hz ... Direct • 192 kHz/24-bit D/A converters • Powerful and highly accurate 32-bit DSP processing • Re-EQ*6 function • Tone control on all channels *1 THX and Ultra2 are trademarks of DTS, Inc. *4 Neural Surround is a trademark owned by Neural Audio Corporation, THX is a...

Owner Manual
Page 7
... the Home Theater products you purchase will give you have the following accessories: Remote controller and three batteries (AA/R6) Speaker setup microphone Indoor FM antenna AM loop... by Macrovision. Available only in the U.S. Features-Continued *5 Theater-Dimensional is a trademark of Onkyo Corporation. *6 Re-Equalization and the "Re-EQ" logo are trademarks of THX Ltd. *7... Audyssey Laboratories. All rights reserved. *9 ©2005 SIRIUS Satellite Radio Inc. THX Ultra2 receivers also feature proprietary THX technologies (e.g., THX Mode) which is your guarantee that is prohibited. and...
... the Home Theater products you purchase will give you have the following accessories: Remote controller and three batteries (AA/R6) Speaker setup microphone Indoor FM antenna AM loop... by Macrovision. Available only in the U.S. Features-Continued *5 Theater-Dimensional is a trademark of Onkyo Corporation. *6 Re-Equalization and the "Re-EQ" logo are trademarks of THX Ltd. *7... Audyssey Laboratories. All rights reserved. *9 ©2005 SIRIUS Satellite Radio Inc. THX Ultra2 receivers also feature proprietary THX technologies (e.g., THX Mode) which is your guarantee that is prohibited. and...

Owner Manual
Page 9
...ZONE 2 indicator (105) Flashes when Zone 2 is being set . F Remote-control sensor (14) Receives control signals from the remote controller. The volume level can also be displayed as an absolute value. The indicator lights up when the AV receiver is on it. Pressing this indicator. K AUDIO SEL button (70) ...2 is on . Lights up when Zone 3 is on . E ZONE 3 indicator (105) Flashes when Zone 3 is being received from the remote controller. Getting to Know the AV Receiver Front Panel 3 Not North American model 1 2 45 6 7 89 STANDBY/ON STANDBY READY ZONE 2 ZONE 3 PURE AUDIO AUDIO ...
...ZONE 2 indicator (105) Flashes when Zone 2 is being set . F Remote-control sensor (14) Receives control signals from the remote controller. The volume level can also be displayed as an absolute value. The indicator lights up when the AV receiver is on it. Pressing this indicator. K AUDIO SEL button (70) ...2 is on . Lights up when Zone 3 is on . E ZONE 3 indicator (105) Flashes when Zone 3 is being received from the remote controller. Getting to Know the AV Receiver Front Panel 3 Not North American model 1 2 45 6 7 89 STANDBY/ON STANDBY READY ZONE 2 ZONE 3 PURE AUDIO AUDIO ...

Owner Manual
Page 12
... or DVR (digital video recorder). nected to Know the AV Receiver-Continued Rear Panel 7 8 North American model only K TX-SR875 only 12 3 4 56 9 J LMN O RS232 IN 4 IN 3 COMPONENT VIDEO ASSIGNABLE IN 3 IN 2 IN 1(DVD) MONITOR OUT Y REMOTE CB/PB CONTROL DIGITAL ASSIGNABLE COAXIAL IN 1 (DVD) CR/PR HDMI ... connecting the AV receiver to suit your setup. E COMPONENT VIDEO MONITOR OUT This RCA component video output is for remote and system control. F HDMI IN 1-4 and OUT The TX-SR805 has HDMI IN 1-3 and OUT. See "HDMI Input Setup" on another -capable Onkyo component for ...
... or DVR (digital video recorder). nected to Know the AV Receiver-Continued Rear Panel 7 8 North American model only K TX-SR875 only 12 3 4 56 9 J LMN O RS232 IN 4 IN 3 COMPONENT VIDEO ASSIGNABLE IN 3 IN 2 IN 1(DVD) MONITOR OUT Y REMOTE CB/PB CONTROL DIGITAL ASSIGNABLE COAXIAL IN 1 (DVD) CR/PR HDMI ... connecting the AV receiver to suit your setup. E COMPONENT VIDEO MONITOR OUT This RCA component video output is for remote and system control. F HDMI IN 1-4 and OUT The TX-SR805 has HDMI IN 1-3 and OUT. See "HDMI Input Setup" on another -capable Onkyo component for ...

Owner Manual
Page 13
...be connected to the IR IN jack, allowing you to control the AV receiver while you're in Zone 2, or control it when it's out of the power cord should be...DVD player. A commercially available IR emitter can be connected to the IR OUT jack to pass IR (infrared) remote control signals through to suit your setup. P DIGITAL COAXIAL IN 1, 2, and 3 These coaxial digital audio inputs are ... for connecting a DVD player. See "Bi-amping the Front Speakers" and "Bridging the Front Speakers (TX-SR875 only)" on page 52. The type and number of outlets depends on a multichannel power amplifier...
...be connected to the IR IN jack, allowing you to control the AV receiver while you're in Zone 2, or control it when it's out of the power cord should be...DVD player. A commercially available IR emitter can be connected to the IR OUT jack to pass IR (infrared) remote control signals through to suit your setup. P DIGITAL COAXIAL IN 1, 2, and 3 These coaxial digital audio inputs are ... for connecting a DVD player. See "Bi-amping the Front Speakers" and "Bridging the Front Speakers (TX-SR875 only)" on page 52. The type and number of outlets depends on a multichannel power amplifier...

Owner Manual
Page 14
... Remote control sensor STANDBY indicator AV receiver 2 Insert the three supplied batteries (AA/R6) in a rack behind colored glass doors. Using the Remote Controller When using the remote controller, point it and the AV receiver's remote control sensor. 14 Keep this in mind when installing. • The remote controller ...inside the battery compartment. 3 Slide the cover shut. Notes: • If the remote controller doesn't work if there's an obstacle between it toward the AV receiver's remote control sensor, as a book or magazine, because a button may be removed as soon as...
... Remote control sensor STANDBY indicator AV receiver 2 Insert the three supplied batteries (AA/R6) in a rack behind colored glass doors. Using the Remote Controller When using the remote controller, point it and the AV receiver's remote control sensor. 14 Keep this in mind when installing. • The remote controller ...inside the battery compartment. 3 Slide the cover shut. Notes: • If the remote controller doesn't work if there's an obstacle between it toward the AV receiver's remote control sensor, as a book or magazine, because a button may be removed as soon as...

Owner Manual
Page 15
... . ■ TV and VCR Modes With these modes, you can control an Onkyo DVD player in an Onkyo RI Dock that mode to control the component. To set the remote controller to control the AV receiver. TUN TV VOL +10 0 CLEAR --/--- 10 11 12 INPUT SELECTOR... S T U 15 By entering the appropriate remote control code, you can control a CD player, MD recorder, or CD recorder made by using the REMOTE MODE buttons. ■ RECEIVER/TAPE Mode In RECEIVER/TAPE mode, you can control the AV receiver and an Onkyo cassette recorder connected via . A B C D RECEIVER TAPE/AMP 5 F G H I ON ...
... . ■ TV and VCR Modes With these modes, you can control an Onkyo DVD player in an Onkyo RI Dock that mode to control the component. To set the remote controller to control the AV receiver. TUN TV VOL +10 0 CLEAR --/--- 10 11 12 INPUT SELECTOR... S T U 15 By entering the appropriate remote control code, you can control a CD player, MD recorder, or CD recorder made by using the REMOTE MODE buttons. ■ RECEIVER/TAPE Mode In RECEIVER/TAPE mode, you can control the AV receiver and an Onkyo cassette recorder connected via . A B C D RECEIVER TAPE/AMP 5 F G H I ON ...

Owner Manual
Page 16
...buttons (71) Used to Standby. L LIGHT button Turns the remote controller's illuminated buttons on or off . P VOL [ ]/[ ] button (62) Adjusts the volume of the AV receiver regardless of each speaker. R MUTING button (68) Mutes or unmutes the AV receiver. F Arrow and ENTER buttons Used to the previous display when...69) Used with the Sleep function. G CH +/- T L NIGHT button (81) Turns the Late Night function on the AV receiver. During playback it selects the beginning of the currently selected remote controller mode. The Next [ ] button selects the next track.
...buttons (71) Used to Standby. L LIGHT button Turns the remote controller's illuminated buttons on or off . P VOL [ ]/[ ] button (62) Adjusts the volume of the AV receiver regardless of each speaker. R MUTING button (68) Mutes or unmutes the AV receiver. F Arrow and ENTER buttons Used to the previous display when...69) Used with the Sleep function. G CH +/- T L NIGHT button (81) Turns the Late Night function on the AV receiver. During playback it selects the beginning of the currently selected remote controller mode. The Next [ ] button selects the next track.
Owner Manual
Page 17
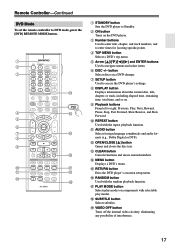
... Turns off the internal video circuitry, eliminating any possibility of interference. 17 PREV CH DISPLAY CABLE SAT TOP MENU DOCK MENU RECEIVER TAPE/AMP SLEEP ENTER VOL GUIDE SETUP EXIT RETURN MUTING REC PLAYLIST RANDOM STEREO LISTENING MODE SURR REPEAT AUDIO SUBTITLE PLAY MODE ... button Cancels functions and clears entered numbers. G SETUP button Used to enter times for locating specific points. Remote Controller-Continued DVD Mode To set the remote controller to right: Previous, Play, Next, Rewind, Pause, Stop, Fast Forward, Slow Reverse, and Slow Forward.
... Turns off the internal video circuitry, eliminating any possibility of interference. 17 PREV CH DISPLAY CABLE SAT TOP MENU DOCK MENU RECEIVER TAPE/AMP SLEEP ENTER VOL GUIDE SETUP EXIT RETURN MUTING REC PLAYLIST RANDOM STEREO LISTENING MODE SURR REPEAT AUDIO SUBTITLE PLAY MODE ... button Cancels functions and clears entered numbers. G SETUP button Used to enter times for locating specific points. Remote Controller-Continued DVD Mode To set the remote controller to right: Previous, Play, Next, Rewind, Pause, Stop, Fast Forward, Slow Reverse, and Slow Forward.

Owner Manual
Page 18
... Set the component to Standby. J OPEN/CLOSE [ ] button Opens or closes the disc tray or ejects the MiniDisc. Remote Controller-Continued CD/MD/CDR Modes To control an Onkyo CD player, MD recorder, or CD recorder, or a CD or MD player/recorder made by another manufacturer, you must ...64257;rst enter the appropriate remote control code (see page 108). D Arrow and ENTER buttons Used with the repeat playback function. K CLEAR button Cancels functions and clears entered numbers. TAPE TUNER CD 7 8 9 PHONO D. PREV CH DISPLAY CABLE SAT TOP MENU DOCK RECEIVER TAPE/AMP SLEEP MENU ...
... Set the component to Standby. J OPEN/CLOSE [ ] button Opens or closes the disc tray or ejects the MiniDisc. Remote Controller-Continued CD/MD/CDR Modes To control an Onkyo CD player, MD recorder, or CD recorder, or a CD or MD player/recorder made by another manufacturer, you must ...64257;rst enter the appropriate remote control code (see page 108). D Arrow and ENTER buttons Used with the repeat playback function. K CLEAR button Cancels functions and clears entered numbers. TAPE TUNER CD 7 8 9 PHONO D. PREV CH DISPLAY CABLE SAT TOP MENU DOCK RECEIVER TAPE/AMP SLEEP MENU ...

Owner Manual
Page 19
...to the TAPE IN or GAME/TV IN L/R jacks. • Set the RI Dock's RI MODE switch to HDD. • Set the AV receiver's Input Display to DOCK (see page 51). • See to select play modes. A B C 4 5 6 7 8 9 J... Rewind [ ] button Press and hold to select the previous song. If the component is for controlling an Apple iPod in an Onkyo RI Dock that's connected via . P Fast Forward [ ] button Press and hold to select .... Works as a Play/Pause button.) N Next [ ] button Selects the next song. Remote Controller-Continued DOCK Mode Dock mode is off the iPod.
...to the TAPE IN or GAME/TV IN L/R jacks. • Set the RI Dock's RI MODE switch to HDD. • Set the AV receiver's Input Display to DOCK (see page 51). • See to select play modes. A B C 4 5 6 7 8 9 J... Rewind [ ] button Press and hold to select the previous song. If the component is for controlling an Apple iPod in an Onkyo RI Dock that's connected via . P Fast Forward [ ] button Press and hold to select .... Works as a Play/Pause button.) N Next [ ] button Selects the next song. Remote Controller-Continued DOCK Mode Dock mode is off the iPod.

Owner Manual
Page 43
..., all channels (see page 51). You can use the AV receiver's remote controller to control your DVD player is a problem, plug the AV receiver into a suitable wall outlet. • Turning on the AV receiver. Connecting Your Components-Continued Connecting Onkyo Components Step 1: Make sure that each Onkyo component is connected to the AV receiver with Onkyo players (DVD, CD, etc.). • Some components have...
..., all channels (see page 51). You can use the AV receiver's remote controller to control your DVD player is a problem, plug the AV receiver into a suitable wall outlet. • Turning on the AV receiver. Connecting Your Components-Continued Connecting Onkyo Components Step 1: Make sure that each Onkyo component is connected to the AV receiver with Onkyo players (DVD, CD, etc.). • Some components have...
Owner Manual
Page 44
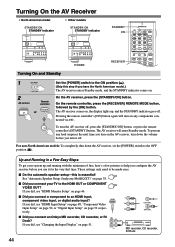
... CDR/MD ZONE2 TV DIMMER CABLE SAT DOCK RECEIVER TAPE/AMP SLEEP 1 POWER ON OFF 2 AV receiver STANDBY/ON Remote controller RECEIVER or ON Set the [POWER] switch to help you configure the AV receiver before you connect an Onkyo MD recorder, CD recorder, or RI Dock? Pressing the remote controller's [ON] button again will enter Standby mode. COAXIAL...
... CDR/MD ZONE2 TV DIMMER CABLE SAT DOCK RECEIVER TAPE/AMP SLEEP 1 POWER ON OFF 2 AV receiver STANDBY/ON Remote controller RECEIVER or ON Set the [POWER] switch to help you configure the AV receiver before you connect an Onkyo MD recorder, CD recorder, or RI Dock? Pressing the remote controller's [ON] button again will enter Standby mode. COAXIAL...

Owner Manual
Page 62
... 6 + TV CH - TAPE TUNER CD 7 8 9 PHONO D. PREV CH DISPLAY CABLE SAT TOP MENU DOCK RECEIVER TAPE/AMP SLEEP MENU ENTER VOL GUIDE SETUP EXIT RETURN MUTING 1 3 1 AV receiver DVD VCR/DVR CBL/SAT GAME/TV AUX 1 AUX 2 Remote controller RECEIVER Use the AV receiver's input selector buttons to -∞ dB, -81.5 dB, -81.0 dB through +18.0 dB. 4 Select...
... 6 + TV CH - TAPE TUNER CD 7 8 9 PHONO D. PREV CH DISPLAY CABLE SAT TOP MENU DOCK RECEIVER TAPE/AMP SLEEP MENU ENTER VOL GUIDE SETUP EXIT RETURN MUTING 1 3 1 AV receiver DVD VCR/DVR CBL/SAT GAME/TV AUX 1 AUX 2 Remote controller RECEIVER Use the AV receiver's input selector buttons to -∞ dB, -81.5 dB, -81.0 dB through +18.0 dB. 4 Select...

Owner Manual
Page 64
...preset with the remote controller. TAPE TUNER CD 7 8 9 PHONO D. DVD VCR/DVR CBL/SAT quency of the radio station. 1 2 3 GAME/TV AUX1 AUX2 For example, to tune to 87.5 (FM), 4 5 6 TAPE TUNER CD press 8, 7, 5. 7 8 9 PHONO +10 0 Note: While the [RECEIVER] button is ...CLEAR --/--- 10 11 12 INPUT SELECTOR MACRO 1 2 3 ZONE3 DVD REMOTE MODE VCR CD CDR/MD ZONE2 TV DIMMER CABLE SAT TOP MENU DOCK MENU RECEIVER TAPE/AMP SLEEP D.TUN RECEIVER 1 RECEIVER Press the [RECEIVER] button, followed by entering the appropriate frequency. Band Frequency Preset # ...
...preset with the remote controller. TAPE TUNER CD 7 8 9 PHONO D. DVD VCR/DVR CBL/SAT quency of the radio station. 1 2 3 GAME/TV AUX1 AUX2 For example, to tune to 87.5 (FM), 4 5 6 TAPE TUNER CD press 8, 7, 5. 7 8 9 PHONO +10 0 Note: While the [RECEIVER] button is ...CLEAR --/--- 10 11 12 INPUT SELECTOR MACRO 1 2 3 ZONE3 DVD REMOTE MODE VCR CD CDR/MD ZONE2 TV DIMMER CABLE SAT TOP MENU DOCK MENU RECEIVER TAPE/AMP SLEEP D.TUN RECEIVER 1 RECEIVER Press the [RECEIVER] button, followed by entering the appropriate frequency. Band Frequency Preset # ...

Owner Manual
Page 67
... OPEN S VIDEO VIDEO L AUDIO R DIGITAL 1 Select the preset that you want to delete. PREV CH DISPLAY CABLE SAT TOP MENU DOCK MENU RECEIVER TAPE/AMP SLEEP ENTER VOL GUIDE SETUP EXIT RETURN MUTING To select a preset, use the PRESET [ ]/[ ] buttons to select a preset from ... STANDBY READY ZONE 2 ZONE 3 DVD 1 VCR/DVR CBL/SAT 2 3 GAME/TV AUX1 AUX2 4 5 6 + TV CH - PRESET SET [ ]/[ ] buttons or the remote controller's CH [+/-] button. + CH DISC ALBUM - 4 MEMORY Press the [MEMORY] button again to store as a preset. 2 MEMORY Press the [MEMORY] button. Note: •...
... OPEN S VIDEO VIDEO L AUDIO R DIGITAL 1 Select the preset that you want to delete. PREV CH DISPLAY CABLE SAT TOP MENU DOCK MENU RECEIVER TAPE/AMP SLEEP ENTER VOL GUIDE SETUP EXIT RETURN MUTING To select a preset, use the PRESET [ ]/[ ] buttons to select a preset from ... STANDBY READY ZONE 2 ZONE 3 DVD 1 VCR/DVR CBL/SAT 2 3 GAME/TV AUX1 AUX2 4 5 6 + TV CH - PRESET SET [ ]/[ ] buttons or the remote controller's CH [+/-] button. + CH DISC ALBUM - 4 MEMORY Press the [MEMORY] button again to store as a preset. 2 MEMORY Press the [MEMORY] button. Note: •...
Owner Manual
Page 68
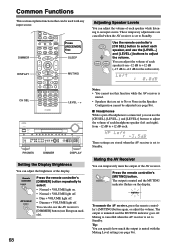
... ENTER GUIDE SETUP EXIT RETURN VOL MUTING MUTING Adjusting Speaker Levels You can use the [LEVEL-] and [LEVEL+] buttons to adjust the volume. Remote controller DIMMER AV receiver DIMMER Press the remote controller's [DIMMER] button repeatedly to select: • Normal + VOLUME light on the display. GAME/TV 4 AUX1 5 AUX2 6 TV CH - L NIGHT DVD LEVEL+ Re-EQ...
... ENTER GUIDE SETUP EXIT RETURN VOL MUTING MUTING Adjusting Speaker Levels You can use the [LEVEL-] and [LEVEL+] buttons to adjust the volume. Remote controller DIMMER AV receiver DIMMER Press the remote controller's [DIMMER] button repeatedly to select: • Normal + VOLUME light on the display. GAME/TV 4 AUX1 5 AUX2 6 TV CH - L NIGHT DVD LEVEL+ Re-EQ...

Owner Manual
Page 69
...AV receiver so that if you press the [SLEEP] button while the sleep time is being displayed, you'll shorten the sleep time by 10 minutes. pears. If the input signal is digital but not PCM, the signal format and the number of channels, and sampling frequency is displayed. SLEEP Press the remote controller...'s [SLEEP] button repeatedly to cycle through the available information. Note that it stays the same. 69 Remote controller DISPLAY Press the [DISPLAY] button repeatedly to select the ...
...AV receiver so that if you press the [SLEEP] button while the sleep time is being displayed, you'll shorten the sleep time by 10 minutes. pears. If the input signal is digital but not PCM, the signal format and the number of channels, and sampling frequency is displayed. SLEEP Press the remote controller...'s [SLEEP] button repeatedly to cycle through the available information. Note that it stays the same. 69 Remote controller DISPLAY Press the [DISPLAY] button repeatedly to select the ...

Owner Manual
Page 71
...The Dolby Digital and DTS listening modes can only be selected if your DVD player is connected to the AV receiver with the Remote Controller + CH DISC ALBUM - Pressing this mode is selected, the AV receiver's display is turned off and only the HDMI OUT outputs video signals. ■ [DIRECT] button This..., or HDMI). • The listening modes you can only select the Pure Audio, Mono, Direct, or Stereo listening mode. Selecting on the AV Receiver STEREO THX STANDBY/ON STANDBY READY ZONE 2 ZONE 3 MASTER VOLUME PURE AUDIO AUDIO SEL DVD VCR/DVR CBL/SAT GAME/TV AUX 1 AUX ...
...The Dolby Digital and DTS listening modes can only be selected if your DVD player is connected to the AV receiver with the Remote Controller + CH DISC ALBUM - Pressing this mode is selected, the AV receiver's display is turned off and only the HDMI OUT outputs video signals. ■ [DIRECT] button This..., or HDMI). • The listening modes you can only select the Pure Audio, Mono, Direct, or Stereo listening mode. Selecting on the AV Receiver STEREO THX STANDBY/ON STANDBY READY ZONE 2 ZONE 3 MASTER VOLUME PURE AUDIO AUDIO SEL DVD VCR/DVR CBL/SAT GAME/TV AUX 1 AUX ...


