
Owner Manual
Page 6
...Optimizer™ is a trademark of this copyright protection technology must pass a rigorous series of Sony Corporation. Use of Onkyo Corporation. THX may be THX Ultra2 Plus certified, it must be authorized by Macrovision Corporation, and is intended for both digital and analog domains. ... Reserved. *3. In Europe, using banana plugs to connect speakers to an audio amplifier is prohibited. 6 THX Ultra2 Plus receivers also feature proprietary THX technologies (e.g., THX Mode) which is your guarantee that is a registered trademark of Audyssey Laboratories. *9.
...Optimizer™ is a trademark of this copyright protection technology must pass a rigorous series of Sony Corporation. Use of Onkyo Corporation. THX may be THX Ultra2 Plus certified, it must be authorized by Macrovision Corporation, and is intended for both digital and analog domains. ... Reserved. *3. In Europe, using banana plugs to connect speakers to an audio amplifier is prohibited. 6 THX Ultra2 Plus receivers also feature proprietary THX technologies (e.g., THX Mode) which is your guarantee that is a registered trademark of Audyssey Laboratories. *9.
Owner Manual
Page 9
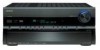
...is in parentheses show where you can also be used with movies and TV. ct THX button (64) Selects the THX listening modes. 9 C STANDBY indicator (40) R MUSIC button (64) This indicator lights up when the AV receiver/AV amplifier is completely shutdown. T MEMORY or Re-EQ button (60, 85) This ... W Arrow, TUNING, PRESET and ENTER buttons When the AM or FM input source is used to select radio presets (see page 60) (TX-SR806 only). cs GAME button (64) Selects the listening modes intended for automatic speaker setup. cr DIGITAL INPUT button (98) Selects the options for...
...is in parentheses show where you can also be used with movies and TV. ct THX button (64) Selects the THX listening modes. 9 C STANDBY indicator (40) R MUSIC button (64) This indicator lights up when the AV receiver/AV amplifier is completely shutdown. T MEMORY or Re-EQ button (60, 85) This ... W Arrow, TUNING, PRESET and ENTER buttons When the AM or FM input source is used to select radio presets (see page 60) (TX-SR806 only). cs GAME button (64) Selects the listening modes intended for automatic speaker setup. cr DIGITAL INPUT button (98) Selects the options for...
Owner Manual
Page 16
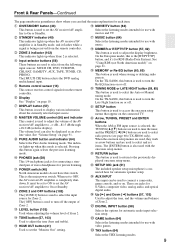
...with good bass, experiment by installing the subwoofer in a front corner, or at the apex. About Home Theater Enjoying Home Theater Thanks to the AV receiver/AV amplifier's superb capabilities, you can enjoy surround sound with a real sense of movement in your own home-just like being in a home theater...-third the width of the bass output from the TV. With DVDs you can also enjoy THX Surround EX (THX-certified THX speaker system recommended). You can enjoy Dolby Pro Logic IIx, DTS Neo:6, or Onkyo's original DSP listening modes. Their role in a movie theater or concert hall. Angle them ...
...with good bass, experiment by installing the subwoofer in a front corner, or at the apex. About Home Theater Enjoying Home Theater Thanks to the AV receiver/AV amplifier's superb capabilities, you can enjoy surround sound with a real sense of movement in your own home-just like being in a home theater...-third the width of the bass output from the TV. With DVDs you can also enjoy THX Surround EX (THX-certified THX speaker system recommended). You can enjoy Dolby Pro Logic IIx, DTS Neo:6, or Onkyo's original DSP listening modes. Their role in a movie theater or concert hall. Angle them ...

Owner Manual
Page 23
... Formats Video equipment can be connected to the AV receiver/AV amplifier by selecting the appropriate input source on the AV receiver/AV amplifier. : Signal Flow Video Audio Video Audio TV, projector, etc. For optimal video performance, THX recommends that you connect the AV IN receiver/AV amplifier's HDMI OUT to the AV receiver/AV amplifier, you can select both the audio and...
... Formats Video equipment can be connected to the AV receiver/AV amplifier by selecting the appropriate input source on the AV receiver/AV amplifier. : Signal Flow Video Audio Video Audio TV, projector, etc. For optimal video performance, THX recommends that you connect the AV IN receiver/AV amplifier's HDMI OUT to the AV receiver/AV amplifier, you can select both the audio and...
Owner Manual
Page 43
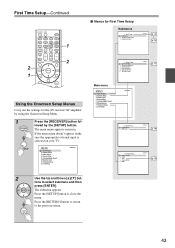
... the [RECEIVER] button fol- Input Assign 2. Source Setup 5. Speaker Settings 2. Level Calibration 5. Audio Adjust 4. Miscellaneous 1. Hardware Setup 1. Zone2 3. Digital Audio Input p. 44 p. 46 2 2 1 Using the Onscreen Setup Menus Carry out the settings for First Time Setup Submenus 1. Speaker Setup 3. Miscellaneous 7. Speaker Configuration 3. THX Audio Setup...submenu appears. Input Assign 1. Tuner 4. Audio Adjust 4. Speaker Distance 4. HDMI Input 2. First Time Setup-Continued 1 ■ Menus for the AV receiver/AV amplifier by the [SETUP] button. Miscellaneous 7.
... the [RECEIVER] button fol- Input Assign 2. Source Setup 5. Speaker Settings 2. Level Calibration 5. Audio Adjust 4. Miscellaneous 1. Hardware Setup 1. Zone2 3. Digital Audio Input p. 44 p. 46 2 2 1 Using the Onscreen Setup Menus Carry out the settings for First Time Setup Submenus 1. Speaker Setup 3. Miscellaneous 7. Speaker Configuration 3. THX Audio Setup...submenu appears. Input Assign 1. Tuner 4. Audio Adjust 4. Speaker Distance 4. HDMI Input 2. First Time Setup-Continued 1 ■ Menus for the AV receiver/AV amplifier by the [SETUP] button. Miscellaneous 7.
Owner Manual
Page 47
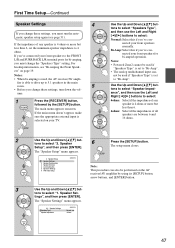
...'ve connected your TV. For hookup information, see page 51). nected your front speakers for bi-amping, you 've con- not be performed on the AV receiver/AV amplifier by the [SETUP] button. Speaker Setup 1. Speaker Configuration 3. Notes: • Powered Zone2 cannot be used if "Speakers Type" is set to... and Right [F]/[S] buttons to select "1. Speaker 6 Press the [SETUP] button. The setup menu closes. Speaker Settings 2. Level Calibration 5. Equalizer Settings 6. THX Audio Setup Note: This procedure can - The "Speaker Settings" menu appears. 2-1.
...'ve connected your TV. For hookup information, see page 51). nected your front speakers for bi-amping, you 've con- not be performed on the AV receiver/AV amplifier by the [SETUP] button. Speaker Setup 1. Speaker Configuration 3. Notes: • Powered Zone2 cannot be used if "Speakers Type" is set to... and Right [F]/[S] buttons to select "1. Speaker 6 Press the [SETUP] button. The setup menu closes. Speaker Settings 2. Level Calibration 5. Equalizer Settings 6. THX Audio Setup Note: This procedure can - The "Speaker Settings" menu appears. 2-1.

Owner Manual
Page 57
... Adjusting the Bass & Treble You can adjust the bass and treble for the front speakers, except when the Direct, Pure Audio or THX listening mode is selected. 1 AV receiver/ AV amplifier Press the [TONE] button repeatedly to select either "Bass" or "Treble". 2 Use the Up [S] and Down [F] buttons to...dB steps. ■ Treble You can adjust the brightness of channels is displayed. The following information can use the AV receiver/AV amplifier's [DIMMER] button (North American models and TX-SA806 only). 57 Audio from -10 dB to "Bi-Amp" (see page 85). Remote controller Press the...
... Adjusting the Bass & Treble You can adjust the bass and treble for the front speakers, except when the Direct, Pure Audio or THX listening mode is selected. 1 AV receiver/ AV amplifier Press the [TONE] button repeatedly to select either "Bass" or "Treble". 2 Use the Up [S] and Down [F] buttons to...dB steps. ■ Treble You can adjust the brightness of channels is displayed. The following information can use the AV receiver/AV amplifier's [DIMMER] button (North American models and TX-SA806 only). 57 Audio from -10 dB to "Bi-Amp" (see page 85). Remote controller Press the...

Owner Manual
Page 64
... Selecting with the Remote Controller MUSIC MOVIE/TV GAME THX Press the [RECEIVER] button, and then press the LISTENING MODE button repeatedly to the AV receiver/AV amplifier with a digital audio connection (coaxial, optical, or HDMI). • The listening modes you can be selected if your... DVD player is connected to select the listening mode. Pressing this mode is selected, the AV receiver/AV amplifier's display is connected, you can only be output. To check the format, see "Displaying Source Information" on page 57. • ...
... Selecting with the Remote Controller MUSIC MOVIE/TV GAME THX Press the [RECEIVER] button, and then press the LISTENING MODE button repeatedly to the AV receiver/AV amplifier with a digital audio connection (coaxial, optical, or HDMI). • The listening modes you can be selected if your... DVD player is connected to select the listening mode. Pressing this mode is selected, the AV receiver/AV amplifier's display is connected, you can only be output. To check the format, see "Displaying Source Information" on page 57. • ...
Owner Manual
Page 74
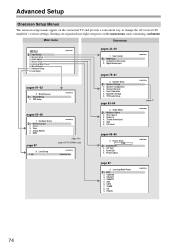
... eight categories on the connected TV and provide a convenient way to change the AV receiver/AV amplifier's various settings. Listening Mode Preset 6. OSD Setup pages 93-96 7. HDMI Input 2. Speaker Setup 1. THX Audio Setup page 83-84 3. Theater-Dimentional 5. A/V Sync 3. Listening Mode ... PLIIx / Neo:6 3. IntelliVolume 2. Picture Adjust page 47 page 87 5. Lock Setup pages 91-92 6. Lock Setup Lock page 100 page 49 (TX-SR806 only) Unlocked pages 44-46 1. Speaker Settings 2. CBL/SAT 4. Input Assign 2. Hardware Setup 8. HDMI page 97 8. Input Assign 1. Dolby EX...
... eight categories on the connected TV and provide a convenient way to change the AV receiver/AV amplifier's various settings. Listening Mode Preset 6. OSD Setup pages 93-96 7. HDMI Input 2. Speaker Setup 1. THX Audio Setup page 83-84 3. Theater-Dimentional 5. A/V Sync 3. Listening Mode ... PLIIx / Neo:6 3. IntelliVolume 2. Picture Adjust page 47 page 87 5. Lock Setup pages 91-92 6. Lock Setup Lock page 100 page 49 (TX-SR806 only) Unlocked pages 44-46 1. Speaker Settings 2. CBL/SAT 4. Input Assign 2. Hardware Setup 8. HDMI page 97 8. Input Assign 1. Dolby EX...

Owner Manual
Page 75
...function, please make sure the appropriate external input is connected. 75 Please note that THX recommends any THX speakers are set to 80 Hz (THX) crossover. 4 1 2, 3 1, 12 2-11 Press the [RECEIVER] button followed by the Automatic Speaker Setup function, or set them manually, which speakers...: Select if no subwoofer is selected on page 47. phones are set up your speaker's manuals to the AV receiver/AV amplifier. Speaker Setup", and then press [ENTER]. THX Audio Setup Use the Up and Down [R]/[X] buttons to select "2. quency will be set to select: Yes:...
...function, please make sure the appropriate external input is connected. 75 Please note that THX recommends any THX speakers are set to 80 Hz (THX) crossover. 4 1 2, 3 1, 12 2-11 Press the [RECEIVER] button followed by the Automatic Speaker Setup function, or set them manually, which speakers...: Select if no subwoofer is selected on page 47. phones are set up your speaker's manuals to the AV receiver/AV amplifier. Speaker Setup", and then press [ENTER]. THX Audio Setup Use the Up and Down [R]/[X] buttons to select "2. quency will be set to select: Yes:...

Owner Manual
Page 77
...in step 5 is distributed to your speakers only if you have large front left and right channels to select: On: Double Bass function on the AV receiver/AV amplifier by using its [SETUP] button, arrow buttons, and [ENTER] button. 77 This function can be used to "Full Band". With this ...setting, you 're using THX-certified speakers, select "Off(THX)". 11 Use the Up and Down [R]/[X] but - With the Double Bass function, you 're using THX-certified speakers, select "80Hz(THX)". 10 Use the Up and Down [R]/[X] but - The setup menu closes....
...in step 5 is distributed to your speakers only if you have large front left and right channels to select: On: Double Bass function on the AV receiver/AV amplifier by using its [SETUP] button, arrow buttons, and [ENTER] button. 77 This function can be used to "Full Band". With this ...setting, you 're using THX-certified speakers, select "Off(THX)". 11 Use the Up and Down [R]/[X] but - With the Double Bass function, you 're using THX-certified speakers, select "80Hz(THX)". 10 Use the Up and Down [R]/[X] but - The setup menu closes....

Owner Manual
Page 78
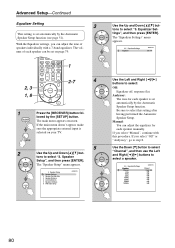
Advanced Setup-Continued Speaker Distance 4 This setting is selected on the AV receiver/AV amplifier by the [SETUP] button. The "Speaker Distance" menu appears. 2-3. Speaker Distance Unit feet Left 12.0ft Center 12.0ft Right 12.0ft Surr Right 7.... Setup function (see page 51). meters: Select if you set from each speaker to 9 meters in feet. Can be set to 30 feet in meters. THX Audio Setup 8 Repeat step 6 for all speakers. Note: Speakers that the sound from each speaker arrives at the listener's ears as the sound designer intended...
Advanced Setup-Continued Speaker Distance 4 This setting is selected on the AV receiver/AV amplifier by the [SETUP] button. The "Speaker Distance" menu appears. 2-3. Speaker Distance Unit feet Left 12.0ft Center 12.0ft Right 12.0ft Surr Right 7.... Setup function (see page 51). meters: Select if you set from each speaker to 9 meters in feet. Can be set to 30 feet in meters. THX Audio Setup 8 Repeat step 6 for all speakers. Note: Speakers that the sound from each speaker arrives at the listener's ears as the sound designer intended...
Owner Manual
Page 79
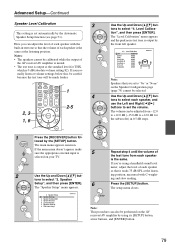
... main menu appears onscreen. The setup menu closes. 2. Speaker Configuration 3. THX Audio Setup Note: This procedure can adjust the level of each speaker with C-weighting and slow reading. Here you can also be performed on the AV receiver/AV amplifier by the [SETUP] button. The "Level Calibration" menu appears and... tone from -12.0 to +12.0 dB (-15.0 dB to +12.0 dB for THX, which is the same at the listen- 2 Use the Up and Down [R]/[X] but- Repeat step 4 until the volume of the AV receiver/AV amplifier is muted. • The test tone is output at volume settings below this,...
... main menu appears onscreen. The setup menu closes. 2. Speaker Configuration 3. THX Audio Setup Note: This procedure can adjust the level of each speaker with C-weighting and slow reading. Here you can also be performed on the AV receiver/AV amplifier by the [SETUP] button. The "Level Calibration" menu appears and... tone from -12.0 to +12.0 dB (-15.0 dB to +12.0 dB for THX, which is the same at the listen- 2 Use the Up and Down [R]/[X] but- Repeat step 4 until the volume of the AV receiver/AV amplifier is muted. • The test tone is output at volume settings below this,...
Owner Manual
Page 80
..., you can adjust the tone of each speaker manually. The main menu appears onscreen. Speaker Setup", and then press [ENTER]. Equalizer Settings 6. THX Audio Setup Use the Up and Down [R]/[X] buttons to select this procedure. Speaker Setup 1. Audyssey: The tone for each speaker can adjust the equalizer ...Speaker Setup function. If the main menu doesn't appear, make sure the appropriate external input is selected on page 79. 1 2-7 4 2, 3 1, 8 1 Press the [RECEIVER] button fol- Equalizer Settings", and then press [ENTER]. Level Calibration 5.
..., you can adjust the tone of each speaker manually. The main menu appears onscreen. Speaker Setup", and then press [ENTER]. Equalizer Settings 6. THX Audio Setup Use the Up and Down [R]/[X] buttons to select this procedure. Speaker Setup 1. Audyssey: The tone for each speaker can adjust the equalizer ...Speaker Setup function. If the main menu doesn't appear, make sure the appropriate external input is selected on page 79. 1 2-7 4 2, 3 1, 8 1 Press the [RECEIVER] button fol- Equalizer Settings", and then press [ENTER]. Level Calibration 5.
Owner Manual
Page 81
.... Repeat step 6 and 7 for each frequency can then apply THX's Boundary Gain Compensation (BGC) to "Yes". You can be performed on the AV receiver/AV amplifier by using a THX-certified subwoofer, set the "THX Ultra2/Select2 Subwoofer" setting to compensate the perceived exaggeration of audio ... Surr Back Sp Spacing > 4ft THX Ultra2/Select2 Subwoofer No BGC - - - The "THX Audio Setup" screen appears. 2-6. If the main menu doesn't appear, make sure the appropriate external input is selected. 1 Remote controller Press the [RECEIVER] button, followed by the Automatic ...
.... Repeat step 6 and 7 for each frequency can then apply THX's Boundary Gain Compensation (BGC) to "Yes". You can be performed on the AV receiver/AV amplifier by using a THX-certified subwoofer, set the "THX Ultra2/Select2 Subwoofer" setting to compensate the perceived exaggeration of audio ... Surr Back Sp Spacing > 4ft THX Ultra2/Select2 Subwoofer No BGC - - - The "THX Audio Setup" screen appears. 2-6. If the main menu doesn't appear, make sure the appropriate external input is selected. 1 Remote controller Press the [RECEIVER] button, followed by the Automatic ...

Owner Manual
Page 82
... [R]/[X] but - ness Plus, home theater audiences can be performed on the AV receiver/AV amplifier by the listener. This enables users experience the true impact of soundtracks regardless the Left and Right [F]/[S] buttons to "2ch" (page 76). Off: Select this to select "THX Ultra2/ arrow buttons, and [ENTER] button. This procedure can also be...
... [R]/[X] but - ness Plus, home theater audiences can be performed on the AV receiver/AV amplifier by the listener. This enables users experience the true impact of soundtracks regardless the Left and Right [F]/[S] buttons to "2ch" (page 76). Off: Select this to select "THX Ultra2/ arrow buttons, and [ENTER] button. This procedure can also be...
Owner Manual
Page 85
... listening at low volume levels-ideal for watching movies late at night when you select the different options. • On the TX-SA806, this procedure can be performed on the AV amplifier by using its [LATE NIGHT] button. Re-EQ Function With the Re-EQ function, you are : Off: Late Night... dynamic range. Off: Late Night function off . On: Re-EQ Function on the display. 2 Use the Up and Down [R]/[X] but- However, in THX listening mode, when the AV receiver/AV amplifier is selected. ■ Bass You can boost or cut high-frequency sounds output by the front speakers from -10 dB to "On...
... listening at low volume levels-ideal for watching movies late at night when you select the different options. • On the TX-SA806, this procedure can be performed on the AV amplifier by using its [LATE NIGHT] button. Re-EQ Function With the Re-EQ function, you are : Off: Late Night... dynamic range. Off: Late Night function off . On: Re-EQ Function on the display. 2 Use the Up and Down [R]/[X] but- However, in THX listening mode, when the AV receiver/AV amplifier is selected. ■ Bass You can boost or cut high-frequency sounds output by the front speakers from -10 dB to "On...
Owner Manual
Page 86
...No" or "None" in 5 millisecond steps. Advanced Setup-Continued Audyssey Dynamic EQTM ■ DynamicEQ (Applies to Non-THX Listening Modes) ■ THX+DynamicEQ (Applies to THX Listening Modes) With Audyssey Dynamic EQ, you can enjoy great sound even when listening at reference level. Audyssey Dynamic ... A/V Sync When using progressive scanning on page 80 are out of deteriorating sound quality as MP3. These temporary adjustments are cancelled when the AV receiver/AV amplifier is muted. • Speakers that the content sounds the way it from -12.0 dB to "On" (see page 75). ...
...No" or "None" in 5 millisecond steps. Advanced Setup-Continued Audyssey Dynamic EQTM ■ DynamicEQ (Applies to Non-THX Listening Modes) ■ THX+DynamicEQ (Applies to THX Listening Modes) With Audyssey Dynamic EQ, you can enjoy great sound even when listening at reference level. Audyssey Dynamic ... A/V Sync When using progressive scanning on page 80 are out of deteriorating sound quality as MP3. These temporary adjustments are cancelled when the AV receiver/AV amplifier is muted. • Speakers that the content sounds the way it from -12.0 dB to "On" (see page 75). ...

Owner Manual
Page 90
...adjust the red/green balance. Mid: Medium noise reduction. To return to the previous screen, press the [RETURN] button. ■ Picture Mode AV receiver/AV amplifier comes with three Picture Modes (picture setting patterns): "Mode1" (default), "Mode2", and "Mode3". ■ Brightness With this setting you... from 0 to its default settings. ■ Noise Reduction With this setting you can adjust saturation. Note: For optimal video performance, THX recommends that the "Picture Adjust" be adjusted from -20 to that adjustment. Can be set it to +20 in the picture. Advanced...
...adjust the red/green balance. Mid: Medium noise reduction. To return to the previous screen, press the [RETURN] button. ■ Picture Mode AV receiver/AV amplifier comes with three Picture Modes (picture setting patterns): "Mode1" (default), "Mode2", and "Mode3". ■ Brightness With this setting you... from 0 to its default settings. ■ Noise Reduction With this setting you can adjust saturation. Note: For optimal video performance, THX recommends that the "Picture Adjust" be adjusted from -20 to that adjustment. Can be set it to +20 in the picture. Advanced...

Owner Manual
Page 92
...", 50 to "Relative", the range is adjusted. OSD Setup ■ Immediate Display This preference determines whether operation details are displayed onscreen when an AV receiver/AV amplifier function is "Off", -32 dB to "Absolute", the range is 16 : 9 (default). ■ Display Position This preference determines where... off. ■ Monitor Type With this setting, you can specify the aspect ratio of the screen (default). For optimal video performance, THX recommends that Immediate Display be output if the input source is "Last", - ∞ dB, -81 dB to "Absolute", the "Maximum...
...", 50 to "Relative", the range is adjusted. OSD Setup ■ Immediate Display This preference determines whether operation details are displayed onscreen when an AV receiver/AV amplifier function is "Off", -32 dB to "Absolute", the range is 16 : 9 (default). ■ Display Position This preference determines where... off. ■ Monitor Type With this setting, you can specify the aspect ratio of the screen (default). For optimal video performance, THX recommends that Immediate Display be output if the input source is "Last", - ∞ dB, -81 dB to "Absolute", the "Maximum...


