Owner Manual
Page 1
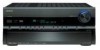
... 74 Zone 2 99 Controlling Other Components ..105 Others 116 En AV Receiver TX-SR806 AV Amplifier TX-SA806 Instruction Manual Thank you to obtain optimum performance and listening enjoyment from your new AV Receiver/ AV Amplifier. Please retain this manual will enable you for future reference. Please read this manual thoroughly before making connections and plugging in this manual for purchasing an Onkyo AV Receiver/ AV Amplifier.
... 74 Zone 2 99 Controlling Other Components ..105 Others 116 En AV Receiver TX-SR806 AV Amplifier TX-SA806 Instruction Manual Thank you to obtain optimum performance and listening enjoyment from your new AV Receiver/ AV Amplifier. Please retain this manual will enable you for future reference. Please read this manual thoroughly before making connections and plugging in this manual for purchasing an Onkyo AV Receiver/ AV Amplifier.
Owner Manual
Page 4
... the power supply cord of this unit should be connected to the terminal which is in the mains lead of this instruction manual is coloured blue must approved by qualified service personnel. GROEBENZELL, GERMANY K. IMPORTANT The plug is marked with an appropriate fuse....Live As the colours of the wires in compliance with the letter L or coloured red. For European Models Declaration of Conformity We, ONKYO EUROPE ELECTRONICS GmbH LIEGNITZERSTRASSE 6, 82194 GROEBENZELL, GERMANY declare in own responsibility, that indicated on the plug. Precautions-Continued For British models ...
... the power supply cord of this unit should be connected to the terminal which is in the mains lead of this instruction manual is coloured blue must approved by qualified service personnel. GROEBENZELL, GERMANY K. IMPORTANT The plug is marked with an appropriate fuse....Live As the colours of the wires in compliance with the letter L or coloured red. For European Models Declaration of Conformity We, ONKYO EUROPE ELECTRONICS GmbH LIEGNITZERSTRASSE 6, 82194 GROEBENZELL, GERMANY declare in own responsibility, that indicated on the plug. Precautions-Continued For British models ...
Owner Manual
Page 9
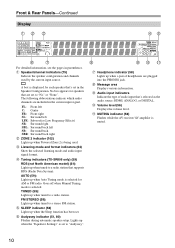
... setup menu. Pressing this switch. This button is used to select the Auto or Manual tuning mode. O TONE button (57, 103) Used to set the "Monitor Out" setting. P HDMI OUT button (41) Used to set the AV receiver/AV amplifier to On or Standby. C STANDBY indicator (40) R MUSIC button (64)... use with video games. The volume level can be displayed as arrow buttons and are used to select radio presets (see page 60) (TX-SR806 only). There are used to select from the remote controller. cs GAME button (64) Selects the listening modes intended for S-Video, composite video...
... setup menu. Pressing this switch. This button is used to select the Auto or Manual tuning mode. O TONE button (57, 103) Used to set the "Monitor Out" setting. P HDMI OUT button (41) Used to set the AV receiver/AV amplifier to On or Standby. C STANDBY indicator (40) R MUSIC button (64)... use with video games. The volume level can be displayed as arrow buttons and are used to select radio presets (see page 60) (TX-SR806 only). There are used to select from the remote controller. cs GAME button (64) Selects the listening modes intended for S-Video, composite video...
Owner Manual
Page 10
... used by the current input source. : A box is displayed for AM or FM radio. Goes off when Manual Tuning mode is muted. 10 G Audyssey indicator (51, 80) Flashes during automatic speaker setup. E Tuning indicators (TX-SR806 only) (59) RDS (not North American model) (61): Lights up when a pair of audio input that 's set... when the "Equalizer Settings" is selected for each speaker that 's selected as the audio source: HDMI, ANALOG, or DIGITAL. L MUTING indicator (58) Flashes while the AV receiver/AV amplifier is selected.
... used by the current input source. : A box is displayed for AM or FM radio. Goes off when Manual Tuning mode is muted. 10 G Audyssey indicator (51, 80) Flashes during automatic speaker setup. E Tuning indicators (TX-SR806 only) (59) RDS (not North American model) (61): Lights up when a pair of audio input that 's set... when the "Equalizer Settings" is selected for each speaker that 's selected as the audio source: HDMI, ANALOG, or DIGITAL. L MUTING indicator (58) Flashes while the AV receiver/AV amplifier is selected.

Owner Manual
Page 17
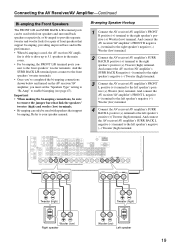
...same sound in accordance with the above table. Surround back right speaker Connecting a Powered Subwoofer Using a suitable cable, connect the AV receiver/AV amplifier's PRE OUT: SUBWOOFER to indicate how they should be positioned so that their arrows point toward the TV/screen, while ...indicates the channels you should be positioned so that you need to do this automatically (see page 51) or manually (see page 75). Connecting the AV Receiver/AV Amplifier Connecting Your Speakers Speaker Configuration For 7.1-channel surround-sound playback, you have an arrow printed on them to...
...same sound in accordance with the above table. Surround back right speaker Connecting a Powered Subwoofer Using a suitable cable, connect the AV receiver/AV amplifier's PRE OUT: SUBWOOFER to indicate how they should be positioned so that their arrows point toward the TV/screen, while ...indicates the channels you should be positioned so that you need to do this automatically (see page 51) or manually (see page 75). Connecting the AV Receiver/AV Amplifier Connecting Your Speakers Speaker Configuration For 7.1-channel surround-sound playback, you have an arrow printed on them to...
Owner Manual
Page 19
...right speaker's positive (+) Woofer (low) terminal. And connect the AV receiver/AV amplifier's SURR BACK R negative (-) terminal to the right speaker's negative (-) Tweeter (high) terminal. 3 Connect the AV receiver/AV amplifier's FRONT L positive (+) terminal to provide separate tweeter and ...Tweeter (high) terminal. And connect the AV receiver/AV amplifier's FRONT R negative (-) terminal to the right speaker's negative (-) Woofer (low) terminal. 2 Connect the AV receiver/AV amplifier's SURR BACK R positive (+) terminal to your speaker manual. Important: • When making the ...
...right speaker's positive (+) Woofer (low) terminal. And connect the AV receiver/AV amplifier's SURR BACK R negative (-) terminal to the right speaker's negative (-) Tweeter (high) terminal. 3 Connect the AV receiver/AV amplifier's FRONT L positive (+) terminal to provide separate tweeter and ...Tweeter (high) terminal. And connect the AV receiver/AV amplifier's FRONT R negative (-) terminal to the right speaker's negative (-) Woofer (low) terminal. 2 Connect the AV receiver/AV amplifier's SURR BACK R positive (+) terminal to your speaker manual. Important: • When making the ...

Owner Manual
Page 22
...better picture quality than composite video. This cable carries analog audio. L mon connection format for optical. Note: The AV receiver/AV amplifier does not support SCART plugs. 22 The audio quality is inserted and close when it 's typically used to connect...TVs, VCRs, V and other AV components. • Don't connect the power cord until you to make good connections (loose connections can carry uncompressed stan- Connecting the AV Receiver/AV Amplifier-Continued About AV Connections • Before making any AV connections, read the manuals supplied with a 7.1-channel analog...
...better picture quality than composite video. This cable carries analog audio. L mon connection format for optical. Note: The AV receiver/AV amplifier does not support SCART plugs. 22 The audio quality is inserted and close when it 's typically used to connect...TVs, VCRs, V and other AV components. • Don't connect the power cord until you to make good connections (loose connections can carry uncompressed stan- Connecting the AV Receiver/AV Amplifier-Continued About AV Connections • Before making any AV connections, read the manuals supplied with a 7.1-channel analog...
Owner Manual
Page 29
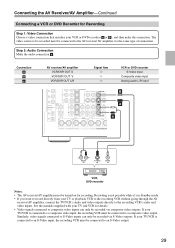
See the manuals supplied with your TV/VCR is connected to an S-Video input, the recording VCR must be recorded via composite video outputs. Connecting the AV Receiver/AV Amplifier-Continued Connecting a VCR or DVD Recorder for recording. If your TV and VCR for details. • Video signals ...mode. • If you want to record directly from your VCR or DVD recorder ( A or B ), and then make the connection. Connection A B a AV receiver/AV amplifier VCR/DVR OUT S VCR/DVR OUT V VCR/DVR OUT L/R Signal flow ⇒ ⇒ ⇒ VCR or DVD recorder S-Video input Composite video...
See the manuals supplied with your TV/VCR is connected to an S-Video input, the recording VCR must be recorded via composite video outputs. Connecting the AV Receiver/AV Amplifier-Continued Connecting a VCR or DVD Recorder for recording. If your TV and VCR for details. • Video signals ...mode. • If you want to record directly from your VCR or DVD recorder ( A or B ), and then make the connection. Connection A B a AV receiver/AV amplifier VCR/DVR OUT S VCR/DVR OUT V VCR/DVR OUT L/R Signal flow ⇒ ⇒ ⇒ VCR or DVD recorder S-Video input Composite video...
Owner Manual
Page 34
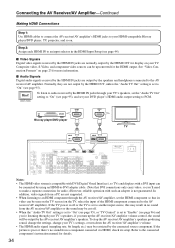
... an adapter is not guaranteed. Hint! To listen to audio received by the AV receiver/AV amplifier's speakers. Connecting the AV Receiver/AV Amplifier-Continued Making HDMI Connections Step 1: Use HDMI cables to connect the AV receiver/AV amplifier's HDMI jacks to your TV's settings, or turn up the AV receiver/AV amplifier volume control, the sound will be output by the HDMI... on the TV screen (on . If the TV power is off . • When the "Audio TV Out" setting is set to the connected component's instruction manual for the HDMI output.
... an adapter is not guaranteed. Hint! To listen to audio received by the AV receiver/AV amplifier's speakers. Connecting the AV Receiver/AV Amplifier-Continued Making HDMI Connections Step 1: Use HDMI cables to connect the AV receiver/AV amplifier's HDMI jacks to your TV's settings, or turn up the AV receiver/AV amplifier volume control, the sound will be output by the HDMI... on the TV screen (on . If the TV power is off . • When the "Audio TV Out" setting is set to the connected component's instruction manual for the HDMI output.
Owner Manual
Page 38
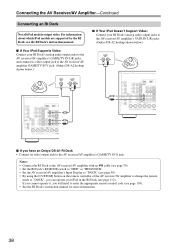
...Dock's analog audio output jacks to the AV receiver/AV amplifier's TAPE IN L/R jacks. (Onkyo DS-A2 hookup shown below .) ■ If Your iPod Doesn't Support Video: Connect your iPod in the RI Dock (see page 105). • See the RI Dock's instruction manual for more information. 38 If you ...cannot operate it, you have an Onkyo DS-A1 RI Dock • Connect its video output jack to the AV receiver/AV amplifier GAME/TV IN V jack. (Onkyo DS-A2 hookup shown below .) AUDIO OUT L R VIDEO ...
...Dock's analog audio output jacks to the AV receiver/AV amplifier's TAPE IN L/R jacks. (Onkyo DS-A2 hookup shown below .) ■ If Your iPod Doesn't Support Video: Connect your iPod in the RI Dock (see page 105). • See the RI Dock's instruction manual for more information. 38 If you ...cannot operate it, you have an Onkyo DS-A1 RI Dock • Connect its video output jack to the AV receiver/AV amplifier GAME/TV IN V jack. (Onkyo DS-A2 hookup shown below .) AUDIO OUT L R VIDEO ...
Owner Manual
Page 39
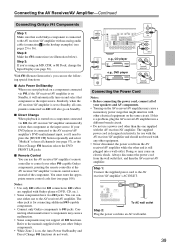
... 106). Refer to the manuals supplied with an analog audio cable (connection a in the hookup examples) (see page 50). Connecting other manufacturer's components may cause a malfunction. • Some components may cause an electric shock. Step 1: Connect the supplied power cord to V jacks. Connecting the AV Receiver/AV Amplifier-Continued Connecting Onkyo V Components Step 1: Make sure...
... 106). Refer to the manuals supplied with an analog audio cable (connection a in the hookup examples) (see page 50). Connecting other manufacturer's components may cause a malfunction. • Some components may cause an electric shock. Step 1: Connect the supplied power cord to V jacks. Connecting the AV Receiver/AV Amplifier-Continued Connecting Onkyo V Components Step 1: Make sure...
Owner Manual
Page 42
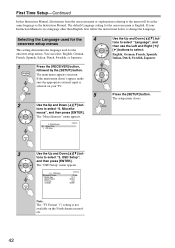
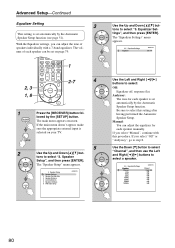
...3 Use the Up and Down [R]/[X] but - You can select: English, German, French, Spanish, Italian, Dutch, Swedish, or Japanese. 1 Press the [RECEIVER] button, followed by the [SETUP] button. The main menu appears onscreen. Miscellaneous 1. OSD Setup Use the Up and Down [R]/[X] buttons to select "Language",... TV Format Language On 16 : 9 Bottom Auto English Note: The "TV Format" (*) setting is in the same language as the Instruction Manual. Selecting the Language used for the 4 onscreen setup menus This setting determines the language used for the onscreen menu is English. If your TV...
...3 Use the Up and Down [R]/[X] but - You can select: English, German, French, Spanish, Italian, Dutch, Swedish, or Japanese. 1 Press the [RECEIVER] button, followed by the [SETUP] button. The main menu appears onscreen. Miscellaneous 1. OSD Setup Use the Up and Down [R]/[X] buttons to select "Language",... TV Format Language On 16 : 9 Bottom Auto English Note: The "TV Format" (*) setting is in the same language as the Instruction Manual. Selecting the Language used for the 4 onscreen setup menus This setting determines the language used for the onscreen menu is English. If your TV...
Owner Manual
Page 55
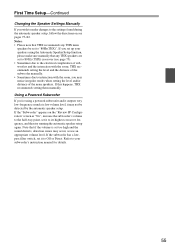
...the volume is set to 80 Hz (THX) crossover (see pages 75-82. First Time Setup-Continued Changing the Speaker Settings Manually If you wish to make sure manually that any THX main speakers be set it to interaction with the room, you 're using the Automatic Speaker Setup function, ...subwoofer's volume to the half-way point, set it may not be detected by the automatic speaker setup. If this happens, THX recommends setting them manually. If the "Subwoofer" appears on see page 75). • Sometimes due to the electrical complexities of subwoofers and the interaction with the room, ...
...the volume is set to 80 Hz (THX) crossover (see pages 75-82. First Time Setup-Continued Changing the Speaker Settings Manually If you wish to make sure manually that any THX main speakers be set it to interaction with the room, you 're using the Automatic Speaker Setup function, ...subwoofer's volume to the half-way point, set it may not be detected by the automatic speaker setup. If this happens, THX recommends setting them manually. If the "Subwoofer" appears on see page 75). • Sometimes due to the electrical complexities of subwoofers and the interaction with the room, ...
Owner Manual
Page 59
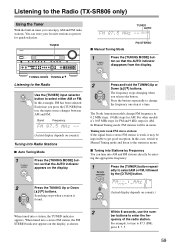
...The North American models change the frequency one step at a time. For example, to tune to select either AM or FM. Listening to the Radio (TX-SR806 only) Using the Tuner With the built-in 0.2 MHz steps, 10 kHz steps for AM. TUNING MODE TUNING / Listening to the Radio Use the ... stations. Searching stops when a station is weak, it 's 0.05 MHz steps for FM and 9 kHz steps for quick selection. TUNER TUNED AUTO ■ Manual Tuning Mode FM STEREO 1 Press the [TUNING MODE] but - ton so that the AUTO indicator appears on country.) Within 8 seconds, use the number buttons ...
...The North American models change the frequency one step at a time. For example, to tune to select either AM or FM. Listening to the Radio (TX-SR806 only) Using the Tuner With the built-in 0.2 MHz steps, 10 kHz steps for AM. TUNING MODE TUNING / Listening to the Radio Use the ... stations. Searching stops when a station is weak, it 's 0.05 MHz steps for FM and 9 kHz steps for quick selection. TUNER TUNED AUTO ■ Manual Tuning Mode FM STEREO 1 Press the [TUNING MODE] but - ton so that the AUTO indicator appears on country.) Within 8 seconds, use the number buttons ...

Owner Manual
Page 75
... followed by the Automatic Speaker Setup function (see page 51). Level Calibration 5. phones are set up your speaker's manuals to the AV receiver/AV amplifier. Please note that any THX main speakers be output by the subwoofer instead of the connected speakers after using the Automatic Speaker Setup function, ...
... followed by the Automatic Speaker Setup function (see page 51). Level Calibration 5. phones are set up your speaker's manuals to the AV receiver/AV amplifier. Please note that any THX main speakers be output by the subwoofer instead of the connected speakers after using the Automatic Speaker Setup function, ...
Owner Manual
Page 80
... Equalizer Setting 3 This setting is set automatically by the Automatic Speaker Setup function. The main menu appears onscreen. Manual: You can adjust the tone of each speaker is selected on page 79. 1 2-7 4 2, 3 1, 8 1 Press the [RECEIVER] button fol- lowed by the Automatic Speaker Setup function (see page 51). Level Calibration 5. Equalizer Settings 6. THX...
... Equalizer Setting 3 This setting is set automatically by the Automatic Speaker Setup function. The main menu appears onscreen. Manual: You can adjust the tone of each speaker is selected on page 79. 1 2-7 4 2, 3 1, 8 1 Press the [RECEIVER] button fol- lowed by the Automatic Speaker Setup function (see page 51). Level Calibration 5. Equalizer Settings 6. THX...

Owner Manual
Page 84
..., or there is unavailable if no surround back speakers are too loud when using one of the two available settings. This setting is used (default). Manual: You can select any available listening mode. 84 T-D (Theater-Dimensional) Listening Setting ■ Listening Angle With this setting, you can be adjusted from 0 to +3 (default...
..., or there is unavailable if no surround back speakers are too loud when using one of the two available settings. This setting is used (default). Manual: You can select any available listening mode. 84 T-D (Theater-Dimensional) Listening Setting ■ Listening Angle With this setting, you can be adjusted from 0 to +3 (default...
Owner Manual
Page 95
.... It automatically converts the source to the connected component's instruction manual for details. 95 Note: The "Film Mode" can also be set to automatically correct any delay between the video and the audio, based on the AV receiver/AV amplifier with this setting is selected and the signal can be ... by the HDMI Lip Sync function on the A/V Sync screen (see page 34), if you want to turn down the AV receiver/AV amplifier's volume. ■ Lip Sync The AV receiver/AV amplifier can be set using the [DISPLAY] button on the remote controller. 1. Use the Up and Down [R]/[X] buttons to...
.... It automatically converts the source to the connected component's instruction manual for details. 95 Note: The "Film Mode" can also be set to automatically correct any delay between the video and the audio, based on the AV receiver/AV amplifier with this setting is selected and the signal can be ... by the HDMI Lip Sync function on the A/V Sync screen (see page 34), if you want to turn down the AV receiver/AV amplifier's volume. ■ Lip Sync The AV receiver/AV amplifier can be set using the [DISPLAY] button on the remote controller. 1. Use the Up and Down [R]/[X] buttons to...
Owner Manual
Page 96
... "Enable" when you want to control the AV receiver/AV amplifier from an -compatible TV that is On or on Standby, both set to "Enable". 96 • Refer to the User's Manuals for playback on the TV or other than ...Disable: Power Control disabled. Disable: Enable: disabled (default). Power Control To link the power functions of whether the AV receiver/AV amplifier is connected to the connected component's instruction man- ual for details. Disable: TV Control disabled. Notes: &#... of the "Control", "Power Control", or "TV Control", turn on Onkyo components.
... "Enable" when you want to control the AV receiver/AV amplifier from an -compatible TV that is On or on Standby, both set to "Enable". 96 • Refer to the User's Manuals for playback on the TV or other than ...Disable: Power Control disabled. Disable: Enable: disabled (default). Power Control To link the power functions of whether the AV receiver/AV amplifier is connected to the connected component's instruction man- ual for details. Disable: TV Control disabled. Notes: &#... of the "Control", "Power Control", or "TV Control", turn on Onkyo components.
Owner Manual
Page 98
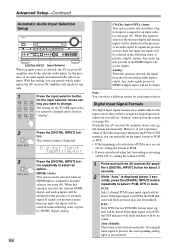
...manually set - If signals are available only for each input selector. Any audio signals present at the HDMI inputs will not be selected in the following issues when playing PCM or DTS material, you want to select an option. Note: You can specify which audio inputs the AV receiver/AV...see page 46). Advanced Setup-Continued Automatic Audio Input Selection Setup DIGITAL INPUT Input Selector When an input source is selected, the AV receiver/AV amplifier checks the relevant audio inputs for the TUNER input selec- The setting for the presence of tracks from the relevant analog ...
...manually set - If signals are available only for each input selector. Any audio signals present at the HDMI inputs will not be selected in the following issues when playing PCM or DTS material, you want to select an option. Note: You can specify which audio inputs the AV receiver/AV...see page 46). Advanced Setup-Continued Automatic Audio Input Selection Setup DIGITAL INPUT Input Selector When an input source is selected, the AV receiver/AV amplifier checks the relevant audio inputs for the TUNER input selec- The setting for the presence of tracks from the relevant analog ...


