Owner Manual
Page 1
... enable you for future reference. AV Receiver TX-SR806 AV Amplifier TX-SA806 Instruction Manual Thank you to obtain optimum performance and listening enjoyment from your new AV Receiver/ AV Amplifier. Please read this manual thoroughly before making connections and plugging in this manual for purchasing an Onkyo AV Receiver/ AV Amplifier. Contents Introduction 2 Connections 17 First Time Setup 41 Basic Operations 56 Using...
... enable you for future reference. AV Receiver TX-SR806 AV Amplifier TX-SA806 Instruction Manual Thank you to obtain optimum performance and listening enjoyment from your new AV Receiver/ AV Amplifier. Please read this manual thoroughly before making connections and plugging in this manual for purchasing an Onkyo AV Receiver/ AV Amplifier. Contents Introduction 2 Connections 17 First Time Setup 41 Basic Operations 56 Using...

Owner Manual
Page 5
Supplied Accessories Make sure you have the following accessories: Remote controller & two batteries (AA/R6) Speaker setup microphone Indoor FM antenna (TX-SR806 only) * Power-plug adapter Only supplied in certain countries. Specifications and operations are the same regardless of the product name ... Right Zone 2 Right Power cord (Plug type varies from country to country). *How to mount the AC plug: AM loop antenna (TX-SR806 only) * In catalogs and on the AV receiver/AV amplifier's power cord (adapter varies from country to country.) 1 2 3 Speaker Cable Speaker cable labels 5
Supplied Accessories Make sure you have the following accessories: Remote controller & two batteries (AA/R6) Speaker setup microphone Indoor FM antenna (TX-SR806 only) * Power-plug adapter Only supplied in certain countries. Specifications and operations are the same regardless of the product name ... Right Zone 2 Right Power cord (Plug type varies from country to country). *How to mount the AC plug: AM loop antenna (TX-SR806 only) * In catalogs and on the AV receiver/AV amplifier's power cord (adapter varies from country to country.) 1 2 3 Speaker Cable Speaker cable labels 5

Owner Manual
Page 7
...Remote Controller 14 Controlling the AV Receiver/AV Amplifier 15 About Home Theater 16 Enjoying Home Theater 16 Connections Connecting the AV Receiver/AV Amplifier 17 Connecting Your Speakers 17 Bi-amping the Front Speakers 19 Connecting Antenna (TX-SR806 only 20 About AV Connections 22 Connecting Both ... 37 Connecting a Tuner (TX-SA806 only 37 Connecting an RI Dock 38 Connecting Onkyo V Components 39 Connecting the Power Cord 39 Turning On the AV Receiver/AV Amplifier 40 Turning On and Standby 40 First Time Setup First Time Setup 41 Monitor Setup 41 Selecting the Language used...
...Remote Controller 14 Controlling the AV Receiver/AV Amplifier 15 About Home Theater 16 Enjoying Home Theater 16 Connections Connecting the AV Receiver/AV Amplifier 17 Connecting Your Speakers 17 Bi-amping the Front Speakers 19 Connecting Antenna (TX-SR806 only 20 About AV Connections 22 Connecting Both ... 37 Connecting a Tuner (TX-SA806 only 37 Connecting an RI Dock 38 Connecting Onkyo V Components 39 Connecting the Power Cord 39 Turning On the AV Receiver/AV Amplifier 40 Turning On and Standby 40 First Time Setup First Time Setup 41 Monitor Setup 41 Selecting the Language used...
Owner Manual
Page 9
...MULTI CH] button selects the DVD analog multichannel input. See "Using RDS (not North American model)" on or off. V SETUP button This button is for connecting a standard pair of the AV receiver/AV amplifier to -∞ dB, -81.5 dB through +18.0 dB (relative display). J PURE AUDIO button and indicator (64... be displayed as arrow buttons and are used when storing or deleting radio presets. When set to OFF, the AV receiver/AV amplifier is used to select radio presets (see page 60) (TX-SR806 only). O TONE button (57, 103) Used to select the Auto or Manual tuning mode. F Remote control...
...MULTI CH] button selects the DVD analog multichannel input. See "Using RDS (not North American model)" on or off. V SETUP button This button is for connecting a standard pair of the AV receiver/AV amplifier to -∞ dB, -81.5 dB through +18.0 dB (relative display). J PURE AUDIO button and indicator (64... be displayed as arrow buttons and are used when storing or deleting radio presets. When set to OFF, the AV receiver/AV amplifier is used to select radio presets (see page 60) (TX-SR806 only). O TONE button (57, 103) Used to select the Auto or Manual tuning mode. F Remote control...
Owner Manual
Page 10
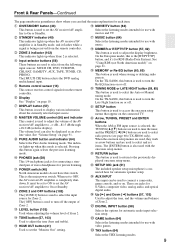
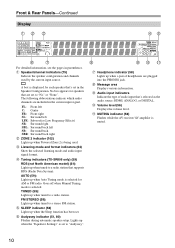
...channels are plugged into the PHONES jack. E Tuning indicators (TX-SR806 only) (59) RDS (not North American model) (61): Lights up when Powered Zone 2 is selected. G Audyssey indicator (51, 80) Flashes during automatic speaker setup. B Speaker/channel indicators (75) Indicate the speaker configuration... System). J Audio input indicators Indicate the type of headphones are included in parentheses. L MUTING indicator (58) Flashes while the AV receiver/AV amplifier is set . Front & Rear Panels-Continued Display 12 3 45 67 For detailed information, see the pages in the current...
...channels are plugged into the PHONES jack. E Tuning indicators (TX-SR806 only) (59) RDS (not North American model) (61): Lights up when Powered Zone 2 is selected. G Audyssey indicator (51, 80) Flashes during automatic speaker setup. B Speaker/channel indicators (75) Indicate the speaker configuration... System). J Audio input indicators Indicate the type of headphones are included in parentheses. L MUTING indicator (58) Flashes while the AV receiver/AV amplifier is set . Front & Rear Panels-Continued Display 12 3 45 67 For detailed information, see the pages in the current...

Owner Manual
Page 12
... on another Onkyo AV component. The HDMI inputs are for connecting components with an HDMI output, such as CD and DVD players. O DIGITAL COAXIAL IN 1, 2, and 3 These coaxial digital audio inputs are for connecting an AM antenna. 12 K RS232 This is output. See "Digital Input Setup" on page...an analog audio input and output (cassette, Mini Disc, etc.). When Zone 2 is turned on on the AV receiver/AV amplifier, a 12volt trigger signal is the RS232 port. J AM ANTENNA (TX-SR806 only) These push terminals are for connecting a TV or projector with an HDMI input. Input jacks include S-...
... on another Onkyo AV component. The HDMI inputs are for connecting components with an HDMI output, such as CD and DVD players. O DIGITAL COAXIAL IN 1, 2, and 3 These coaxial digital audio inputs are for connecting an AM antenna. 12 K RS232 This is output. See "Digital Input Setup" on page...an analog audio input and output (cassette, Mini Disc, etc.). When Zone 2 is turned on on the AV receiver/AV amplifier, a 12volt trigger signal is the RS232 port. J AM ANTENNA (TX-SR806 only) These push terminals are for connecting a TV or projector with an HDMI input. Input jacks include S-...

Owner Manual
Page 15
...AV receiver/AV amplifier. ■ Controlling the tuner (TX-SR806 only) To control the AV receiver's tuner, press the [TUNER] (or [RECEIVER]) button. L VOL [R]/[X] button (56) Adjusts the volume of the AV receiver/AV amplifier regardless of the currently selected remote controller mode. When the "Audio TV Out" setting is disabled. G SETUP...in Receiver mode (see the pages in this button is set to select the listening modes. See page 105 for more details. 1 94 2 3 4 bk bl * 5 15 6 bm bn 7 2 38 bo For detailed information, see page 113). 15 Note: An Onkyo cassette...
...AV receiver/AV amplifier. ■ Controlling the tuner (TX-SR806 only) To control the AV receiver's tuner, press the [TUNER] (or [RECEIVER]) button. L VOL [R]/[X] button (56) Adjusts the volume of the AV receiver/AV amplifier regardless of the currently selected remote controller mode. When the "Audio TV Out" setting is disabled. G SETUP...in Receiver mode (see the pages in this button is set to select the listening modes. See page 105 for more details. 1 94 2 3 4 bk bl * 5 15 6 bm bn 7 2 38 bo For detailed information, see page 113). 15 Note: An Onkyo cassette...
Owner Manual
Page 24
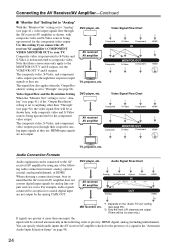
... signal flow also applies when the "Output Res- TV, projector, etc. When choosing a connection format, bear in the "Automatic Audio Input Selection Setup" on the "Audio TV Out" setting (see page 95). *2 Only the front L/R channels are output. (There will be no down mix.)...input signals as shown here, with composite video and S-Video sources being upconverted for the component video output. For example, audio signals AV receiver/ AV amplifier Analog Multichannel Optical IN Coaxial HDMI connected to an optical or coaxial digital input OUT are . The composite video, S-Video,...
... signal flow also applies when the "Output Res- TV, projector, etc. When choosing a connection format, bear in the "Automatic Audio Input Selection Setup" on the "Audio TV Out" setting (see page 95). *2 Only the front L/R channels are output. (There will be no down mix.)...input signals as shown here, with composite video and S-Video sources being upconverted for the component video output. For example, audio signals AV receiver/ AV amplifier Analog Multichannel Optical IN Coaxial HDMI connected to an optical or coaxial digital input OUT are . The composite video, S-Video,...

Owner Manual
Page 27
To select the multichannel input, see "Hardware Setup" on page 93. 7.1 ch FRONT 5.1 ch CENTER SURR SURR BACK L L R R SUBWOOFER DVD L R FRONT CENTER L RL SUB SURROUND WOOFER R SURR BACK DVD player Note: When a ...will be no down mix. 27 Use a multichannel analog audio cable, or several normal audio cables, to connect the AV receiver/AV amplifier's DVD FRONT L/R, CENTER, SURR L/R, SURR BACK L/R, and SUBWOOFER jacks to the AV receiver/AV amplifier's SURR BACK L/R jacks. To adjust the subwoofer sensitivity for the multichannel input, see "Using the Multichannel DVD ...
To select the multichannel input, see "Hardware Setup" on page 93. 7.1 ch FRONT 5.1 ch CENTER SURR SURR BACK L L R R SUBWOOFER DVD L R FRONT CENTER L RL SUB SURROUND WOOFER R SURR BACK DVD player Note: When a ...will be no down mix. 27 Use a multichannel analog audio cable, or several normal audio cables, to connect the AV receiver/AV amplifier's DVD FRONT L/R, CENTER, SURR L/R, SURR BACK L/R, and SUBWOOFER jacks to the AV receiver/AV amplifier's SURR BACK L/R jacks. To adjust the subwoofer sensitivity for the multichannel input, see "Using the Multichannel DVD ...
Owner Manual
Page 34
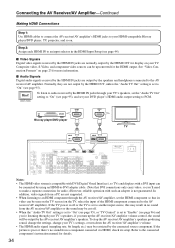
... connected by using an HDMI-to-DVI adapter cable. (Note that its setup. Connecting the AV Receiver/AV Amplifier-Continued Making HDMI Connections Step 1: Use HDMI cables to connect the AV receiver/AV amplifier's HDMI jacks to your TV's speakers, if you turn down the AV receiver/AV amplifier's volume. • The HDMI audio signal (sampling rate, bit length, etc...
... connected by using an HDMI-to-DVI adapter cable. (Note that its setup. Connecting the AV Receiver/AV Amplifier-Continued Making HDMI Connections Step 1: Use HDMI cables to connect the AV receiver/AV amplifier's HDMI jacks to your TV's speakers, if you turn down the AV receiver/AV amplifier's volume. • The HDMI audio signal (sampling rate, bit length, etc...

Owner Manual
Page 40
... 51. ■ Did you connected an Onkyo MD recorder, CD recorder, or RI Dock? OUT IN TAPE 40 CD recorder, MD recorder, RI Dock If you have, see "Monitor Setup" on the AV receiver/AV amplifier, always turn down the AV receiver/AV amplifier, set the [POWER] switch to ...the OFF position ( ). Alternatively, press the remote controller's [RECEIVER] button, followed by the [ON/STANDBY] button. Smooth Operation ...
... 51. ■ Did you connected an Onkyo MD recorder, CD recorder, or RI Dock? OUT IN TAPE 40 CD recorder, MD recorder, RI Dock If you have, see "Monitor Setup" on the AV receiver/AV amplifier, always turn down the AV receiver/AV amplifier, set the [POWER] switch to ...the OFF position ( ). Alternatively, press the remote controller's [RECEIVER] button, followed by the [ON/STANDBY] button. Smooth Operation ...

Owner Manual
Page 41
... if your TV is selected, the onscreen setup menus are output by only the HDMI OUT. The onscreen setup menus are upconverted* and output by the HDMI OUT. HDMI: Select this if your TV is connected to make before using the AV receiver/AV amplifier for the very first time. If ...VIDEO MONITOR OUT. Note: See page 23 for the HDMI OUT and COMPONENT VIDEO MONITOR OUT and have the onscreen setup menu output through the HDMI OUT or through the AV receiver/AV amplifier. Composite video, S-Video, component video IN HDMI OUT Composite video, S-Video, component video HDMI You can ...
... if your TV is selected, the onscreen setup menus are output by only the HDMI OUT. The onscreen setup menus are upconverted* and output by the HDMI OUT. HDMI: Select this if your TV is connected to make before using the AV receiver/AV amplifier for the very first time. If ...VIDEO MONITOR OUT. Note: See page 23 for the HDMI OUT and COMPONENT VIDEO MONITOR OUT and have the onscreen setup menu output through the HDMI OUT or through the AV receiver/AV amplifier. Composite video, S-Video, component video IN HDMI OUT Composite video, S-Video, component video HDMI You can ...
Owner Manual
Page 42
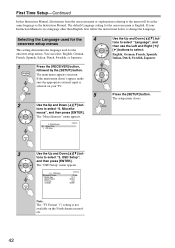
... and then press [ENTER]. You can select: English, German, French, Spanish, Italian, Dutch, Swedish, or Japanese. 1 Press the [RECEIVER] button, followed by the [SETUP] button. If the main menu doesn't appear, make sure the appropriate external input is in the same language as the Instruction Manual. OSD... Setup", and then press [ENTER]. OSD Setup Use the Up and Down [R]/[X] buttons to select "Language", and then use the Left and Right [F]/ [S] buttons to...
... and then press [ENTER]. You can select: English, German, French, Spanish, Italian, Dutch, Swedish, or Japanese. 1 Press the [RECEIVER] button, followed by the [SETUP] button. If the main menu doesn't appear, make sure the appropriate external input is in the same language as the Instruction Manual. OSD... Setup", and then press [ENTER]. OSD Setup Use the Up and Down [R]/[X] buttons to select "Language", and then use the Left and Right [F]/ [S] buttons to...
Owner Manual
Page 43
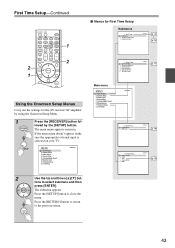
... menu MENU 1. Remote Control 2. Analog Multich 5. HDMI p. 47 p. 48 p. 49 2 Use the Up and Down [R]/[X] but- First Time Setup-Continued 1 ■ Menus for the AV receiver/AV amplifier by the [SETUP] button. If the main menu doesn't appear, make sure the appropriate external input is selected on your TV. Miscellaneous 7. Speaker Settings 2. lowed by using...
... menu MENU 1. Remote Control 2. Analog Multich 5. HDMI p. 47 p. 48 p. 49 2 Use the Up and Down [R]/[X] but- First Time Setup-Continued 1 ■ Menus for the AV receiver/AV amplifier by the [SETUP] button. If the main menu doesn't appear, make sure the appropriate external input is selected on your TV. Miscellaneous 7. Speaker Settings 2. lowed by using...

Owner Manual
Page 44
...Input Assign" menu appears. 1. Digital Audio Input 3 Use the Up and Down [R]/[X] but - HDMI5 to select "1. The setup menu closes. If you've connected your TV to the AV receiver/AV amplifier with an HDMI cable, you can set this for the HDMI OUT, the "Monitor Out" setting must be set...assigned to an input selector as explained here, the digital audio input for more information on the AV receiver/AV amplifier by the [SETUP] button. See "Digital Input Setup" on page 46. • On the TX-SR806, the TUNER input selector cannot be assigned and is fixed at the option. • This procedure...
...Input Assign" menu appears. 1. Digital Audio Input 3 Use the Up and Down [R]/[X] but - HDMI5 to select "1. The setup menu closes. If you've connected your TV to the AV receiver/AV amplifier with an HDMI cable, you can set this for the HDMI OUT, the "Monitor Out" setting must be set...assigned to an input selector as explained here, the digital audio input for more information on the AV receiver/AV amplifier by the [SETUP] button. See "Digital Input Setup" on page 46. • On the TX-SR806, the TUNER input selector cannot be assigned and is fixed at the option. • This procedure...

Owner Manual
Page 45
... VIDEO IN, you must be set to output composite and S-Video sources from the COMPONENT VIDEO MONITOR OUT. 5 Press the [SETUP] button. You can set the AV receiver/AV amplifier so that composite video and SVideo sources are upconverted* and output by selecting the option. If the main menu doesn't appear...DVD player to COMPONENT VIDEO IN 2, you should assign it to select "2. Input selector DVD VCR/DVR CBL/SAT GAME/TV AUX TAPE TUNER (TX-SA806 only) CD PHONO Default assignment IN1 ----IN2 If you've connected your TV. 2 Use the Up and Down [R]/[X] but- IN2 4 Use...
... VIDEO IN, you must be set to output composite and S-Video sources from the COMPONENT VIDEO MONITOR OUT. 5 Press the [SETUP] button. You can set the AV receiver/AV amplifier so that composite video and SVideo sources are upconverted* and output by selecting the option. If the main menu doesn't appear...DVD player to COMPONENT VIDEO IN 2, you should assign it to select "2. Input selector DVD VCR/DVR CBL/SAT GAME/TV AUX TAPE TUNER (TX-SA806 only) CD PHONO Default assignment IN1 ----IN2 If you've connected your TV. 2 Use the Up and Down [R]/[X] but- IN2 4 Use...

Owner Manual
Page 46
...OPT2 - - - - - 4 Use the Up and Down [R]/[X] but - Input selector DVD VCR/DVR CBL/SAT GAME/TV AUX TAPE TUNER (TX-SA806 only) CD PHONO Default assignment COAX1 COAX2 COAX3 OPT1 FRONT ----- ----- tons to select "3. Digital Audio Input", and then press [ENTER]. When... the other inputs (e.g., COAX1 or COAX2), be selected. And in the "HDMI Input Setup" on the AV receiver/AV amplifier by the [SETUP] button. OPT2 ----- 1 Press the [RECEIVER] button fol- Input Assign", and then press [ENTER]. The setup menu closes. Digital Audio Input 3 Use the Up and Down [R]/[X] but -
...OPT2 - - - - - 4 Use the Up and Down [R]/[X] but - Input selector DVD VCR/DVR CBL/SAT GAME/TV AUX TAPE TUNER (TX-SA806 only) CD PHONO Default assignment COAX1 COAX2 COAX3 OPT1 FRONT ----- ----- tons to select "3. Digital Audio Input", and then press [ENTER]. When... the other inputs (e.g., COAX1 or COAX2), be selected. And in the "HDMI Input Setup" on the AV receiver/AV amplifier by the [SETUP] button. OPT2 ----- 1 Press the [RECEIVER] button fol- Input Assign", and then press [ENTER]. The setup menu closes. Digital Audio Input 3 Use the Up and Down [R]/[X] but -
Owner Manual
Page 47
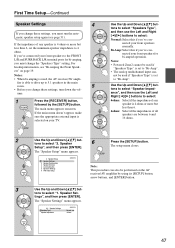
... "2. nected your front speakers to "Bi-Amp". • The analog multichannel input can also be used , the AV receiver/AV ampli- Level Calibration 5. For hookup information, see page 51). not be performed on the AV receiver/AV amplifier by the [SETUP] button. tings", and then press [ENTER]. fier is set to the FRONT L/R and SURR BACK L/R terminal...
... "2. nected your front speakers to "Bi-Amp". • The analog multichannel input can also be used , the AV receiver/AV ampli- Level Calibration 5. For hookup information, see page 51). not be performed on the AV receiver/AV amplifier by the [SETUP] button. tings", and then press [ENTER]. fier is set to the FRONT L/R and SURR BACK L/R terminal...

Owner Manual
Page 48
... used in your TV. OSD Setup", and then press [ENTER]. Volume Setup 2. The main menu appears onscreen. If the main menu doesn't appear, make sure the appropriate external input is selected on the AV receiver/AV amplifier by the [SETUP] button. neous", and then press... [ENTER]. PAL: Select if the TV system in your area. 1 Press the [RECEIVER] button fol- The "OSD Setup" menu appears. 6-2. tons to display properly, you ...
... used in your TV. OSD Setup", and then press [ENTER]. Volume Setup 2. The main menu appears onscreen. If the main menu doesn't appear, make sure the appropriate external input is selected on the AV receiver/AV amplifier by the [SETUP] button. neous", and then press... [ENTER]. PAL: Select if the TV system in your area. 1 Press the [RECEIVER] button fol- The "OSD Setup" menu appears. 6-2. tons to display properly, you ...

Owner Manual
Page 49
...steps are deleted. 1 Press the [RECEIVER] button, followed by using its [SETUP] button, arrow buttons, and [ENTER] button. 2 Use the Up and Down [R]/[X] but - Note that when this setting is selected on the AV receiver/AV amplifier by the [SETUP] button. Note: This procedure can also... be performed on your TV. 5 Press the [SETUP] button. Hardware Setup", and then press [ENTER]. The setup menu closes. First Time Setup-Continued AM Frequency Step Setup (on some models) For...
...steps are deleted. 1 Press the [RECEIVER] button, followed by using its [SETUP] button, arrow buttons, and [ENTER] button. 2 Use the Up and Down [R]/[X] but - Note that when this setting is selected on the AV receiver/AV amplifier by the [SETUP] button. Note: This procedure can also... be performed on your TV. 5 Press the [SETUP] button. Hardware Setup", and then press [ENTER]. The setup menu closes. First Time Setup-Continued AM Frequency Step Setup (on some models) For...


