Owner Manual
Page 1
... 17 First Time Setup 41 Basic Operations 56 Using the Listening Modes ...........64 Advanced Setup 74 Zone 2 99 Controlling Other Components ..105 Others 116 En AV Receiver TX-SR806 AV Amplifier TX-SA806 Instruction Manual Thank you to obtain optimum performance and listening enjoyment from your new AV Receiver/ AV Amplifier. Please read this manual for purchasing an Onkyo AV Receiver/ AV Amplifier.
... 17 First Time Setup 41 Basic Operations 56 Using the Listening Modes ...........64 Advanced Setup 74 Zone 2 99 Controlling Other Components ..105 Others 116 En AV Receiver TX-SR806 AV Amplifier TX-SA806 Instruction Manual Thank you to obtain optimum performance and listening enjoyment from your new AV Receiver/ AV Amplifier. Please read this manual for purchasing an Onkyo AV Receiver/ AV Amplifier.

Owner Manual
Page 3
...readily operable (easily accessible) at all over with a weak solution of the following measures: • Reorient or relocate the receiving antenna. • Increase the separation between the equipment and receiver. • Connect the equipment into an outlet on , so be sure to Part 15 of the copyright holder. 2. ... was when you cannot turn it on a circuit dif- This is no guarantee that to disconnect this unit or its power cord while your Onkyo dealer. 8. However, there is normal. • If you turn on the unit, contact your area meets the voltage requirements printed on the...
...readily operable (easily accessible) at all over with a weak solution of the following measures: • Reorient or relocate the receiving antenna. • Increase the separation between the equipment and receiver. • Connect the equipment into an outlet on , so be sure to Part 15 of the copyright holder. 2. ... was when you cannot turn it on a circuit dif- This is no guarantee that to disconnect this unit or its power cord while your Onkyo dealer. 8. However, there is normal. • If you turn on the unit, contact your area meets the voltage requirements printed on the...

Owner Manual
Page 5
...Supplied Accessories Make sure you have the following accessories: Remote controller & two batteries (AA/R6) Speaker setup microphone Indoor FM antenna (TX-SR806 only) * Power-plug adapter Only supplied in certain countries. Specifications and operations are the same regardless of the product name indicates ...Right Zone 2 Right Power cord (Plug type varies from country to mount the AC plug: AM loop antenna (TX-SR806 only) * In catalogs and on the AV receiver/AV amplifier's power cord (adapter varies from country to country). *How to country.) 1 2 3 Speaker Cable Speaker cable labels 5
...Supplied Accessories Make sure you have the following accessories: Remote controller & two batteries (AA/R6) Speaker setup microphone Indoor FM antenna (TX-SR806 only) * Power-plug adapter Only supplied in certain countries. Specifications and operations are the same regardless of the product name indicates ...Right Zone 2 Right Power cord (Plug type varies from country to mount the AC plug: AM loop antenna (TX-SR806 only) * In catalogs and on the AV receiver/AV amplifier's power cord (adapter varies from country to country). *How to country.) 1 2 3 Speaker Cable Speaker cable labels 5

Owner Manual
Page 6
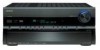
...in the contiguous United States (excluding Alaska and Hawaii) and Canada. *7. THX Ultra2 Plus receivers also feature proprietary THX technologies (e.g., THX Mode) which is a trademark of Onkyo Corporation. and other countries. * "x.v.Color" is a trademark of parameters, including power .../24-bit D/A Converters • Two TI (Aureus) 32-bit DSP Processing Connections • 5 HDMI*4 Inputs and 1 Output (ver. 1.3a) • Onkyo for System Control • 6 Digital Inputs (3 Optical / 3 Coaxial) • 5 S-Video Inputs / 2 Outputs • Component Video Switching (2 Inputs/1 Output...
...in the contiguous United States (excluding Alaska and Hawaii) and Canada. *7. THX Ultra2 Plus receivers also feature proprietary THX technologies (e.g., THX Mode) which is a trademark of Onkyo Corporation. and other countries. * "x.v.Color" is a trademark of parameters, including power .../24-bit D/A Converters • Two TI (Aureus) 32-bit DSP Processing Connections • 5 HDMI*4 Inputs and 1 Output (ver. 1.3a) • Onkyo for System Control • 6 Digital Inputs (3 Optical / 3 Coaxial) • 5 S-Video Inputs / 2 Outputs • Component Video Switching (2 Inputs/1 Output...

Owner Manual
Page 7
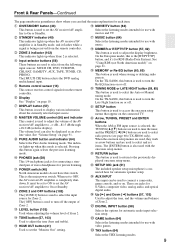
...Controller 14 Controlling the AV Receiver/AV Amplifier 15 About Home Theater 16 Enjoying Home Theater 16 Connections Connecting the AV Receiver/AV Amplifier 17 Connecting Your Speakers 17 Bi-amping the Front Speakers 19 Connecting Antenna (TX-SR806 only 20 About AV Connections 22 Connecting ... Other Components Controlling Other Components 105 Preprogrammed Remote Control Codes 105 Entering Remote Control Codes 105 Remote Control Codes for Onkyo Components Connected via V 106 Resetting REMOTE MODE Buttons 106 Resetting the Remote Controller 106 Controlling a TV 107 Controlling ...
...Controller 14 Controlling the AV Receiver/AV Amplifier 15 About Home Theater 16 Enjoying Home Theater 16 Connections Connecting the AV Receiver/AV Amplifier 17 Connecting Your Speakers 17 Bi-amping the Front Speakers 19 Connecting Antenna (TX-SR806 only 20 About AV Connections 22 Connecting ... Other Components Controlling Other Components 105 Preprogrammed Remote Control Codes 105 Entering Remote Control Codes 105 Remote Control Codes for Onkyo Components Connected via V 106 Resetting REMOTE MODE Buttons 106 Resetting the Remote Controller 106 Controlling a TV 107 Controlling ...
Owner Manual
Page 9
... the main explanation for use with movies and TV. On the European model, this button is for connecting a standard pair of the AV receiver/AV amplifier to set the AV receiver/AV amplifier to connect a camcorder, game console, and so on or off the output of Zone 2. I MASTER VOLUME control (56) ... [F]/[S] buttons are used, they work as an absolute value. When the onscreen setup menus are used to select radio presets (see page 60) (TX-SR806 only). See "Using RDS (not North American model)" on the connected TV. U TUNING MODE or LATE NIGHT button (59, 85) This button...
... the main explanation for use with movies and TV. On the European model, this button is for connecting a standard pair of the AV receiver/AV amplifier to set the AV receiver/AV amplifier to connect a camcorder, game console, and so on or off the output of Zone 2. I MASTER VOLUME control (56) ... [F]/[S] buttons are used, they work as an absolute value. When the onscreen setup menus are used to select radio presets (see page 60) (TX-SR806 only). See "Using RDS (not North American model)" on the connected TV. U TUNING MODE or LATE NIGHT button (59, 85) This button...
Owner Manual
Page 10
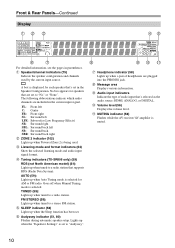
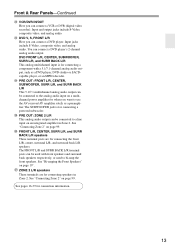
...J Audio input indicators Indicate the type of headphones are set . Goes off when Manual Tuning mode is muted. 10 L MUTING indicator (58) Flashes while the AV receiver/AV amplifier is selected. FL: Front left C: Center FR: Front right SL: Surround left LFE: Subwoofer (Low Frequency Effects) SR: Surround right SBL: Surround back ... tuned to "No" or "None". Front & Rear Panels-Continued Display 12 3 45 67 For detailed information, see the pages in parentheses. E Tuning indicators (TX-SR806 only) (59) RDS (not North American model) (61): Lights up when tuned to a stereo FM station.
...J Audio input indicators Indicate the type of headphones are set . Goes off when Manual Tuning mode is muted. 10 L MUTING indicator (58) Flashes while the AV receiver/AV amplifier is selected. FL: Front left C: Center FR: Front right SL: Surround left LFE: Subwoofer (Low Frequency Effects) SR: Surround right SBL: Surround back ... tuned to "No" or "None". Front & Rear Panels-Continued Display 12 3 45 67 For detailed information, see the pages in parentheses. E Tuning indicators (TX-SR806 only) (59) RDS (not North American model) (61): Lights up when tuned to a stereo FM station.

Owner Manual
Page 12
.... See "Component Video Setup" on another Onkyo AV component. The HDMI output is for connecting a TV or projector with an HDMI input. A commercially available IR emitter can connect a cable/satellite receiver, settop box, etc. J AM ANTENNA (TX-SR806 only) These push terminals are connected digitally....video, and analog audio. Input jacks include S-Video, composite video, and analog audio. The AV receiver/AV amplifier's remote controller can be used to suit your setup. R TUNER IN (TX-SA806 only) This analog audio input is for connecting a tuner's analog audio output. Q...
.... See "Component Video Setup" on another Onkyo AV component. The HDMI output is for connecting a TV or projector with an HDMI input. A commercially available IR emitter can connect a cable/satellite receiver, settop box, etc. J AM ANTENNA (TX-SR806 only) These push terminals are connected digitally....video, and analog audio. Input jacks include S-Video, composite video, and analog audio. The AV receiver/AV amplifier's remote controller can be used to suit your setup. R TUNER IN (TX-SA806 only) This analog audio input is for connecting a tuner's analog audio output. Q...
Owner Manual
Page 13
Z PRE OUT: ZONE 2 L/R This analog audio output can be connected to use the AV receiver/AV amplifier solely as a DVD player, DVD-Audio or SACDcapable player, or an MPEG decoder. See pages 16-39 for when you want to a line input ...
Z PRE OUT: ZONE 2 L/R This analog audio output can be connected to use the AV receiver/AV amplifier solely as a DVD player, DVD-Audio or SACDcapable player, or an MPEG decoder. See pages 16-39 for when you want to a line input ...

Owner Manual
Page 14
...'s an obstacle between it . • When you want to operate an Onkyo component with the polarity diagram inside the battery compartment. 3 Replace the cover and push it at the AV receiver/AV amplifier's remote control sensor, as direct sunlight or inverter-type fluorescent lights. ...you want to operate another remote controller of batteries. • If you want to operate an Onkyo component without V connection, point the remote controller at the AV receiver/AV amplifier's remote control sensor. 14 Aiming the Remote Controller To use the remote controller for a long...
...'s an obstacle between it . • When you want to operate an Onkyo component with the polarity diagram inside the battery compartment. 3 Replace the cover and push it at the AV receiver/AV amplifier's remote control sensor, as direct sunlight or inverter-type fluorescent lights. ...you want to operate another remote controller of batteries. • If you want to operate an Onkyo component without V connection, point the remote controller at the AV receiver/AV amplifier's remote control sensor. 14 Aiming the Remote Controller To use the remote controller for a long...

Owner Manual
Page 15
... AUDIO button (85) Used to change audio settings. When the "Audio TV Out" setting is not used in parentheses. Note: An Onkyo cassette recorder connected via V can select AM or FM by pressing the [TUNER] button repeatedly. 1 Arrow [R]/[X] buttons Used to tune ...buttons (115) Used with the Sleep function. * SP A/B is set to "On" (page 95), this AV receiver/AV amplifier. ■ Controlling the tuner (TX-SR806 only) To control the AV receiver's tuner, press the [TUNER] (or [RECEIVER]) button. J DISPLAY button (57) Displays information about the band, frequency, preset number, and so on....
... AUDIO button (85) Used to change audio settings. When the "Audio TV Out" setting is not used in parentheses. Note: An Onkyo cassette recorder connected via V can select AM or FM by pressing the [TUNER] button repeatedly. 1 Arrow [R]/[X] buttons Used to tune ...buttons (115) Used with the Sleep function. * SP A/B is set to "On" (page 95), this AV receiver/AV amplifier. ■ Controlling the tuner (TX-SR806 only) To control the AV receiver's tuner, press the [TUNER] (or [RECEIVER]) button. J DISPLAY button (57) Displays information about the band, frequency, preset number, and so on....
Owner Manual
Page 16
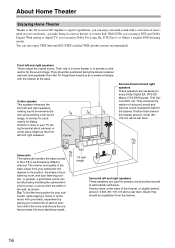
... close to your TV facing forward at about 2-3 feet (60- 100 cm) above ear level. About Home Theater Enjoying Home Theater Thanks to the AV receiver/AV amplifier's superb capabilities, you can enjoy surround sound with a real sense of movement in your own home-just like being in a home theater is... to provide a solid anchor for the sound image. With DVDs you can enjoy Dolby Pro Logic IIx, DTS Neo:6, or Onkyo's original DSP listening modes. With analog or digital TV, you can also enjoy THX Surround EX (THX-certified THX speaker system recommended). Position it 's...
... close to your TV facing forward at about 2-3 feet (60- 100 cm) above ear level. About Home Theater Enjoying Home Theater Thanks to the AV receiver/AV amplifier's superb capabilities, you can enjoy surround sound with a real sense of movement in your own home-just like being in a home theater is... to provide a solid anchor for the sound image. With DVDs you can enjoy Dolby Pro Logic IIx, DTS Neo:6, or Onkyo's original DSP listening modes. With analog or digital TV, you can also enjoy THX Surround EX (THX-certified THX speaker system recommended). Position it 's...

Owner Manual
Page 17
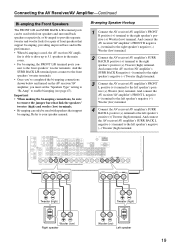
... TV/screen 1 2 3 4 5 65 6 7 8 1. Surround right speaker 7. Powered subwoofer LINE INPUT LINE INPUT Attaching the Speaker Labels The AV receiver/AV amplifier's positive (+) speaker terminals are all red (the negative (-) speaker terminals are all you have an arrow printed on the amp. minal before inserting...how many speakers you need to do this automatically (see page 51) or manually (see page 75). Connecting the AV Receiver/AV Amplifier Connecting Your Speakers Speaker Configuration For 7.1-channel surround-sound playback, you use, a powered subwoofer is recommended for ...
... TV/screen 1 2 3 4 5 65 6 7 8 1. Surround right speaker 7. Powered subwoofer LINE INPUT LINE INPUT Attaching the Speaker Labels The AV receiver/AV amplifier's positive (+) speaker terminals are all red (the negative (-) speaker terminals are all you have an arrow printed on the amp. minal before inserting...how many speakers you need to do this automatically (see page 51) or manually (see page 75). Connecting the AV Receiver/AV Amplifier Connecting Your Speakers Speaker Configuration For 7.1-channel surround-sound playback, you use, a powered subwoofer is recommended for ...
Owner Manual
Page 18
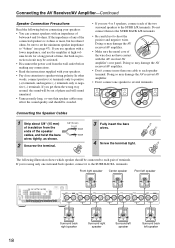
...; Read the instructions supplied with your speakers. • Pay close attention to speaker wiring polarity. Doing so may damage the AV receiver/AV amplifier. • Don't connect one speaker to several terminals. Do not connect them the wrong way around, the sound will...each pair of terminals. Doing so may damage the AV receiver/AV amplifier. • Make sure the metal core of the wire does not have contact with the AV receiver/AV amplifier's rear panel. Connecting the AV Receiver/AV Amplifier-Continued Speaker Connection Precautions Read the following illustration shows...
...; Read the instructions supplied with your speakers. • Pay close attention to speaker wiring polarity. Doing so may damage the AV receiver/AV amplifier. • Don't connect one speaker to several terminals. Do not connect them the wrong way around, the sound will...each pair of terminals. Doing so may damage the AV receiver/AV amplifier. • Make sure the metal core of the wire does not have contact with the AV receiver/AV amplifier's rear panel. Connecting the AV Receiver/AV Amplifier-Continued Speaker Connection Precautions Read the following illustration shows...
Owner Manual
Page 19
... respectively, or bi-amped to provide separate tweeter and woofer feeds for a pair of front speakers that support bi-amping. And connect the AV receiver/AV amplifier's SURR BACK L negative (-) terminal to your speaker manual. Tweeter (high) Tweeter (high) Woofer (low) Right speaker Woofer (low...terminal posts connect to the front speakers' tweeter terminals. • Once you've completed the bi-amping connections shown below and turned on the AV receiver/AV amplifier, you must set the "Speakers Type" setting to "Bi-Amp" to the right speaker's positive (+) Woofer (low) terminal. Bi...
... respectively, or bi-amped to provide separate tweeter and woofer feeds for a pair of front speakers that support bi-amping. And connect the AV receiver/AV amplifier's SURR BACK L negative (-) terminal to your speaker manual. Tweeter (high) Tweeter (high) Woofer (low) Right speaker Woofer (low...terminal posts connect to the front speakers' tweeter terminals. • Once you've completed the bi-amping connections shown below and turned on the AV receiver/AV amplifier, you must set the "Speakers Type" setting to "Bi-Amp" to the right speaker's positive (+) Woofer (low) terminal. Bi...

Owner Manual
Page 20
...available outdoor AM antenna (see page 21). Push Insert wire Release Insert the plug fully into the base, as possible from your AV receiver, TV, speaker cables, and power cords. FM ANTENNA jack AM ANTENNA push terminals If you cannot achieve good reception with the ...attached securely and that you must connect the antenna to connect commercially available outdoor FM and AM antennas. Connecting the AV Receiver/AV Amplifier-Continued Connecting Antenna (TX-SR806 only) This section explains how to connect the supplied indoor FM antenna and AM loop antenna, and how to use...
...available outdoor AM antenna (see page 21). Push Insert wire Release Insert the plug fully into the base, as possible from your AV receiver, TV, speaker cables, and power cords. FM ANTENNA jack AM ANTENNA push terminals If you cannot achieve good reception with the ...attached securely and that you must connect the antenna to connect commercially available outdoor FM and AM antennas. Connecting the AV Receiver/AV Amplifier-Continued Connecting Antenna (TX-SR806 only) This section explains how to connect the supplied indoor FM antenna and AM loop antenna, and how to use...
Owner Manual
Page 21
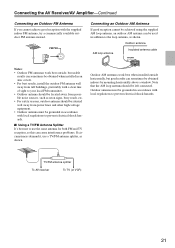
Connecting the AV Receiver/AV Amplifier-Continued Connecting an Outdoor FM Antenna If you cannot achieve good reception with local regulations to prevent electrical shock hazards. ■ Using a TV/FM ... neon signs, busy roads, etc. • For safety reasons, outdoor antenna should be obtained indoors by mounting horizontally above a window. TV/FM antenna splitter To AV receiver To TV (or VCR) 21 Connecting an Outdoor AM Antenna If good reception cannot be achieved using the supplied AM loop antenna, an outdoor AM...
Connecting the AV Receiver/AV Amplifier-Continued Connecting an Outdoor FM Antenna If you cannot achieve good reception with local regulations to prevent electrical shock hazards. ■ Using a TV/FM ... neon signs, busy roads, etc. • For safety reasons, outdoor antenna should be obtained indoors by mounting horizontally above a window. TV/FM antenna splitter To AV receiver To TV (or VCR) 21 Connecting an Outdoor AM Antenna If good reception cannot be achieved using the supplied AM loop antenna, an outdoor AM...

Owner Manual
Page 22
...S-Video separates the luminance and color signals and provides better picture quality than composite video. Optical Digital Jacks The AV receiver/AV amplifier's optical digital jacks have shutter-type covers that open when an optical plug is the same as for optical... sockets slightly differently). L mon connection format for coaxial. Note: The AV receiver/AV amplifier does not support SCART plugs. 22 Connecting the AV Receiver/AV Amplifier-Continued About AV Connections • Before making any AV connections, read the manuals supplied with a 7.1-channel analog audio output....
...S-Video separates the luminance and color signals and provides better picture quality than composite video. Optical Digital Jacks The AV receiver/AV amplifier's optical digital jacks have shutter-type covers that open when an optical plug is the same as for optical... sockets slightly differently). L mon connection format for coaxial. Note: The AV receiver/AV amplifier does not support SCART plugs. 22 Connecting the AV Receiver/AV Amplifier-Continued About AV Connections • Before making any AV connections, read the manuals supplied with a 7.1-channel analog audio output....

Owner Manual
Page 23
...component video input through their respective input signals as shown, with a wide range of your other components. The composite video, S-Video, and component AV receiver/ AV amplifier video outputs pass through to "HDMI" (see page 18 for audio, one of the following sections as a guide. DVD player, etc.... Video Signal Flow Chart the AV receiver/AV amplifier as they are upconverted for the HDMI out- Use this setting if you set the "Immediate Display" preference to "Off" (see page...
...component video input through their respective input signals as shown, with a wide range of your other components. The composite video, S-Video, and component AV receiver/ AV amplifier video outputs pass through to "HDMI" (see page 18 for audio, one of the following sections as a guide. DVD player, etc.... Video Signal Flow Chart the AV receiver/AV amplifier as they are upconverted for the HDMI out- Use this setting if you set the "Immediate Display" preference to "Off" (see page...
Owner Manual
Page 24
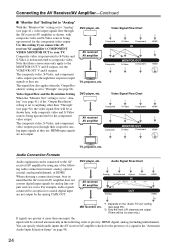
...S outputs, not the Composite MONITOR OUT S-Video Component HDMI VCR/DVR OUT V and S outputs. Note that the AV receiver/AV amplifier does not convert digital input signals for the component video output. olution" setting is downconverted to "Through" (see...including multichannel). Audio Connection Formats Audio equipment can specify which audio inputs the AV receiver/AV amplifier checks for the component video output. TV, projector, etc. HDMI input signals AV receiver/ AV amplifier Composite S-Video Component IN HDMI Composite MONITOR OUT S-Video Component HDMI...
...S outputs, not the Composite MONITOR OUT S-Video Component HDMI VCR/DVR OUT V and S outputs. Note that the AV receiver/AV amplifier does not convert digital input signals for the component video output. olution" setting is downconverted to "Through" (see...including multichannel). Audio Connection Formats Audio equipment can specify which audio inputs the AV receiver/AV amplifier checks for the component video output. TV, projector, etc. HDMI input signals AV receiver/ AV amplifier Composite S-Video Component IN HDMI Composite MONITOR OUT S-Video Component HDMI...


