
Owner Manual
Page 5
...).......42 Connecting Onkyo Components 43 Connecting the Power Cord 43 Turning On the AV Receiver 44 Turning On and Standby 44 First Time Setup 45 Speaker Settings 45 HDMI Monitor Setup 46 HDMI Input Setup 48 Component Video Input Setup 50 Changing the Input Display 51 Digital Input Setup 52 Analog Input Setup 54 Automatic Speaker Setup (Audyssey MultEQ XT 55 TV Format Setup (not North American models 60 AM Frequency Step Setup (on some models 61 Playing Your AV Components 62 Basic AV Receiver Operation 62 Listening to the Radio 63 Listening to AM/FM Stations 63 Using RDS...
...).......42 Connecting Onkyo Components 43 Connecting the Power Cord 43 Turning On the AV Receiver 44 Turning On and Standby 44 First Time Setup 45 Speaker Settings 45 HDMI Monitor Setup 46 HDMI Input Setup 48 Component Video Input Setup 50 Changing the Input Display 51 Digital Input Setup 52 Analog Input Setup 54 Automatic Speaker Setup (Audyssey MultEQ XT 55 TV Format Setup (not North American models 60 AM Frequency Step Setup (on some models 61 Playing Your AV Components 62 Basic AV Receiver Operation 62 Listening to the Radio 63 Listening to AM/FM Stations 63 Using RDS...

Owner Manual
Page 10
... S VIDEO VIDEO L AUDIO R DIGITAL bcd Other models e T PHONES POWER ZONE 2 OFF LEVEL TONE HDMI OUT STEREO THX TUNING RT/PTY/TP MEMORY MODE SETUP ON OFF ZONE 3 DIGITAL INPUT LISTENING MODE CLEAR TUNING PRESET TUNING RETURN ENTER SETUP MIC AUX 2 INPUT PUSH TO OPEN S VIDEO VIDEO L AUDIO R DIGITAL For detailed information, see page 67). T DIMMER (RT/PTY/TP) button (66, 68) Adjusts the display brightness. a AUX 2 INPUT (39, 79) Used to adjust the tone (bass and treble). b Up [ ] and Down [ ] buttons (82, 106) Used to adjust the tone, and the volume and...
... S VIDEO VIDEO L AUDIO R DIGITAL bcd Other models e T PHONES POWER ZONE 2 OFF LEVEL TONE HDMI OUT STEREO THX TUNING RT/PTY/TP MEMORY MODE SETUP ON OFF ZONE 3 DIGITAL INPUT LISTENING MODE CLEAR TUNING PRESET TUNING RETURN ENTER SETUP MIC AUX 2 INPUT PUSH TO OPEN S VIDEO VIDEO L AUDIO R DIGITAL For detailed information, see page 67). T DIMMER (RT/PTY/TP) button (66, 68) Adjusts the display brightness. a AUX 2 INPUT (39, 79) Used to adjust the tone (bass and treble). b Up [ ] and Down [ ] buttons (82, 106) Used to adjust the tone, and the volume and...

Owner Manual
Page 13
... connecting a DVD player. Z FRONT L/R, CENTER, SURR L/R, and SURR BACK L/R SPEAKERS These terminal posts are for connecting a powered subwoofer. c PRE OUT: ZONE 2, ZONE 3 These analog audio outputs can be connected to the 12-volt trigger input on a multichannel power amplifier for when you want to use the AV receiver solely as a VCR or DVR, can be connected here for connecting a turntable's ground wire. O AC INLET The supplied power cord is for connecting a digital recorder with a 5.1/7.1-channel analog audio output, such as a DVD player, DVD-Audio...
... connecting a DVD player. Z FRONT L/R, CENTER, SURR L/R, and SURR BACK L/R SPEAKERS These terminal posts are for connecting a powered subwoofer. c PRE OUT: ZONE 2, ZONE 3 These analog audio outputs can be connected to the 12-volt trigger input on a multichannel power amplifier for when you want to use the AV receiver solely as a VCR or DVR, can be connected here for connecting a turntable's ground wire. O AC INLET The supplied power cord is for connecting a digital recorder with a 5.1/7.1-channel analog audio output, such as a DVD player, DVD-Audio...

Owner Manual
Page 15
... AV components. It can also be used to control an Onkyo cassette recorder connected via . TAPE TUNER CD 7 8 9 PHONO D. By entering the appropriate remote control code, you can control a CD player, MD recorder, or CD recorder made by other components. PREV CH DISPLAY CABLE SAT TOP MENU DOCK MENU RECEIVER TAPE/AMP SLEEP ENTER VOL GUIDE SETUP EXIT RETURN MUTING 1 REC PLAYLIST RANDOM J K STEREO LISTENING MODE SURR REPEAT AUDIO SUBTITLE PLAY MODE PURE A DIRECT THX ALL ST TEST TONE CH SEL LEVEL- OPEN/CLOSE VIDEO OFF AUDIO SEL VCR L NIGHT DVD LEVEL...
... AV components. It can also be used to control an Onkyo cassette recorder connected via . TAPE TUNER CD 7 8 9 PHONO D. By entering the appropriate remote control code, you can control a CD player, MD recorder, or CD recorder made by other components. PREV CH DISPLAY CABLE SAT TOP MENU DOCK MENU RECEIVER TAPE/AMP SLEEP ENTER VOL GUIDE SETUP EXIT RETURN MUTING 1 REC PLAYLIST RANDOM J K STEREO LISTENING MODE SURR REPEAT AUDIO SUBTITLE PLAY MODE PURE A DIRECT THX ALL ST TEST TONE CH SEL LEVEL- OPEN/CLOSE VIDEO OFF AUDIO SEL VCR L NIGHT DVD LEVEL...

Owner Manual
Page 29
...Video is set to anything other than Through (see page 46), the video signal flow will be connected to composite video. Note that the AV receiver does not convert digital input signals for the component video output. The composite video, S-Video, and component video outputs pass through their respective input signals as shown here, with composite video and S-Video sources being upconverted for analog line outputs and vice versa. AV receiver Composite S-Video Component IN HDMI Composite MONITOR OUT S-Video Component TV, projector, etc. Video Signal Flow Chart DVD player...
...Video is set to anything other than Through (see page 46), the video signal flow will be connected to composite video. Note that the AV receiver does not convert digital input signals for the component video output. The composite video, S-Video, and component video outputs pass through their respective input signals as shown here, with composite video and S-Video sources being upconverted for analog line outputs and vice versa. AV receiver Composite S-Video Component IN HDMI Composite MONITOR OUT S-Video Component TV, projector, etc. Video Signal Flow Chart DVD player...

Owner Manual
Page 43
...) R R OPTICAL PHONO IN 1 CD TAPE AUX 1 GAME/TV CBL/SAT VCR/DVR DVD (GAME/TV) GND ZONE2 R SURR BACK R Bi-AMP FRONT R SURR R IN 2 (CD) OUT SUBWOOFER MULTI CH CENTER SURR L FRONT R (BTL) IN L R CD FRONT L R DVD e.g., CD player e.g., DVD player R L ANALOG AUDIO OUT R L ANALOG AUDIO OUT Connecting the Power Cord • Before connecting the power cord, connect all functions. If this is a problem, plug the AV receiver into a suitable wall outlet. • Turning on the AV receiver may not support...
...) R R OPTICAL PHONO IN 1 CD TAPE AUX 1 GAME/TV CBL/SAT VCR/DVR DVD (GAME/TV) GND ZONE2 R SURR BACK R Bi-AMP FRONT R SURR R IN 2 (CD) OUT SUBWOOFER MULTI CH CENTER SURR L FRONT R (BTL) IN L R CD FRONT L R DVD e.g., CD player e.g., DVD player R L ANALOG AUDIO OUT R L ANALOG AUDIO OUT Connecting the Power Cord • Before connecting the power cord, connect all functions. If this is a problem, plug the AV receiver into a suitable wall outlet. • Turning on the AV receiver may not support...
Owner Manual
Page 44
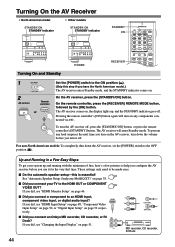
..., "Component Video PB Input Setup" on page 50, or "Digital Input Setup" on page 51. On the remote controller, press the [RECEIVER] REMOTE MODE button, followed by the [ON] button. For non-North American models: To completely shut down the volume before you turn down the AV receiver, set the [POWER] switch to help you configure the AV receiver before you connect a component to the ON position ( ). (Skip this is essential! COAXIAL OPTICAL ■ Did you did , see "HDMI Monitor Setup...
..., "Component Video PB Input Setup" on page 50, or "Digital Input Setup" on page 51. On the remote controller, press the [RECEIVER] REMOTE MODE button, followed by the [ON] button. For non-North American models: To completely shut down the volume before you turn down the AV receiver, set the [POWER] switch to help you configure the AV receiver before you connect a component to the ON position ( ). (Skip this is essential! COAXIAL OPTICAL ■ Did you did , see "HDMI Monitor Setup...

Owner Manual
Page 48
.... PREV CH DISPLAY CABLE SAT TOP MENU DOCK MENU RECEIVER TAPE/AMP SLEEP ENTER VOL GUIDE SETUP EXIT RETURN MUTING 1 2-4 REC PLAYLIST RANDOM STEREO LISTENING MODE SURR REPEAT AUDIO SUBTITLE PLAY MODE PURE A DIRECT THX ALL ST If you connect a video component to an HDMI IN, you can set the AV receiver so that input to HDMI IN 3. If you've connected your DVD player to HDMI IN 1, you must be assigned: DVD, VCR/DVR, CBL/SAT, GAME/TV, AUX 1, AUX 2, TAPE, TUNER, CD, PHONO. The HDMI Input menu appears. 1-2.HDMI Input DVD --- See page...
.... PREV CH DISPLAY CABLE SAT TOP MENU DOCK MENU RECEIVER TAPE/AMP SLEEP ENTER VOL GUIDE SETUP EXIT RETURN MUTING 1 2-4 REC PLAYLIST RANDOM STEREO LISTENING MODE SURR REPEAT AUDIO SUBTITLE PLAY MODE PURE A DIRECT THX ALL ST If you connect a video component to an HDMI IN, you can set the AV receiver so that input to HDMI IN 3. If you've connected your DVD player to HDMI IN 1, you must be assigned: DVD, VCR/DVR, CBL/SAT, GAME/TV, AUX 1, AUX 2, TAPE, TUNER, CD, PHONO. The HDMI Input menu appears. 1-2.HDMI Input DVD --- See page...

Owner Manual
Page 62
...TUNER CD PHONO MASTER VOLUME DISPLAY PUSH TO OPEN 1 1 ON STANDBY TV INPUT DVD 1 GAME/TV 4 VCR/DVR 2 AUX1 5 CBL/SAT 3 AUX2 6 + TV CH - PREV CH DISPLAY CABLE SAT TOP MENU DOCK RECEIVER TAPE/AMP SLEEP MENU ENTER VOL GUIDE SETUP EXIT RETURN MUTING 1 3 1 AV receiver DVD VCR/DVR CBL/SAT GAME/TV AUX 1 AUX 2 Remote controller RECEIVER Use the AV receiver's input selector buttons to the AV receiver's COMPONENT VIDEO OUT, HDMI OUT, or MONITOR OUT. To select an input source with the remote controller, press its INPUT SELECTOR buttons. See "Using the Listening Modes...
...TUNER CD PHONO MASTER VOLUME DISPLAY PUSH TO OPEN 1 1 ON STANDBY TV INPUT DVD 1 GAME/TV 4 VCR/DVR 2 AUX1 5 CBL/SAT 3 AUX2 6 + TV CH - PREV CH DISPLAY CABLE SAT TOP MENU DOCK RECEIVER TAPE/AMP SLEEP MENU ENTER VOL GUIDE SETUP EXIT RETURN MUTING 1 3 1 AV receiver DVD VCR/DVR CBL/SAT GAME/TV AUX 1 AUX 2 Remote controller RECEIVER Use the AV receiver's input selector buttons to the AV receiver's COMPONENT VIDEO OUT, HDMI OUT, or MONITOR OUT. To select an input source with the remote controller, press its INPUT SELECTOR buttons. See "Using the Listening Modes...

Owner Manual
Page 71
...is selected, the AV receiver's display is connected, you can select depends on the AV Receiver STEREO THX STANDBY/ON STANDBY READY ZONE 2 ZONE 3 MASTER VOLUME PURE AUDIO AUDIO SEL DVD VCR/DVR CBL/SAT GAME/TV AUX 1 AUX 2 TAPE TUNER PHONES POWER ZONE 2 OFF LEVEL TONE HDMI OUT STEREO THX TUNING RT/PTY/TP MEMORY MODE SETUP ON OFF ZONE 3 DIGITAL INPUT LISTENING MODE CLEAR TUNING PRESET TUNING RETURN ENTER CD PHONO SETUP MIC DISPLAY AUX 2 INPUT PUSH TO OPEN S VIDEO VIDEO L AUDIO R DIGITAL PURE AUDIO LISTENING MODE ■ [PURE AUDIO] button This button selects...
...is selected, the AV receiver's display is connected, you can select depends on the AV Receiver STEREO THX STANDBY/ON STANDBY READY ZONE 2 ZONE 3 MASTER VOLUME PURE AUDIO AUDIO SEL DVD VCR/DVR CBL/SAT GAME/TV AUX 1 AUX 2 TAPE TUNER PHONES POWER ZONE 2 OFF LEVEL TONE HDMI OUT STEREO THX TUNING RT/PTY/TP MEMORY MODE SETUP ON OFF ZONE 3 DIGITAL INPUT LISTENING MODE CLEAR TUNING PRESET TUNING RETURN ENTER CD PHONO SETUP MIC DISPLAY AUX 2 INPUT PUSH TO OPEN S VIDEO VIDEO L AUDIO R DIGITAL PURE AUDIO LISTENING MODE ■ [PURE AUDIO] button This button selects...
Owner Manual
Page 76
... are turned off , only the HDMI OUT outputs video.) Note: • The Pure Audio listening mode cannot be selected while Zone 2 is output directly with 96 kHz/24bit sampling rate and signal resolution. Multichannel This mode is output by the front left and right channels of the additional storage space offered by sound effects. Dolby Digital Plus Developed for use it 'll put you 're not using any surround back speakers, Dolby Pro...
... are turned off , only the HDMI OUT outputs video.) Note: • The Pure Audio listening mode cannot be selected while Zone 2 is output directly with 96 kHz/24bit sampling rate and signal resolution. Multichannel This mode is output by the front left and right channels of the additional storage space offered by sound effects. Dolby Digital Plus Developed for use it 'll put you 're not using any surround back speakers, Dolby Pro...

Owner Manual
Page 81
... L NIGHT Using the Re-EQ Function With the Re-EQ function, you don't want to turn off . For Dolby Digital and Dolby Digital Plus sources, the options are : Auto: The dynamic range is too harsh, making it will be set to Auto. 81 PREV CH DISPLAY CABLE SAT TOP MENU DOCK MENU RECEIVER TAPE/AMP SLEEP ENTER VOL GUIDE SETUP EXIT RETURN MUTING RECEIVER REC PLAYLIST RANDOM STEREO LISTENING MODE SURR REPEAT AUDIO SUBTITLE PLAY MODE PURE A DIRECT THX ALL ST TEST TONE CH SEL LEVEL- This function...
... L NIGHT Using the Re-EQ Function With the Re-EQ function, you don't want to turn off . For Dolby Digital and Dolby Digital Plus sources, the options are : Auto: The dynamic range is too harsh, making it will be set to Auto. 81 PREV CH DISPLAY CABLE SAT TOP MENU DOCK MENU RECEIVER TAPE/AMP SLEEP ENTER VOL GUIDE SETUP EXIT RETURN MUTING RECEIVER REC PLAYLIST RANDOM STEREO LISTENING MODE SURR REPEAT AUDIO SUBTITLE PLAY MODE PURE A DIRECT THX ALL ST TEST TONE CH SEL LEVEL- This function...

Owner Manual
Page 83
... function on . Conversely, if the stereo image feels like it's in order to +3. Higher settings move it backward. When set to create a phantom center). Main: The main channel is output. Mono ■ Input Ch This setting determines which channel of the center channel sound. L+R: Both the left and right speakers. Sub: The sub channel is selected. Adjusting the Listening Modes-Continued Direct Setting Delay Enable ■ DSD This setting determines whether or not DSD (SACD) audio signals are output (default...
... function on . Conversely, if the stereo image feels like it's in order to +3. Higher settings move it backward. When set to create a phantom center). Main: The main channel is output. Mono ■ Input Ch This setting determines which channel of the center channel sound. L+R: Both the left and right speakers. Sub: The sub channel is selected. Adjusting the Listening Modes-Continued Direct Setting Delay Enable ■ DSD This setting determines whether or not DSD (SACD) audio signals are output (default...

Owner Manual
Page 84
... AV receiver will be used (page 101), this setting is Dolby EX, you can select any surround back speakers, or Powered Zone 2 is being used the next time you turn on the format of the input signal. The Listening Mode Preset menu appears. 5.Listening Mode Preset 1.DVD 2.VCR/DVR 3.CBL/SAT 4.GAME/TV 5.AUX1 6.AUX2 7.TAPE 8.TUNER 9.CD 10.PHONO 84 LFE Level Settings With these sources, change the setting to -∞, -20 dB, -10 dB, or 0 dB (default). T-D (Theater-Dimensional) Setting ■ Listening Angle...
... AV receiver will be used (page 101), this setting is Dolby EX, you can select any surround back speakers, or Powered Zone 2 is being used the next time you turn on the format of the input signal. The Listening Mode Preset menu appears. 5.Listening Mode Preset 1.DVD 2.VCR/DVR 3.CBL/SAT 4.GAME/TV 5.AUX1 6.AUX2 7.TAPE 8.TUNER 9.CD 10.PHONO 84 LFE Level Settings With these sources, change the setting to -∞, -20 dB, -10 dB, or 0 dB (default). T-D (Theater-Dimensional) Setting ■ Listening Angle...

Owner Manual
Page 86
... woofer. ENTER SETUP INPUT SELECTOR MACRO 1 2 3 DVD REMOTE MODE VCR CD CDR/MD ZONE3 ZONE2 TV DIMMER + CH DISC ALBUM - The Speaker Setup menu appears. 2.Speaker Setup 1.Speaker Settings 2.Speaker Config 3.Speaker Distance 4.Level Calibration 5.Equalizer Settings 6.THX Audio Setup 3 ENTER ENTER 4 ENTER ENTER Use the Up and Down [ ]/[ ] buttons to determine the optimum crossover frequencies. SETUP 2 ENTER ENTER Use the Up and Down [ ]/[ ] buttons to select: Yes: Select if a subwoofer is connected. 86 PREV CH DISPLAY CABLE SAT TOP MENU DOCK RECEIVER TAPE/AMP...
... woofer. ENTER SETUP INPUT SELECTOR MACRO 1 2 3 DVD REMOTE MODE VCR CD CDR/MD ZONE3 ZONE2 TV DIMMER + CH DISC ALBUM - The Speaker Setup menu appears. 2.Speaker Setup 1.Speaker Settings 2.Speaker Config 3.Speaker Distance 4.Level Calibration 5.Equalizer Settings 6.THX Audio Setup 3 ENTER ENTER 4 ENTER ENTER Use the Up and Down [ ]/[ ] buttons to determine the optimum crossover frequencies. SETUP 2 ENTER ENTER Use the Up and Down [ ]/[ ] buttons to select: Yes: Select if a subwoofer is connected. 86 PREV CH DISPLAY CABLE SAT TOP MENU DOCK RECEIVER TAPE/AMP...

Owner Manual
Page 99
...'s speakers. Analog Multich ■ Subwoofer Input Sensitivity Some DVD players output the LFE channel from an HDMI component through your TV's speakers (see page 37), if you turn up the AV receiver's volume control, the sound will output no sound may want to listen to be controlled with this setting. If you can check the amount of antenna, select XM/SIRIUS. With this setting, you can change this setting to the AV receiver's MULTI CH SUBWOOFER jack. Notes: • This function works only if your HDMI-compatible...
...'s speakers. Analog Multich ■ Subwoofer Input Sensitivity Some DVD players output the LFE channel from an HDMI component through your TV's speakers (see page 37), if you turn up the AV receiver's volume control, the sound will output no sound may want to listen to be controlled with this setting. If you can check the amount of antenna, select XM/SIRIUS. With this setting, you can change this setting to the AV receiver's MULTI CH SUBWOOFER jack. Notes: • This function works only if your HDMI-compatible...

Owner Manual
Page 104
...'ve connected your Zone 2 or Zone 3 speakers to an amp with no volume control, set the Zone 2 Out or Zone 3 Out setting, respectively, to Variable so that zone. ZONE3 ZONE2 TONE STANDBY/ON STANDBY READY ZONE 2 ZONE 3 MASTER VOLUME PURE AUDIO AUDIO SEL DVD VCR/DVR CBL/SAT GAME/TV AUX 1 AUX 2 TAPE TUNER PHONES POWER ZONE 2 OFF LEVEL TONE HDMI OUT STEREO THX TUNING RT/PTY/TP MEMORY MODE SETUP ON OFF ZONE 3 DIGITAL INPUT LISTENING MODE CLEAR TUNING PRESET TUNING RETURN ENTER CD PHONO SETUP MIC DISPLAY AUX 2 INPUT PUSH TO OPEN S VIDEO VIDEO L AUDIO R DIGITAL OFF...
...'ve connected your Zone 2 or Zone 3 speakers to an amp with no volume control, set the Zone 2 Out or Zone 3 Out setting, respectively, to Variable so that zone. ZONE3 ZONE2 TONE STANDBY/ON STANDBY READY ZONE 2 ZONE 3 MASTER VOLUME PURE AUDIO AUDIO SEL DVD VCR/DVR CBL/SAT GAME/TV AUX 1 AUX 2 TAPE TUNER PHONES POWER ZONE 2 OFF LEVEL TONE HDMI OUT STEREO THX TUNING RT/PTY/TP MEMORY MODE SETUP ON OFF ZONE 3 DIGITAL INPUT LISTENING MODE CLEAR TUNING PRESET TUNING RETURN ENTER CD PHONO SETUP MIC DISPLAY AUX 2 INPUT PUSH TO OPEN S VIDEO VIDEO L AUDIO R DIGITAL OFF...

Owner Manual
Page 108
... DISPLAY CABLE SAT TOP MENU DOCK MENU RECEIVER TAPE/AMP SLEEP ENTER VOL GUIDE SETUP EXIT RETURN MUTING Remote indicator TV I RECEIVER REC PLAYLIST RANDOM STEREO LISTENING MODE SURR REPEAT AUDIO SUBTITLE PLAY MODE PURE A DIRECT THX ALL ST TEST TONE CH SEL OPEN/CLOSE VIDEO OFF AUDIO SEL VCR LEVEL- TUN TV VOL +10 0 CLEAR --/--- 10 11 12 INPUT SELECTOR MACRO 1 2 3 ZONE3 DVD REMOTE MODE VCR CD CDR/MD ZONE2 TV DIMMER + CH DISC ALBUM - The codes are listed, try each component...
... DISPLAY CABLE SAT TOP MENU DOCK MENU RECEIVER TAPE/AMP SLEEP ENTER VOL GUIDE SETUP EXIT RETURN MUTING Remote indicator TV I RECEIVER REC PLAYLIST RANDOM STEREO LISTENING MODE SURR REPEAT AUDIO SUBTITLE PLAY MODE PURE A DIRECT THX ALL ST TEST TONE CH SEL OPEN/CLOSE VIDEO OFF AUDIO SEL VCR LEVEL- TUN TV VOL +10 0 CLEAR --/--- 10 11 12 INPUT SELECTOR MACRO 1 2 3 ZONE3 DVD REMOTE MODE VCR CD CDR/MD ZONE2 TV DIMMER + CH DISC ALBUM - The codes are listed, try each component...

Owner Manual
Page 113
... sure that all audio connecting plugs are pushed in contact with a mono source, such as it's turned on your DVD player's remote controller. • If your Onkyo dealer. STANDBY/ON VCR/DVR Note that the bare wire is assigned to select a compatible audio format. Try another listening mode (page 71). • Not much sound may be produced by the surround back speakers with its factory defaults, turn it on the source component. Audio There's no sound or it...
... sure that all audio connecting plugs are pushed in contact with a mono source, such as it's turned on your DVD player's remote controller. • If your Onkyo dealer. STANDBY/ON VCR/DVR Note that the bare wire is assigned to select a compatible audio format. Try another listening mode (page 71). • Not much sound may be produced by the surround back speakers with its factory defaults, turn it on the source component. Audio There's no sound or it...

Owner Manual
Page 114
... LFE channel, the subwoofer produces no sound with power cords, speaker cables, and so on can play DVDs, the default setting is reduced to 5.1-channels and the surround back speakers produce no picture from a source connected to an HDMI IN • When the HDMI Monitor setting is set to No, and the Resolution setting is set (page 96). • After the Automatic Speaker Setup function has been run, or the volume level of audio received by the HDMI OUT. The volume cannot be connected...
... LFE channel, the subwoofer produces no sound with power cords, speaker cables, and so on can play DVDs, the default setting is reduced to 5.1-channels and the surround back speakers produce no picture from a source connected to an HDMI IN • When the HDMI Monitor setting is set to No, and the Resolution setting is set (page 96). • After the Automatic Speaker Setup function has been run, or the volume level of audio received by the HDMI OUT. The volume cannot be connected...


