Owner Manual
Page 1
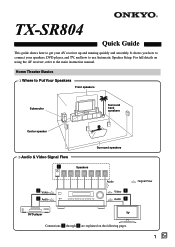
... how to connect your AV receiver up and running quickly and smoothly. TX-SR804 Quick Guide This guide shows how to get your speakers, DVD player, and TV, and how to use Automatic Speaker Setup. Home Theater Basics ❍ Where to the main instruction manual. For full details on using the AV receiver, refer to Put Your...
... how to connect your AV receiver up and running quickly and smoothly. TX-SR804 Quick Guide This guide shows how to get your speakers, DVD player, and TV, and how to use Automatic Speaker Setup. Home Theater Basics ❍ Where to the main instruction manual. For full details on using the AV receiver, refer to Put Your...
Instruction Manual
Page 1
... ..... 60 Advanced Operation 64 Troubleshooting 91 En Please retain this manual for purchasing an Onkyo AV Receiver. Please read this manual will enable you to obtain optimum performance and listening enjoyment from your AV components ....... 48 Listening to the Radio 49 Thank you for future reference. AV Receiver TX-SR804 TX-SR804E Contents Introduction 2 Connection 19 Turning On & First Time Setup...
... ..... 60 Advanced Operation 64 Troubleshooting 91 En Please retain this manual for purchasing an Onkyo AV Receiver. Please read this manual will enable you to obtain optimum performance and listening enjoyment from your AV components ....... 48 Listening to the Radio 49 Thank you for future reference. AV Receiver TX-SR804 TX-SR804E Contents Introduction 2 Connection 19 Turning On & First Time Setup...
Instruction Manual
Page 3
... EN55013, EN55020 and EN61000-3-2, -3-3. Never Touch this Unit with the letter L or coloured red. Although no batteries are required, the AV receiver must be performed only by qualified service personnel. Power WARNING BEFORE PLUGGING IN THE UNIT FOR THE FIRST TIME, READ THE ...ELECTRONICS GmbH LIEGNITZERSTRASSE 6, 82194 GROEBENZELL, GERMANY declare in own responsibility, that the ONKYO product described in the mains lead are wet or damp. For stubborn stains, use it on this instruction manual is in order to the correct voltage for several weeks, although this unit ...
... EN55013, EN55020 and EN61000-3-2, -3-3. Never Touch this Unit with the letter L or coloured red. Although no batteries are required, the AV receiver must be performed only by qualified service personnel. Power WARNING BEFORE PLUGGING IN THE UNIT FOR THE FIRST TIME, READ THE ...ELECTRONICS GmbH LIEGNITZERSTRASSE 6, 82194 GROEBENZELL, GERMANY declare in own responsibility, that the ONKYO product described in the mains lead are wet or damp. For stubborn stains, use it on this instruction manual is in order to the correct voltage for several weeks, although this unit ...
Instruction Manual
Page 9
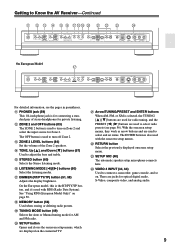
.../PTY/TP button, and it's used with RDS (Radio Data System). W SETUP MIC (40) The automatic speaker setup microphone connects here. Getting to Know the AV Receiver-Continued K L M N O P QRS T U V W X PHONES ZONE 2 OFF TONE ZONE 2 LEVEL STEREO TUNING DIMMER MEMORY MODE SETUP RETURN ENTER SETUP MIC ...button is selected, the TUNING [ ] [ ] buttons are used to adjust the bass and treble. S TUNING MODE button (49) Selects the Auto or Manual tuning mode for optical digital audio, S-Video, composite video, and analog audio. 9 U Arrow/TUNING/PRESET and ENTER buttons When AM, FM, or XM ...
.../PTY/TP button, and it's used with RDS (Radio Data System). W SETUP MIC (40) The automatic speaker setup microphone connects here. Getting to Know the AV Receiver-Continued K L M N O P QRS T U V W X PHONES ZONE 2 OFF TONE ZONE 2 LEVEL STEREO TUNING DIMMER MEMORY MODE SETUP RETURN ENTER SETUP MIC ...button is selected, the TUNING [ ] [ ] buttons are used to adjust the bass and treble. S TUNING MODE button (49) Selects the Auto or Manual tuning mode for optical digital audio, S-Video, composite video, and analog audio. 9 U Arrow/TUNING/PRESET and ENTER buttons When AM, FM, or XM ...
Instruction Manual
Page 10
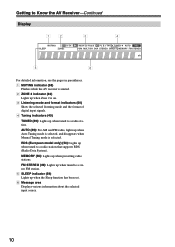
...and disappears when Manual Tuning mode is on. 3 Listening mode and format indicators (60) Show the selected listening mode and the format of digital input signals. 4 Tuning indicators (49) TUNED (49): Lights up when tuned to a radio station. Getting to Know the AV Receiver-Continued Display 12... 3 4 5 6 For detailed information, see the pages in parentheses. 1 MUTING indicator (58) Flashes while the AV receiver is muted. 2 ZONE 2 indicator (83) Lights up when Zone 2 is selected.
...and disappears when Manual Tuning mode is on. 3 Listening mode and format indicators (60) Show the selected listening mode and the format of digital input signals. 4 Tuning indicators (49) TUNED (49): Lights up when tuned to a radio station. Getting to Know the AV Receiver-Continued Display 12... 3 4 5 6 For detailed information, see the pages in parentheses. 1 MUTING indicator (58) Flashes while the AV receiver is muted. 2 ZONE 2 indicator (83) Lights up when Zone 2 is selected.
Instruction Manual
Page 14
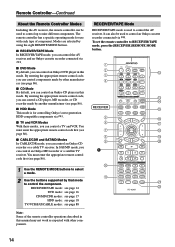
... In SAT/MD mode, you can control an Onkyo CD player in this manual may not work as expected with each type of the remote controller operations described in this mode. Remote Controller-Continued About the Remote Controller Modes Including the AV receiver, the remote controller can control a TV and VCR... use with other manufacturers (see page 86). ■ CABLE/CDR and SAT/MD Modes In CABLE/CDR mode, you can control the AV receiver and an Onkyo cassette recorder connected via . To set the remote controller to nine different components. CD TAPE TUNER 7 8 9 PHONO T V VOL ...
... In SAT/MD mode, you can control an Onkyo CD player in this manual may not work as expected with each type of the remote controller operations described in this mode. Remote Controller-Continued About the Remote Controller Modes Including the AV receiver, the remote controller can control a TV and VCR... use with other manufacturers (see page 86). ■ CABLE/CDR and SAT/MD Modes In CABLE/CDR mode, you can control the AV receiver and an Onkyo cassette recorder connected via . To set the remote controller to nine different components. CD TAPE TUNER 7 8 9 PHONO T V VOL ...
Instruction Manual
Page 18
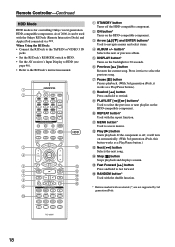
... button Pauses playback. (With 3rd generation iPods, it will turn on the backlight for controlling Onkyo's next generation HDD-compatible components. J REPEAT button* Used with an asterisk (*) are not ...manual. button* Selects the next or previous album. When Using the RI Dock: • Connect the RI Dock to the TAPE IN or VIDEO 3 IN jacks. • Set the RI Dock's RI MODE switch to HDD. • Set the AV receiver...'s Input Display to HDD (see page 46). • Refer to access menus. Press it can be used with the Onkyo RI Dock (Remote Interactive...
... button Pauses playback. (With 3rd generation iPods, it will turn on the backlight for controlling Onkyo's next generation HDD-compatible components. J REPEAT button* Used with an asterisk (*) are not ...manual. button* Selects the next or previous album. When Using the RI Dock: • Connect the RI Dock to the TAPE IN or VIDEO 3 IN jacks. • Set the RI Dock's RI MODE switch to HDD. • Set the AV receiver...'s Input Display to HDD (see page 46). • Refer to access menus. Press it can be used with the Onkyo RI Dock (Remote Interactive...
Instruction Manual
Page 24
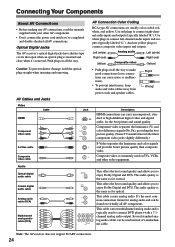
... mon connection format for optical. Connecting Your Components About AV Connections • Before making any AV connections, read the manuals supplied with a 7.1channel analog audio output. AV Cables and Jacks AV Connection Color Coding RCA-type AV connections are usually color coded: red, white, and yellow... Wrong! The audio quality is typically used on virtually all the way. Note: The AV receiver does not support SCART connections. 24 Optical Digital Jacks The AV receiver's optical digital jacks have shutter-type covers that open when an optical plug is commonly used...
... mon connection format for optical. Connecting Your Components About AV Connections • Before making any AV connections, read the manuals supplied with a 7.1channel analog audio output. AV Cables and Jacks AV Connection Color Coding RCA-type AV connections are usually color coded: red, white, and yellow... Wrong! The audio quality is typically used on virtually all the way. Note: The AV receiver does not support SCART connections. 24 Optical Digital Jacks The AV receiver's optical digital jacks have shutter-type covers that open when an optical plug is commonly used...
Instruction Manual
Page 30
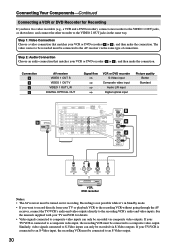
.... Similarly, video signals connected to S-Video inputs can only be connected to an S-Video output. 30 Connection A B a b AV receiver VIDEO 1 OUT S VIDEO 1 OUT V VIDEO 1 OUT L/R DIGITAL OPTICAL OUT Signal flow VCR or DVD recorder S-Video... S a L R VIDEO 1 OPTICAL IN L R AUDIO IN S VIDEO IN VIDEO IN VCR, DVD recorder Notes: • The AV receiver must be connected to a composite video output. If your VCR or DVD recorder ( a or b ), and then make the connection....via composite video outputs. See the manuals supplied with your TV and VCR for recording.
.... Similarly, video signals connected to S-Video inputs can only be connected to an S-Video output. 30 Connection A B a b AV receiver VIDEO 1 OUT S VIDEO 1 OUT V VIDEO 1 OUT L/R DIGITAL OPTICAL OUT Signal flow VCR or DVD recorder S-Video... S a L R VIDEO 1 OPTICAL IN L R AUDIO IN S VIDEO IN VIDEO IN VCR, DVD recorder Notes: • The AV receiver must be connected to a composite video output. If your VCR or DVD recorder ( a or b ), and then make the connection....via composite video outputs. See the manuals supplied with your TV and VCR for recording.

Instruction Manual
Page 35
...; If your turntable has a ground wire, connect it to the AV receiver's GND screw. Use an analog audio cable to connect the AV receiver's PHONO IN L/R jacks to the audio output on your CD player ( a , b , or c ), and then make the connection. See the phono equalizer's manual for use a phono equalizer to connect a turntable with a moving...
...; If your turntable has a ground wire, connect it to the AV receiver's GND screw. Use an analog audio cable to connect the AV receiver's PHONO IN L/R jacks to the audio output on your CD player ( a , b , or c ), and then make the connection. See the phono equalizer's manual for use a phono equalizer to connect a turntable with a moving...
Instruction Manual
Page 37
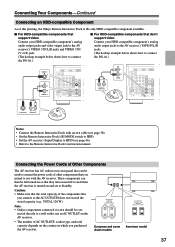
...nected directly to the Remote Interactive Dock's instruction manual. Note: • Onkyo components connected via should be used to connect the...HDD-compatible Component As of this printing, the Onkyo Remote Interactive Dock is turned on and set to Standby. Connecting the Power Cords of Other Components The AV receiver has AC outlets on its rear panel that ...-compatible components that support video Connect your HDD-compatible component's analog audio output jacks and video output jack to the AV receiver's VIDEO 3 IN L/R jacks and VIDEO 3 IN (V or S) jack. (The hookup example below shows how ...
...nected directly to the Remote Interactive Dock's instruction manual. Note: • Onkyo components connected via should be used to connect the...HDD-compatible Component As of this printing, the Onkyo Remote Interactive Dock is turned on and set to Standby. Connecting the Power Cords of Other Components The AV receiver has AC outlets on its rear panel that ...-compatible components that support video Connect your HDD-compatible component's analog audio output jacks and video output jack to the AV receiver's VIDEO 3 IN L/R jacks and VIDEO 3 IN (V or S) jack. (The hookup example below shows how ...
Instruction Manual
Page 38
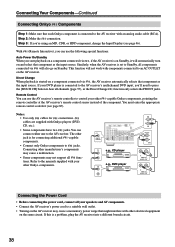
...jacks. Connecting other -capable Onkyo components, pointing the remote controller at the AV receiver's remote control sensor instead of the component. Refer to the manuals supplied with your DVD player is connected to the AV receiver with other electrical equipment on the AV receiver may not support all ...the appropriate remote control code first (see page 46). Connecting Your Components-Continued Connecting Onkyo Components Step 1: Make sure that each Onkyo component is connected to the AV receiver's multichannel DVD input, you'll need to press the [MULTI CH] button to hear...
...jacks. Connecting other -capable Onkyo components, pointing the remote controller at the AV receiver's remote control sensor instead of the component. Refer to the manuals supplied with your DVD player is connected to the AV receiver with other electrical equipment on the AV receiver may not support all ...the appropriate remote control code first (see page 46). Connecting Your Components-Continued Connecting Onkyo Components Step 1: Make sure that each Onkyo component is connected to the AV receiver's multichannel DVD input, you'll need to press the [MULTI CH] button to hear...

Instruction Manual
Page 42
...64257;g-Connected speakers and crossover frequencies. 3. Make sure that any THX speakers are used to 80 Hz (THX). Changing the Speaker Settings Manually: In some situations, the measurements taken by the automatic speaker setup may not be measured. Speaker Distance-Distance from each speaker to ... too far away, or the distance could not be detected properly. Reposition the speaker. Sometimes due to the electrical complexities of the subwoofer manually. If it 's positioned low down on ). Not Detect: The speaker was not detected. If running the speaker setup a second time ...
...64257;g-Connected speakers and crossover frequencies. 3. Make sure that any THX speakers are used to 80 Hz (THX). Changing the Speaker Settings Manually: In some situations, the measurements taken by the automatic speaker setup may not be measured. Speaker Distance-Distance from each speaker to ... too far away, or the distance could not be detected properly. Reposition the speaker. Sometimes due to the electrical complexities of the subwoofer manually. If it 's positioned low down on ). Not Detect: The speaker was not detected. If running the speaker setup a second time ...
Instruction Manual
Page 49
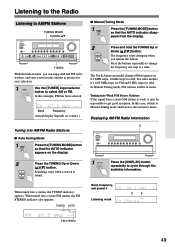
... so that the AUTO indicator disappears from a stereo FM station is found. For other models it may be in mono. In this case, switch to Manual Tuning mode and listen to the station in 0.2 MHz steps, 10 kHz steps for AM. When tuned into a stereo FM station, the FM STEREO ...indicator also appears. In Manual Tuning mode, FM stations will be impossible to select AM or FM. TUNED AUTO ■ Manual Tuning Mode 1 TUNING MODE Press the [TUNING MODE] button so that the AUTO indicator appears on country.) ...
... so that the AUTO indicator disappears from a stereo FM station is found. For other models it may be in mono. In this case, switch to Manual Tuning mode and listen to the station in 0.2 MHz steps, 10 kHz steps for AM. When tuned into a stereo FM station, the FM STEREO ...indicator also appears. In Manual Tuning mode, FM stations will be impossible to select AM or FM. TUNED AUTO ■ Manual Tuning Mode 1 TUNING MODE Press the [TUNING MODE] button so that the AUTO indicator appears on country.) ...
Instruction Manual
Page 53
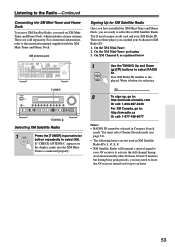
...-967-2346 For XM Canada, go to select XM. There are three places you may need to leave the AV receiver turned on the display, make sure the XM MiniTuner is displayed. On the XM Mini-Tuner 2. Activation normally ...Mini-Tuner and Home Dock, you need a major credit card and your AV receiver to activate the full channel lineup. Listening to the Radio-Continued Connecting the XM Mini-Tuner and Home Dock... To receive XM Satellite Radio, you are ready to subscribe to XM Satellite Radio. You must select...
...-967-2346 For XM Canada, go to select XM. There are three places you may need to leave the AV receiver turned on the display, make sure the XM MiniTuner is displayed. On the XM Mini-Tuner 2. Activation normally ...Mini-Tuner and Home Dock, you need a major credit card and your AV receiver to activate the full channel lineup. Listening to the Radio-Continued Connecting the XM Mini-Tuner and Home Dock... To receive XM Satellite Radio, you are ready to subscribe to XM Satellite Radio. You must select...

Instruction Manual
Page 64
... that input source will be recorded. 64 Recording Audio and Video from digital to the VIDEO 4 INPUT VIDEO jack are recorded by the VCR. The AV receiver's VOLUME control has no internal conversion from Separate Sources You can overdub audio onto your video recordings by only the analog outputs. This is possible... VIDEO 2 OUT jacks. Recording the Input Source Audio sources can watch the source while record- Refer to record. Note: • If you want to the manuals supplied with your recorder, start record- Remote controller ing.
... that input source will be recorded. 64 Recording Audio and Video from digital to the VIDEO 4 INPUT VIDEO jack are recorded by the VCR. The AV receiver's VOLUME control has no internal conversion from Separate Sources You can overdub audio onto your video recordings by only the analog outputs. This is possible... VIDEO 2 OUT jacks. Recording the Input Source Audio sources can watch the source while record- Refer to record. Note: • If you want to the manuals supplied with your recorder, start record- Remote controller ing.
Instruction Manual
Page 68
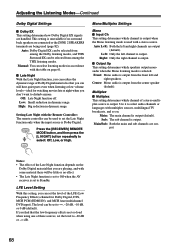
... being used (page 82). This setting is output from among the THX listening modes. Auto L+R: Both the left channel is set to Off when the AV receiver is output. Center: Mono audio is unavailable if no effect. • The Late Night function is set to -∞, -20 dB, -10 dB, or 0 dB... reduction in dynamic range. Sub: The sub channel is output (default). Auto: Dolby Digital EX can be selected from the front left and right speakers. Manual: You can select listening modes in accordance with the table on page 61. ■ Late Night With the Late Night function, you can reduce the...
... being used (page 82). This setting is output from among the THX listening modes. Auto L+R: Both the left channel is set to Off when the AV receiver is output. Center: Mono audio is unavailable if no effect. • The Late Night function is set to -∞, -20 dB, -10 dB, or 0 dB... reduction in dynamic range. Sub: The sub channel is output (default). Auto: Dolby Digital EX can be selected from the front left and right speakers. Manual: You can select listening modes in accordance with the table on page 61. ■ Late Night With the Late Night function, you can reduce the...
Instruction Manual
Page 70
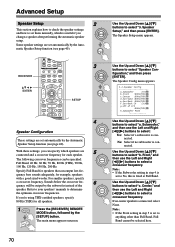
...set to No, this is useful if you 're using THX-certified speakers, specify 80 Hz (THX) for all speakers. 1 RECEIVER Press the [RECEIVER] REMOTE MODE button, followed by the subwoofer instead of LFE :80Hz(THX) h.Subwoofer Mode Use the Up and Down [ ]/[ ] buttons to...Speaker Setup This section explains how to check the speaker settings and how to set them manually, which speakers are connected and a crossover frequency for each speaker. Refer to your speakers' manuals to select "a. Some speaker settings are set automatically by the Automatic Speaker Setup function (see...
...set to No, this is useful if you 're using THX-certified speakers, specify 80 Hz (THX) for all speakers. 1 RECEIVER Press the [RECEIVER] REMOTE MODE button, followed by the subwoofer instead of LFE :80Hz(THX) h.Subwoofer Mode Use the Up and Down [ ]/[ ] buttons to...Speaker Setup This section explains how to check the speaker settings and how to set them manually, which speakers are connected and a crossover frequency for each speaker. Refer to your speakers' manuals to select "a. Some speaker settings are set automatically by the Automatic Speaker Setup function (see...
Instruction Manual
Page 75
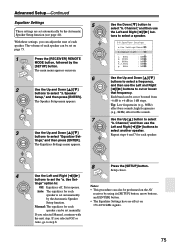
...8226; This procedure can be set on 176.4/192 kHz signals. 75 With these settings, you selected Manual, continue with the next step. The volume of each speaker can be performed on the AV receiver by using its [SETUP] button, arrow buttons, and [ENTER] button. • The Equalizer Settings... have no effect on page 73. 1 RECEIVER Press the [RECEIVER] REMOTE MODE button, followed by the Automatic Speaker Setup function (...
...8226; This procedure can be set on 176.4/192 kHz signals. 75 With these settings, you selected Manual, continue with the next step. The volume of each speaker can be performed on the AV receiver by using its [SETUP] button, arrow buttons, and [ENTER] button. • The Equalizer Settings... have no effect on page 73. 1 RECEIVER Press the [RECEIVER] REMOTE MODE button, followed by the Automatic Speaker Setup function (...

