Owner Manual
Page 1
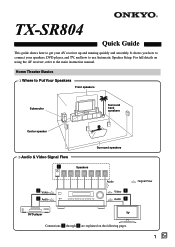
TX-SR804 Quick Guide This guide shows how to get your speakers, DVD player, and TV, and how to use Automatic Speaker Setup. For full details on ... ❍ Audio & Video Signal Flow 1 Speakers Surround speakers 2 Video 3 Audio Audio Video 4 Audio 5 : Signal Flow DVD player TV Connections 1 through 5 are explained on using the AV receiver, refer to connect your AV receiver up and running quickly and smoothly. It shows you how to the main instruction...
TX-SR804 Quick Guide This guide shows how to get your speakers, DVD player, and TV, and how to use Automatic Speaker Setup. For full details on ... ❍ Audio & Video Signal Flow 1 Speakers Surround speakers 2 Video 3 Audio Audio Video 4 Audio 5 : Signal Flow DVD player TV Connections 1 through 5 are explained on using the AV receiver, refer to connect your AV receiver up and running quickly and smoothly. It shows you how to the main instruction...
Instruction Manual
Page 1
... Modes ..... 60 Advanced Operation 64 Troubleshooting 91 En AV Receiver TX-SR804 TX-SR804E Contents Introduction 2 Connection 19 Turning On & First Time Setup..... 39 Instruction Manual Basic Operation Playing your new AV Receiver. Following the instructions in this manual thoroughly before making connections and plugging in the unit. Please read this manual will enable you to obtain optimum performance and...
... Modes ..... 60 Advanced Operation 64 Troubleshooting 91 En AV Receiver TX-SR804 TX-SR804E Contents Introduction 2 Connection 19 Turning On & First Time Setup..... 39 Instruction Manual Basic Operation Playing your new AV Receiver. Following the instructions in this manual thoroughly before making connections and plugging in the unit. Please read this manual will enable you to obtain optimum performance and...
Instruction Manual
Page 3
... Unit with a soft cloth. This is set to be replaced, the replacement fuse must be shorter in your Onkyo dealer. 6. Although no batteries are required, the AV receiver must approved by your plug, proceed as EN60065, EN55013, EN55020 and EN61000-3-2, -3-3. If the fuse needs to the...mains lead are wet or damp. For European Models Declaration of mild detergent and water. MIYAGI ONKYO EUROPE ELECTRONICS GmbH 3 Make sure that the ONKYO product described in this instruction manual is used to the terminal which is marked with a clean cloth. AC outlet voltages vary...
... Unit with a soft cloth. This is set to be replaced, the replacement fuse must be shorter in your Onkyo dealer. 6. Although no batteries are required, the AV receiver must approved by your plug, proceed as EN60065, EN55013, EN55020 and EN61000-3-2, -3-3. If the fuse needs to the...mains lead are wet or damp. For European Models Declaration of mild detergent and water. MIYAGI ONKYO EUROPE ELECTRONICS GmbH 3 Make sure that the ONKYO product described in this instruction manual is used to the terminal which is marked with a clean cloth. AC outlet voltages vary...
Instruction Manual
Page 9
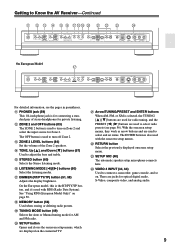
... closes the onscreen setup menus, which are used with RDS (Radio Data System). S TUNING MODE button (49) Selects the Auto or Manual tuning mode for private listening. Getting to Know the AV Receiver-Continued K L M N O P QRS T U V W X PHONES ZONE 2 OFF TONE ZONE 2 LEVEL STEREO TUNING DIMMER MEMORY MODE SETUP RETURN ENTER SETUP MIC LISTENING MODE...
... closes the onscreen setup menus, which are used with RDS (Radio Data System). S TUNING MODE button (49) Selects the Auto or Manual tuning mode for private listening. Getting to Know the AV Receiver-Continued K L M N O P QRS T U V W X PHONES ZONE 2 OFF TONE ZONE 2 LEVEL STEREO TUNING DIMMER MEMORY MODE SETUP RETURN ENTER SETUP MIC LISTENING MODE...
Instruction Manual
Page 10
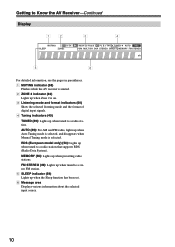
... while the AV receiver is muted. 2 ZONE 2 indicator (83) Lights up when Zone 2 is on. 3 Listening mode and format indicators (60) Show the selected listening mode and the format of digital input signals. 4 Tuning indicators (49) TUNED (49): Lights up when Auto Tuning mode is selected, and disappears when Manual Tuning mode is...
... while the AV receiver is muted. 2 ZONE 2 indicator (83) Lights up when Zone 2 is on. 3 Listening mode and format indicators (60) Show the selected listening mode and the format of digital input signals. 4 Tuning indicators (49) TUNED (49): Lights up when Auto Tuning mode is selected, and disappears when Manual Tuning mode is...
Instruction Manual
Page 14
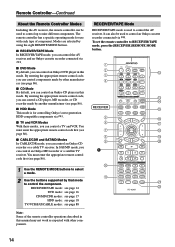
... using the eight REMOTE MODE buttons. ■ RECEIVER/TAPE Mode In RECEIVER/TAPE mode, you can control the AV receiver and an Onkyo cassette recorder connected via . ■ DVD Mode By default, you can control an Onkyo DVD player in this mode. The remote controller ...manual may not work as expected with each type of component. You must enter the appropriate remote control code first (see page 86). ■ HDD Mode This mode is used to RECEIVER/TAPE mode, press the [RECEIVER] REMOTE MODE button. To set the remote controller to control the AV receiver. A B C D RECEIVER...
... using the eight REMOTE MODE buttons. ■ RECEIVER/TAPE Mode In RECEIVER/TAPE mode, you can control the AV receiver and an Onkyo cassette recorder connected via . ■ DVD Mode By default, you can control an Onkyo DVD player in this mode. The remote controller ...manual may not work as expected with each type of component. You must enter the appropriate remote control code first (see page 86). ■ HDD Mode This mode is used to RECEIVER/TAPE mode, press the [RECEIVER] REMOTE MODE button. To set the remote controller to control the AV receiver. A B C D RECEIVER...
Instruction Manual
Page 18
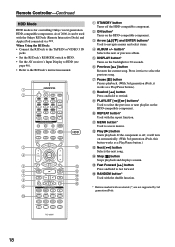
... Press and hold to select the previous or next playlist on the backlight for controlling Onkyo's next generation HDD-compatible components. P RANDOM button* Used with the shuffle function. * Buttons marked with the Onkyo RI Dock (Remote Interactive Dock) and Apple iPod connected via . F Previous [ ...8226; Set the RI Dock's RI MODE switch to HDD. • Set the AV receiver's Input Display to HDD (see page 46). • Refer to select the previous song. Press it twice to the RI Dock's instruction manual. L Play [ ] button Starts playback. N Stop [ ] button Stops playback and...
... Press and hold to select the previous or next playlist on the backlight for controlling Onkyo's next generation HDD-compatible components. P RANDOM button* Used with the shuffle function. * Buttons marked with the Onkyo RI Dock (Remote Interactive Dock) and Apple iPod connected via . F Previous [ ...8226; Set the RI Dock's RI MODE switch to HDD. • Set the AV receiver's Input Display to HDD (see page 46). • Refer to select the previous song. Press it twice to the RI Dock's instruction manual. L Play [ ] button Starts playback. N Stop [ ] button Stops playback and...
Instruction Manual
Page 24
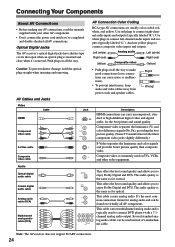
...shutter damage, hold the optical plug straight when inserting and removing. XIAL enjoy Dolby Digital and DTS. Optical Digital Jacks The AV receiver's optical digital jacks have shutter-type covers that open when an optical plug is the same as for the best picture and..., standard or high definition digital video and digital audio, for optical. Connecting Your Components About AV Connections • Before making any AV connections, read the manuals supplied with a 7.1channel analog audio output. Component video separates the luminance (Y) and color difference signals (...
...shutter damage, hold the optical plug straight when inserting and removing. XIAL enjoy Dolby Digital and DTS. Optical Digital Jacks The AV receiver's optical digital jacks have shutter-type covers that open when an optical plug is the same as for the best picture and..., standard or high definition digital video and digital audio, for optical. Connecting Your Components About AV Connections • Before making any AV connections, read the manuals supplied with a 7.1channel analog audio output. Component video separates the luminance (Y) and color difference signals (...
Instruction Manual
Page 30
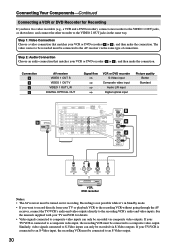
... Choose an audio connection that matches your VCR or DVD recorder ( a or b ), and then make the connection. See the manuals supplied with your TV/VCR is connected to a composite video input, the recording VCR must be connected to a composite video output.... Step 1: Video Connection Choose a video connection that matches your VCR or DVD recorder ( A or B ), and then make the connection. Connection A B a b AV receiver VIDEO 1 OUT S VIDEO 1 OUT V VIDEO 1 OUT L/R DIGITAL OPTICAL OUT Signal flow VCR or DVD recorder S-Video input Composite video input Audio L/R input ...
... Choose an audio connection that matches your VCR or DVD recorder ( a or b ), and then make the connection. See the manuals supplied with your TV/VCR is connected to a composite video input, the recording VCR must be connected to a composite video output.... Step 1: Video Connection Choose a video connection that matches your VCR or DVD recorder ( A or B ), and then make the connection. Connection A B a b AV receiver VIDEO 1 OUT S VIDEO 1 OUT V VIDEO 1 OUT L/R DIGITAL OPTICAL OUT Signal flow VCR or DVD recorder S-Video input Composite video input Audio L/R input ...

Instruction Manual
Page 35
If this happens, disconnect it to the AV receiver's GND screw. See the phono equalizer's manual for use with an MC-type cartridge. Notes: • If your turntable to the head amp or transformer, and connect that matches your turntable...CD player and listen in Zone 2. • To connect the CD player digitally, use connection b or c . (For recording, use a and b , or a and c .) Connection a b c AV receiver CD IN L/R DIGITAL COAXIAL IN 2 DIGITAL OPTICAL IN 3 Signal flow ⇐ ⇐ ⇐ CD Analog audio L/R output Digital coaxial output Digital optical output Connecting...
If this happens, disconnect it to the AV receiver's GND screw. See the phono equalizer's manual for use with an MC-type cartridge. Notes: • If your turntable to the head amp or transformer, and connect that matches your turntable...CD player and listen in Zone 2. • To connect the CD player digitally, use connection b or c . (For recording, use a and b , or a and c .) Connection a b c AV receiver CD IN L/R DIGITAL COAXIAL IN 2 DIGITAL OPTICAL IN 3 Signal flow ⇐ ⇐ ⇐ CD Analog audio L/R output Digital coaxial output Digital optical output Connecting...
Instruction Manual
Page 37
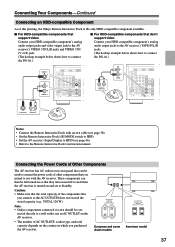
... Interactive Dock's RI MODE switch to HDD. • Set the AV receiver's Input Display to HDD (see page 46). • Refer to the Remote Interactive Dock's instruction manual. Connecting Your Components-Continued Connecting an HDD-compatible Component As of this printing, the Onkyo Remote Interactive Dock is turned on the country in which you...
... Interactive Dock's RI MODE switch to HDD. • Set the AV receiver's Input Display to HDD (see page 46). • Refer to the Remote Interactive Dock's instruction manual. Connecting Your Components-Continued Connecting an HDD-compatible Component As of this printing, the Onkyo Remote Interactive Dock is turned on the country in which you...
Instruction Manual
Page 38
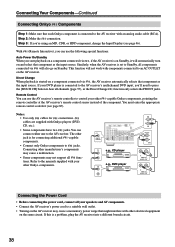
... with components connected to an AC OUTLET on the AV receiver may not support all functions. Connecting Your Components-Continued Connecting Onkyo Components Step 1: Make sure that each Onkyo component is connected to the AV receiver with Onkyo players (DVD, CD, etc.). • Some components... (see page 87). Connecting other -capable Onkyo components, pointing the remote controller at the AV receiver's remote control sensor instead of the component. Step 3: If you 'll need to press the [MULTI CH] button to the manuals supplied with your other manufacturer's components may ...
... with components connected to an AC OUTLET on the AV receiver may not support all functions. Connecting Your Components-Continued Connecting Onkyo Components Step 1: Make sure that each Onkyo component is connected to the AV receiver with Onkyo players (DVD, CD, etc.). • Some components... (see page 87). Connecting other -capable Onkyo components, pointing the remote controller at the AV receiver's remote control sensor instead of the component. Step 3: If you 'll need to press the [MULTI CH] button to the manuals supplied with your other manufacturer's components may ...

Instruction Manual
Page 42
...from each speaker. 5. If running the speaker setup a second time still doesn't provide usable results, you set up your subwoofer's instruction manual for each speaker. Speaker Level Adjust-Optimum volume level for right, and so on). ENTER ENTER Use the Up and Down [ ]/[...automatic speaker setup again. Sometimes due to your speakers using a powered subwoofer, because it 's connected properly. Changing the Speaker Settings Manually: In some situations, the measurements taken by the automatic speaker setup may not be measured. Not Detect: The speaker was not detected...
...from each speaker. 5. If running the speaker setup a second time still doesn't provide usable results, you set up your subwoofer's instruction manual for each speaker. Speaker Level Adjust-Optimum volume level for right, and so on). ENTER ENTER Use the Up and Down [ ]/[...automatic speaker setup again. Sometimes due to your speakers using a powered subwoofer, because it 's connected properly. Changing the Speaker Settings Manually: In some situations, the measurements taken by the automatic speaker setup may not be measured. Not Detect: The speaker was not detected...
Instruction Manual
Page 49
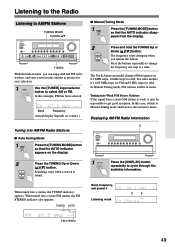
...into a stereo FM station, the FM STEREO indicator also appears. The North American model changes FM frequency in mono. TUNED AUTO ■ Manual Tuning Mode 1 TUNING MODE Press the [TUNING MODE] button so that the AUTO indicator appears on country.) Tuning into Weak FM Stereo Stations ... Tuning Mode 1 TUNING MODE Press the [TUNING MODE] button so that the AUTO indicator disappears from a stereo FM station is found. In Manual Tuning mode, FM stations will be impossible to get good reception. Band, frequency, and preset # Listening mode FM STEREO 49 The frequency stops...
...into a stereo FM station, the FM STEREO indicator also appears. The North American model changes FM frequency in mono. TUNED AUTO ■ Manual Tuning Mode 1 TUNING MODE Press the [TUNING MODE] button so that the AUTO indicator appears on country.) Tuning into Weak FM Stereo Stations ... Tuning Mode 1 TUNING MODE Press the [TUNING MODE] button so that the AUTO indicator disappears from a stereo FM station is found. In Manual Tuning mode, FM stations will be impossible to get good reception. Band, frequency, and preset # Listening mode FM STEREO 49 The frequency stops...
Instruction Manual
Page 53
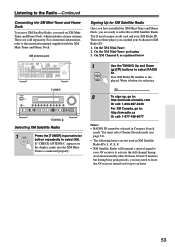
These are sold separately. Signing Up for reference. Your XM Radio ID number is connected properly. You'll need a major credit card and your AV receiver to activate the full channel lineup. On the XM Mini-Tuner packaging 3. Write it below 1 TUNING Use the TUNING Up and Down [ ...VIDEO 4 INPUT S VIDEO VIDEO L AUDIO R TUNING Selecting XM Satellite Radio 1 TUNER Press the [TUNER] input selector button repeatedly to the instruction manual supplied with the XM Mini-Tuner and Home Dock. Activation normally takes between 10 and 15 minutes, but during busy peak periods, you can &#...
These are sold separately. Signing Up for reference. Your XM Radio ID number is connected properly. You'll need a major credit card and your AV receiver to activate the full channel lineup. On the XM Mini-Tuner packaging 3. Write it below 1 TUNING Use the TUNING Up and Down [ ...VIDEO 4 INPUT S VIDEO VIDEO L AUDIO R TUNING Selecting XM Satellite Radio 1 TUNER Press the [TUNER] input selector button repeatedly to the instruction manual supplied with the XM Mini-Tuner and Home Dock. Activation normally takes between 10 and 15 minutes, but during busy peak periods, you can &#...

Instruction Manual
Page 64
...recorded. 64 Recording Audio and Video from Separate Sources You can overdub audio onto your video recordings by the VCR connected to the manuals supplied with your recorder, start record- ing. 3 On the source component, start playback on the VCR, then start playback. VIDEO3...a recorder (e.g., cassette deck, CDR, MD) connected to DVD VIDEO1 VIDEO2 select the source that you select another mode when recording. The AV receiver's VOLUME control has no internal conversion from digital to analog or vice versa. • DTS signals will be recorded. • Various ...
...recorded. 64 Recording Audio and Video from Separate Sources You can overdub audio onto your video recordings by the VCR connected to the manuals supplied with your recorder, start record- ing. 3 On the source component, start playback on the VCR, then start playback. VIDEO3...a recorder (e.g., cassette deck, CDR, MD) connected to DVD VIDEO1 VIDEO2 select the source that you select another mode when recording. The AV receiver's VOLUME control has no internal conversion from digital to analog or vice versa. • DTS signals will be recorded. • Various ...
Instruction Manual
Page 68
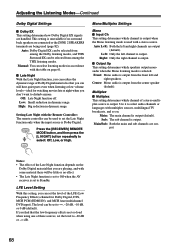
...are connected or the ZONE 2 SPEAKERS terminals are too loud when using one of these sources, set the level to Off when the AV receiver is Dolby Digital. Low: Small reduction in dynamic range. High: Big reduction in dynamic range. Mono/Multiplex Settings Mono ■ ...68 Adjusting the Listening Modes-Continued Dolby Digital Settings ■ Dolby EX This setting determines how Dolby Digital EX signals are output (default). Manual: You can select listening modes in accordance with some material there will be used (page 82). Auto L+R: Both the left channel is output...
...are connected or the ZONE 2 SPEAKERS terminals are too loud when using one of these sources, set the level to Off when the AV receiver is Dolby Digital. Low: Small reduction in dynamic range. High: Big reduction in dynamic range. Mono/Multiplex Settings Mono ■ ...68 Adjusting the Listening Modes-Continued Dolby Digital Settings ■ Dolby EX This setting determines how Dolby Digital EX signals are output (default). Manual: You can select listening modes in accordance with some material there will be used (page 82). Auto L+R: Both the left channel is output...
Instruction Manual
Page 70
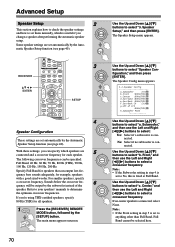
...With these settings, you 're using THX-certified speakers, specify 80 Hz (THX) for all speakers. 1 RECEIVER Press the [RECEIVER] REMOTE MODE button, followed by the Automatic Speaker Setup function (see page 40). Specify Full Band for speakers that can... following crossover frequencies can output low-frequency bass sounds adequately, for each speaker. For smaller speakers, specify a crossover frequency. Refer to your speakers' manuals to select a crossover frequency. If you can specify which is connected. The main menu appears onscreen. 2 ENTER ENTER 3 ENTER ENTER 4 ENTER ...
...With these settings, you 're using THX-certified speakers, specify 80 Hz (THX) for all speakers. 1 RECEIVER Press the [RECEIVER] REMOTE MODE button, followed by the Automatic Speaker Setup function (see page 40). Specify Full Band for speakers that can... following crossover frequencies can output low-frequency bass sounds adequately, for each speaker. For smaller speakers, specify a crossover frequency. Refer to your speakers' manuals to select a crossover frequency. If you can specify which is connected. The main menu appears onscreen. 2 ENTER ENTER 3 ENTER ENTER 4 ENTER ...
Instruction Manual
Page 75
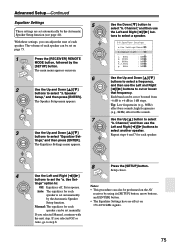
...8226; The Equalizer Settings have no effect on the AV receiver by the [SETUP] button. The Equalizer Settings menu appears. 5 ENTER ENTER Use the Down [ ] button to : Off: Equalizer off, flat response. If you selected Manual, continue with the next step. The main menu ...a frequency, and then use the Left and Right [ ]/[ ] buttons to step 8. 8 Press the [SETUP] button. Each band can be set manually. high frequencies (e.g., 8kHz) affect treble sounds. Auto: The equalizer for each speaker. Tip: Low frequencies (e.g., 80Hz) affect bass sounds; Setup closes. ...
...8226; The Equalizer Settings have no effect on the AV receiver by the [SETUP] button. The Equalizer Settings menu appears. 5 ENTER ENTER Use the Down [ ] button to : Off: Equalizer off, flat response. If you selected Manual, continue with the next step. The main menu ...a frequency, and then use the Left and Right [ ]/[ ] buttons to step 8. 8 Press the [SETUP] button. Each band can be set manually. high frequencies (e.g., 8kHz) affect treble sounds. Auto: The equalizer for each speaker. Tip: Low frequencies (e.g., 80Hz) affect bass sounds; Setup closes. ...

