
Owner Manual
Page 1
Please retain this manual will enable you for future reference. AV Receiver TX-SR800 Instruction Manual Contents Before using 2 Facilities and connections 8 Setup and operation 29 Thank you to obtain optimum performance and listening enjoyment from your new AV Receiver. Remote controller 61 Appendix 73 E Please read this manual thoroughly before making connections and plugging in this manual for purchasing the Onkyo AV Receiver. Following the instructions in the unit.
Please retain this manual will enable you for future reference. AV Receiver TX-SR800 Instruction Manual Contents Before using 2 Facilities and connections 8 Setup and operation 29 Thank you to obtain optimum performance and listening enjoyment from your new AV Receiver. Remote controller 61 Appendix 73 E Please read this manual thoroughly before making connections and plugging in this manual for purchasing the Onkyo AV Receiver. Following the instructions in the unit.

Owner Manual
Page 2
...for service. Important Safeguards 1. Retain Instructions - The safety and operating instructions should be blocked or covered. Attachments - Do not use instructions should be read before cleaning. in performance - The appliance may cause the S3125A appliance and cart combination to qualified service ...excessive force, and uneven surfaces may fall into the appliance through openings as an improper adjustment of electric shock to your home, consult your obsolete outlet. Power-supply cords should be located in damage and will prevent damage to the appliance due ...
...for service. Important Safeguards 1. Retain Instructions - The safety and operating instructions should be blocked or covered. Attachments - Do not use instructions should be read before cleaning. in performance - The appliance may cause the S3125A appliance and cart combination to qualified service ...excessive force, and uneven surfaces may fall into the appliance through openings as an improper adjustment of electric shock to your home, consult your obsolete outlet. Power-supply cords should be located in damage and will prevent damage to the appliance due ...
Owner Manual
Page 3
...this plug. Do not use is illegal without permission of the area where this switch to the terminal which the receiver is colored blue must be.../TV technician for the ASTA mark or the BSI mark on , contact your Onkyo authorized service station. 3. FCC Information for User CAUTION: The user changes or...the instructions, may result in a particular installation. For Canadian models NOTE: THIS CLASS B DIGITAL APPARATUS COMPLIES WITH CANADIAN ICES-003. IMPORTANT A 5 ampere fuse is not user-serviceable. Power...IN YOUR HOME THEN THE FUSE SHOULD BE REMOVED AND THE PLUG CUT OFF AND...
...this plug. Do not use is illegal without permission of the area where this switch to the terminal which the receiver is colored blue must be.../TV technician for the ASTA mark or the BSI mark on , contact your Onkyo authorized service station. 3. FCC Information for User CAUTION: The user changes or...the instructions, may result in a particular installation. For Canadian models NOTE: THIS CLASS B DIGITAL APPARATUS COMPLIES WITH CANADIAN ICES-003. IMPORTANT A 5 ampere fuse is not user-serviceable. Power...IN YOUR HOME THEN THE FUSE SHOULD BE REMOVED AND THE PLUG CUT OFF AND...
Owner Manual
Page 4
... Canadian models) ..... 23 Connecting the remote zone (Zone 2) speakers .... 24 When using the SURR BACK/ZONE 2 SPEAKERS terminals 24 When using the SURR BACK/ZONE 2 PRE OUT terminals ....... 24 Connecting the TX-SR800 to the monitor for the remote zone .. 24 Operating components not reached by the...a stereo radio station (FM mode 34 Presetting a radio station 35 Selecting a preset radio station 35 Erasing a preset radio station 35 Enjoying music in the remote zone 36 Using the buttons on the TX-SR800 36 Using the remote controller 36 Adjusting the volume for the remote zone 36 ...
... Canadian models) ..... 23 Connecting the remote zone (Zone 2) speakers .... 24 When using the SURR BACK/ZONE 2 SPEAKERS terminals 24 When using the SURR BACK/ZONE 2 PRE OUT terminals ....... 24 Connecting the TX-SR800 to the monitor for the remote zone .. 24 Operating components not reached by the...a stereo radio station (FM mode 34 Presetting a radio station 35 Selecting a preset radio station 35 Erasing a preset radio station 35 Enjoying music in the remote zone 36 Using the buttons on the TX-SR800 36 Using the remote controller 36 Adjusting the volume for the remote zone 36 ...
Owner Manual
Page 5
... Sound Effect Sub-menu 54 3-4. LFE Level Sub-menu 55 3-6. Digital Setup Sub-menu 46 2-2. Character Input Sub-menu 49 2-5. Volume ...3-2. Surround Speakers Sub-menu 53 3-3. Mono Sub-menu 55 3-7. Theater Dimensional Sub-menu 55 3-8. Listening Mode Preset Sub-menu 50 Audio...menu 47 2-3. Video Setup Sub-menu 48 2-4. Delay Sub-menu 54 3-5. THX Sub-menu 57 3-10. 3-11. 3-12. 3-13. 3-14. 3-15...Using remote controller 61 Overview 61 Controlling an Onkyo cassette tape deck 61 Controlling an Onkyo DVD player 62 Controlling an Onkyo CD player 63 Controlling an Onkyo...
... Sound Effect Sub-menu 54 3-4. LFE Level Sub-menu 55 3-6. Digital Setup Sub-menu 46 2-2. Character Input Sub-menu 49 2-5. Volume ...3-2. Surround Speakers Sub-menu 53 3-3. Mono Sub-menu 55 3-7. Theater Dimensional Sub-menu 55 3-8. Listening Mode Preset Sub-menu 50 Audio...menu 47 2-3. Video Setup Sub-menu 48 2-4. Delay Sub-menu 54 3-5. THX Sub-menu 57 3-10. 3-11. 3-12. 3-13. 3-14. 3-15...Using remote controller 61 Overview 61 Controlling an Onkyo cassette tape deck 61 Controlling an Onkyo DVD player 62 Controlling an Onkyo CD player 63 Controlling an Onkyo...
Owner Manual
Page 6
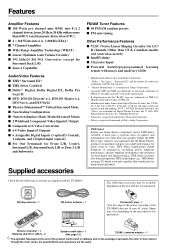
...THX Ltd. THX Select receivers also feature proprietary THX technologies (e.g., THX Mode, see page 52) which accurately translate film soundtracks for L/C/ R channels (Other than 0.08 % total harmonic distorrtion (FTC ) I 2 × 160 Watts into 8 Ω 2 channel driven, from Digital Theater...(Use this receiver. "DTS," "DTS-ES Extended Surround" and "Neo:6" are supplied with the TX-SR800. The following accessories are trademarks of the TX-SR800 ... is a trademark of Onkyo Corporation. • Lucasfilm THX and THX are the same. Check that the Home Theatre products you purchase ...
...THX Ltd. THX Select receivers also feature proprietary THX technologies (e.g., THX Mode, see page 52) which accurately translate film soundtracks for L/C/ R channels (Other than 0.08 % total harmonic distorrtion (FTC ) I 2 × 160 Watts into 8 Ω 2 channel driven, from Digital Theater...(Use this receiver. "DTS," "DTS-ES Extended Surround" and "Neo:6" are supplied with the TX-SR800. The following accessories are trademarks of the TX-SR800 ... is a trademark of Onkyo Corporation. • Lucasfilm THX and THX are the same. Check that the Home Theatre products you purchase ...
Owner Manual
Page 7
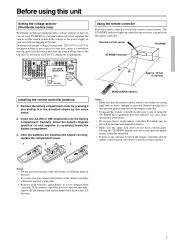
... 1 PRE OUT R L FRONT ANTENNA AUDIO VIDEO S VIDEO MONITOR OUT 2 3 OPT 1 SUB SURR SURR BACK / R ZONE 2 FRONT 2 R SUB 3 DIGITAL OUTPUT OPT SURR R SURR BACK GND CENTER AM OUT ZONE 2 R L L FM 75 MULTI CH INPUT L AUDIO R L CENTER PHONO CD L OUT TAPE ... Point the remote controller toward the remote control sensor. The STANDBY indicator lights up when the unit receives a signal from corrosion. Before using the TX-SR800 near equipment that uses infrared rays may cause operational interference. • Do not put objects on the remote controller. Remove...
... 1 PRE OUT R L FRONT ANTENNA AUDIO VIDEO S VIDEO MONITOR OUT 2 3 OPT 1 SUB SURR SURR BACK / R ZONE 2 FRONT 2 R SUB 3 DIGITAL OUTPUT OPT SURR R SURR BACK GND CENTER AM OUT ZONE 2 R L L FM 75 MULTI CH INPUT L AUDIO R L CENTER PHONO CD L OUT TAPE ... Point the remote controller toward the remote control sensor. The STANDBY indicator lights up when the unit receives a signal from corrosion. Before using the TX-SR800 near equipment that uses infrared rays may cause operational interference. • Do not put objects on the remote controller. Remove...

Owner Manual
Page 9
... MONO. RETURN button [40] When in succession. When the TX-SR800 is turned on with the receiver plugged in brackets [ ]. To prevent this button is automatically fixed to SOURCE. STEREO: Selects for the Dolby Pro LogicII, DTS Neo:6, Dolby Digital, or DTS listening modes. If you can hold down (or... concerning the input signal. There are properly connected. • When the power is a great deal of the button you to be used for the THX listening mode. That source will exit the Setup Menu. 9 If pressed while at the same time. When either the TUNING or button...
... MONO. RETURN button [40] When in succession. When the TX-SR800 is turned on with the receiver plugged in brackets [ ]. To prevent this button is automatically fixed to SOURCE. STEREO: Selects for the Dolby Pro LogicII, DTS Neo:6, Dolby Digital, or DTS listening modes. If you can hold down (or... concerning the input signal. There are properly connected. • When the power is a great deal of the button you to be used for the THX listening mode. That source will exit the Setup Menu. 9 If pressed while at the same time. When either the TUNING or button...
Owner Manual
Page 10
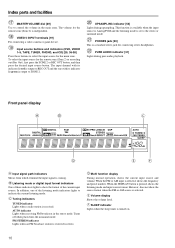
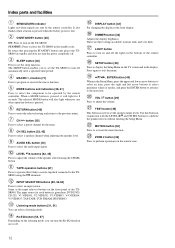
...for connecting stereo headphones. Multi function display During normal operation, shows the current input source and volume. PHONES jack [30] This is received. Listening mode or digital input format indicators One of the listening mode indicators lights to indicate the current listening mode. VIDEO 5 INPUT terminals [19] For connecting...show the source format when the FM or AM source is set to ZONE 2. Index parts and facilities MASTER VOLUME dial [29] Use to select the input source for the main zone. The input channel with its indicator lit green is output to REC OUT and the one...
...for connecting stereo headphones. Multi function display During normal operation, shows the current input source and volume. PHONES jack [30] This is received. Listening mode or digital input format indicators One of the listening mode indicators lights to indicate the current listening mode. VIDEO 5 INPUT terminals [19] For connecting...show the source format when the FM or AM source is set to ZONE 2. Index parts and facilities MASTER VOLUME dial [29] Use to select the input source for the main zone. The input channel with its indicator lit green is output to REC OUT and the one...
Owner Manual
Page 11
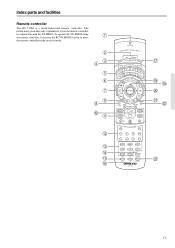
Index parts and facilities Remote controller The RC-510M is a multi-functional remote controller. To operate the TX-SR800 using the remote controller, first press the RCVR MODE button to use the remote controller in the receiver mode. 11 The instructions given here only explain how to place the remote controller in conjunction with the TX-SR800.
Index parts and facilities Remote controller The RC-510M is a multi-functional remote controller. To operate the TX-SR800 using the remote controller, first press the RCVR MODE button to use the remote controller in the receiver mode. 11 The instructions given here only explain how to place the remote controller in conjunction with the TX-SR800.
Owner Manual
Page 12
...on the listening mode, you to set the TX-SR800 to be operated by the remote controller. Use this button in the Setup Menu, press the upper and lower arrow buttons to select an item, press the right and left arrow buttons to select parameter values or modes, and press the ENTER ... light whenever any other Onkyo cassette tapedeck connected to set the sleep function. STANDBY: Press to select a speaker channel when adjusting the speaker level. When a MODE button is used to the TXSR800 using the CH SEL button. CH SEL button [32, 45] Press to place the TX-SR800 in the buttons of ...
...on the listening mode, you to set the TX-SR800 to be operated by the remote controller. Use this button in the Setup Menu, press the upper and lower arrow buttons to select an item, press the right and left arrow buttons to select parameter values or modes, and press the ENTER ... light whenever any other Onkyo cassette tapedeck connected to set the sleep function. STANDBY: Press to select a speaker channel when adjusting the speaker level. When a MODE button is used to the TXSR800 using the CH SEL button. CH SEL button [32, 45] Press to place the TX-SR800 in the buttons of ...
Owner Manual
Page 13
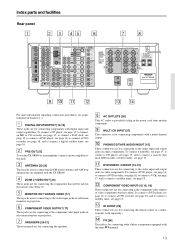
...PHONO/CD/TAPE AUDIO IN/OUT [15] These connectors are for connecting other Onkyo components equipped with digital input and output capabilities. to connect a DVD recorder, see page 15;...player, see page 18; to connect a digital satellite tuner, see page 16; and to connect a DVD recorder, see page 15; PRE OUT [27] To use the TX-SR800 as a preamplifier, connect a power amplifier ...of video components that will be used in the power cord from another component. To connect a turntable, see page 15; SURR BACK/ ZONE 2 SPEAKERS R L REMOTE CONTROL AV RECEIVER MODEL NO. FRONT SPEAKERS R ...
...PHONO/CD/TAPE AUDIO IN/OUT [15] These connectors are for connecting other Onkyo components equipped with digital input and output capabilities. to connect a DVD recorder, see page 15;...player, see page 18; to connect a digital satellite tuner, see page 16; and to connect a DVD recorder, see page 15; PRE OUT [27] To use the TX-SR800 as a preamplifier, connect a power amplifier ...of video components that will be used in the power cord from another component. To connect a turntable, see page 15; SURR BACK/ ZONE 2 SPEAKERS R L REMOTE CONTROL AV RECEIVER MODEL NO. FRONT SPEAKERS R ...
Owner Manual
Page 14
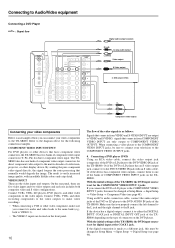
... plug in the connection diagrams as shown below. Doing so may adversely affect the picture and sound quality. • The optical digital jacks are depicted in the power cord until all connections have been properly made. • For input jacks, red connectors (marked R) are... used for the right channel, white connectors (marked L) are used for the left channel, and yellow connectors (marked V) are used for video connection. • Insert all of the shutter-type construction. Rear optical jack ...
... plug in the connection diagrams as shown below. Doing so may adversely affect the picture and sound quality. • The optical digital jacks are depicted in the power cord until all connections have been properly made. • For input jacks, red connectors (marked R) are... used for the right channel, white connectors (marked L) are used for the left channel, and yellow connectors (marked V) are used for video connection. • Insert all of the shutter-type construction. Rear optical jack ...

Owner Manual
Page 15
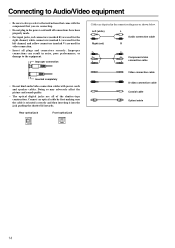
... a ground (or earth) wire to the TAPE AUDIO OUT jacks of the TX-SR800 for the following connection examples. If the digital connection is made when using an optical input or output jack, always use with moving magnet cartridges. Connecting a turntable (PHONO) Using an RCA audio cable, connect the output jacks of the turntable to the...
... a ground (or earth) wire to the TAPE AUDIO OUT jacks of the TX-SR800 for the following connection examples. If the digital connection is made when using an optical input or output jack, always use with moving magnet cartridges. Connecting a turntable (PHONO) Using an RCA audio cable, connect the output jacks of the turntable to the...
Owner Manual
Page 16
...the L jack and the right channel to the DVD AUDIO IN jacks of the TX-SR800. Make sure that normally would degrade the image. If the digital connection is set for the following connection examples. Using an RCA audio connection cable, connect the audio output jacks of the DVD or ...LD player to the R jack. With the initial settings of the TX-SR800, the DVD input source is made at...
...the L jack and the right channel to the DVD AUDIO IN jacks of the TX-SR800. Make sure that normally would degrade the image. If the digital connection is set for the following connection examples. Using an RCA audio connection cable, connect the audio output jacks of the DVD or ...LD player to the R jack. With the initial settings of the TX-SR800, the DVD input source is made at...
Owner Manual
Page 17
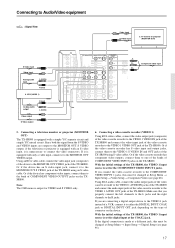
...to the MONITOR OUT VIDEO output. Since both the signal from the S VIDEO and VIDEO inputs are connecting a digital output device to the VIDEO 1 jack instead of the TX-SR800 using an S video cable. If you properly connect the left channels to the L jacks and the right channels to...VIDEO IN and OUT jacks of a VCR, connect it is unnecessary to the MONITOR OUT S VIDEO jack of the TX-SR800 using S video cables. With the initial settings of the TX-SR800. If the digital connection is equipped with only a video input, connect it is made at a different jack, this must be changed...
...to the MONITOR OUT VIDEO output. Since both the signal from the S VIDEO and VIDEO inputs are connecting a digital output device to the VIDEO 1 jack instead of the TX-SR800 using an S video cable. If you properly connect the left channels to the L jacks and the right channels to...VIDEO IN and OUT jacks of a VCR, connect it is unnecessary to the MONITOR OUT S VIDEO jack of the TX-SR800 using S video cables. With the initial settings of the TX-SR800. If the digital connection is equipped with only a video input, connect it is made at a different jack, this must be changed...

Owner Manual
Page 18
... jacks and the right channels to the DIGITAL OUTPUT OPT jack of the TX-SR800 for digital recording of the REC OUT signal from the DIGITAL OUTPUT jack of the TX-SR800 is set for the COMPONENT VIDEO INPUT 2 jacks. Note: The output from the TX-SR800. Using RCA audio cables, connect the audio output... jacks of the device to the VIDEO 2 S VIDEO IN and OUT jacks of the TX-SR800 using S video cables. Connecting to the VIDEO 2 VIDEO OUT jack of the TX-SR800. If the digital connection is set for digital input at Setup Menu → Input Setup → Video Setup → Component Video ...
... jacks and the right channels to the DIGITAL OUTPUT OPT jack of the TX-SR800 for digital recording of the REC OUT signal from the DIGITAL OUTPUT jack of the TX-SR800 is set for the COMPONENT VIDEO INPUT 2 jacks. Note: The output from the TX-SR800. Using RCA audio cables, connect the audio output... jacks of the device to the VIDEO 2 S VIDEO IN and OUT jacks of the TX-SR800 using S video cables. Connecting to the VIDEO 2 VIDEO OUT jack of the TX-SR800. If the digital connection is set for digital input at Setup Menu → Input Setup → Video Setup → Component Video ...
Owner Manual
Page 19
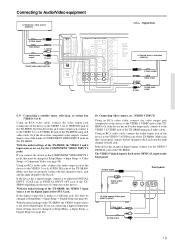
...the device to the VIDEO 5 DIGITAL jack of the TX-SR800. With the initial settings of the TX-SR800 using an S video cable. If you properly connect the left channel to the L jack and the right channel to the VIDEO 3 (or 4) S VIDEO IN jack of the TX-SR800, the VIDEO 3 and 4 input...8594; Video Setup → Component Video (see page 48). With the initial settings of the TX-SR800 using an S video cable. If the digital connection is fixed to Audio/Video equipment 8. S Video output Front panel Digital output (optical) 10. Or if the device has an S video output jack, connect it...
...the device to the VIDEO 5 DIGITAL jack of the TX-SR800. With the initial settings of the TX-SR800 using an S video cable. If you properly connect the left channel to the L jack and the right channel to the VIDEO 3 (or 4) S VIDEO IN jack of the TX-SR800, the VIDEO 3 and 4 input...8594; Video Setup → Component Video (see page 48). With the initial settings of the TX-SR800 using an S video cable. If the digital connection is fixed to Audio/Video equipment 8. S Video output Front panel Digital output (optical) 10. Or if the device has an S video output jack, connect it...
Owner Manual
Page 20
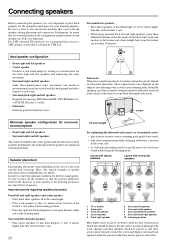
...containing good quality base sound, • take some experimenting while changing subwoofer's position in the room, and • try different positioning until you use a THX speaker system that is placed in which that their height is 3 feet (1 meter) higher than 30 degrees. 10 8 9 Subwoofer When bass ... 9 Surround back right speaker 10 Listening position Most dipoles have an arrow on the size of the listener's ears. • When using surround back left and right speakers, place them properly for the optimum sound space for the best sound quality, be placed. Those characteristics...
...containing good quality base sound, • take some experimenting while changing subwoofer's position in the room, and • try different positioning until you use a THX speaker system that is placed in which that their height is 3 feet (1 meter) higher than 30 degrees. 10 8 9 Subwoofer When bass ... 9 Surround back right speaker 10 Listening position Most dipoles have an arrow on the size of the listener's ears. • When using surround back left and right speakers, place them properly for the optimum sound space for the best sound quality, be placed. Those characteristics...
Owner Manual
Page 21
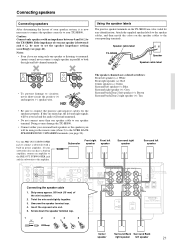
...of even one speaker terminal. SURR BACK/ ZONE 2 SPEAKERS R L REMOTE CONTROL AV RECEIVER MODEL NO. NO! Use the PRE OUT SUBWOOFER jack to connect a subwoofer with an impedance between 4 and 6 Ω, be using only one speaker or listening to monaural (mono) sound, never connect a single speaker... and then match the colors on the TX-SR800 are using in parallel to both the right and left speaker (+): Brown Surround back/Zone 2 right speaker (+): Tan • Be sure to connect the positive and negative cables for easy identification. DIGITAL OUTPUT Twist R the wire L ends ...
...of even one speaker terminal. SURR BACK/ ZONE 2 SPEAKERS R L REMOTE CONTROL AV RECEIVER MODEL NO. NO! Use the PRE OUT SUBWOOFER jack to connect a subwoofer with an impedance between 4 and 6 Ω, be using only one speaker or listening to monaural (mono) sound, never connect a single speaker... and then match the colors on the TX-SR800 are using in parallel to both the right and left speaker (+): Brown Surround back/Zone 2 right speaker (+): Tan • Be sure to connect the positive and negative cables for easy identification. DIGITAL OUTPUT Twist R the wire L ends ...

