
Owner Manual
Page 5
... models) (Plug type varies from country to country). *How to mount the AC plug: AM loop antenna (TX-SR706 only) * In catalogs and on the AV receiver/AV amplifier's power cord (adapter varies from country to country.) 1 2 3 Speaker Cable Speaker cable labels 5 Specifications and operations are the same regardless of the product name indicates the color. Supplied...
... models) (Plug type varies from country to country). *How to mount the AC plug: AM loop antenna (TX-SR706 only) * In catalogs and on the AV receiver/AV amplifier's power cord (adapter varies from country to country.) 1 2 3 Speaker Cable Speaker cable labels 5 Specifications and operations are the same regardless of the product name indicates the color. Supplied...
Owner Manual
Page 6
...dog logo, channel names and logos are trademarks of SIRIUS Satellite Radio Inc. All rights reserved. *8. THX Select2 Plus receivers also feature proprietary THX technologies (e.g., THX Mode) which is your guarantee that is protected by Macrovision. patents and other ... 4 HDMI*4 Inputs and 1 Output (ver. 1.3a) • Onkyo for System Control • 6 Digital Inputs (3 Optical / 3 Coaxial) • 5 S-Video Inputs / 2 Outputs • Component Video Switching (2 Inputs/1 Output) • Banana Plug-Compatible Speaker Posts*5 • Powered Zone 2 • IR Input and 12 ...
...dog logo, channel names and logos are trademarks of SIRIUS Satellite Radio Inc. All rights reserved. *8. THX Select2 Plus receivers also feature proprietary THX technologies (e.g., THX Mode) which is your guarantee that is protected by Macrovision. patents and other ... 4 HDMI*4 Inputs and 1 Output (ver. 1.3a) • Onkyo for System Control • 6 Digital Inputs (3 Optical / 3 Coaxial) • 5 S-Video Inputs / 2 Outputs • Component Video Switching (2 Inputs/1 Output) • Banana Plug-Compatible Speaker Posts*5 • Powered Zone 2 • IR Input and 12 ...
Owner Manual
Page 7
... Controller 14 Controlling the AV Receiver/AV Amplifier 15 About Home Theater 16 Enjoying Home Theater 16 Connections Connecting the AV Receiver/AV Amplifier 17 Connecting Your Speakers 17 Bi-amping the Front Speakers 19 Connecting Antenna (TX-SR706 only 20 About AV Connections 22 Connecting Both ... Components Controlling Other Components 102 Preprogrammed Remote Control Codes 102 Entering Remote Control Codes 102 Remote Control Codes for Onkyo Components Connected via V 103 Resetting REMOTE MODE Buttons 103 Resetting the Remote Controller 103 Controlling a TV 104 Controlling...
... Controller 14 Controlling the AV Receiver/AV Amplifier 15 About Home Theater 16 Enjoying Home Theater 16 Connections Connecting the AV Receiver/AV Amplifier 17 Connecting Your Speakers 17 Bi-amping the Front Speakers 19 Connecting Antenna (TX-SR706 only 20 About AV Connections 22 Connecting Both ... Components Controlling Other Components 102 Preprogrammed Remote Control Codes 102 Entering Remote Control Codes 102 Remote Control Codes for Onkyo Components Connected via V 103 Resetting REMOTE MODE Buttons 103 Resetting the Remote Controller 103 Controlling a TV 104 Controlling...
Owner Manual
Page 9
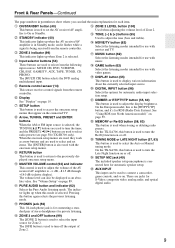
...+18.0 dB (relative display). Y SETUP MIC jack (49) The included speaker setup microphone is connected here for use with movies and TV. Z AUX ...AV receiver/AV amplifier to display various information about the currently selected input source. L PURE AUDIO button and indicator (62) Selects the Pure Audio listening mode. On the European model, this button is used to adjust the display brightness. On the TX... and the PRESET [F]/[S] buttons are used to select radio presets (see page 58) (TX-SR706 only). E Input selector buttons (54) These buttons are jacks for use with music. ...
...+18.0 dB (relative display). Y SETUP MIC jack (49) The included speaker setup microphone is connected here for use with movies and TV. Z AUX ...AV receiver/AV amplifier to display various information about the currently selected input source. L PURE AUDIO button and indicator (62) Selects the Pure Audio listening mode. On the European model, this button is used to adjust the display brightness. On the TX... and the PRESET [F]/[S] buttons are used to select radio presets (see page 58) (TX-SR706 only). E Input selector buttons (54) These buttons are jacks for use with music. ...

Owner Manual
Page 10
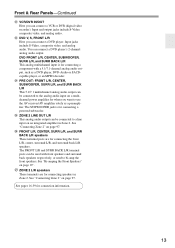
...type of headphones are included in the current input signal. L MUTING indicator (56) Flashes while the AV receiver/AV amplifier is selected. G Audyssey indicator (49, 78) Flashes during automatic speaker setup. E Tuning indicators (TX-SR706 only) (57) RDS (not North American model) (59): Lights up when Auto Tuning mode ... and audio input signal format. Front & Rear Panels-Continued Display 12 3 45 67 For detailed information, see the pages in the Speaker Configuration. No box appears for AM or FM radio. Goes off when Manual Tuning mode is muted. 10 AUTO (57): Lights up...
...type of headphones are included in the current input signal. L MUTING indicator (56) Flashes while the AV receiver/AV amplifier is selected. G Audyssey indicator (49, 78) Flashes during automatic speaker setup. E Tuning indicators (TX-SR706 only) (57) RDS (not North American model) (59): Lights up when Auto Tuning mode ... and audio input signal format. Front & Rear Panels-Continued Display 12 3 45 67 For detailed information, see the pages in the Speaker Configuration. No box appears for AM or FM radio. Goes off when Manual Tuning mode is muted. 10 AUTO (57): Lights up...
Owner Manual
Page 13
... for connecting speakers in Zone 2. Front & Rear Panels-Continued W VCR/DVR IN/OUT Here you can connect a DVD player. Z ZONE 2 LINE OUT L/R This analog audio output can be used to a line input on an integrated amplifier in Zone 2. See pages 16-39 for when you want to use the AV receiver/AV amplifier solely...
... for connecting speakers in Zone 2. Front & Rear Panels-Continued W VCR/DVR IN/OUT Here you can connect a DVD player. Z ZONE 2 LINE OUT L/R This analog audio output can be used to a line input on an integrated amplifier in Zone 2. See pages 16-39 for when you want to use the AV receiver/AV amplifier solely...
Owner Manual
Page 16
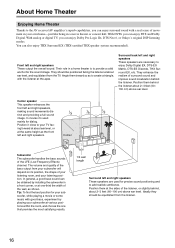
With DVDs you can enjoy Dolby Pro Logic IIx, DTS Neo:6, or Onkyo's original DSP listening modes. Front left and right speakers, making sound movements distinct and providing a full sound image. Angle them inward so as to create a triangle, with the listener at the same... Theater Thanks to the AV receiver/AV amplifier's superb capabilities, you can enjoy surround sound with a real sense of movement in your own home-just like being in a front corner, or at one that provides the most satisfying results. 1/3 wall length Surround left and right speakers These speakers are necessary to enjoy ...
With DVDs you can enjoy Dolby Pro Logic IIx, DTS Neo:6, or Onkyo's original DSP listening modes. Front left and right speakers, making sound movements distinct and providing a full sound image. Angle them inward so as to create a triangle, with the listener at the same... Theater Thanks to the AV receiver/AV amplifier's superb capabilities, you can enjoy surround sound with a real sense of movement in your own home-just like being in a front corner, or at one that provides the most satisfying results. 1/3 wall length Surround left and right speakers These speakers are necessary to enjoy ...
Owner Manual
Page 17
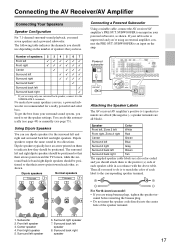
...'s PRE OUT: SUBWOOFER to an input on the amp. Powered subwoofer LINE INPUT LINE INPUT Attaching the Speaker Labels The AV receiver/AV amplifier's positive (+) speaker terminals are all red (the negative (-) speaker terminals are all you need to do this automatically (see page 49) or manually (see page 73). For North American model • If...
...'s PRE OUT: SUBWOOFER to an input on the amp. Powered subwoofer LINE INPUT LINE INPUT Attaching the Speaker Labels The AV receiver/AV amplifier's positive (+) speaker terminals are all red (the negative (-) speaker terminals are all you need to do this automatically (see page 49) or manually (see page 73). For North American model • If...

Owner Manual
Page 18
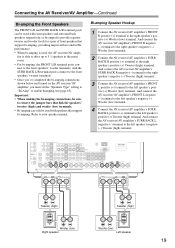
... use speakers with the AV receiver/AV amplifier's rear panel. Doing so may damage the AV receiver/AV amplifier. • Make sure the metal core of terminals. In other words, connect positive (+) terminals only to positive (+) terminals, and negative (-) terminals only to each speaker terminal. Front right speaker Center speaker Front left speaker Surround back right speaker Surround right speaker Surround left speaker Surround...
... use speakers with the AV receiver/AV amplifier's rear panel. Doing so may damage the AV receiver/AV amplifier. • Make sure the metal core of terminals. In other words, connect positive (+) terminals only to positive (+) terminals, and negative (-) terminals only to each speaker terminal. Front right speaker Center speaker Front left speaker Surround back right speaker Surround right speaker Surround left speaker Surround...
Owner Manual
Page 19
... (high) terminal. And connect the AV receiver/AV amplifier's FRONT R negative (-) terminal to the right speaker's negative (-) Woofer (low) terminal. 2 Connect the AV receiver/AV amplifier's SURR BACK R positive (+) terminal to enable biamping (see page 45). And connect the AV receiver/AV amplifier's FRONT L negative (-) terminal to the left speaker's negative (-) Woofer (low) terminal. 4 Connect the AV receiver/AV amplifier's SURR BACK L positive (+) terminal...
... (high) terminal. And connect the AV receiver/AV amplifier's FRONT R negative (-) terminal to the right speaker's negative (-) Woofer (low) terminal. 2 Connect the AV receiver/AV amplifier's SURR BACK R positive (+) terminal to enable biamping (see page 45). And connect the AV receiver/AV amplifier's FRONT L negative (-) terminal to the left speaker's negative (-) Woofer (low) terminal. 4 Connect the AV receiver/AV amplifier's SURR BACK L positive (+) terminal...
Owner Manual
Page 20
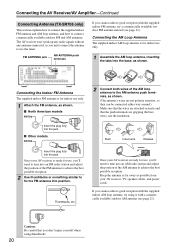
...see page 21). Connecting the AV Receiver/AV Amplifier-Continued Connecting Antenna (TX-SR706 only) This section explains how to connect the supplied indoor FM antenna and AM loop antenna, and how to fix the FM antenna into position. Once your AV receiver, TV, speaker cables, and power cords.... Caution: Be careful that the push terminals are attached securely and that you must connect the antenna to achieve the best possible reception. The AV receiver won't pick up any radio signals...
...see page 21). Connecting the AV Receiver/AV Amplifier-Continued Connecting Antenna (TX-SR706 only) This section explains how to connect the supplied indoor FM antenna and AM loop antenna, and how to fix the FM antenna into position. Once your AV receiver, TV, speaker cables, and power cords.... Caution: Be careful that the push terminals are attached securely and that you must connect the antenna to achieve the best possible reception. The AV receiver won't pick up any radio signals...
Owner Manual
Page 22
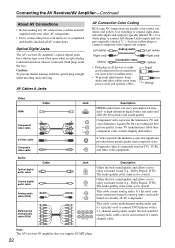
...audio, and can cause noise or malfunctions). • To prevent interference, keep audio and video cables away from power cords and speaker cables. Push plugs in all the way. And use yellow plugs to enjoy surround sound (e.g., Dolby Digital, DTS). Offers the ... and yellow. or high-definition digital video and audio and offer the best picture and sound quality. Connecting the AV Receiver/AV Amplifier-Continued About AV Connections • Before making any AV connections, read the manuals supplied with a 7.1-channel analog audio output. Use white plugs to enjoy surround sound ...
...audio, and can cause noise or malfunctions). • To prevent interference, keep audio and video cables away from power cords and speaker cables. Push plugs in all the way. And use yellow plugs to enjoy surround sound (e.g., Dolby Digital, DTS). Offers the ... and yellow. or high-definition digital video and audio and offer the best picture and sound quality. Connecting the AV Receiver/AV Amplifier-Continued About AV Connections • Before making any AV connections, read the manuals supplied with a 7.1-channel analog audio output. Use white plugs to enjoy surround sound ...
Owner Manual
Page 23
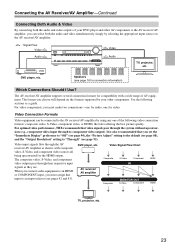
Speakers (see page 92). Video Connection Formats Video equipment can select both the audio and video outputs of your DVD player and other AV components to the AV receiver/AV amplifier, you can be connected to the AV receiver/AV amplifier by your other components. For optimal video performance, THX recommends that AV receiver/ AV... Resolution" setting to an input selector (see pages 42 and 43). The format you choose will depend on the AV receiver/AV amplifier. : Signal Flow Video Audio Video Audio TV, projector, etc. Use the following video connection formats: composite ...
Speakers (see page 92). Video Connection Formats Video equipment can select both the audio and video outputs of your DVD player and other AV components to the AV receiver/AV amplifier, you can be connected to the AV receiver/AV amplifier by your other components. For optimal video performance, THX recommends that AV receiver/ AV... Resolution" setting to an input selector (see pages 42 and 43). The format you choose will depend on the AV receiver/AV amplifier. : Signal Flow Video Audio Video Audio TV, projector, etc. Use the following video connection formats: composite ...
Owner Manual
Page 34
... video can be upconverted for display on . Composite video, S-Video, and component video sources can be connected by the AV receiver/AV amplifier's speakers. To listen to audio received by the HDMI IN jacks through the AV receiver/AV amplifier, set to another input source, this may be seen on the TV screen (on page 23 for more...
... video can be upconverted for display on . Composite video, S-Video, and component video sources can be connected by the AV receiver/AV amplifier's speakers. To listen to audio received by the HDMI IN jacks through the AV receiver/AV amplifier, set to another input source, this may be seen on the TV screen (on page 23 for more...
Owner Manual
Page 37
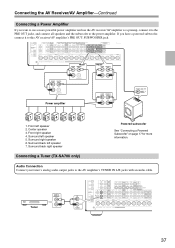
... Center speaker 3. Front right speaker 4. Surround back left speaker 2. Surround left speaker 5. Surround back right speaker Connecting a Tuner (TX-SA706 only) Powered subwoofer See "Connecting a Powered Subwoofer" on page 17 for more powerful power amplifier and use the AV receiver/AV amplifier as a preamp, connect it to this AV receiver/AV amplifier's PRE OUT: SUBWOOFER jack. Power amplifier 1234567 1. Connecting the AV Receiver/AV Amplifier...
... Center speaker 3. Front right speaker 4. Surround back left speaker 2. Surround left speaker 5. Surround back right speaker Connecting a Tuner (TX-SA706 only) Powered subwoofer See "Connecting a Powered Subwoofer" on page 17 for more powerful power amplifier and use the AV receiver/AV amplifier as a preamp, connect it to this AV receiver/AV amplifier's PRE OUT: SUBWOOFER jack. Power amplifier 1234567 1. Connecting the AV Receiver/AV Amplifier...
Owner Manual
Page 39
... the manuals supplied with your speakers and AV components. • Turning on a component connected via V, the AV receiver/AV amplifier automatically selects that component as the input source. With V (Remote Interactive), you can use the AV receiver/AV amplifier's remote controller to control your other V-capable Onkyo components, pointing the remote controller at the AV receiver/AV amplifier's remote control sensor instead...
... the manuals supplied with your speakers and AV components. • Turning on a component connected via V, the AV receiver/AV amplifier automatically selects that component as the input source. With V (Remote Interactive), you can use the AV receiver/AV amplifier's remote controller to control your other V-capable Onkyo components, pointing the remote controller at the AV receiver/AV amplifier's remote control sensor instead...
Owner Manual
Page 40
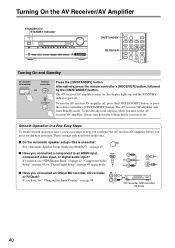
... Onkyo MD recorder, CD recorder, or RI Dock? Smooth Operation in a Few Easy Steps To ensure smooth operation, here's a few easy steps to be made once. ■ Do the automatic speaker setup-this is essential! If you have , see "Changing the Input Display" on the AV receiver/AV amplifier, always turn the AV receiver/AV amplifier off . The AV receiver/AV...
... Onkyo MD recorder, CD recorder, or RI Dock? Smooth Operation in a Few Easy Steps To ensure smooth operation, here's a few easy steps to be made once. ■ Do the automatic speaker setup-this is essential! If you have , see "Changing the Input Display" on the AV receiver/AV amplifier, always turn the AV receiver/AV amplifier off . The AV receiver/AV...

Owner Manual
Page 41
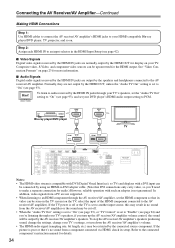
... submenu appears. Miscellaneous 7. Speaker Setup 3. Listening Mode Preset 6. Hardware Setup 8. Press the [SETUP] button to change the settings The settings of the AV receiver/AV amplifier can be displayed one by the [SETUP] button. 2 2 The submenu item appears on the TV screen will be 1 changed using the AV receiver/AV amplifier for the AV receiver/AV amplifier by the [SETUP...
... submenu appears. Miscellaneous 7. Speaker Setup 3. Listening Mode Preset 6. Hardware Setup 8. Press the [SETUP] button to change the settings The settings of the AV receiver/AV amplifier can be displayed one by the [SETUP] button. 2 2 The submenu item appears on the TV screen will be 1 changed using the AV receiver/AV amplifier for the AV receiver/AV amplifier by the [SETUP...

Owner Manual
Page 45
.... Notes: • Powered Zone2 cannot be used if "Speakers Type" is used if "Speakers Type" is able to drive up to "Bi-Amp". • The analog multichannel input can also be used , the AV receiver/AV ampli- Speaker Setup 1. tings", and then press [ENTER]. Notes: •... Down [R]/[X] but- Setup", and then press [ENTER]. Speaker Set- not be performed on the AV receiver/AV amplifier by the [SETUP] button. Equalizer Settings 6. nected your front speakers to select: 4ohms: Select if the impedance of any speaker is selected on page 19. THX Audio Setup Note: ...
.... Notes: • Powered Zone2 cannot be used if "Speakers Type" is used if "Speakers Type" is able to drive up to "Bi-Amp". • The analog multichannel input can also be used , the AV receiver/AV ampli- Speaker Setup 1. tings", and then press [ENTER]. Notes: •... Down [R]/[X] but- Setup", and then press [ENTER]. Speaker Set- not be performed on the AV receiver/AV amplifier by the [SETUP] button. Equalizer Settings 6. nected your front speakers to select: 4ohms: Select if the impedance of any speaker is selected on page 19. THX Audio Setup Note: ...
Owner Manual
Page 49
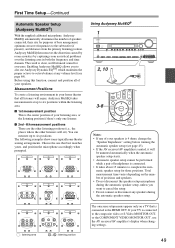
..., connect and position all listeners will enjoy, Audyssey MultEQ takes measurements at any speakers during the automatic speaker setup, unless you to cancel the setup. • Do not connect or disconnect any volume level (see page 45). • If the AV receiver/AV amplifier is muted, it will sit). Enabling Audyssey MultEQ allows you want...
..., connect and position all listeners will enjoy, Audyssey MultEQ takes measurements at any speakers during the automatic speaker setup, unless you to cancel the setup. • Do not connect or disconnect any volume level (see page 45). • If the AV receiver/AV amplifier is muted, it will sit). Enabling Audyssey MultEQ allows you want...

