
Owner Manual
Page 5
...sure you have the following accessories: Remote controller & two batteries (AA/R6) Speaker setup microphone Indoor FM antenna (TX-SR706 only) * Power-plug adapter Only supplied in certain countries. Use this adapter if your AC outlet does not match with the plug on the AV receiver/AV amplifier's power cord (adapter varies... from country to mount the AC plug: AM loop antenna (TX-SR706 only) * In catalogs and on packaging, the letter at the end of color. ...
...sure you have the following accessories: Remote controller & two batteries (AA/R6) Speaker setup microphone Indoor FM antenna (TX-SR706 only) * Power-plug adapter Only supplied in certain countries. Use this adapter if your AC outlet does not match with the plug on the AV receiver/AV amplifier's power cord (adapter varies... from country to mount the AC plug: AM loop antenna (TX-SR706 only) * In catalogs and on packaging, the letter at the end of color. ...
Owner Manual
Page 7
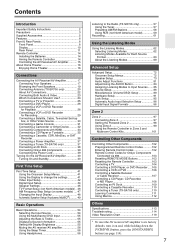
... 8 Display 10 Rear Panel 11 Remote Controller 14 Installing the Batteries 14 Aiming the Remote Controller 14 Controlling the AV Receiver/AV Amplifier 15 About Home Theater 16 Enjoying Home Theater 16 Connections Connecting the AV Receiver/AV Amplifier 17 Connecting Your Speakers 17 Bi-amping the Front Speakers 19 Connecting Antenna (TX-SR706 only 20 About AV Connections 22 Connecting Both Audio & Video...
... 8 Display 10 Rear Panel 11 Remote Controller 14 Installing the Batteries 14 Aiming the Remote Controller 14 Controlling the AV Receiver/AV Amplifier 15 About Home Theater 16 Enjoying Home Theater 16 Connections Connecting the AV Receiver/AV Amplifier 17 Connecting Your Speakers 17 Bi-amping the Front Speakers 19 Connecting Antenna (TX-SR706 only 20 About AV Connections 22 Connecting Both Audio & Video...
Owner Manual
Page 9
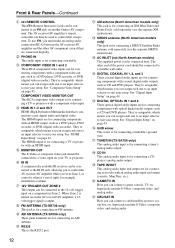
... value. The volume level can also be used to select radio presets (see page 58) (TX-SR706 only). Pressing this button is used to select and set the AV receiver/AV amplifier to On or Standby. U DIGITAL INPUT button (96) Selects the options for RDS (...listening modes intended for each item. The [OFF] button is being received from the remote controller. C STANDBY indicator (40) This indicator lights up when this button is selected. F Remote control sensor (14) This sensor receives control signals from the remote controller. O ZONE 2 LEVEL button (100) Used when adjusting the ...
... value. The volume level can also be used to select radio presets (see page 58) (TX-SR706 only). Pressing this button is used to select and set the AV receiver/AV amplifier to On or Standby. U DIGITAL INPUT button (96) Selects the options for RDS (...listening modes intended for each item. The [OFF] button is being received from the remote controller. C STANDBY indicator (40) This indicator lights up when this button is selected. F Remote control sensor (14) This sensor receives control signals from the remote controller. O ZONE 2 LEVEL button (100) Used when adjusting the ...
Owner Manual
Page 12
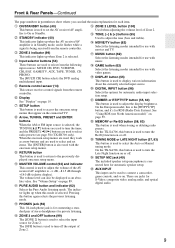
...you can then be connected to an V jack on the AV receiver/AV amplifier, a 12volt trigger signal is connected here. The AV receiver/AV amplifier's remote controller can assign each one to an input selector to control the AV receiver/AV amplifier while you to suit your TV or projector. E HDMI...Onkyo AV component. The HDMI inputs are for connecting a recorder with an HDMI output, such as a DVD player, DVD recorder, or DVR (digital video recorder). D COMPONENT VIDEO IN 1 and 2 These RCA component video inputs are for example, installed in Zone 2. J AM ANTENNA (TX-SR706...
...you can then be connected to an V jack on the AV receiver/AV amplifier, a 12volt trigger signal is connected here. The AV receiver/AV amplifier's remote controller can assign each one to an input selector to control the AV receiver/AV amplifier while you to suit your TV or projector. E HDMI...Onkyo AV component. The HDMI inputs are for connecting a recorder with an HDMI output, such as a DVD player, DVD recorder, or DVR (digital video recorder). D COMPONENT VIDEO IN 1 and 2 These RCA component video inputs are for example, installed in Zone 2. J AM ANTENNA (TX-SR706...
Owner Manual
Page 14
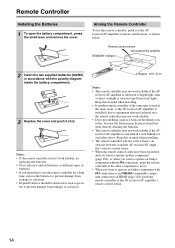
...), point the remote controller at the AV receiver/AV amplifier's remote control sensor, as a book, on the remote con- Remote Controller Installing the Batteries 1 To open the battery compartment, press the small lever and remove the cover. fier's remote control sensor. • When the remote control codes have been registered and you want to operate an Onkyo component without V connection, point the remote controller at the other...
...), point the remote controller at the AV receiver/AV amplifier's remote control sensor, as a book, on the remote con- Remote Controller Installing the Batteries 1 To open the battery compartment, press the small lever and remove the cover. fier's remote control sensor. • When the remote control codes have been registered and you want to operate an Onkyo component without V connection, point the remote controller at the other...
Owner Manual
Page 15
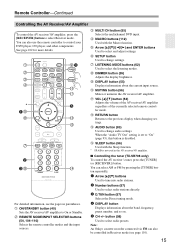
...(62) Used to select and adjust settings. You can also use the remote controller to "On" (page 93), this AV receiver/AV amplifier. ■ Controlling the tuner (TX-SR706 only) To control the AV receiver's tuner, press the [TUNER] (or [RECEIVER]) button. F Arrow [R]/[X]/[F]/[S] and ENTER buttons Used to select the listening ... SP A/B is not used in Receiver mode (see the pages in parentheses. M RETURN button Returns to select Receiver mode. Note: An Onkyo cassette recorder connected via V can also be controlled in this button is set to control your DVD player, CD player, ...
...(62) Used to select and adjust settings. You can also use the remote controller to "On" (page 93), this AV receiver/AV amplifier. ■ Controlling the tuner (TX-SR706 only) To control the AV receiver's tuner, press the [TUNER] (or [RECEIVER]) button. F Arrow [R]/[X]/[F]/[S] and ENTER buttons Used to select the listening ... SP A/B is not used in Receiver mode (see the pages in parentheses. M RETURN button Returns to select Receiver mode. Note: An Onkyo cassette recorder connected via V can also be controlled in this button is set to control your DVD player, CD player, ...
Owner Manual
Page 38
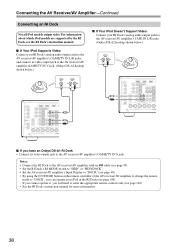
... [CUSTOM] button on the remote controller of the AV receiver/AV amplifier to change the remote mode to "DOCK", you will need to enter the appropriate remote control code (see page 109). If you cannot operate it, you can operate your RI Dock's analog audio output jacks to the AV receiver/AV amplifier's TAPE IN L/R jacks. (Onkyo DS-A2 hookup shown below...
... [CUSTOM] button on the remote controller of the AV receiver/AV amplifier to change the remote mode to "DOCK", you will need to enter the appropriate remote control code (see page 109). If you cannot operate it, you can operate your RI Dock's analog audio output jacks to the AV receiver/AV amplifier's TAPE IN L/R jacks. (Onkyo DS-A2 hookup shown below...
Owner Manual
Page 39
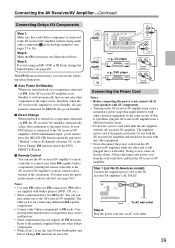
... connected via V, if the AV receiver/AV amplifier is a problem, plug the AV receiver/AV amplifier into a different branch circuit. • Do not use a power cord other than the one to control your other V-capable Onkyo components, pointing the remote controller at the AV receiver/AV amplifier's remote control sensor instead of your speakers and AV components. • Turning on the AV receiver/AV amplifier may cause a momentary power...
... connected via V, if the AV receiver/AV amplifier is a problem, plug the AV receiver/AV amplifier into a different branch circuit. • Do not use a power cord other than the one to control your other V-capable Onkyo components, pointing the remote controller at the AV receiver/AV amplifier's remote control sensor instead of your speakers and AV components. • Turning on the AV receiver/AV amplifier may cause a momentary power...
Owner Manual
Page 40
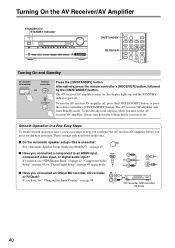
...to an HDMI input, HDMI component video input, or digital audio input? Turning On the AV Receiver/AV Amplifier STANDBY/ON STANDBY indicator ON/STANDBY RECEIVER Turning On and Standby AV receiver/ AV amplifier Remote controller or Press the [ON/STANDBY] button. To turn it for the very first time.... If you have , see "Changing the Input Display" on page 49. ■ Have you connected an Onkyo MD recorder, ...
...to an HDMI input, HDMI component video input, or digital audio input? Turning On the AV Receiver/AV Amplifier STANDBY/ON STANDBY indicator ON/STANDBY RECEIVER Turning On and Standby AV receiver/ AV amplifier Remote controller or Press the [ON/STANDBY] button. To turn it for the very first time.... If you have , see "Changing the Input Display" on page 49. ■ Have you connected an Onkyo MD recorder, ...

Owner Manual
Page 47
...the appropriate external input is changed, all radio presets are used in your area. 9kHz: Select if 9 kHz steps are deleted. 1 Press the [RECEIVER] button, followed by using its [SETUP] button, arrow buttons, and [ENTER] button. 2 Use the Up and Down [R]/[X] but - The ..."Tuner" menu appears. 7-3. Note: This procedure can also be performed on your area. Remote Control 2. HDMI 3 Use the Up and Down [R]/[X] but - Note that when this setting is selected on the AV receiver/AV amplifier by the [SETUP] button. The main menu appears onscreen. tons to select "3.
...the appropriate external input is changed, all radio presets are used in your area. 9kHz: Select if 9 kHz steps are deleted. 1 Press the [RECEIVER] button, followed by using its [SETUP] button, arrow buttons, and [ENTER] button. 2 Use the Up and Down [R]/[X] but - The ..."Tuner" menu appears. 7-3. Note: This procedure can also be performed on your area. Remote Control 2. HDMI 3 Use the Up and Down [R]/[X] but - Note that when this setting is selected on the AV receiver/AV amplifier by the [SETUP] button. The main menu appears onscreen. tons to select "3.
Owner Manual
Page 54
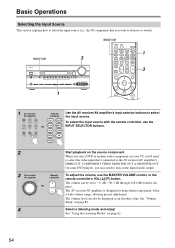
..., −81.5 dB through +18.0 dB (relative dis- MULTI CH 1 MULTI CH 3 3 1 1 AV receiver/ AV amplifier Remote controller Use the AV receiver/AV amplifier's input selector buttons to turn on the digital audio output. To adjust the volume, use the or INPUT SELECTOR buttons. 2 3 AV receiver/ AV amplifier Remote controller or 4 Start playback on page 89. Select a listening mode and enjoy! On some...
..., −81.5 dB through +18.0 dB (relative dis- MULTI CH 1 MULTI CH 3 3 1 1 AV receiver/ AV amplifier Remote controller Use the AV receiver/AV amplifier's input selector buttons to turn on the digital audio output. To adjust the volume, use the or INPUT SELECTOR buttons. 2 3 AV receiver/ AV amplifier Remote controller or 4 Start playback on page 89. Select a listening mode and enjoy! On some...
Owner Manual
Page 55
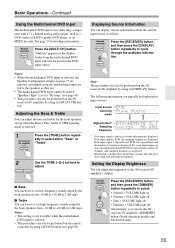
... DVD input is selected. • This procedure can also be performed on the remote controller by using [AUDIO] button (see page 45). • This procedure can also be performed on the AV receiver/AV amplifier by using its [MULTI CH] button. Remote controller Press the [MULTI CH] button. Notes: • This setting is not available...Input source Listening mode Signal format* Sampling frequency * If the input signal is analog, no format information is displayed. Alternatively, you can use the AV receiver/AV amplifier's [DIMMER] button (North American models and TX-SA706 only). 55
... DVD input is selected. • This procedure can also be performed on the remote controller by using [AUDIO] button (see page 45). • This procedure can also be performed on the AV receiver/AV amplifier by using its [MULTI CH] button. Remote controller Press the [MULTI CH] button. Notes: • This setting is not available...Input source Listening mode Signal format* Sampling frequency * If the input signal is analog, no format information is displayed. Alternatively, you can use the AV receiver/AV amplifier's [DIMMER] button (North American models and TX-SA706 only). 55
Owner Manual
Page 57
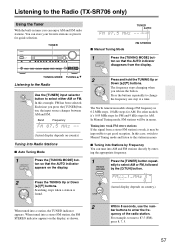
...the display, as presets for quick selection. The North American models change the frequency one step at a time. Listening to the Radio (TX-SR706 only) Using the Tuner With the built-in tuner you press the [TUNER] button, the input source changes between AM and FM. ... favorite stations as shown. (Actual display depends on country) Tuning into AM and FM stations directly by entering the appropriate frequency. 1 Remote controller Press the [TUNER] button repeatedly to enter the frequency of the radio station. The frequency stops changing when you release the button. ...
...the display, as presets for quick selection. The North American models change the frequency one step at a time. Listening to the Radio (TX-SR706 only) Using the Tuner With the built-in tuner you press the [TUNER] button, the input source changes between AM and FM. ... favorite stations as shown. (Actual display depends on country) Tuning into AM and FM stations directly by entering the appropriate frequency. 1 Remote controller Press the [TUNER] button repeatedly to enter the frequency of the radio station. The frequency stops changing when you release the button. ...
Owner Manual
Page 58
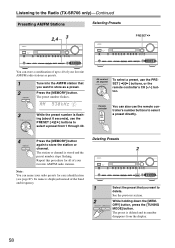
...the band and frequency. Remote controller You can also use the remote controller's number buttons to select a preset directly. 4 Press the [MEMORY] button again to select a preset from the display. 58 ORY] button, press the [TUNING MODE] button. AV receiver/ AV amplifier To select a ...preset. 2 Press the [MEMORY] button. ing (about 8 seconds), use the PRESET [F]/[S] buttons, or the remote controller's CH [+/-] button. Listening to the Radio (TX-SR706 only)-Continued Presetting AM/FM Stations Selecting Presets 2,4 3 PRESET You can store a combination of up to 40...
...the band and frequency. Remote controller You can also use the remote controller's number buttons to select a preset directly. 4 Press the [MEMORY] button again to select a preset from the display. 58 ORY] button, press the [TUNING MODE] button. AV receiver/ AV amplifier To select a ...preset. 2 Press the [MEMORY] button. ing (about 8 seconds), use the PRESET [F]/[S] buttons, or the remote controller's CH [+/-] button. Listening to the Radio (TX-SR706 only)-Continued Presetting AM/FM Stations Selecting Presets 2,4 3 PRESET You can store a combination of up to 40...

Owner Manual
Page 62
...see "Displaying Source Information" on page 55. • While a pair of the input signal. Pressing this mode is selected, the AV receiver/AV amplifier's display is connected, you can select depends on the format of headphones is turned off and only video signals input through HDMI IN... Listening Modes See "About the Listening Modes" on page 69 for use with the Remote Controller MUSIC MOVIE/TV GAME THX Press the [RECEIVER] button, and then press the LISTENING MODE button repeatedly to the AV receiver/AV amplifier with a digital audio connection (coaxial, optical, or HDMI). • The...
...see "Displaying Source Information" on page 55. • While a pair of the input signal. Pressing this mode is selected, the AV receiver/AV amplifier's display is connected, you can select depends on the format of headphones is turned off and only video signals input through HDMI IN... Listening Modes See "About the Listening Modes" on page 69 for use with the Remote Controller MUSIC MOVIE/TV GAME THX Press the [RECEIVER] button, and then press the LISTENING MODE button repeatedly to the AV receiver/AV amplifier with a digital audio connection (coaxial, optical, or HDMI). • The...
Owner Manual
Page 69
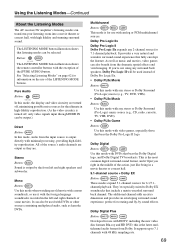
Button: The LISTENING MODE button illustration shows the remote controller buttons with DVDs that bear the Dolby Digital logo, and Dolby Digital TV broadcasts. Dolby Pro Logic IIx Dolby Pro Logic II Dolby Pro Logic ... disc formats Blu-ray and HD DVD, this mode, the display and video circuitry are . Using the Listening Modes-Continued About the Listening Modes The AV receiver/AV amplifier's listening modes can transform your listening room into a movie theater or concert hall, with DVDs or other sources containing multiplexed audio, such as karaoke...
Button: The LISTENING MODE button illustration shows the remote controller buttons with DVDs that bear the Dolby Digital logo, and Dolby Digital TV broadcasts. Dolby Pro Logic IIx Dolby Pro Logic II Dolby Pro Logic ... disc formats Blu-ray and HD DVD, this mode, the display and video circuitry are . Using the Listening Modes-Continued About the Listening Modes The AV receiver/AV amplifier's listening modes can transform your listening room into a movie theater or concert hall, with DVDs or other sources containing multiplexed audio, such as karaoke...
Owner Manual
Page 72
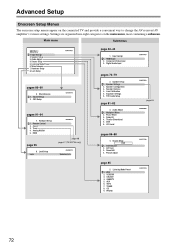
... 98 page 47 (TX-SR706 only) Unlocked page 42-44 1. Digital Audio Input pages 73-79 2. Speaker Settings 2. THX Audio Setup page 81-82 3. Dolby EX 4. Theater-Dimentional 5. LFE Level pages 86-88 4. IntelliVolume 2. A/V Sync 3. Listening Mode Preset 1. TUNER 8. PHONO 72 Lock Setup pages 89-90 6. Remote Control 2. Level Calibration 5...., most containing a submenu. Settings are organized into eight categories on the connected TV and provide a convenient way to change the AV receiver/AV amplifier's various settings. Main menu Submenus MENU 1. Zone2 3. TAPE 7.
... 98 page 47 (TX-SR706 only) Unlocked page 42-44 1. Digital Audio Input pages 73-79 2. Speaker Settings 2. THX Audio Setup page 81-82 3. Dolby EX 4. Theater-Dimentional 5. LFE Level pages 86-88 4. IntelliVolume 2. A/V Sync 3. Listening Mode Preset 1. TUNER 8. PHONO 72 Lock Setup pages 89-90 6. Remote Control 2. Level Calibration 5...., most containing a submenu. Settings are organized into eight categories on the connected TV and provide a convenient way to change the AV receiver/AV amplifier's various settings. Main menu Submenus MENU 1. Zone2 3. TAPE 7.
Owner Manual
Page 79
...(i.e., wall). The volume at low volume. The main menu appears onscreen. Notes: • When the listening mode is selected. 1 Remote controller Press the [RECEIVER] button, followed by the Automatic Speaker Setup function (see page 49). Equalizer Settings 6. The "THX Audio Setup" screen appears. 2-6.... you can be performed on your surround back speakers. When the "Loudness Plus" is set to "On", it is selected on the AV receiver/AV amplifier by using a THX-certified subwoofer, set the THX Loudness Plus. The "Speaker Setup" menu appears. 2. Advanced Setup-Continued 6 ...
...(i.e., wall). The volume at low volume. The main menu appears onscreen. Notes: • When the listening mode is selected. 1 Remote controller Press the [RECEIVER] button, followed by the Automatic Speaker Setup function (see page 49). Equalizer Settings 6. The "THX Audio Setup" screen appears. 2-6.... you can be performed on your surround back speakers. When the "Loudness Plus" is set to "On", it is selected on the AV receiver/AV amplifier by using a THX-certified subwoofer, set the THX Loudness Plus. The "Speaker Setup" menu appears. 2. Advanced Setup-Continued 6 ...
Owner Manual
Page 81
... tons to select the settings, and use the Left and Right [F]/[S] buttons to set listening mode-related settings and functions. 1 Remote controller Press the [RECEIVER] button followed by using the Dolby Pro Logic II Music or Dolby Pro Logic IIx Music listening mode. The settings are output... The main menu appears onscreen. tons to select audio channels or languages with multiplex sources, multilingual TV broadcasts, and so on the AV receiver/AV amplifier by the [SETUP] button. tons to be performed on . PLIIx/Neo:6 Music Mode Settings ■ PLIIx Music (2ch ...
... tons to select the settings, and use the Left and Right [F]/[S] buttons to set listening mode-related settings and functions. 1 Remote controller Press the [RECEIVER] button followed by using the Dolby Pro Logic II Music or Dolby Pro Logic IIx Music listening mode. The settings are output... The main menu appears onscreen. tons to select audio channels or languages with multiplex sources, multilingual TV broadcasts, and so on the AV receiver/AV amplifier by the [SETUP] button. tons to be performed on . PLIIx/Neo:6 Music Mode Settings ■ PLIIx Music (2ch ...
Owner Manual
Page 83
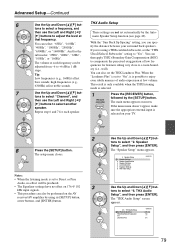
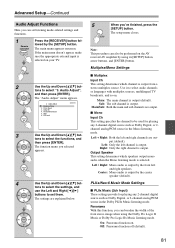
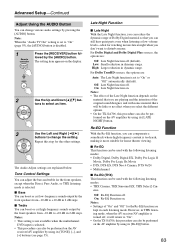
... that you select the different options. • On the TX-SA706, this procedure can also be performed on the AV amplifier by using its [TONE], [-], and [+] buttons (see page 55). However, in THX listening mode, when the AV receiver/AV amplifier is selected. ■ Bass You can boost or...Using the AUDIO Button You can change the setting. The Audio Adjust settings are : Auto: The Late Night function is disabled. 1 Remote controller Press the [RECEIVER] button followed by pressing the [AUDIO] button. For Dolby Digital and Dolby Digital Plus sources, the options are playing and the ...
... that you select the different options. • On the TX-SA706, this procedure can also be performed on the AV amplifier by using its [TONE], [-], and [+] buttons (see page 55). However, in THX listening mode, when the AV receiver/AV amplifier is selected. ■ Bass You can boost or...Using the AUDIO Button You can change the setting. The Audio Adjust settings are : Auto: The Late Night function is disabled. 1 Remote controller Press the [RECEIVER] button followed by pressing the [AUDIO] button. For Dolby Digital and Dolby Digital Plus sources, the options are playing and the ...


