Owner Manual
Page 1
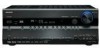
.... Please read this manual will enable you for future reference. Please retain this manual for purchasing an Onkyo AV Receiver/ AV Amplifier. AV Receiver TX-SR706 AV Amplifier TX-SA706 Instruction Manual Thank you to obtain optimum performance and listening enjoyment from your new AV Receiver/ AV Amplifier. Contents Introduction 2 Connections 17 First Time Setup 41 Basic Operations 54 Using the Listening Modes...
.... Please read this manual will enable you for future reference. Please retain this manual for purchasing an Onkyo AV Receiver/ AV Amplifier. AV Receiver TX-SR706 AV Amplifier TX-SA706 Instruction Manual Thank you to obtain optimum performance and listening enjoyment from your new AV Receiver/ AV Amplifier. Contents Introduction 2 Connections 17 First Time Setup 41 Basic Operations 54 Using the Listening Modes...

Owner Manual
Page 5
...controller & two batteries (AA/R6) Speaker setup microphone Indoor FM antenna (TX-SR706 only) * Power-plug adapter Only supplied in certain countries. Use this adapter if your AC outlet does not match with the plug on the AV receiver/AV amplifier's power cord (adapter varies from country to mount the AC plug...: AM loop antenna (TX-SR706 only) * In catalogs and on packaging, the letter at the end of color. Specifications ...
...controller & two batteries (AA/R6) Speaker setup microphone Indoor FM antenna (TX-SR706 only) * Power-plug adapter Only supplied in certain countries. Use this adapter if your AC outlet does not match with the plug on the AV receiver/AV amplifier's power cord (adapter varies from country to mount the AC plug...: AM loop antenna (TX-SR706 only) * In catalogs and on packaging, the letter at the end of color. Specifications ...
Owner Manual
Page 7
...Controller 14 Controlling the AV Receiver/AV Amplifier 15 About Home Theater 16 Enjoying Home Theater 16 Connections Connecting the AV Receiver/AV Amplifier 17 Connecting Your Speakers 17 Bi-amping the Front Speakers 19 Connecting Antenna (TX-SR706 only 20 About AV Connections 22 Connecting ... Other Components Controlling Other Components 102 Preprogrammed Remote Control Codes 102 Entering Remote Control Codes 102 Remote Control Codes for Onkyo Components Connected via V 103 Resetting REMOTE MODE Buttons 103 Resetting the Remote Controller 103 Controlling a TV 104 Controlling ...
...Controller 14 Controlling the AV Receiver/AV Amplifier 15 About Home Theater 16 Enjoying Home Theater 16 Connections Connecting the AV Receiver/AV Amplifier 17 Connecting Your Speakers 17 Bi-amping the Front Speakers 19 Connecting Antenna (TX-SR706 only 20 About AV Connections 22 Connecting ... Other Components Controlling Other Components 102 Preprogrammed Remote Control Codes 102 Entering Remote Control Codes 102 Remote Control Codes for Onkyo Components Connected via V 103 Resetting REMOTE MODE Buttons 103 Resetting the Remote Controller 103 Controlling a TV 104 Controlling ...

Owner Manual
Page 8
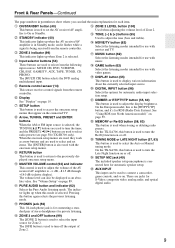
Front & Rear Panels Front Panel TX-SR706 North American model 1 2 3 45 6 7 8 9 bk bl bm bn bo bp bqbrbs btck clcmcn co cp TX-SR706 other than North American model cl TX-SA706 clcmcn 8
Front & Rear Panels Front Panel TX-SR706 North American model 1 2 3 45 6 7 8 9 bk bl bm bn bo bp bqbrbs btck clcmcn co cp TX-SR706 other than North American model cl TX-SA706 clcmcn 8
Owner Manual
Page 9
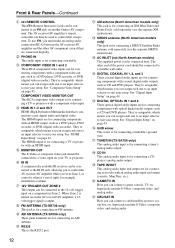
... presets. Z AUX INPUT This input can also be used to set items. The [ENTER] button is also used to turn off the output of the AV receiver/AV amplifier to turn the Re-EQ function on or off . The [OFF] button is used with music. G Display See "Display" on . R MUSIC button... This button is used , they work as an absolute value. When the onscreen setup menus are used to select radio presets (see page 58) (TX-SR706 only). J RETURN button This button is used to return to display various information about the currently selected input source. K MASTER VOLUME control (54)...
... presets. Z AUX INPUT This input can also be used to set items. The [ENTER] button is also used to turn off the output of the AV receiver/AV amplifier to turn the Re-EQ function on or off . The [OFF] button is used with music. G Display See "Display" on . R MUSIC button... This button is used , they work as an absolute value. When the onscreen setup menus are used to select radio presets (see page 58) (TX-SR706 only). J RETURN button This button is used to return to display various information about the currently selected input source. K MASTER VOLUME control (54)...

Owner Manual
Page 10
...): Lights up when Powered Zone 2 is selected for speakers that supports RDS (Radio Data System). No box appears for AM or FM radio. E Tuning indicators (TX-SR706 only) (57) RDS (not North American model) (59): Lights up when tuned to a radio station. Goes off when Manual Tuning mode is muted. 10 TUNED... a stereo FM station. G Audyssey indicator (49, 78) Flashes during automatic speaker setup. K Volume level (54) Displays the volume level. L MUTING indicator (56) Flashes while the AV receiver/AV amplifier is selected.
...): Lights up when Powered Zone 2 is selected for speakers that supports RDS (Radio Data System). No box appears for AM or FM radio. E Tuning indicators (TX-SR706 only) (57) RDS (not North American model) (59): Lights up when tuned to a radio station. Goes off when Manual Tuning mode is muted. 10 TUNED... a stereo FM station. G Audyssey indicator (49, 78) Flashes during automatic speaker setup. K Volume level (54) Displays the volume level. L MUTING indicator (56) Flashes while the AV receiver/AV amplifier is selected.

Owner Manual
Page 11
Front & Rear Panels-Continued Rear Panel TX-SR706 North American model 1 23 4 567 8 9bkblbm bobpbq bs bt ck cl cm cn co cp cq cr TX-SR706 other than North American model 1 23 4 567 8 9bk bn bobpbq bs bt ck cl cm cn co cp cq cr TX-SA706 1 23 4 567 bk bn bobpbq brbs bt ck cl cm cn co cp cq cr 11
Front & Rear Panels-Continued Rear Panel TX-SR706 North American model 1 23 4 567 8 9bkblbm bobpbq bs bt ck cl cm cn co cp cq cr TX-SR706 other than North American model 1 23 4 567 8 9bk bn bobpbq bs bt ck cl cm cn co cp cq cr TX-SA706 1 23 4 567 bk bn bobpbq brbs bt ck cl cm cn co cp cq cr 11
Owner Manual
Page 12
... Here you 're in Zone 2, or control it when it's out of the power cord should be connected to a video input on another Onkyo AV component. D COMPONENT VIDEO IN 1 and 2 These RCA component video inputs are for connecting components with a component video output, such as CD ... audio and digital video. G IR IN A commercially available IR receiver can be connected to the IR IN jack, allowing you to control the AV receiver/AV amplifier while you can connect a cable/satellite receiver, settop box, etc. I FM ANTENNA (TX-SR706 only) This jack is for connecting a recorder with coaxial digital...
... Here you 're in Zone 2, or control it when it's out of the power cord should be connected to a video input on another Onkyo AV component. D COMPONENT VIDEO IN 1 and 2 These RCA component video inputs are for connecting components with a component video output, such as CD ... audio and digital video. G IR IN A commercially available IR receiver can be connected to the IR IN jack, allowing you to control the AV receiver/AV amplifier while you can connect a cable/satellite receiver, settop box, etc. I FM ANTENNA (TX-SR706 only) This jack is for connecting a recorder with coaxial digital...
Owner Manual
Page 15
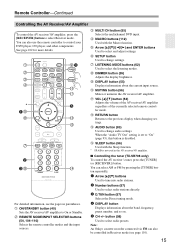
...parentheses. B ON/STANDBY button (40) Sets the AV receiver/AV amplifier to control your DVD player, CD player, and other components. E MACRO buttons (112) Used with the Sleep function. * SP A/B is disabled. M RETURN button Returns to change settings. Note: An Onkyo cassette recorder connected via V can also use the... 104-110) Selects the remote controller modes and the input sources. H LISTENING MODE buttons (62) Used to "On" (page 93), this AV receiver/AV amplifier. ■ Controlling the tuner (TX-SR706 only) To control the AV receiver's tuner, press the [TUNER] (or...
...parentheses. B ON/STANDBY button (40) Sets the AV receiver/AV amplifier to control your DVD player, CD player, and other components. E MACRO buttons (112) Used with the Sleep function. * SP A/B is disabled. M RETURN button Returns to change settings. Note: An Onkyo cassette recorder connected via V can also use the... 104-110) Selects the remote controller modes and the input sources. H LISTENING MODE buttons (62) Used to "On" (page 93), this AV receiver/AV amplifier. ■ Controlling the tuner (TX-SR706 only) To control the AV receiver's tuner, press the [TUNER] (or...
Owner Manual
Page 20
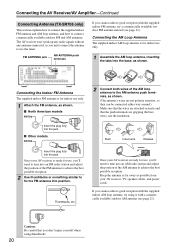
... best possible reception. 2 Use thumbtacks or something similar to connect commercially available outdoor FM and AM antennas. Connecting the AV Receiver/AV Amplifier-Continued Connecting Antenna (TX-SR706 only) This section explains how to connect the supplied indoor FM antenna and AM loop antenna, and how to fix... the FM antenna into position. The AV receiver won't pick up any radio signals without any antenna connected, so you 'll need ...
... best possible reception. 2 Use thumbtacks or something similar to connect commercially available outdoor FM and AM antennas. Connecting the AV Receiver/AV Amplifier-Continued Connecting Antenna (TX-SR706 only) This section explains how to connect the supplied indoor FM antenna and AM loop antenna, and how to fix... the FM antenna into position. The AV receiver won't pick up any radio signals without any antenna connected, so you 'll need ...
Owner Manual
Page 37
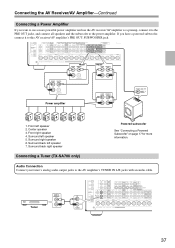
... 3. Surround left speaker 7. AUDIO OUTPUT L L R R Tuner 37 Power amplifier 1234567 1. Surround back left speaker 5. Connecting the AV Receiver/AV Amplifier-Continued Connecting a Power Amplifier If you have a powered subwoofer, connect it to the PRE OUT jacks, and connect all speakers and... 4. Surround back right speaker Connecting a Tuner (TX-SA706 only) Powered subwoofer See "Connecting a Powered Subwoofer" on page 17 for more powerful power amplifier and use the AV receiver/AV amplifier as a preamp, connect it to the AV amplifier's TUNER IN L/R jacks with an audio ...
... 3. Surround left speaker 7. AUDIO OUTPUT L L R R Tuner 37 Power amplifier 1234567 1. Surround back left speaker 5. Connecting the AV Receiver/AV Amplifier-Continued Connecting a Power Amplifier If you have a powered subwoofer, connect it to the PRE OUT jacks, and connect all speakers and... 4. Surround back right speaker Connecting a Tuner (TX-SA706 only) Powered subwoofer See "Connecting a Powered Subwoofer" on page 17 for more powerful power amplifier and use the AV receiver/AV amplifier as a preamp, connect it to the AV amplifier's TUNER IN L/R jacks with an audio ...
Owner Manual
Page 42
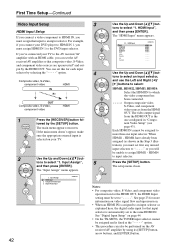
..., S-Video, and component video upconversion for the HDMI OUT, the HDMI Input setting must assign that input to an input selector. You can set the AV receiver/AV amplifier so that input selector is the one input selector. Input Assign 1. Component Video Input 3. Digital Audio Input 42 3 Use the Up and Down...video sources from the HDMI OUT is automatically set to the same HDMI IN. See "Digital Input Setup" on page 44. • On the TX-SR706, the TUNER input selector cannot be assigned and is fixed at the option. • This procedure can also be performed on video signal flow ...
..., S-Video, and component video upconversion for the HDMI OUT, the HDMI Input setting must assign that input to an input selector. You can set the AV receiver/AV amplifier so that input selector is the one input selector. Input Assign 1. Component Video Input 3. Digital Audio Input 42 3 Use the Up and Down...video sources from the HDMI OUT is automatically set to the same HDMI IN. See "Digital Input Setup" on page 44. • On the TX-SR706, the TUNER input selector cannot be assigned and is fixed at the option. • This procedure can also be performed on video signal flow ...

Owner Manual
Page 43
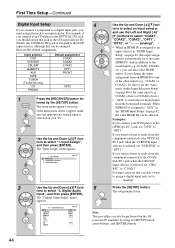
...Up and Down [R]/[X] but - The main menu appears onscreen. If the main menu doesn't appear, make sure the appropriate external input is selected on the AV receiver/AV amplifier by the [SETUP] button. Input Assign 1. HDMI Input 2. tons to select an input selector, and then use the Left and Right [F]/[S] buttons... VIDEO IN, you must assign it to the DVD input selector. Input selector DVD VCR/DVR CBL/SAT GAME/TV AUX TAPE TUNER (TX-SA706 only) CD PHONO Default assignment IN1 ----IN2 1 Press the [RECEIVER] button fol- IN2: Select if the video component is connected to COMPO-
...Up and Down [R]/[X] but - The main menu appears onscreen. If the main menu doesn't appear, make sure the appropriate external input is selected on the AV receiver/AV amplifier by the [SETUP] button. Input Assign 1. HDMI Input 2. tons to select an input selector, and then use the Left and Right [F]/[S] buttons... VIDEO IN, you must assign it to the DVD input selector. Input selector DVD VCR/DVR CBL/SAT GAME/TV AUX TAPE TUNER (TX-SA706 only) CD PHONO Default assignment IN1 ----IN2 1 Press the [RECEIVER] button fol- IN2: Select if the video component is connected to COMPO-
Owner Manual
Page 44
...IN to one of the other inputs (e.g., COAX1 or COAX2), be changed. Input selector DVD VCR/DVR CBL/SAT GAME/TV AUX TAPE TUNER (TX-SA706 only) CD PHONO Default assignment COAX1 COAX2 COAX3 OPT1 FRONT ----- ----- If the main menu doesn't appear, make sure the appropriate external ... from the component connected to "OPT2". If you want to assign a digital input jack, set to "AUX" in "HDMI Input Setup" on the AV receiver/AV amplifier by the [SETUP] button. Note: This procedure can also be selected. First Time Setup-Continued Digital Input Setup If you connect a component to ...
...IN to one of the other inputs (e.g., COAX1 or COAX2), be changed. Input selector DVD VCR/DVR CBL/SAT GAME/TV AUX TAPE TUNER (TX-SA706 only) CD PHONO Default assignment COAX1 COAX2 COAX3 OPT1 FRONT ----- ----- If the main menu doesn't appear, make sure the appropriate external ... from the component connected to "OPT2". If you want to assign a digital input jack, set to "AUX" in "HDMI Input Setup" on the AV receiver/AV amplifier by the [SETUP] button. Note: This procedure can also be selected. First Time Setup-Continued Digital Input Setup If you connect a component to ...
Owner Manual
Page 55
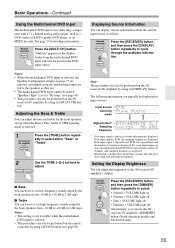
...of channels is displayed. Information is displayed for hookup information. Setting the Display Brightness You can also be performed on the AV receiver/AV amplifier by using its [DISPLAY] button. Alternatively, you can display various information about three seconds, then the previously displayed... page 27 for about the current input source as follows. Displaying Source Information You can use the AV receiver/AV amplifier's [DIMMER] button (North American models and TX-SA706 only). 55 Notes: • While the multichannel DVD input is selected, the Speaker Configuration ...
...of channels is displayed. Information is displayed for hookup information. Setting the Display Brightness You can also be performed on the AV receiver/AV amplifier by using its [DISPLAY] button. Alternatively, you can display various information about three seconds, then the previously displayed... page 27 for about the current input source as follows. Displaying Source Information You can use the AV receiver/AV amplifier's [DIMMER] button (North American models and TX-SA706 only). 55 Notes: • While the multichannel DVD input is selected, the Speaker Configuration ...
Owner Manual
Page 57
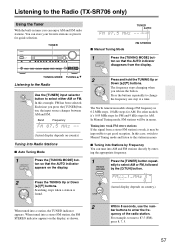
... Tuning mode, FM stations will be impossible to get good reception. For example, to tune to select either AM or FM. Listening to the Radio (TX-SR706 only) Using the Tuner With the built-in tuner you can tune into AM and FM stations directly by entering the appropriate frequency. 1 Remote controller...
... Tuning mode, FM stations will be impossible to get good reception. For example, to tune to select either AM or FM. Listening to the Radio (TX-SR706 only) Using the Tuner With the built-in tuner you can tune into AM and FM stations directly by entering the appropriate frequency. 1 Remote controller...
Owner Manual
Page 58
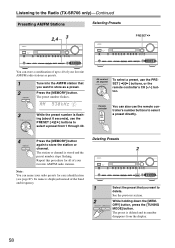
The preset number flashes. 3 While the preset number is stored and the preset number stops flashing. The station or channel is flash- AV receiver/ AV amplifier To select a preset, use the remote controller's number buttons to select a preset directly. 4 Press the [MEMORY] button again ...preset is displayed instead of your favorite AM/FM radio stations. ORY] button, press the [TUNING MODE] button. Listening to the Radio (TX-SR706 only)-Continued Presetting AM/FM Stations Selecting Presets 2,4 3 PRESET You can store a combination of up to 40 of your favorite AM/FM radio...
The preset number flashes. 3 While the preset number is stored and the preset number stops flashing. The station or channel is flash- AV receiver/ AV amplifier To select a preset, use the remote controller's number buttons to select a preset directly. 4 Press the [MEMORY] button again ...preset is displayed instead of your favorite AM/FM radio stations. ORY] button, press the [TUNING MODE] button. Listening to the Radio (TX-SR706 only)-Continued Presetting AM/FM Stations Selecting Presets 2,4 3 PRESET You can store a combination of up to 40 of your favorite AM/FM radio...

Owner Manual
Page 59
RDS stands for 3 seconds. The AV receiver supports four types of RDS information: PS (Program Service) When tuned to search for RDS ...allows you find radio stations by the European Broadcasting Union (EBU) and is weak, RDS data may be shown on the AV receiver may not be displayed intermittently or not at all. This is not a malfunction. • If the signal from an RDS... to an RDS station that broadcast traffic information (see page 60). Listening to the Radio (TX-SR706 only)-Continued Using RDS (not North American model) RDS only works in areas where RDS broadcasts are...
RDS stands for 3 seconds. The AV receiver supports four types of RDS information: PS (Program Service) When tuned to search for RDS ...allows you find radio stations by the European Broadcasting Union (EBU) and is weak, RDS data may be shown on the AV receiver may not be displayed intermittently or not at all. This is not a malfunction. • If the signal from an RDS... to an RDS station that broadcast traffic information (see page 60). Listening to the Radio (TX-SR706 only)-Continued Using RDS (not North American model) RDS only works in areas where RDS broadcasts are...

Owner Manual
Page 60
...RT/PTY/TP] button once. The RT information scrolls across the display. Notes: • The message "Waiting" may appear while the AV receiver waits for the RT information. • If the message "No Text Data" appears on the display, and traffic news will be displayed.... 2 To locate a station that is broadcast- cast. The AV receiver searches until it finds a station of program you want to listen to is available. The AV receiver searches until it 's broad- Listening to the Radio (TX-SR706 only)-Continued When tuned to an RDS station that's broadcasting text ...
...RT/PTY/TP] button once. The RT information scrolls across the display. Notes: • The message "Waiting" may appear while the AV receiver waits for the RT information. • If the message "No Text Data" appears on the display, and traffic news will be displayed.... 2 To locate a station that is broadcast- cast. The AV receiver searches until it finds a station of program you want to listen to is available. The AV receiver searches until it 's broad- Listening to the Radio (TX-SR706 only)-Continued When tuned to an RDS station that's broadcasting text ...
Owner Manual
Page 72
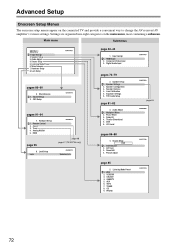
...88 4. Name Edit 4. DVD 2. VCR/DVR 3. Audio Adjust 4. Listening Mode Preset 6. Volume Setup 2. Lock Setup Lock page 98 page 47 (TX-SR706 only) Unlocked page 42-44 1. Speaker Settings 2. Level Calibration 5. Listening Mode Preset 1. CBL/SAT 4. AUX 6. TAPE 7. PHONO 72 Input ...main menu, most containing a submenu. Settings are organized into eight categories on the connected TV and provide a convenient way to change the AV receiver/AV amplifier's various settings. Speaker Setup 3. Source Setup 5. Hardware Setup 8. Tuner 4. Analog Multich 5. Input Assign 1. HDMI Input 2. ...
...88 4. Name Edit 4. DVD 2. VCR/DVR 3. Audio Adjust 4. Listening Mode Preset 6. Volume Setup 2. Lock Setup Lock page 98 page 47 (TX-SR706 only) Unlocked page 42-44 1. Speaker Settings 2. Level Calibration 5. Listening Mode Preset 1. CBL/SAT 4. AUX 6. TAPE 7. PHONO 72 Input ...main menu, most containing a submenu. Settings are organized into eight categories on the connected TV and provide a convenient way to change the AV receiver/AV amplifier's various settings. Speaker Setup 3. Source Setup 5. Hardware Setup 8. Tuner 4. Analog Multich 5. Input Assign 1. HDMI Input 2. ...


