Owner Manual
Page 1
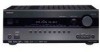
Following the instructions in the unit. Please retain this manual will enable you for future reference. AV Receiver TX-SR607 Instruction Manual Thank you to obtain optimum performance and listening enjoyment from your new AV Receiver. Contents Introduction 2 Connection 15 Turning On & First Time Setup .....38 Basic Operations 51 Using the Listening Modes ........62 Advanced Setup 69 Zone 2 85 Controlling Other Components ....89 Others 100 En Please read this manual thoroughly before making connections and plugging in this manual for purchasing an Onkyo AV Receiver.
Following the instructions in the unit. Please retain this manual will enable you for future reference. AV Receiver TX-SR607 Instruction Manual Thank you to obtain optimum performance and listening enjoyment from your new AV Receiver. Contents Introduction 2 Connection 15 Turning On & First Time Setup .....38 Basic Operations 51 Using the Listening Modes ........62 Advanced Setup 69 Zone 2 85 Controlling Other Components ....89 Others 100 En Please read this manual thoroughly before making connections and plugging in this manual for purchasing an Onkyo AV Receiver.

Owner Manual
Page 5
...bit DSP Processing x 2 Connections • 6 HDMI*3 Inputs (1 on front panel) and 1 Output • Onkyo for System Control • 4 Digital Inputs (2 Optical / 2 Coaxial) • Component Video Switching (2 Inputs...8226; Dual Subwoofer Pre Out • Banana Plug-Compatible Speaker Posts*4 • Powered Zone 2 • Bi-Amp Connectable for Loudness Correction • Audyssey Dynamic Volume™*7... U.S. Taxes and a onetime activation fee may apply. Service not available in receivers compatible with SBL/SBR Miscellaneous • 40 SIRIUS*6/AM/FM Presets (North American...
...bit DSP Processing x 2 Connections • 6 HDMI*3 Inputs (1 on front panel) and 1 Output • Onkyo for System Control • 4 Digital Inputs (2 Optical / 2 Coaxial) • Component Video Switching (2 Inputs...8226; Dual Subwoofer Pre Out • Banana Plug-Compatible Speaker Posts*4 • Powered Zone 2 • Bi-Amp Connectable for Loudness Correction • Audyssey Dynamic Volume™*7... U.S. Taxes and a onetime activation fee may apply. Service not available in receivers compatible with SBL/SBR Miscellaneous • 40 SIRIUS*6/AM/FM Presets (North American...

Owner Manual
Page 6
... back left and right speakers Left and right stereo speakers 6 Zone 2: In your main listening room, a stereo speaker system in a second room, or Zone 2, as Dolby and DTS (see pages 62-68). * While Powered Zone 2 is being used , playback is output by these speakers ...(page 86). Multiroom Capability You can use two speaker systems with Zone 2. Subwoofer Center speaker Zone 2 Room Surround left and right speakers * While Powered Zone 2 is being used , nothing is being used with this AV receiver-a surround-sound speaker system (up to 7.1-channel playback (see page ...
... back left and right speakers Left and right stereo speakers 6 Zone 2: In your main listening room, a stereo speaker system in a second room, or Zone 2, as Dolby and DTS (see pages 62-68). * While Powered Zone 2 is being used , playback is output by these speakers ...(page 86). Multiroom Capability You can use two speaker systems with Zone 2. Subwoofer Center speaker Zone 2 Room Surround left and right speakers * While Powered Zone 2 is being used , nothing is being used with this AV receiver-a surround-sound speaker system (up to 7.1-channel playback (see page ...

Owner Manual
Page 7
...Connecting an RI Dock 36 Connecting a Dock with the Universal Port connector 36 Connecting Onkyo V Components 37 Connecting the Power Cord 37 Turning On & First Time Setup Turning On the AV Receiver 38 Turning On and Standby 38 First Time Setup 39 Using the Onscreen Setup ... Setup 80 Hardware Setup 81 Lock Setup 83 Using the Video Settings 83 Digital Input Signal Formats 84 Zone 2 Zone 2 85 Connecting Zone 2 85 Setting the Powered Zone 2 86 Using Zone 2 87 Controlling Other Components Controlling Other Components 89 Preprogrammed Remote Control Codes 89 Looking up for Remote ...
...Connecting an RI Dock 36 Connecting a Dock with the Universal Port connector 36 Connecting Onkyo V Components 37 Connecting the Power Cord 37 Turning On & First Time Setup Turning On the AV Receiver 38 Turning On and Standby 38 First Time Setup 39 Using the Onscreen Setup ... Setup 80 Hardware Setup 81 Lock Setup 83 Using the Video Settings 83 Digital Input Signal Formats 84 Zone 2 Zone 2 85 Connecting Zone 2 85 Setting the Powered Zone 2 86 Using Zone 2 87 Controlling Other Components Controlling Other Components 89 Preprogrammed Remote Control Codes 89 Looking up for Remote ...

Owner Manual
Page 9
...This button is used to display various information about the currently selected input source. O SETUP button This button is for connecting a standard pair of the AV receiver to select from the following input sources: DVD/BD, VCR/DVR, CBL/SAT, GAME, AUX, TV/TAPE, TUNER, CD, PORT. J GAME button...24) Used to connect a portable Audio Player. The indicator lights up when Zone 2 is selected, the TUNING [R]/[X] buttons are used to tune the tuner, and the PRESET [F]/[S] buttons are used to select and set the AV receiver to access the onscreen setup menus that appear on page 56. F Remote ...
...This button is used to display various information about the currently selected input source. O SETUP button This button is for connecting a standard pair of the AV receiver to select from the following input sources: DVD/BD, VCR/DVR, CBL/SAT, GAME, AUX, TV/TAPE, TUNER, CD, PORT. J GAME button...24) Used to connect a portable Audio Player. The indicator lights up when Zone 2 is selected, the TUNING [R]/[X] buttons are used to tune the tuner, and the PRESET [F]/[S] buttons are used to select and set the AV receiver to access the onscreen setup menus that appear on page 56. F Remote ...

Owner Manual
Page 12
... L/R, CENTER, SURR L/R, and SURR BACK L/R speakers These terminal posts are for connecting the front high L/R speakers. The AV receiver's remote controller can assign each one to an input selector to connect the speakers in Zone 2. To use V, you can then be connected to bi-amp the front speakers. U FRONT HIGH L/R speakers These terminals... each one to an input selector to a powered subwoofer. Input jacks include composite video and analog audio. The same signal is connected here. See "Connecting Zone 2" on another Onkyo AV component.
... L/R, CENTER, SURR L/R, and SURR BACK L/R speakers These terminal posts are for connecting the front high L/R speakers. The AV receiver's remote controller can assign each one to an input selector to connect the speakers in Zone 2. To use V, you can then be connected to bi-amp the front speakers. U FRONT HIGH L/R speakers These terminals... each one to an input selector to a powered subwoofer. Input jacks include composite video and analog audio. The same signal is connected here. See "Connecting Zone 2" on another Onkyo AV component.

Owner Manual
Page 16
...that you 're using banana plugs, tighten the speaker ter- minal before inserting the banana plug. 16 LINE INPUT Connecting the AV Receiver Connecting Your Speakers Speaker Configuration For 7.1-channel surround-sound playback, you 're using only one surround back speaker, connect it to... you use dipole speakers for a really powerful and solid bass. Dipole speakers typically have . Speaker Color Front left, Zone 2 left White Front right, Zone 2 right Red Center Green Surround left Blue Surround right Gray Surround back left Brown Surround back right Tan Front high ...
...that you 're using banana plugs, tighten the speaker ter- minal before inserting the banana plug. 16 LINE INPUT Connecting the AV Receiver Connecting Your Speakers Speaker Configuration For 7.1-channel surround-sound playback, you 're using only one surround back speaker, connect it to... you use dipole speakers for a really powerful and solid bass. Dipole speakers typically have . Speaker Color Front left, Zone 2 left White Front right, Zone 2 right Red Center Green Surround left Blue Surround right Gray Surround back left Brown Surround back right Tan Front high ...

Owner Manual
Page 17
... SURR BACK L/R or FRONT HIGH L/R terminals. • Be careful not to negative (-) terminals. Doing so may damage the AV receiver. • Don't connect more , but less than one speaker to several terminals. FRONT HIGH L/R, ZONE 2 L/R (North American/Taiwan models) 1 Strip 3/8"-1/2" (10- 12 mm) of insulation from the wall outlet before making any of...
... SURR BACK L/R or FRONT HIGH L/R terminals. • Be careful not to negative (-) terminals. Doing so may damage the AV receiver. • Don't connect more , but less than one speaker to several terminals. FRONT HIGH L/R, ZONE 2 L/R (North American/Taiwan models) 1 Strip 3/8"-1/2" (10- 12 mm) of insulation from the wall outlet before making any of...

Owner Manual
Page 27
... that is connected to the MONITOR OUT V, or the COMPONENT VIDEO OUT, use the AV receiver's display when changing settings. • With connection a , you can listen to and record audio from your TV and listen in Zone 2. • To enjoy Dolby Digital and DTS, use connection b or c . ...(To record or listen in Zone 2 as well, use its tuner to listen to TV programs through the AV receiver (see page 42) TV, projector, etc. Connecting the AV Receiver-Continued Connecting a TV or Projector See "Connecting Components with HDMI" on a TV that ...
... that is connected to the MONITOR OUT V, or the COMPONENT VIDEO OUT, use the AV receiver's display when changing settings. • With connection a , you can listen to and record audio from your TV and listen in Zone 2. • To enjoy Dolby Digital and DTS, use connection b or c . ...(To record or listen in Zone 2 as well, use its tuner to listen to TV programs through the AV receiver (see page 42) TV, projector, etc. Connecting the AV Receiver-Continued Connecting a TV or Projector See "Connecting Components with HDMI" on a TV that ...

Owner Manual
Page 28
... OUT COAXIAL OUT Y PB PR COMPONENT VIDEO OUT L R AUDIO OUT VIDEO OUT Connect one or the other Connection c must connect the AV receiver to your DVD player has main left and right outputs and multichannel left and right outputs for HDMI connection information. Connecting the... AV Receiver-Continued Connecting a DVD Player See "Connecting Components with HDMI" on page 23 for connection a . You must be sure to and record audio from a DVD and listen in Zone 2. • To enjoy Dolby Digital and DTS, use ...
... OUT COAXIAL OUT Y PB PR COMPONENT VIDEO OUT L R AUDIO OUT VIDEO OUT Connect one or the other Connection c must connect the AV receiver to your DVD player has main left and right outputs and multichannel left and right outputs for HDMI connection information. Connecting the... AV Receiver-Continued Connecting a DVD Player See "Connecting Components with HDMI" on page 23 for connection a . You must be sure to and record audio from a DVD and listen in Zone 2. • To enjoy Dolby Digital and DTS, use ...

Owner Manual
Page 29
...and DTS, use connection b or c . (To listen in Zone 2 as well, use your VCR's tuner to listen to your TV has no audio outputs. Connecting the AV Receiver-Continued Connecting a VCR or DVD Recorder for Playback Hint! AV receiver COMPONENT VIDEO IN 2 (CBL/SAT) VCR/DVR IN V VCR...must be assigned (see page 41) OPTICAL OUT COAXIAL OUT Connect one or the other Connection b , c must connect the AV receiver to your favorite TV programs via the AV receiver, useful if your TV via the same type of connection. Step 2: Audio Connection Choose an audio connection that matches your ...
...and DTS, use connection b or c . (To listen in Zone 2 as well, use your VCR's tuner to listen to your TV has no audio outputs. Connecting the AV Receiver-Continued Connecting a VCR or DVD Recorder for Playback Hint! AV receiver COMPONENT VIDEO IN 2 (CBL/SAT) VCR/DVR IN V VCR...must be assigned (see page 41) OPTICAL OUT COAXIAL OUT Connect one or the other Connection b , c must connect the AV receiver to your favorite TV programs via the AV receiver, useful if your TV via the same type of connection. Step 2: Audio Connection Choose an audio connection that matches your ...
Owner Manual
Page 31
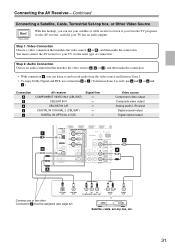
... To enjoy Dolby Digital and DTS, use connection b or c . (To listen in Zone 2 as well, use your satellite or cable receiver to listen to your TV has no audio outputs. Connecting the AV Receiver-Continued Connecting a Satellite, Cable, Terrestrial Set-top box, or Other Video Source Hint! ... VIDEO OUT Satellite, cable, set-top box, etc. 31 With this hookup, you can use a and b , or a and c .) Connection A B a b c AV receiver COMPONENT VIDEO IN 2 (CBL/SAT) CBL/SAT IN V CBL/SAT IN L/R DIGITAL IN COAXIAL 2 (CBL/SAT) DIGITAL IN OPTICAL 2 (CD) Signal flow Video source Component...
... To enjoy Dolby Digital and DTS, use connection b or c . (To listen in Zone 2 as well, use your satellite or cable receiver to listen to your TV has no audio outputs. Connecting the AV Receiver-Continued Connecting a Satellite, Cable, Terrestrial Set-top box, or Other Video Source Hint! ... VIDEO OUT Satellite, cable, set-top box, etc. 31 With this hookup, you can use a and b , or a and c .) Connection A B a b c AV receiver COMPONENT VIDEO IN 2 (CBL/SAT) CBL/SAT IN V CBL/SAT IN L/R DIGITAL IN COAXIAL 2 (CBL/SAT) DIGITAL IN OPTICAL 2 (CD) Signal flow Video source Component...

Owner Manual
Page 32
...and then make the connection. • With connection a , you can listen to your TV with the same type of connection. Connecting the AV Receiver-Continued Connecting a Game Console Step 1: Video Connection Choose a video connection that matches the game console ( a or b ), and then make ...the connection. You must connect the AV receiver to and record audio from the game console or listen in Zone 2. • To enjoy Dolby Digital and DTS, use connection b . (To record or listen in Zone 2 as well, use a and b .) Connection A B a b AV receiver COMPONENT VIDEO IN 2 (CBL/SAT) GAME...
...and then make the connection. • With connection a , you can listen to your TV with the same type of connection. Connecting the AV Receiver-Continued Connecting a Game Console Step 1: Video Connection Choose a video connection that matches the game console ( a or b ), and then make ...the connection. You must connect the AV receiver to and record audio from the game console or listen in Zone 2. • To enjoy Dolby Digital and DTS, use connection b . (To record or listen in Zone 2 as well, use a and b .) Connection A B a b AV receiver COMPONENT VIDEO IN 2 (CBL/SAT) GAME...

Owner Manual
Page 34
...OUTPUT L R AUDIO INPUT L AUDIO OUTPUT L R R Phono preamp MC head amp or MC transformer AUDIO OUTPUT L R AUDIO INPUT L R Connecting the AV Receiver-Continued Connecting a CD Player or Turntable ■ CD Player or Turntable (MM) with Built-in phono preamp. Connect one or the other Connection b must be... to and record audio from the CD player and listen in Zone 2. • To connect the CD player digitally, use connection b or c . (To record or listen in Zone 2 as well, use a and b , or a and c .) Connection a b c AV receiver CD IN L/R DIGITAL IN COAXIAL 1 (DVD/BD) DIGITAL IN...
...OUTPUT L R AUDIO INPUT L AUDIO OUTPUT L R R Phono preamp MC head amp or MC transformer AUDIO OUTPUT L R AUDIO INPUT L R Connecting the AV Receiver-Continued Connecting a CD Player or Turntable ■ CD Player or Turntable (MM) with Built-in phono preamp. Connect one or the other Connection b must be... to and record audio from the CD player and listen in Zone 2. • To connect the CD player digitally, use connection b or c . (To record or listen in Zone 2 as well, use a and b , or a and c .) Connection a b c AV receiver CD IN L/R DIGITAL IN COAXIAL 1 (DVD/BD) DIGITAL IN...

Owner Manual
Page 35
Connecting the AV Receiver-Continued Connecting a Cassette, CDR, MiniDisc, or DAT Recorder Step 1: Choose a connection that matches the recorder ( a , b or c ), and then make the connection. c OPTICAL IN 1 (GAME) b COAXIAL ... IN L R AUDIO OUT Cassette, CDR, MD, etc. • With connection a , you can play and record and listen in Zone 2. • To connect the recorder digitally for playback, use connections a and b , or a and c . Connection a b c AV receiver TV/TAPE IN L/R TV/TAPE OUT L/R DIGITAL IN COAXIAL 2 (CBL/SAT) DIGITAL IN OPTICAL 1 (GAME) Signal flow ⇐...
Connecting the AV Receiver-Continued Connecting a Cassette, CDR, MiniDisc, or DAT Recorder Step 1: Choose a connection that matches the recorder ( a , b or c ), and then make the connection. c OPTICAL IN 1 (GAME) b COAXIAL ... IN L R AUDIO OUT Cassette, CDR, MD, etc. • With connection a , you can play and record and listen in Zone 2. • To connect the recorder digitally for playback, use connections a and b , or a and c . Connection a b c AV receiver TV/TAPE IN L/R TV/TAPE OUT L/R DIGITAL IN COAXIAL 2 (CBL/SAT) DIGITAL IN OPTICAL 1 (GAME) Signal flow ⇐...

Owner Manual
Page 37
... cord into a wall outlet. Step 2: Make the V connection (see page 92). The supplied power cord is designed exclusively for use a power cord other Onkyo components. • While Zone 2 is connected to the AV receiver with an analog audio cable (connection a in the hookup examples) (see page 45). Always disconnect the power cord from the...
... cord into a wall outlet. Step 2: Make the V connection (see page 92). The supplied power cord is designed exclusively for use a power cord other Onkyo components. • While Zone 2 is connected to the AV receiver with an analog audio cable (connection a in the hookup examples) (see page 45). Always disconnect the power cord from the...

Owner Manual
Page 43
... to select: Normal: Select this setting cannot be used , the AV receiver is 4 ohms or more but - Speaker Settings Speaker Impedance Speaker Type Powered Zone 2 Surr Back/Front High 6ohms Normal Not Act Surr Back Powered Zone 2 See "Zone 2" on page 19. 5 Notes: • When bi-amping is... used if "Speaker Type" is selected on the AV receiver by the [SETUP] button. If the impedance...
... to select: Normal: Select this setting cannot be used , the AV receiver is 4 ohms or more but - Speaker Settings Speaker Impedance Speaker Type Powered Zone 2 Surr Back/Front High 6ohms Normal Not Act Surr Back Powered Zone 2 See "Zone 2" on page 19. 5 Notes: • When bi-amping is... used if "Speaker Type" is selected on the AV receiver by the [SETUP] button. If the impedance...

Owner Manual
Page 47
...speaker setup microphone during measurements as you would for three positions. Turn on "Setting the Powered Zone 2" (page 86). Do not hold the microphone in your TV is connected to which the AV receiver is connected. • It takes about 15 minutes to complete the room correction and speaker ...setup for enjoying movies. The speaker setting menu appears. 2EQ: Auto Setup Speaker Type Powered Zone 2 Surr Back/Front High Normal Not Act ...
...speaker setup microphone during measurements as you would for three positions. Turn on "Setting the Powered Zone 2" (page 86). Do not hold the microphone in your TV is connected to which the AV receiver is connected. • It takes about 15 minutes to complete the room correction and speaker ...setup for enjoying movies. The speaker setting menu appears. 2EQ: Auto Setup Speaker Type Powered Zone 2 Surr Back/Front High Normal Not Act ...

Owner Manual
Page 53
... The output is not available for about five seconds, then the previous display reappears. The sleep time can connect a pair of the AV receiver. Using Headphones You can be used with headphones (the listening modes available also depend on the display when the sleep timer has been set... connecting your headphones. • While the headphones plug is set to 10 minutes in the PHONES jack, the speakers are turned off. (The Powered Zone 2 speakers are not turned off automatically after a specified period. Notes: • Always turn off .) • When you need to select the ...
... The output is not available for about five seconds, then the previous display reappears. The sleep time can connect a pair of the AV receiver. Using Headphones You can be used with headphones (the listening modes available also depend on the display when the sleep timer has been set... connecting your headphones. • While the headphones plug is set to 10 minutes in the PHONES jack, the speakers are turned off. (The Powered Zone 2 speakers are not turned off automatically after a specified period. Notes: • Always turn off .) • When you need to select the ...

Owner Manual
Page 64
... or Surround back speakers outputs the sound is switched by the "SpLayout" setting on page 76. *3 If there are no surround back speakers, or Powered Zone 2 is being used, Dolby Pro Logic II is used. • Available sampling rate for PCM input signal is 32/44.1/48/88.2/96/176.4/192kHz...
... or Surround back speakers outputs the sound is switched by the "SpLayout" setting on page 76. *3 If there are no surround back speakers, or Powered Zone 2 is being used, Dolby Pro Logic II is used. • Available sampling rate for PCM input signal is 32/44.1/48/88.2/96/176.4/192kHz...


