
Owner Manual
Page 2
... to the presence of free space at the top and sides and 10 cm (4") at plugs, convenience receptacles, and the point where they may be set 10 cm (4") away from tip-over. 13. Important Safety Instructions 1. Do not block any way, and F. The wide blade or the third prong are covered...
... to the presence of free space at the top and sides and 10 cm (4") at plugs, convenience receptacles, and the point where they may be set 10 cm (4") away from tip-over. 13. Important Safety Instructions 1. Do not block any way, and F. The wide blade or the third prong are covered...

Owner Manual
Page 5
...of Audyssey Laboratories. *8. Taxes and a onetime activation fee may apply. Service not available in receivers compatible with the SIRIUS Satellite Radio System. Music Optimizer™ is a trademark of Onkyo Corporation. * Apple and iPod are trademarks or registered trademarks of Dolby Laboratories. *2. DTS is... to 100 ms) • On-Screen Display via HDMI • Aluminum Front Panel • Preprogrammed (with On-Screen Display Set-up) V-Compatible Remote *1. SIRIUS tuner required (sold separately. lems • Audyssey Dynamic EQ™*7 for Loudness Correction •...
...of Audyssey Laboratories. *8. Taxes and a onetime activation fee may apply. Service not available in receivers compatible with the SIRIUS Satellite Radio System. Music Optimizer™ is a trademark of Onkyo Corporation. * Apple and iPod are trademarks or registered trademarks of Dolby Laboratories. *2. DTS is... to 100 ms) • On-Screen Display via HDMI • Aluminum Front Panel • Preprogrammed (with On-Screen Display Set-up) V-Compatible Remote *1. SIRIUS tuner required (sold separately. lems • Audyssey Dynamic EQ™*7 for Loudness Correction •...

Owner Manual
Page 7
... Port connector 36 Connecting Onkyo V Components 37 Connecting the Power Cord 37 Turning On & First Time Setup Turning On the AV Receiver 38 Turning On and Standby 38 First Time Setup 39 Using the Onscreen Setup Menus 39 Using the Display to change the settings 39 Video Input Setup ... Basic Operations Basic Operations 51 Selecting the Input Source 51 Adjusting the Bass & Treble 52 Displaying Source Information 52 Setting the Display Brightness 52 Muting the AV receiver 53 Using the Sleep Timer 53 Using Headphones 53 Listening to the Radio 54 Using the Tuner 54 Presetting AM/...
... Port connector 36 Connecting Onkyo V Components 37 Connecting the Power Cord 37 Turning On & First Time Setup Turning On the AV Receiver 38 Turning On and Standby 38 First Time Setup 39 Using the Onscreen Setup Menus 39 Using the Display to change the settings 39 Video Input Setup ... Basic Operations Basic Operations 51 Selecting the Input Source 51 Adjusting the Bass & Treble 52 Displaying Source Information 52 Setting the Display Brightness 52 Muting the AV receiver 53 Using the Sleep Timer 53 Using Headphones 53 Listening to the Radio 54 Using the Tuner 54 Presetting AM/...

Owner Manual
Page 9
...PTY/TP] button, and it flashes while a signal is also used to adjust the tone (bass and treble) and the volume level of the AV receiver to connect a portable Audio Player. B ON/STANDBY button (38) This button is used to display various information about the currently selected input source...listening modes intended for each item. PORTABLE (33): Used to Min, 1 through 79 or Max. Pressing this mode is used to select and set the AV receiver to On or Standby. R MASTER VOLUME control (51) This control is selected, the TUNING [R]/[X] buttons are used to tune the tuner, and...
...PTY/TP] button, and it flashes while a signal is also used to adjust the tone (bass and treble) and the volume level of the AV receiver to connect a portable Audio Player. B ON/STANDBY button (38) This button is used to display various information about the currently selected input source...listening modes intended for each item. PORTABLE (33): Used to Min, 1 through 79 or Max. Pressing this mode is used to select and set the AV receiver to On or Standby. R MASTER VOLUME control (51) This control is selected, the TUNING [R]/[X] buttons are used to tune the tuner, and...

Owner Manual
Page 10
...(54): Lights up when the Sleep function has been set to a radio station that 's selected as the audio source: PCM, MULTI CH, or HDMI. F Message area Displays various information. C MUTING indicator (53) Flashes while the AV receiver is selected. B SLEEP indicator (53) Lights up ...when Auto Tuning mode is set . G Audio input indicators Indicate the type of audio input that supports RDS (Radio Data System). H ...
...(54): Lights up when the Sleep function has been set to a radio station that 's selected as the audio source: PCM, MULTI CH, or HDMI. F Message area Displays various information. C MUTING indicator (53) Flashes while the AV receiver is selected. B SLEEP indicator (53) Lights up ...when Auto Tuning mode is set . G Audio input indicators Indicate the type of audio input that supports RDS (Radio Data System). H ...

Owner Manual
Page 14
...AV Receiver To control the AV receiver, press the [RECEIVER] button to On or Standby. B ON/STANDBY button (38) Sets the AV receiver to select Receiver... mode. You can also use the remote controller to select the listening modes. B C 1D E F 2G H3 I MUTING button (53) Mutes or unmutes the AV receiver... display brightness. When the "Audio TV Out" setting is disabled. See page 91 for more details....set to change audio settings. L RETURN button Returns to change video settings. M AUDIO button (75) Used to the previous display when changing settings...
...AV Receiver To control the AV receiver, press the [RECEIVER] button to On or Standby. B ON/STANDBY button (38) Sets the AV receiver to select Receiver... mode. You can also use the remote controller to select the listening modes. B C 1D E F 2G H3 I MUTING button (53) Mutes or unmutes the AV receiver... display brightness. When the "Audio TV Out" setting is disabled. See page 91 for more details....set to change audio settings. L RETURN button Returns to change video settings. M AUDIO button (75) Used to the previous display when changing settings...

Owner Manual
Page 16
.... Powered subwoofer LINE INPUT For North American model • If you need seven speakers and a powered subwoofer. Connecting the AV Receiver Connecting Your Speakers Speaker Configuration For 7.1-channel surround-sound playback, you are using banana plugs, tighten the speaker ter- Dipole ...to set the speaker settings. Surround right speaker 7 8 7. The same signal is recommended for the surround left and right, surround back left and right and front high left speaker 10.Front high right speaker Connecting a Powered Subwoofer Using a suitable cable, connect the AV receiver's ...
.... Powered subwoofer LINE INPUT For North American model • If you need seven speakers and a powered subwoofer. Connecting the AV Receiver Connecting Your Speakers Speaker Configuration For 7.1-channel surround-sound playback, you are using banana plugs, tighten the speaker ter- Dipole ...to set the speaker settings. Surround right speaker 7 8 7. The same signal is recommended for the surround left and right, surround back left and right and front high left speaker 10.Front high right speaker Connecting a Powered Subwoofer Using a suitable cable, connect the AV receiver's ...

Owner Manual
Page 17
...terminals, and negative (-) terminals only to negative (-) terminals. Doing so may damage the AV receiver. • Don't connect one cable to each of the two surround speakers to the SURR L/R terminals. Doing so may be sure to set the minimum speaker impedance to "4ohms" (see page 43). Doing so may damage ...the AV receiver. • Make sure the metal core of the wire does not have contact with the...
...terminals, and negative (-) terminals only to negative (-) terminals. Doing so may damage the AV receiver. • Don't connect one cable to each of the two surround speakers to the SURR L/R terminals. Doing so may be sure to set the minimum speaker impedance to "4ohms" (see page 43). Doing so may damage ...the AV receiver. • Make sure the metal core of the wire does not have contact with the...

Owner Manual
Page 19
... speakers' tweeter terminals. • Once you've completed the bi-amping connections shown below and turned on the AV receiver, you must set the "Speaker Type" setting to "Bi-Amp" to the right speaker's positive (+) Tweeter (high) terminal. And connect the AV receiver's FRONT R negative (-) terminal to the right speaker's negative (-) Woofer (low) terminal. 2 Connect the...
... speakers' tweeter terminals. • Once you've completed the bi-amping connections shown below and turned on the AV receiver, you must set the "Speaker Type" setting to "Bi-Amp" to the right speaker's positive (+) Tweeter (high) terminal. And connect the AV receiver's FRONT R negative (-) terminal to the right speaker's negative (-) Woofer (low) terminal. 2 Connect the...

Owner Manual
Page 23
...input can be guaranteed. • Set "HDMI Control (RIHD)" to "On" (page 82). • See "Controlling a TV" (page 93) and "Controlling a DVD Player, or DVD Recorder" (page 94) for operation. The AV receiver's HDMI interface is based on Onkyo components. Commercially available HDMI cables ... linked operations are not *1 DVI (Digital Visual Interface): The digital display interface standard set -top boxes, and other AV receiver /AV amplifier via HDMI must also support HDCP. The AV receiver can be used with CEC (Consumer Electronics Control), which stands for Remote Interactive over...
...input can be guaranteed. • Set "HDMI Control (RIHD)" to "On" (page 82). • See "Controlling a TV" (page 93) and "Controlling a DVD Player, or DVD Recorder" (page 94) for operation. The AV receiver's HDMI interface is based on Onkyo components. Commercially available HDMI cables ... linked operations are not *1 DVI (Digital Visual Interface): The digital display interface standard set -top boxes, and other AV receiver /AV amplifier via HDMI must also support HDCP. The AV receiver can be used with CEC (Consumer Electronics Control), which stands for Remote Interactive over...

Owner Manual
Page 24
...by the HDMI OUT for display on the TV, select the input of the HDMI component connected to the AV receiver). Hint! If the TV power is off . • When the "Audio TV Out" setting is set to "On" (see page 81), or "TV Control" is poor or there's no sound from the...DVI (Digital Visual Interface), so TVs and displays with such an adapter is set your DVD player's HDMI audio output setting to PCM. To stop the AV receiver's speakers producing sound, change the settings, change your TV's settings, or turn up the AV receiver volume control, the sound will be connected by using an HDMI-to-DVI ...
...by the HDMI OUT for display on the TV, select the input of the HDMI component connected to the AV receiver). Hint! If the TV power is off . • When the "Audio TV Out" setting is set to "On" (see page 81), or "TV Control" is poor or there's no sound from the...DVI (Digital Visual Interface), so TVs and displays with such an adapter is set your DVD player's HDMI audio output setting to PCM. To stop the AV receiver's speakers producing sound, change the settings, change your TV's settings, or turn up the AV receiver volume control, the sound will be connected by using an HDMI-to-DVI ...

Owner Manual
Page 26
... as the source and TV, projector, etc. If your TV is connected to the MONITOR OUT V, or the COMPONENT VIDEO OUT, use the AV receiver's display when changing settings. Audio Connection Formats Audio equipment can be connected to the input selector, this will be selected. The onscreen setup menus appear only on the...
... as the source and TV, projector, etc. If your TV is connected to the MONITOR OUT V, or the COMPONENT VIDEO OUT, use the AV receiver's display when changing settings. Audio Connection Formats Audio equipment can be connected to the input selector, this will be selected. The onscreen setup menus appear only on the...

Owner Manual
Page 27
... then make the connection. Connecting the AV Receiver-Continued Connecting a TV or Projector See "Connecting Components with HDMI" on a TV that is connected to the MONITOR OUT V, or the COMPONENT VIDEO OUT, use the AV receiver's display when changing settings. • With connection a , ...you can listen to and record audio from your VCR or cable or satellite receiver to the AV receiver and use a and b , or a and c .) Connection A B a b c AV receiver COMPONENT VIDEO OUT MONITOR OUT ...
... then make the connection. Connecting the AV Receiver-Continued Connecting a TV or Projector See "Connecting Components with HDMI" on a TV that is connected to the MONITOR OUT V, or the COMPONENT VIDEO OUT, use the AV receiver's display when changing settings. • With connection a , ...you can listen to and record audio from your VCR or cable or satellite receiver to the AV receiver and use a and b , or a and c .) Connection A B a b c AV receiver COMPONENT VIDEO OUT MONITOR OUT ...
Owner Manual
Page 31
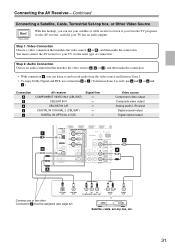
...programs via the same type of connection. Connecting the AV Receiver-Continued Connecting a Satellite, Cable, Terrestrial Set-top box, or Other Video Source Hint! With this hookup, you can use a and b , or a and c .) Connection A B a b c AV receiver COMPONENT VIDEO IN 2 (CBL/SAT) CBL/SAT... output Digital optical output c B b a A OPTICAL OUT COAXIAL OUT Connect one or the other Connection c must connect the AV receiver to your TV via the AV receiver, useful if your TV has no audio outputs. Step 1: Video Connection Choose a video connection that matches the video source ( ...
...programs via the same type of connection. Connecting the AV Receiver-Continued Connecting a Satellite, Cable, Terrestrial Set-top box, or Other Video Source Hint! With this hookup, you can use a and b , or a and c .) Connection A B a b c AV receiver COMPONENT VIDEO IN 2 (CBL/SAT) CBL/SAT... output Digital optical output c B b a A OPTICAL OUT COAXIAL OUT Connect one or the other Connection c must connect the AV receiver to your TV via the AV receiver, useful if your TV has no audio outputs. Step 1: Video Connection Choose a video connection that matches the video source ( ...
Owner Manual
Page 36
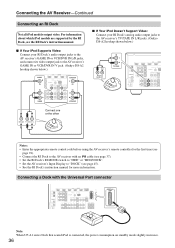
...to the AV receiver's TV/TAPE IN L/R jacks. (Onkyo DS-A2 hookup shown below.) IN L R TV/TAPE Notes: • Enter the appropriate remote control code before using the AV receiver's remote controller for the first time (see page 91). • Connect the RI Dock to "DOCK" (see page 37). • Set the RI... Dock's RI MODE switch to "HDD" or "HDD/DOCK". • Set the AV receiver's Input Display to the AV receiver with the Universal Port connector Note: When UP-A1 series Dock that seated iPod is connected, the...
...to the AV receiver's TV/TAPE IN L/R jacks. (Onkyo DS-A2 hookup shown below.) IN L R TV/TAPE Notes: • Enter the appropriate remote control code before using the AV receiver's remote controller for the first time (see page 91). • Connect the RI Dock to "DOCK" (see page 37). • Set the RI... Dock's RI MODE switch to "HDD" or "HDD/DOCK". • Set the AV receiver's Input Display to the AV receiver with the Universal Port connector Note: When UP-A1 series Dock that seated iPod is connected, the...

Owner Manual
Page 37
... the input source. Similarly, when the AV receiver is set to Standby, all components connected via V, the AV receiver automatically selects that component as the input source. ■ Remote Control You can con- Connecting other end is for connecting additional V-capable components. • Connect only Onkyo components to the AV receiver with an analog audio cable (connection a in...
... the input source. Similarly, when the AV receiver is set to Standby, all components connected via V, the AV receiver automatically selects that component as the input source. ■ Remote Control You can con- Connecting other end is for connecting additional V-capable components. • Connect only Onkyo components to the AV receiver with an analog audio cable (connection a in...

Owner Manual
Page 38
..., HDMI component video input, or digital audio input? Turning On the AV Receiver STANDBY/ON STANDBY indicator ON/STANDBY RECEIVER Turning On and Standby AV receiver Remote controller or Press the [ON/STANDBY] button. The AV receiver will enter Standby mode. See "Audyssey 2EQ™ Room Correction and ... an Onkyo MD recorder, CD recorder, or RI Dock? OUT IN TV/TAPE CD recorder, MD recorder, RI Dock 38 To turn it for the very first time. Alternatively, press the remote controller's [RECEIVER] button, followed by the [ON/STANDBY] button. These settings only ...
..., HDMI component video input, or digital audio input? Turning On the AV Receiver STANDBY/ON STANDBY indicator ON/STANDBY RECEIVER Turning On and Standby AV receiver Remote controller or Press the [ON/STANDBY] button. The AV receiver will enter Standby mode. See "Audyssey 2EQ™ Room Correction and ... an Onkyo MD recorder, CD recorder, or RI Dock? OUT IN TV/TAPE CD recorder, MD recorder, RI Dock 38 To turn it for the very first time. Alternatively, press the remote controller's [RECEIVER] button, followed by the [ON/STANDBY] button. These settings only ...

Owner Manual
Page 39
... appears on your TV is connected to the composite video MONITOR OUT, or the COMPONENT VIDEO OUT, use the AV receiver's display when changing settings. 1 Press the [RECEIVER] button fol- If your TV. Menu 1. Speaker Setup 3. Listening Mode Preset 6. tons to select submenu and... the main menu doesn't appear, make before using the AV receiver for the AV receiver by one. Onscreen Setup Menus Menu 1. Hardware Setup 8. Input Assign 2. Using the Onscreen Setup Menus Carry out the settings for the very first time. Onscreen Setup Menus and Display...
... appears on your TV is connected to the composite video MONITOR OUT, or the COMPONENT VIDEO OUT, use the AV receiver's display when changing settings. 1 Press the [RECEIVER] button fol- If your TV. Menu 1. Speaker Setup 3. Listening Mode Preset 6. tons to select submenu and... the main menu doesn't appear, make before using the AV receiver for the AV receiver by one. Onscreen Setup Menus Menu 1. Hardware Setup 8. Input Assign 2. Using the Onscreen Setup Menus Carry out the settings for the very first time. Onscreen Setup Menus and Display...

Owner Manual
Page 40
... that seated iPod) to the UNIVERSAL PORT jack, you cannot assign any unused input selectors to or you set The "HDMI Input" menu appears. For example, if you connect your TV to the AV receiver with the and then press [ENTER]. The video output signal from the HDMI OUT. Each HDMI IN cannot...
... that seated iPod) to the UNIVERSAL PORT jack, you cannot assign any unused input selectors to or you set The "HDMI Input" menu appears. For example, if you connect your TV to the AV receiver with the and then press [ENTER]. The video output signal from the HDMI OUT. Each HDMI IN cannot...

Owner Manual
Page 42
... to the usual inputs (e.g., COAX1, COAX2, etc.), you can also be changed. COAX 2 OPT 1 OPT 2 - - - - - tons to select "3. The "* " mark is automatically set "CBL/SAT" to "COAX1". Examples: If you connect your TV. 2 Use the Up and Down [R]/[X] but- Press the [SETUP] button. Digital Audio Input DVD/BD... selected on page 40, this can be performed on the AV receiver by the [SETUP] button. By default, the COAXIAL IN1 jack is assigned to "OPT1". And in "HDMI Input Setup" on your DVD player to the OPTICAL IN 1 jack, set "DVD/BD" to the DVD/ BD input selector, although...
... to the usual inputs (e.g., COAX1, COAX2, etc.), you can also be changed. COAX 2 OPT 1 OPT 2 - - - - - tons to select "3. The "* " mark is automatically set "CBL/SAT" to "COAX1". Examples: If you connect your TV. 2 Use the Up and Down [R]/[X] but- Press the [SETUP] button. Digital Audio Input DVD/BD... selected on page 40, this can be performed on the AV receiver by the [SETUP] button. By default, the COAXIAL IN1 jack is assigned to "OPT1". And in "HDMI Input Setup" on your DVD player to the OPTICAL IN 1 jack, set "DVD/BD" to the DVD/ BD input selector, although...


