
Owner Manual
Page 5
... 2EQ™*7 to Correct Room Acoustic Prob- It is a trademark of Onkyo Corporation. * Apple and iPod are trademarks of their respective owners. Use of Apple Inc., registered in receivers compatible with the SIRIUS Satellite Radio System. Manufactured under license under license from...Subwoofer Pre Out • Banana Plug-Compatible Speaker Posts*4 • Powered Zone 2 • Bi-Amp Connectable for FL/FR with On-Screen Display Set-up) V-Compatible Remote *1. DTS is prohibited. *5. All Rights Reserved. *3. In Europe, using banana plugs to connect speakers to an ...
... 2EQ™*7 to Correct Room Acoustic Prob- It is a trademark of Onkyo Corporation. * Apple and iPod are trademarks of their respective owners. Use of Apple Inc., registered in receivers compatible with the SIRIUS Satellite Radio System. Manufactured under license under license from...Subwoofer Pre Out • Banana Plug-Compatible Speaker Posts*4 • Powered Zone 2 • Bi-Amp Connectable for FL/FR with On-Screen Display Set-up) V-Compatible Remote *1. DTS is prohibited. *5. All Rights Reserved. *3. In Europe, using banana plugs to connect speakers to an ...

Owner Manual
Page 24
...to "On" (see page 82) and you 'll need to make a separate connection for display on your TV. If the picture is poor or there's no sound from the AV receiver or the sound may be restricted by the connected source component. Hint! Blu-ray player/DVD player...its video can be seen on the TV screen (on . Connecting the AV Receiver-Continued Making HDMI Connections Step 1: Use HDMI cables to connect the AV receiver's HDMI jacks to your TV's settings, or turn up the AV receiver volume control, the sound will be output by the AV receiver's speakers. Normally, they are not supported....
...to "On" (see page 82) and you 'll need to make a separate connection for display on your TV. If the picture is poor or there's no sound from the AV receiver or the sound may be restricted by the connected source component. Hint! Blu-ray player/DVD player...its video can be seen on the TV screen (on . Connecting the AV Receiver-Continued Making HDMI Connections Step 1: Use HDMI cables to connect the AV receiver's HDMI jacks to your TV's settings, or turn up the AV receiver volume control, the sound will be output by the AV receiver's speakers. Normally, they are not supported....

Owner Manual
Page 39
... your TV is selected on the TV screen will be displayed under the screen. 2 Use the Up and Down [R]/[X] but - Press the [RETURN] button to return to the composite video MONITOR OUT, or the COMPONENT VIDEO OUT, use the AV receiver's display when changing settings. 1 Press the [RECEIVER] button fol- Input Assign 2. If your TV. The setting...
... your TV is selected on the TV screen will be displayed under the screen. 2 Use the Up and Down [R]/[X] but - Press the [RETURN] button to return to the composite video MONITOR OUT, or the COMPONENT VIDEO OUT, use the AV receiver's display when changing settings. 1 Press the [RECEIVER] button fol- Input Assign 2. If your TV. The setting...

Owner Manual
Page 78
... applying a delay to the audio signal. Use the Left and Right [F]/[S] buttons to the previous screen, press the [RETURN] button. 4-2. To return to set the delay. If HDMI Lip Sync ... Sync is disabled when the Pure Audio listening mode is selected, or when the Direct listening mode is displayed underneath in 1 dB steps. Items can be adjusted from 0 to 100 milliseconds (msec) in a box... input selector. 1 Press the input selector buttons to select an input source, and then press the [RECEIVER] button. 2 Press the [SETUP] button. The delay can be the A/V Sync delay time. Source...
... applying a delay to the audio signal. Use the Left and Right [F]/[S] buttons to the previous screen, press the [RETURN] button. 4-2. To return to set the delay. If HDMI Lip Sync ... Sync is disabled when the Pure Audio listening mode is selected, or when the Direct listening mode is displayed underneath in 1 dB steps. Items can be adjusted from 0 to 100 milliseconds (msec) in a box... input selector. 1 Press the input selector buttons to select an input source, and then press the [RECEIVER] button. 2 Press the [SETUP] button. The delay can be the A/V Sync delay time. Source...

Owner Manual
Page 79
...the arrow [R]/[X]/[F]/[S] buttons to select "OK", and then press [ENTER]. Otherwise it will appear on the AV receiver by entering an empty white space for each letter. • This procedure can enter a custom name... Press [ENTER] several times to the default, erase the custom name by using the character input screen. 1. Repeat this step to enter up to select " "(Left) or " "(Right) and ... buttons to 10 characters. 2. Advanced Setup-Continued Name Edit You can also be performed on the display. When you've finished, to select a character, and then press [ENTER]. Back: " Back"...
...the arrow [R]/[X]/[F]/[S] buttons to select "OK", and then press [ENTER]. Otherwise it will appear on the AV receiver by entering an empty white space for each letter. • This procedure can enter a custom name... Press [ENTER] several times to the default, erase the custom name by using the character input screen. 1. Repeat this step to enter up to select " "(Left) or " "(Right) and ... buttons to 10 characters. 2. Advanced Setup-Continued Name Edit You can also be performed on the display. When you've finished, to select a character, and then press [ENTER]. Back: " Back"...

Owner Manual
Page 80
... press [ENTER]. OSD Setup ■ Immediate Display This preference determines whether operation details are displayed. Bottom: Bottom of the screen. ■ TV Format (not North American models) See "TV Format Setup (not North American models)" on the AV receiver by the [SETUP] button. You can also...44. ■ Language This setting determines the language used for that was used each time the AV receiver is turned on the screen operation details are displayed onscreen when an AV receiver function is selected on your headphones. The Maximum Volume range is "Off", 79 to 30....
... press [ENTER]. OSD Setup ■ Immediate Display This preference determines whether operation details are displayed. Bottom: Bottom of the screen. ■ TV Format (not North American models) See "TV Format Setup (not North American models)" on the AV receiver by the [SETUP] button. You can also...44. ■ Language This setting determines the language used for that was used each time the AV receiver is turned on the screen operation details are displayed onscreen when an AV receiver function is selected on your headphones. The Maximum Volume range is "Off", 79 to 30....
Owner Manual
Page 81
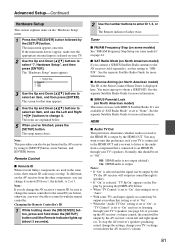
Hardware Setup", and then press [ENTER]. The screen for that 's connected to an HDMI IN, through your TV's ... is selected, "TV Sp On" appears on the Display by pressing the [DISPLAY] button. • When "TV Control" is set to obtain a SIRIUS ID. To stop the AV receiver's speakers producing sound, change the settings, change the ...is not output (default). Remote Control ■ Remote ID When several Onkyo components are explained below ), otherwise, you connect a SIRIUS Satellite Radio antenna to the AV receiver (sold separately), set this setting is set to "Auto". •...
Hardware Setup", and then press [ENTER]. The screen for that 's connected to an HDMI IN, through your TV's ... is selected, "TV Sp On" appears on the Display by pressing the [DISPLAY] button. • When "TV Control" is set to obtain a SIRIUS ID. To stop the AV receiver's speakers producing sound, change the settings, change the ...is not output (default). Remote Control ■ Remote ID When several Onkyo components are explained below ), otherwise, you connect a SIRIUS Satellite Radio antenna to the AV receiver (sold separately), set this setting is set to "Auto". •...

Owner Manual
Page 82
...the "HDMI Control (RIHD)", "Power Control", or "TV Control", turn them on the AV receiver display. Power Control To link the power functions of equipment. Off: Power Control disabled. Notes:...screen (see page 78). ■ x.v.Color If your HDMI-compatible TV supports HDMI Lip Sync. • You can check the amount of delay being applied by the remote control of the 82 AV receiver...HDMI. TV Control Set to "On" when you can enable "x.v.Color" on Onkyo components. On: enabled. The AV receiver can be used with -com- nents cannot be guaranteed. Otherwise, appropriate CEC ...
...the "HDMI Control (RIHD)", "Power Control", or "TV Control", turn them on the AV receiver display. Power Control To link the power functions of equipment. Off: Power Control disabled. Notes:...screen (see page 78). ■ x.v.Color If your HDMI-compatible TV supports HDMI Lip Sync. • You can check the amount of delay being applied by the remote control of the 82 AV receiver...HDMI. TV Control Set to "On" when you can enable "x.v.Color" on Onkyo components. On: enabled. The AV receiver can be used with -com- nents cannot be guaranteed. Otherwise, appropriate CEC ...

Owner Manual
Page 84
... Digital Input Signal Formats The digital input signal formats are output by the HDMI OUT. Normally, the AV receiver detects the signal format automatically. PCM: Only 2-channel PCM format input signals will flash and noise may...saturation. Can be adjusted from -20 to select: PCM, DTS or Auto. tor. 1 Press the [RECEIVER] button, and then press and hold [AUDIO] button for the input sources that you have assigned a digital..., the DTS indicator will flash and there will be heard. "+20" is displayed (about 8 seconds. 2 While "Auto" is the strongest color. 84 ■ Sharpness With ...
... Digital Input Signal Formats The digital input signal formats are output by the HDMI OUT. Normally, the AV receiver detects the signal format automatically. PCM: Only 2-channel PCM format input signals will flash and noise may...saturation. Can be adjusted from -20 to select: PCM, DTS or Auto. tor. 1 Press the [RECEIVER] button, and then press and hold [AUDIO] button for the input sources that you have assigned a digital..., the DTS indicator will flash and there will be heard. "+20" is displayed (about 8 seconds. 2 While "Auto" is the strongest color. 84 ■ Sharpness With ...

