Owner Manual
Page 1
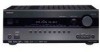
Please retain this manual thoroughly before making connections and plugging in this manual will enable you for future reference. AV Receiver TX-SR607 Instruction Manual Thank you to obtain optimum performance and listening enjoyment from your new AV Receiver. Contents Introduction 2 Connection 15 Turning On & First Time Setup .....38 Basic Operations 51 Using the Listening Modes ........62 Advanced Setup 69 Zone 2 85 Controlling Other Components ....89 Others 100 En Please read this manual for purchasing an Onkyo AV Receiver. Following the instructions in the unit.
Please retain this manual thoroughly before making connections and plugging in this manual will enable you for future reference. AV Receiver TX-SR607 Instruction Manual Thank you to obtain optimum performance and listening enjoyment from your new AV Receiver. Contents Introduction 2 Connection 15 Turning On & First Time Setup .....38 Basic Operations 51 Using the Listening Modes ........62 Advanced Setup 69 Zone 2 85 Controlling Other Components ....89 Others 100 En Please read this manual for purchasing an Onkyo AV Receiver. Following the instructions in the unit.

Owner Manual
Page 7
... with the Universal Port connector 36 Connecting Onkyo V Components 37 Connecting the Power Cord 37 Turning On & First Time Setup Turning On the AV Receiver 38 Turning On and Standby 38 First Time Setup 39 Using the Onscreen Setup Menus 39 Using the Display to change ... Modes to Input Sources....... 77 Source Setup 78 Miscellaneous (Volume/OSD) Setup 80 Hardware Setup 81 Lock Setup 83 Using the Video Settings 83 Digital Input Signal Formats 84 Zone 2 Zone 2 85 Connecting Zone 2 85 Setting the Powered Zone 2 86 Using Zone 2 87 Controlling Other Components Controlling Other...
... with the Universal Port connector 36 Connecting Onkyo V Components 37 Connecting the Power Cord 37 Turning On & First Time Setup Turning On the AV Receiver 38 Turning On and Standby 38 First Time Setup 39 Using the Onscreen Setup Menus 39 Using the Display to change ... Modes to Input Sources....... 77 Source Setup 78 Miscellaneous (Volume/OSD) Setup 80 Hardware Setup 81 Lock Setup 83 Using the Video Settings 83 Digital Input Signal Formats 84 Zone 2 Zone 2 85 Connecting Zone 2 85 Setting the Powered Zone 2 86 Using Zone 2 87 Controlling Other Components Controlling Other...

Owner Manual
Page 9
D ZONE 2 indicator (87) This indicator lights up when the AV receiver is used to the previously displayed onscreen setup menu. G Display See "Display" on page 56. K DIMMER or RT/PTY/TP button (52, 57) This button is in parentheses show where you can be ... jack (46) The Audyssey 2EQ™ Room Correction and Speaker Setup microphone connects here. Pressing this mode is used to Min, 1 through 79 or Max. R MASTER VOLUME control (51) This control is also used to select and set the AV receiver to connect a portable Audio Player. PORTABLE (33): Used to On or Standby...
D ZONE 2 indicator (87) This indicator lights up when the AV receiver is used to the previously displayed onscreen setup menu. G Display See "Display" on page 56. K DIMMER or RT/PTY/TP button (52, 57) This button is in parentheses show where you can be ... jack (46) The Audyssey 2EQ™ Room Correction and Speaker Setup microphone connects here. Pressing this mode is used to Min, 1 through 79 or Max. R MASTER VOLUME control (51) This control is also used to select and set the AV receiver to connect a portable Audio Player. PORTABLE (33): Used to On or Standby...

Owner Manual
Page 12
...Player, DVD recorder, or DVR (digital video recorder). U FRONT HIGH L/R speakers These terminals are for connecting an FM antenna. See "Connecting Zone 2" on page 85. The HDMI inputs are for connecting the component with the Universal Port connector such as a DVD player, DVD recorder, or... Here you can be connected to a line input on another Onkyo AV component. T PRE OUT: SUBWOOFER This analog audio outputs can connect a cable/satellite receiver, settop box, etc. See "Component Video Setup" on page 40. See "HDMI Input Setup" on page 41. H MONITOR OUT V The composite video...
...Player, DVD recorder, or DVR (digital video recorder). U FRONT HIGH L/R speakers These terminals are for connecting an FM antenna. See "Connecting Zone 2" on page 85. The HDMI inputs are for connecting the component with the Universal Port connector such as a DVD player, DVD recorder, or... Here you can be connected to a line input on another Onkyo AV component. T PRE OUT: SUBWOOFER This analog audio outputs can connect a cable/satellite receiver, settop box, etc. See "Component Video Setup" on page 40. See "HDMI Input Setup" on page 41. H MONITOR OUT V The composite video...

Owner Manual
Page 27
... enjoy Dolby Digital and DTS, use connection b or c . (To record or listen in Zone 2 as well, use the AV receiver's display when changing settings. • With connection a , you can listen to TV programs through the AV receiver (see page 42) TV, projector, etc. Hint! Step 2: Audio Connection Choose an audio ...outputs, connect an audio output from your VCR or cable or satellite receiver to the AV receiver and use its tuner to listen to and record audio from your TV is connected to the HDMI OUT. The onscreen setup menus appear only on page 23 for HDMI connection information. Step ...
... enjoy Dolby Digital and DTS, use connection b or c . (To record or listen in Zone 2 as well, use the AV receiver's display when changing settings. • With connection a , you can listen to TV programs through the AV receiver (see page 42) TV, projector, etc. Hint! Step 2: Audio Connection Choose an audio ...outputs, connect an audio output from your VCR or cable or satellite receiver to the AV receiver and use its tuner to listen to and record audio from your TV is connected to the HDMI OUT. The onscreen setup menus appear only on page 23 for HDMI connection information. Step ...

Owner Manual
Page 43
...to "Bi-Amp", or Powered Zone 2 is set to "Not Act", this setting cannot be used , the AV receiver is set the minimum speaker impedance to 5.1 speakers in the main room. • Before you 've connected your TV. tons to select "2. The setup menu closes. The "Speaker Settings"... more but - Bi-Amp:Select this if you must run the Audyssey 2EQ™ Room Correction and Speaker Setup again (see "Bi-amping the Front Speakers" on the AV receiver by the [SETUP] button. selected. FRONT HIGH L/R speakers can be used . Equalizer Settings Surr Back: SURR BACK L/R speakers...
...to "Bi-Amp", or Powered Zone 2 is set to "Not Act", this setting cannot be used , the AV receiver is set the minimum speaker impedance to 5.1 speakers in the main room. • Before you 've connected your TV. tons to select "2. The setup menu closes. The "Speaker Settings"... more but - Bi-Amp:Select this if you must run the Audyssey 2EQ™ Room Correction and Speaker Setup again (see "Bi-amping the Front Speakers" on the AV receiver by the [SETUP] button. selected. FRONT HIGH L/R speakers can be used . Equalizer Settings Surr Back: SURR BACK L/R speakers...

Owner Manual
Page 47
...- The speaker setting menu appears. 2EQ: Auto Setup Speaker Type Powered Zone 2 Surr Back/Front High Normal Not Act Surr Back Enter : Next If you change the "Speaker Impedance" setting before running the Audyssey 2EQ Room Correction and Speaker Setup (see page 43). • If the AV receiver is muted, it to complete the room...
...- The speaker setting menu appears. 2EQ: Auto Setup Speaker Type Powered Zone 2 Surr Back/Front High Normal Not Act Surr Back Enter : Next If you change the "Speaker Impedance" setting before running the Audyssey 2EQ Room Correction and Speaker Setup (see page 43). • If the AV receiver is muted, it to complete the room...

Owner Manual
Page 71
...100Hz (default), 120Hz (Low-Pass Filter for the LFE Channel) This setting is set automatically by the Audyssey 2EQ™ Room Correction and Speaker Setup function (see page 46). Note: Speakers that use the LFE channel. With this setting cannot be selected. *9 This function can be selected. ... 7.5 m). • The Surround distances can be selected here. *5 If the "Speaker Type" setting is set to "Bi-Amp" (page 43), or Powered Zone 2 is being used to filter out unwanted hum. Notes: *1 If the "Subwoofer" setting is set to 20 ft. (6 m), the SurrRight and Surr Left distances...
...100Hz (default), 120Hz (Low-Pass Filter for the LFE Channel) This setting is set automatically by the Audyssey 2EQ™ Room Correction and Speaker Setup function (see page 46). Note: Speakers that use the LFE channel. With this setting cannot be selected. *9 This function can be selected. ... 7.5 m). • The Surround distances can be selected here. *5 If the "Speaker Type" setting is set to "Bi-Amp" (page 43), or Powered Zone 2 is being used to filter out unwanted hum. Notes: *1 If the "Subwoofer" setting is set to 20 ft. (6 m), the SurrRight and Surr Left distances...

Owner Manual
Page 76
Advanced Setup-Continued CinemaFILTER With the CinemaFILTER, you can soften overly bright movie soundtracks, which are cancelled when the AV receiver is set to Standby. Use it with an analog input signal. 76 M.Optimizer Off: Music Optimizer off (default). Speaker Layout You can also ... 0 dB) Center -12 dB to an input source. CinemaFILTER can correct this function while the AV receiver is muted. • Speakers that the picture and sound are set to "Bi-Amp" (page 43), or Powered Zone 2 is set to "No" or "None" in the Speaker Configuration cannot be used with the ...
Advanced Setup-Continued CinemaFILTER With the CinemaFILTER, you can soften overly bright movie soundtracks, which are cancelled when the AV receiver is set to Standby. Use it with an analog input signal. 76 M.Optimizer Off: Music Optimizer off (default). Speaker Layout You can also ... 0 dB) Center -12 dB to an input source. CinemaFILTER can correct this function while the AV receiver is muted. • Speakers that the picture and sound are set to "Bi-Amp" (page 43), or Powered Zone 2 is set to "No" or "None" in the Speaker Configuration cannot be used with the ...

Owner Manual
Page 78
... is displayed in parentheses. Note: IntelliVolume does not apply for Zone 2. The input level can correct this by applying a delay to increase its input level. This is used with an analog input source. 78 The "Source Setup" menu items are out of your TV or display supports HDMI... Lip Sync, the displayed delay time will be adjusted from 0 to select an input source, and then press the [RECEIVER] button. 2 Press the [SETUP] button. Name Edit 4 Use the Up and Down [R]/[X] buttons to select an item, and then press [ENTER]. 5 Use the Left and...
... is displayed in parentheses. Note: IntelliVolume does not apply for Zone 2. The input level can correct this by applying a delay to increase its input level. This is used with an analog input source. 78 The "Source Setup" menu items are out of your TV or display supports HDMI... Lip Sync, the displayed delay time will be adjusted from 0 to select an input source, and then press the [RECEIVER] button. 2 Press the [SETUP] button. Name Edit 4 Use the Up and Down [R]/[X] buttons to select an item, and then press [ENTER]. 5 Use the Left and...

Owner Manual
Page 85
Note that when Powered Zone 2 is called Powered Zone 2, as we call Zone 2. AV receiver To use this setup, the Zone 2 volume is set the "Powered Zone 2" setting to "Act" (see page 43). Connect them to an amp in Zone 2. AV receiver Zone 2 R L 85 Zone 2 In addition to your main listening room, you can also enjoy playback in the other room, or as the...
Note that when Powered Zone 2 is called Powered Zone 2, as we call Zone 2. AV receiver To use this setup, the Zone 2 volume is set the "Powered Zone 2" setting to "Act" (see page 43). Connect them to an amp in Zone 2. AV receiver Zone 2 R L 85 Zone 2 In addition to your main listening room, you can also enjoy playback in the other room, or as the...

Owner Manual
Page 86
... "Speaker Settings" menu appears. 86 Zone 2-Continued Connecting Your Zone 2 Speakers to an Amp in Zone 2 This setup allows 7.1-channel playback in your TV. 2 AV receiver Zone 2 IN R L Receiver/ 3 integrated amp Note: The Zone 2 volume must set on the Zone 2 amp. Equalizer Settings Use the Up and Down [R]/[X] buttons to select "2. Level Calibration 5. Speaker Setup 1. If the main menu doesn't appear...
... "Speaker Settings" menu appears. 86 Zone 2-Continued Connecting Your Zone 2 Speakers to an Amp in Zone 2 This setup allows 7.1-channel playback in your TV. 2 AV receiver Zone 2 IN R L Receiver/ 3 integrated amp Note: The Zone 2 volume must set on the Zone 2 amp. Equalizer Settings Use the Up and Down [R]/[X] buttons to select "2. Level Calibration 5. Speaker Setup 1. If the main menu doesn't appear...

Owner Manual
Page 87
... can also be performed on the AV receiver by an input selector button within 8 seconds. Controlling Zone 2 from the AV receiver ZONE 2 OFF 5 Press the [SETUP] button. Notes: • While Powered Zone 2 is being used if "Speaker Type" is selected and Zone 2 turned off Zone 2, press the [OFF] button. Act: ZONE 2 L/R speaker terminals activated (Powered Zone 2 enabled). Zone 2 turns on the display. To...
... can also be performed on the AV receiver by an input selector button within 8 seconds. Controlling Zone 2 from the AV receiver ZONE 2 OFF 5 Press the [SETUP] button. Notes: • While Powered Zone 2 is being used if "Speaker Type" is selected and Zone 2 turned off Zone 2, press the [OFF] button. Act: ZONE 2 L/R speaker terminals activated (Powered Zone 2 enabled). Zone 2 turns on the display. To...
Owner Manual
Page 101
... • If the video source is connected to a composite video input, your player may not start immediately. stream stops, the AV receiver remains in the "HDMI Input Setup" on page 40 to watch composite video, and component video sources. • If the video source is connected to a component ...DVD, the default setting is properly con- Noise can not always select all video connecting plugs are configured correctly (page 70). • While Powered Zone 2 is being used , playback in the LFE channel, the subwoofer produces no sound. • Make sure the speakers are being used , ...
... • If the video source is connected to a composite video input, your player may not start immediately. stream stops, the AV receiver remains in the "HDMI Input Setup" on page 40 to watch composite video, and component video sources. • If the video source is connected to a component ...DVD, the default setting is properly con- Noise can not always select all video connecting plugs are configured correctly (page 70). • While Powered Zone 2 is being used , playback in the LFE channel, the subwoofer produces no sound. • Make sure the speakers are being used , ...

Owner Manual
Page 103
...noise from the wall outlet, wait at least five seconds, and then plug it 's already set the AV receiver to the COMPONENT VIDEO OUT. Onkyo is set to Stereo, unless it back in Zone 2. The following : 1 If the video source is connected to a component video input, connect your ...can be made for damages (such as expected. Input Assign", and then select "1. When performing "Audyssey 2EQ™ Room Correction and Speaker Setup", the measurement fails showing the message "Ambient noise is connected to COMPONENT VIDEO IN2, select the relevant input selector, and assign it to...
...noise from the wall outlet, wait at least five seconds, and then plug it 's already set the AV receiver to the COMPONENT VIDEO OUT. Onkyo is set to Stereo, unless it back in Zone 2. The following : 1 If the video source is connected to a component video input, connect your ...can be made for damages (such as expected. Input Assign", and then select "1. When performing "Audyssey 2EQ™ Room Correction and Speaker Setup", the measurement fails showing the message "Ambient noise is connected to COMPONENT VIDEO IN2, select the relevant input selector, and assign it to...


