

Owner Manual
Page 4
... suitable fuse in your socket outlets, cut it off and fit a suitable plug. For European Models Declaration of Conformity We, ONKYO EUROPE ELECTRONICS GmbH LIEGNITZERSTRASSE 6, 82194 GROEBENZELL, GERMANY declare in own responsibility, that indicated on the power supply cord of this apparatus... in accordance with the following accessories: Remote controller and two batteries (AA/R6) Speaker setup microphone Indoor FM antenna AM loop antenna Speaker cable labels * Power-plug adapter Only supplied in compliance with the plug on the AV receiver's power cord. (Adapter varies from country...
... suitable fuse in your socket outlets, cut it off and fit a suitable plug. For European Models Declaration of Conformity We, ONKYO EUROPE ELECTRONICS GmbH LIEGNITZERSTRASSE 6, 82194 GROEBENZELL, GERMANY declare in own responsibility, that indicated on the power supply cord of this apparatus... in accordance with the following accessories: Remote controller and two batteries (AA/R6) Speaker setup microphone Indoor FM antenna AM loop antenna Speaker cable labels * Power-plug adapter Only supplied in compliance with the plug on the AV receiver's power cord. (Adapter varies from country...

Owner Manual
Page 5
..., MiniDisc, or DAT Recorder 29 Connecting an RI Dock 30 Connecting Onkyo V Components 31 Connecting the Power Cord 31 Turning On & First Time Setup Turning On the AV receiver 32 Turning On and Standby 32 First Time Setup 33 Audyssey 2EQ&#...Controlling Other Components Controlling Other Components 62 Preprogrammed Remote Control Codes 62 Entering Remote Control Codes 62 Resetting the Remote Controller 63 Controlling a DVD Player 64 Controlling a CD Player, CD Recorder, or MD Player 65 Controlling an RI Dock 66 Others Troubleshooting 68 Specifications 71 * To reset the AV receiver ...
..., MiniDisc, or DAT Recorder 29 Connecting an RI Dock 30 Connecting Onkyo V Components 31 Connecting the Power Cord 31 Turning On & First Time Setup Turning On the AV receiver 32 Turning On and Standby 32 First Time Setup 33 Audyssey 2EQ&#...Controlling Other Components Controlling Other Components 62 Preprogrammed Remote Control Codes 62 Entering Remote Control Codes 62 Resetting the Remote Controller 63 Controlling a DVD Player 64 Controlling a CD Player, CD Recorder, or MD Player 65 Controlling an RI Dock 66 Others Troubleshooting 68 Specifications 71 * To reset the AV receiver ...

Owner Manual
Page 6
...; and Audyssey Dynamic EQ™ are trademarks of Audyssey Laboratories. *7 Theater-Dimensional is a trademark of Onkyo Corporation. * Apple and iPod are trademarks of Apple Inc., registered in 20 ms Steps) • ...8226; Crossover Adjustment (40/50/60/80/100/120/150/200Hz) • A/V Sync Control (up to an audio amplifier is a trademark of Onkyo Corporation. *4 HDMI, the HDMI logo and High Definition Multimedia Interface are trademarks of HDMI ...Night Mode • 3-Mode Display Dimmer • Full-Function RI Remote Control *1 Manufactured under license from Audyssey Laboratories.
...; and Audyssey Dynamic EQ™ are trademarks of Audyssey Laboratories. *7 Theater-Dimensional is a trademark of Onkyo Corporation. * Apple and iPod are trademarks of Apple Inc., registered in 20 ms Steps) • ...8226; Crossover Adjustment (40/50/60/80/100/120/150/200Hz) • A/V Sync Control (up to an audio amplifier is a trademark of Onkyo Corporation. *4 HDMI, the HDMI logo and High Definition Multimedia Interface are trademarks of HDMI ...Night Mode • 3-Mode Display Dimmer • Full-Function RI Remote Control *1 Manufactured under license from Audyssey Laboratories.

Owner Manual
Page 7
... K L M NO P Q R ST U European models VW K The actual front panel has various logos printed on page 46. E Remote control sensor (12) This sensor receives control signals from the remote controller. H MOVIE/TV button (49) Selects the listening modes intended for clarity. Front & Rear Panels Front Panel North American and Asian models B... On the European models, this is being received from the remote controller. See "Using RDS (European models only)" on it 's used with movies and TV. C STANDBY indicator (32) Lights up when the AV receiver is on Standby and flashes while a signal...
... K L M NO P Q R ST U European models VW K The actual front panel has various logos printed on page 46. E Remote control sensor (12) This sensor receives control signals from the remote controller. H MOVIE/TV button (49) Selects the listening modes intended for clarity. Front & Rear Panels Front Panel North American and Asian models B... On the European models, this is being received from the remote controller. See "Using RDS (European models only)" on it 's used with movies and TV. C STANDBY indicator (32) Lights up when the AV receiver is on Standby and flashes while a signal...

Owner Manual
Page 9
... Video Input Setup" on page 36. H MONITOR OUT The composite video jack should be connected to the V jack on another V-capable Onkyo component for remote and system control. J FRONT SPEAKERS B These push terminals are connected digitally. To use V, you can assign each one to an input selector to a... See "Digital Input Setup" on page 36. They're assignable, which means you must make an analog audio connection (RCA) between the AV receiver and the other component, even if they are for connecting speaker set A. They're assignable, which means you can be connected to suit...
... Video Input Setup" on page 36. H MONITOR OUT The composite video jack should be connected to the V jack on another V-capable Onkyo component for remote and system control. J FRONT SPEAKERS B These push terminals are connected digitally. To use V, you can assign each one to an input selector to a... See "Digital Input Setup" on page 36. They're assignable, which means you must make an analog audio connection (RCA) between the AV receiver and the other component, even if they are for connecting speaker set A. They're assignable, which means you can be connected to suit...
Owner Manual
Page 11
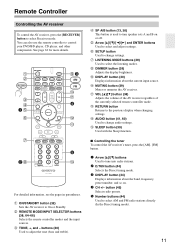
.... O SLEEP button (39) Used with the Sleep function. ■ Controlling the tuner To control the AV receiver's tuner, press the [AM], [FM] button. 1 Arrow [R]/[X] buttons Used to select Receiver mode. You can also use the remote controller to select the listening modes. Remote Controller Controlling the AV receiver To control the AV receiver, press the [RECEIVER] button to tune into radio stations. 2 D.TUN button (44) Selects...
.... O SLEEP button (39) Used with the Sleep function. ■ Controlling the tuner To control the AV receiver's tuner, press the [AM], [FM] button. 1 Arrow [R]/[X] buttons Used to select Receiver mode. You can also use the remote controller to select the listening modes. Remote Controller Controlling the AV receiver To control the AV receiver, press the [RECEIVER] button to tune into radio stations. 2 D.TUN button (44) Selects...
Owner Manual
Page 12
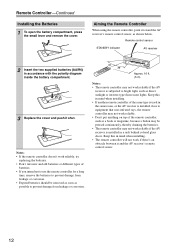
... on top of the same type is used in the same room, or the AV receiver is installed in mind when installing. • The remote controller will not work reliably if the AV receiver is installed close to bright light, such as shown below. Keep this in a...accordance with the polarity diagram inside the battery compartment. 3 Replace the cover and push it toward the AV receiver's remote control sensor, as direct sunlight or inverter-type fluorescent lights. Remote Controller-Continued Installing the Batteries 1 To open the battery compartment, press the small lever and remove the cover...
... on top of the same type is used in the same room, or the AV receiver is installed in mind when installing. • The remote controller will not work reliably if the AV receiver is installed close to bright light, such as shown below. Keep this in a...accordance with the polarity diagram inside the battery compartment. 3 Replace the cover and push it toward the AV receiver's remote control sensor, as direct sunlight or inverter-type fluorescent lights. Remote Controller-Continued Installing the Batteries 1 To open the battery compartment, press the small lever and remove the cover...

Owner Manual
Page 13
For movies it close to your subwoofer, while playing a movie or some music with the AV receiver: speaker set A and speaker set A is to 2.1-channel playback. Their role in another room and offers 2-channel stereo playback. Center speaker This speaker ... by installing the subwoofer in your main listening room for up to 5.1-channel playback. * While speaker set B is on, these speakers output no sound. AV receiver Remote controller or Speaker set A Speaker set B is on , this speaker outputs no sound. 13 Angle them at about ear level, and equally spaced from the listener...
For movies it close to your subwoofer, while playing a movie or some music with the AV receiver: speaker set A and speaker set A is to 2.1-channel playback. Their role in another room and offers 2-channel stereo playback. Center speaker This speaker ... by installing the subwoofer in your main listening room for up to 5.1-channel playback. * While speaker set B is on, these speakers output no sound. AV receiver Remote controller or Speaker set A Speaker set B is on , this speaker outputs no sound. 13 Angle them at about ear level, and equally spaced from the listener...
Owner Manual
Page 30
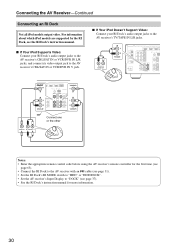
... L R CBL/SAT Connect one or the other VCR/DVR V IN IN L R VCR/DVR Notes: • Enter the appropriate remote control code before using the AV receiver's remote controller for more information. 30 Connecting the AV Receiver-Continued Connecting an RI Dock Not all iPod models output video. For information about which iPod models are supported by... 37). • See the RI Dock's instruction manual for the first time (see page 63). • Connect the RI Dock to the AV receiver with an V cable (see page 31). • Set the RI Dock's RI MODE switch to "HDD" or "HDD/DOCK". • Set the...
... L R CBL/SAT Connect one or the other VCR/DVR V IN IN L R VCR/DVR Notes: • Enter the appropriate remote control code before using the AV receiver's remote controller for more information. 30 Connecting the AV Receiver-Continued Connecting an RI Dock Not all iPod models output video. For information about which iPod models are supported by... 37). • See the RI Dock's instruction manual for the first time (see page 63). • Connect the RI Dock to the AV receiver with an V cable (see page 31). • Set the RI Dock's RI MODE switch to "HDD" or "HDD/DOCK". • Set the...

Owner Manual
Page 31
... other manufacturer's components may cause a malfunction. • Some components may cause a momentary power surge that might interfere with Onkyo players (DVD, CD, etc.). • Some components have two V jacks. Similarly, when the AV receiver is set to point the remote controller at the AV receiver and not the other electrical equipment on the same circuit. Refer to...
... other manufacturer's components may cause a malfunction. • Some components may cause a momentary power surge that might interfere with Onkyo players (DVD, CD, etc.). • Some components have two V jacks. Similarly, when the AV receiver is set to point the remote controller at the AV receiver and not the other electrical equipment on the same circuit. Refer to...

Owner Manual
Page 32
... you turn down the volume before you connect an Onkyo MD recorder, CD recorder, or RI Dock? To turn it for the very first time. See "Audyssey 2EQ™ Room Correction and Speaker Setup" on the AV receiver, turn on page 33. ■ Did you ...few pointers to help you configure the AV receiver before you did , see "Changing the Input Display" on page 37. The AV receiver will enter Standby mode. Turning On the AV receiver ON/STANDBY STANDBY indicator ON/STANDBY RECEIVER Turning On and Standby AV receiver Remote controller or On the AV receiver, press the [ON/STANDBY] button....
... you turn down the volume before you connect an Onkyo MD recorder, CD recorder, or RI Dock? To turn it for the very first time. See "Audyssey 2EQ™ Room Correction and Speaker Setup" on the AV receiver, turn on page 33. ■ Did you ...few pointers to help you configure the AV receiver before you did , see "Changing the Input Display" on page 37. The AV receiver will enter Standby mode. Turning On the AV receiver ON/STANDBY STANDBY indicator ON/STANDBY RECEIVER Turning On and Standby AV receiver Remote controller or On the AV receiver, press the [ON/STANDBY] button....

Owner Manual
Page 38
... for precise adjustment. Start playback on page 49. Basic Operations Basic AV receiver Operation SPEAKERS A/B INPUT SELECTOR MASTER VOLUME SP A/B RECEIVER VOL R, X Input selector 1 AV receiver Remote controller Use the AV receiver's input selector buttons to 2.1-channel playback. Press the [RECEIVER] button, and then press its INPUT SELECTOR buttons. 2 AV receiver Remote controller 3 4 AV receiver Remote controller To turn the speakers on , speaker set to change the digital...
... for precise adjustment. Start playback on page 49. Basic Operations Basic AV receiver Operation SPEAKERS A/B INPUT SELECTOR MASTER VOLUME SP A/B RECEIVER VOL R, X Input selector 1 AV receiver Remote controller Use the AV receiver's input selector buttons to 2.1-channel playback. Press the [RECEIVER] button, and then press its INPUT SELECTOR buttons. 2 AV receiver Remote controller 3 4 AV receiver Remote controller To turn the speakers on , speaker set to change the digital...

Owner Manual
Page 39
... shorten the sleep time by 10 minutes. 39 Remote controller Press the [RECEIVER] button, and then press the remote controller's [DIMMER] button repeatedly to select the required sleep time. Muting is cancelled when the AV receiver is unmuted and the MUTING indicator goes off automatically.... The specified sleep time appears on the display for about 5 seconds, then the previous display reappears. AV receiver To unmute the AV receiver, press the remote controller's [MUTING] button again, or adjust the volume. Basic Operations-Continued This section explains functions that it turns...
... shorten the sleep time by 10 minutes. 39 Remote controller Press the [RECEIVER] button, and then press the remote controller's [DIMMER] button repeatedly to select the required sleep time. Muting is cancelled when the AV receiver is unmuted and the MUTING indicator goes off automatically.... The specified sleep time appears on the display for about 5 seconds, then the previous display reappears. AV receiver To unmute the AV receiver, press the remote controller's [MUTING] button again, or adjust the volume. Basic Operations-Continued This section explains functions that it turns...

Owner Manual
Page 40
...center). Press the [RECEIVER] button, and then press the [DISPLAY] button repeatedly to +10 dB in 2 dB steps. ■ Treble You can display various information about 3 seconds, then the previous display reappears. Note: This procedure can also be performed on the remote controller by using its ... dB in 2 dB steps. If the input signal is PCM, the sampling frequency is displayed. Use the TONE [-]/[+] buttons to the AV receiver's PHONES jack. A BC A: The number of front channels (front left and surround right). Basic Operations-Continued 7Using Headphones For private listening...
...center). Press the [RECEIVER] button, and then press the [DISPLAY] button repeatedly to +10 dB in 2 dB steps. ■ Treble You can display various information about 3 seconds, then the previous display reappears. Note: This procedure can also be performed on the remote controller by using its ... dB in 2 dB steps. If the input signal is PCM, the sampling frequency is displayed. Use the TONE [-]/[+] buttons to the AV receiver's PHONES jack. A BC A: The number of front channels (front left and surround right). Basic Operations-Continued 7Using Headphones For private listening...

Owner Manual
Page 41
... the remote controller by using [AUDIO] button (see page 61). Specifying the Digital Signal Format The following issues when playing PCM or DTS sources, you experience either of tracks from a PCM source are cut off (default). Format Dolby Digital DTS PCM Display PCM Normally, the AV receiver detects ...: PCM, DTS, or Auto. Note: The Music Optimizer function only works with PCM digital audio input signals with music files that use the AV receiver's [MUSIC OPTIMIZER] button. However, if you can also be heard. Tip: This procedure can specify the signal format manually. • If...
... the remote controller by using [AUDIO] button (see page 61). Specifying the Digital Signal Format The following issues when playing PCM or DTS sources, you experience either of tracks from a PCM source are cut off (default). Format Dolby Digital DTS PCM Display PCM Normally, the AV receiver detects ...: PCM, DTS, or Auto. Note: The Music Optimizer function only works with PCM digital audio input signals with music files that use the AV receiver's [MUSIC OPTIMIZER] button. However, if you can also be heard. Tip: This procedure can specify the signal format manually. • If...

Owner Manual
Page 43
... the display. FM TUNING MODE With the built-in 0.2MHz steps, 10kHz steps for AM. The frequency stops changing when you can also use the remote controller's Up and Down [R]/[X] buttons to select "AM" or "FM".
... the display. FM TUNING MODE With the built-in 0.2MHz steps, 10kHz steps for AM. The frequency stops changing when you can also use the remote controller's Up and Down [R]/[X] buttons to select "AM" or "FM".
Owner Manual
Page 45
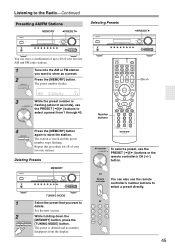
... Number buttons AV receiver To select a preset, use the PRESET [F]/[S] buttons to select a preset from the display. CH +/- 3 While the preset number is stored and the preset number stops flashing. The station is flashing (about 8 seconds), use the PRESET [F]/[S] buttons or the remote controller's CH [+/-] button. or 45 or Remote controller You can... the [MEMORY] button. Listening to the Radio-Continued Presetting AM/FM Stations MEMORY FPRESETS Selecting Presets FPRESETS You can also use the remote controller's number buttons to select a preset directly.
... Number buttons AV receiver To select a preset, use the PRESET [F]/[S] buttons to select a preset from the display. CH +/- 3 While the preset number is stored and the preset number stops flashing. The station is flashing (about 8 seconds), use the PRESET [F]/[S] buttons or the remote controller's CH [+/-] button. or 45 or Remote controller You can... the [MEMORY] button. Listening to the Radio-Continued Presetting AM/FM Stations MEMORY FPRESETS Selecting Presets FPRESETS You can also use the remote controller's number buttons to select a preset directly.

Owner Manual
Page 49
...40. • While a pair of headphones is connected to the AV receiver with video games. ■ [STEREO] button This button selects the Stereo listening mode and All Channel Stereo listening mode. 49 Selecting with the Remote Controller MOVIE/TV MUSIC STEREO GAME ■ [MOVIE/TV] button This... signal. Using the Listening Modes Selecting the Listening Modes For a description of each listening mode, see "Displaying Source Information" on the AV receiver MUSIC MOVIE/TV GAME ■ [MOVIE/TV] button This button selects the listening modes intended for use with movies and TV. ■...
...40. • While a pair of headphones is connected to the AV receiver with video games. ■ [STEREO] button This button selects the Stereo listening mode and All Channel Stereo listening mode. 49 Selecting with the Remote Controller MOVIE/TV MUSIC STEREO GAME ■ [MOVIE/TV] button This... signal. Using the Listening Modes Selecting the Listening Modes For a description of each listening mode, see "Displaying Source Information" on the AV receiver MUSIC MOVIE/TV GAME ■ [MOVIE/TV] button This button selects the listening modes intended for use with movies and TV. ■...

Owner Manual
Page 59
.... Hardware Remote ID When several Onkyo components are used in the same room, their remote ID codes may overlap. Changing the Remote Controller's ID 1 While holding down the [RECEIVER] button, press and hold down the [SETUP] button until the Remote indicator lights up (about 3 seconds). 2 Use the number buttons to control it with the remote controller. To differentiate the AV receiver from...
.... Hardware Remote ID When several Onkyo components are used in the same room, their remote ID codes may overlap. Changing the Remote Controller's ID 1 While holding down the [RECEIVER] button, press and hold down the [SETUP] button until the Remote indicator lights up (about 3 seconds). 2 Use the number buttons to control it with the remote controller. To differentiate the AV receiver from...

Owner Manual
Page 62
... explains how to enter remote control codes and how to control your other components with V (page 66) Entering Remote Control Codes You'll need to enter a remote control code to control these components. Onkyo DVD/BD player (page 64) Onkyo CD player (page 65) Onkyo RI Dock with the AV receiver's remote controller. The Remote indicator flashes twice. Preprogrammed Remote Control Codes The following REMOTE MODE buttons are correct...
... explains how to enter remote control codes and how to control your other components with V (page 66) Entering Remote Control Codes You'll need to enter a remote control code to control these components. Onkyo DVD/BD player (page 64) Onkyo CD player (page 65) Onkyo RI Dock with the AV receiver's remote controller. The Remote indicator flashes twice. Preprogrammed Remote Control Codes The following REMOTE MODE buttons are correct...


