Basic Manual - English
Page 1
http://www.onkyo.com/manual/txrz920/adv/en.html En TX-RZ920 / AV RECEIVER Before Start 2 What's in the box 2 Part Names 3 Part Names 3 Install 7 Installation procedure 7 Step1: Speaker Layout 8 Step2: Connect the Speakers 14 Step3: Connect ... to the AM/FM Radio 29 Multi-zone 31 Listening Mode 33 For details about the Network Functions and listening modes, and information regarding the advanced settings, refer to the "Advanced Manual" available on our website.
http://www.onkyo.com/manual/txrz920/adv/en.html En TX-RZ920 / AV RECEIVER Before Start 2 What's in the box 2 Part Names 3 Part Names 3 Install 7 Installation procedure 7 Step1: Speaker Layout 8 Step2: Connect the Speakers 14 Step3: Connect ... to the AM/FM Radio 29 Multi-zone 31 Listening Mode 33 For details about the Network Functions and listening modes, and information regarding the advanced settings, refer to the "Advanced Manual" available on our website.

Basic Manual - English
Page 3
... the perpendicular axis and 30° to work when this unit is within about 16y/5 m, at the time of the remote controller is in the Advanced Manual. Front Panel 1. Í ON/STANDBY button 2.
... the perpendicular axis and 30° to work when this unit is within about 16y/5 m, at the time of the remote controller is in the Advanced Manual. Front Panel 1. Í ON/STANDBY button 2.

Basic Manual - English
Page 4
... the HDMI OUT jack to output video signals. (P16) 16.INFO button: Switches the information on the display. (P33) 17.SETUP button: You can show advanced setting items on the TV screen. 19.Cursor buttons (S / T / W / X) and ENTER button: Select the item with the input selector and the ...back software which has been encoded in the following message: "DialogNorm:+4dB", to the previous state. 21.DIMMER button: You can find details in the Advanced Manual. 9. Select from "Movie/ TV", "Music", "Game", then turn down the volume control by USB and the USB device is not properly connected. ...
... the HDMI OUT jack to output video signals. (P16) 16.INFO button: Switches the information on the display. (P33) 17.SETUP button: You can show advanced setting items on the TV screen. 19.Cursor buttons (S / T / W / X) and ENTER button: Select the item with the input selector and the ...back software which has been encoded in the following message: "DialogNorm:+4dB", to the previous state. 21.DIMMER button: You can find details in the Advanced Manual. 9. Select from "Movie/ TV", "Music", "Game", then turn down the volume control by USB and the USB device is not properly connected. ...

Basic Manual - English
Page 5
... 2/ZONE 3). 3. GND terminal: The ground wire of the turntable is connected. 13.RS232 port: For connection to a pre-main amplifier or power amplifier in the Advanced Manual. Rear Panel 1. COMPONENT VIDEO IN jacks: Input the AV component video signals with a component video cable. (Compatible only with an analog video...
... 2/ZONE 3). 3. GND terminal: The ground wire of the turntable is connected. 13.RS232 port: For connection to a pre-main amplifier or power amplifier in the Advanced Manual. Rear Panel 1. COMPONENT VIDEO IN jacks: Input the AV component video signals with a component video cable. (Compatible only with an analog video...

Basic Manual - English
Page 6
... for play operations when playing Music Server or USB. 10. Input selector buttons: Switches the input to be connected. button: You can show advanced setting items on the display. 12. Cursor buttons and ENTER button: Select the item with an even better experience. (*) 6. CLEAR...the mode to control the main room. 6 > Before Start > Part Names > Install > Initial Setup > Playback (*)You can find details in the Advanced Manual. 15.IR IN port: Allows you to connect a multiroom remote control kit. (*) 16.12V TRIGGER OUT A/B jack: Allows you to connect a ...
... for play operations when playing Music Server or USB. 10. Input selector buttons: Switches the input to be connected. button: You can show advanced setting items on the display. 12. Cursor buttons and ENTER button: Select the item with an even better experience. (*) 6. CLEAR...the mode to control the main room. 6 > Before Start > Part Names > Install > Initial Setup > Playback (*)You can find details in the Advanced Manual. 15.IR IN port: Allows you to connect a multiroom remote control kit. (*) 16.12V TRIGGER OUT A/B jack: Allows you to connect a ...

Basic Manual - English
Page 18
... Bitstream output on , so that does not have an HDMI jack. When video input connection is an example of the input jacks you see the Advanced Manual. Setup 0 The COMPONENT VIDEO IN jacks are compatible only with an AV component that you connect the video input jacks to match the jacks it...
... Bitstream output on , so that does not have an HDMI jack. When video input connection is an example of the input jacks you see the Advanced Manual. Setup 0 The COMPONENT VIDEO IN jacks are compatible only with an AV component that you connect the video input jacks to match the jacks it...

Basic Manual - English
Page 27
... this unit with the cursors, then There may need to make some settings on 0 To return to the previous screen, press Advanced Manual for this unit to the following procedure when the 0 Depending on the internet radio service, unit is on the TV to play...connecting this unit. With Music Server, operations, see the 0 You may need to confirm your Basic Manual. ENTER to play . Note smartphone to play . Also see the Advanced Manual. Perform the following for Spotify settings: cursors of Windows Media® Player select the desired music ...
... this unit with the cursors, then There may need to make some settings on 0 To return to the previous screen, press Advanced Manual for this unit to the following procedure when the 0 Depending on the internet radio service, unit is on the TV to play...connecting this unit. With Music Server, operations, see the 0 You may need to confirm your Basic Manual. ENTER to play . Note smartphone to play . Also see the Advanced Manual. Perform the following for Spotify settings: cursors of Windows Media® Player select the desired music ...

Basic Manual - English
Page 33
...as Dolby Digital or DTS, you to expand the playback signal to a maximum of 11 channels to the number of channels in the Basic Manual. Note that the moviegoer is enveloped in a movie theater along with the natural flow of timbre with the sound field towards the front.... MUSIC button) which is selected. Input source & volume Listening mode Signal format The display changes few seconds later. For more details, see the Advanced Manual. 0 The listening mode last selected for the source is remembered for DTS-HD Master Audio. Note that suits the input signal. THX Surround Modes...
...as Dolby Digital or DTS, you to expand the playback signal to a maximum of 11 channels to the number of channels in the Basic Manual. Note that the moviegoer is enveloped in a movie theater along with the natural flow of timbre with the sound field towards the front.... MUSIC button) which is selected. Input source & volume Listening mode Signal format The display changes few seconds later. For more details, see the Advanced Manual. 0 The listening mode last selected for the source is remembered for DTS-HD Master Audio. Note that suits the input signal. THX Surround Modes...
Basic/Advanced English
Page 1
En The Advanced Manual has more detailed information and advanced settings. AV RECEIVER TX-RZ920 Basic Manual Before Start 2 What's in the box 2 Part Names 3 Part Names 3 Install 7 Installation procedure 7 Step1: Speaker Layout 8 Step2: Connect the ...Storage Device 28 Listening to the AM/FM Radio 29 Multi-zone 31 Listening Mode 33 The Basic Manual includes information needed when starting up and also instructions for frequently used operations. > Before Start > Part Names > Install > Initial Setup > Playback > Advanced Manual Troubleshooting | Supplementary Information, etc.
En The Advanced Manual has more detailed information and advanced settings. AV RECEIVER TX-RZ920 Basic Manual Before Start 2 What's in the box 2 Part Names 3 Part Names 3 Install 7 Installation procedure 7 Step1: Speaker Layout 8 Step2: Connect the ...Storage Device 28 Listening to the AM/FM Radio 29 Multi-zone 31 Listening Mode 33 The Basic Manual includes information needed when starting up and also instructions for frequently used operations. > Before Start > Part Names > Install > Initial Setup > Playback > Advanced Manual Troubleshooting | Supplementary Information, etc.
Basic/Advanced English
Page 2
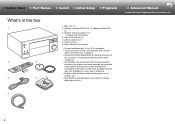
... cease services, meaning that some network services and content may become unavailable in the box BeforeStart 1 2 3 4 5 1. Power cord (1) ≥ Basic Manual (This manual) 0 Connect speakers with 4 Ω to change without prior notice. > Advanced Manual Troubleshooting | Supplementary Information, etc. 6 2 Indoor FM antenna (1) 5. Main unit (1) 2. Remote controller (RC-911R) (1), Batteries (AAA/R03) (2) 3. > Before Start > Part Names...
... cease services, meaning that some network services and content may become unavailable in the box BeforeStart 1 2 3 4 5 1. Power cord (1) ≥ Basic Manual (This manual) 0 Connect speakers with 4 Ω to change without prior notice. > Advanced Manual Troubleshooting | Supplementary Information, etc. 6 2 Indoor FM antenna (1) 5. Main unit (1) 2. Remote controller (RC-911R) (1), Batteries (AAA/R03) (2) 3. > Before Start > Part Names...

Basic/Advanced English
Page 3
... > Before Start > Part Names > Install > Initial Setup > Playback Part Names PartNames > Advanced Manual Troubleshooting | Supplementary Information, etc. (*)You can find details in standby, such as HDMI Standby Through and Network Standby. 4. PURE AUDIO button/indicator:... side. 6. Remote control sensor: Receives signals from the remote controller. 0 The signal range of the remote controller is in the Advanced Manual. Front Panel 1. Í ON/STANDBY button 2. are enabled that continue to...
... > Before Start > Part Names > Install > Initial Setup > Playback Part Names PartNames > Advanced Manual Troubleshooting | Supplementary Information, etc. (*)You can find details in standby, such as HDMI Standby Through and Network Standby. 4. PURE AUDIO button/indicator:... side. 6. Remote control sensor: Receives signals from the remote controller. 0 The signal range of the remote controller is in the Advanced Manual. Front Panel 1. Í ON/STANDBY button 2. are enabled that continue to...

Basic/Advanced English
Page 4
...level at THX calibrated loudness, just turn the LISTENING MODE dial (below ) to change the mode (P33). (*) 10.You can find details in the Advanced Manual. 9. SLEEP: When the sleep timer is not properly connected. NET: When "NET" is connected to confirm. TUNED: Receiving AM/FM radio. AUTO... the TONE dial (below ) to adjust. 11. HDMI: When HDMI signals are connected. > Before Start > Part Names > Install > Initial Setup > Playback > Advanced Manual Troubleshooting | Supplementary Information, etc. (*)You can adjust the sound quality of the display in three steps.
...level at THX calibrated loudness, just turn the LISTENING MODE dial (below ) to change the mode (P33). (*) 10.You can find details in the Advanced Manual. 9. SLEEP: When the sleep timer is not properly connected. NET: When "NET" is connected to confirm. TUNED: Receiving AM/FM radio. AUTO... the TONE dial (below ) to adjust. 11. HDMI: When HDMI signals are connected. > Before Start > Part Names > Install > Initial Setup > Playback > Advanced Manual Troubleshooting | Supplementary Information, etc. (*)You can adjust the sound quality of the display in three steps.

Basic/Advanced English
Page 5
... a BLUETOOTH enabled device. HDMI OUT jacks: Transmit video signals and audio signals with an analog video cable. 5. > Before Start > Part Names > Install > Initial Setup > Playback > Advanced Manual Troubleshooting | Supplementary Information, etc. (*)You can also supply power (maximum 5 V/1 A) to USB devices with a USB cable. 10.DIGITAL IN OPTICAL/COAXIAL jacks: Input AV component...
... a BLUETOOTH enabled device. HDMI OUT jacks: Transmit video signals and audio signals with an analog video cable. 5. > Before Start > Part Names > Install > Initial Setup > Playback > Advanced Manual Troubleshooting | Supplementary Information, etc. (*)You can also supply power (maximum 5 V/1 A) to USB devices with a USB cable. 10.DIGITAL IN OPTICAL/COAXIAL jacks: Input AV component...

Basic/Advanced English
Page 6
... items on the TV screen. 11. Volume buttons 7. > Before Start > Part Names > Install > Initial Setup > Playback > Advanced Manual Troubleshooting | Supplementary Information, etc. (*)You can find details in the Advanced Manual. 15.IR IN port: Allows you to connect a multiroom remote control kit. (*) 16.12V TRIGGER OUT A/B jack: Allows you to connect a device with...
... items on the TV screen. 11. Volume buttons 7. > Before Start > Part Names > Install > Initial Setup > Playback > Advanced Manual Troubleshooting | Supplementary Information, etc. (*)You can find details in the Advanced Manual. 15.IR IN port: Allows you to connect a multiroom remote control kit. (*) 16.12V TRIGGER OUT A/B jack: Allows you to connect a device with...

Basic/Advanced English
Page 7
> Before Start > Part Names > Install > Initial Setup > Playback > Advanced Manual Troubleshooting | Supplementary Information, etc. Speaker layouts include systems that use surround back speakers, systems that use height speakers, and systems that use a speaker layout using a ...
> Before Start > Part Names > Install > Initial Setup > Playback > Advanced Manual Troubleshooting | Supplementary Information, etc. Speaker layouts include systems that use surround back speakers, systems that use height speakers, and systems that use a speaker layout using a ...

Basic/Advanced English
Page 8
..., ¢2: 90e to 120e, ¢3: 135e to -date 3D sound, when the input format is Dolby Atmos. > Before Start > Part Names > Install > Initial Setup > Playback > Advanced Manual Troubleshooting | Supplementary Information, etc.
..., ¢2: 90e to 120e, ¢3: 135e to -date 3D sound, when the input format is Dolby Atmos. > Before Start > Part Names > Install > Initial Setup > Playback > Advanced Manual Troubleshooting | Supplementary Information, etc.

Basic/Advanced English
Page 9
... sounds, when the input format is Dolby Atmos. Both should match the distance between the front speakers. > Before Start > Part Names > Install > Initial Setup > Playback > Advanced Manual Troubleshooting | Supplementary Information, etc. 3´ (0.9 m) or more En 9 Front high speakers should be situated directly above the front speakers and the distance between the rear...
... sounds, when the input format is Dolby Atmos. Both should match the distance between the front speakers. > Before Start > Part Names > Install > Initial Setup > Playback > Advanced Manual Troubleshooting | Supplementary Information, etc. 3´ (0.9 m) or more En 9 Front high speakers should be situated directly above the front speakers and the distance between the rear...

Basic/Advanced English
Page 10
... this type of height speakers to 150e Height Speakers-2 (Ceiling Speakers) These are types of height speakers. > Before Start > Part Names > Install > Initial Setup > Playback > Advanced Manual Troubleshooting | Supplementary Information, etc. ˎ3 ˎ2 ˎ1 ¢1: 30e to 55e, ¢2: 65e to 100e, ¢3: 125e to obtain the best Dolby Atmos effect. 0 "Speaker...
... this type of height speakers to 150e Height Speakers-2 (Ceiling Speakers) These are types of height speakers. > Before Start > Part Names > Install > Initial Setup > Playback > Advanced Manual Troubleshooting | Supplementary Information, etc. ˎ3 ˎ2 ˎ1 ¢1: 30e to 55e, ¢2: 65e to 100e, ¢3: 125e to obtain the best Dolby Atmos effect. 0 "Speaker...

Basic/Advanced English
Page 11
> Before Start > Part Names > Install > Initial Setup > Playback > Advanced Manual Troubleshooting | Supplementary Information, etc. ˎ1 ˎ2 ˎ3 Height Speakers-3 (Dolby Enabled Speakers (Dolby Speakers)) These are special speakers designed to face the ceiling so that ...
> Before Start > Part Names > Install > Initial Setup > Playback > Advanced Manual Troubleshooting | Supplementary Information, etc. ˎ1 ˎ2 ˎ3 Height Speakers-3 (Dolby Enabled Speakers (Dolby Speakers)) These are special speakers designed to face the ceiling so that ...

Basic/Advanced English
Page 12
> Before Start > Part Names > Install > Initial Setup > Playback > Advanced Manual Troubleshooting | Supplementary Information, etc. ˎ1 ˎ2 ˎ3 Bi-Amping the Speakers It is possible to connect front speakers supporting BiAmping to 150e 12 The effects and placements for speakers are the same as for a system that doesn't use Bi-Amping speakers. 0 "Speaker combinations" (P13) introduces some detailed examples of speaker combinations. 1,2 Front Speakers (Bi-Amping) ¢1: 22e to 30e, ¢2: 90e to 120e, ¢3: 135e to improve quality of the bass and treble.
> Before Start > Part Names > Install > Initial Setup > Playback > Advanced Manual Troubleshooting | Supplementary Information, etc. ˎ1 ˎ2 ˎ3 Bi-Amping the Speakers It is possible to connect front speakers supporting BiAmping to 150e 12 The effects and placements for speakers are the same as for a system that doesn't use Bi-Amping speakers. 0 "Speaker combinations" (P13) introduces some detailed examples of speaker combinations. 1,2 Front Speakers (Bi-Amping) ¢1: 22e to 30e, ¢2: 90e to 120e, ¢3: 135e to improve quality of the bass and treble.

