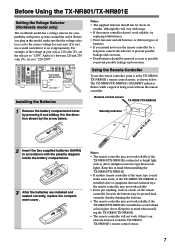
Owner Manual
Page 3
... IN YOUR HOME THEN THE FUSE SHOULD BE REMOVED AND THE PLUG CUT OFF AND DISPOSED OF SAFELY. For British Models Replacement and mounting of an AC plug on the power supply cord of this equipment does cause harmful interference to radio communications. FCC Information for the ASTA mark or the BSI mark on the TX-NR801/TX-NR801E's rear panel (e.g., AC 230...
... IN YOUR HOME THEN THE FUSE SHOULD BE REMOVED AND THE PLUG CUT OFF AND DISPOSED OF SAFELY. For British Models Replacement and mounting of an AC plug on the power supply cord of this equipment does cause harmful interference to radio communications. FCC Information for the ASTA mark or the BSI mark on the TX-NR801/TX-NR801E's rear panel (e.g., AC 230...
Owner Manual
Page 4
...the Bass and Treble Sound (Tone Control 54 Selecting Surround Speakers to Output the Sound (Surround Speakers 54 Setting the Various Sound Effects (Sound Effect 55 Useful Settings (Advanced) Input Setup (Advanced 56 Configuring the Listening Modes You Use Frequently (Listening Mode Preset 56 Audio Adjust (Advanced 57 Adjusting the Audio Delay (Delay Sub-menu) ... 57 Setting the Low Frequency Effect Levels (LFE Level 58 Detailed Settings for Each Listening Mode ... 58 Preference (Advanced 62 Volume Setup Sub-menu 62 Adjusting the Headphone Volume Level (Headphones Level 63 Setting the...
...the Bass and Treble Sound (Tone Control 54 Selecting Surround Speakers to Output the Sound (Surround Speakers 54 Setting the Various Sound Effects (Sound Effect 55 Useful Settings (Advanced) Input Setup (Advanced 56 Configuring the Listening Modes You Use Frequently (Listening Mode Preset 56 Audio Adjust (Advanced 57 Adjusting the Audio Delay (Delay Sub-menu) ... 57 Setting the Low Frequency Effect Levels (LFE Level 58 Detailed Settings for Each Listening Mode ... 58 Preference (Advanced 62 Volume Setup Sub-menu 62 Adjusting the Headphone Volume Level (Headphones Level 63 Setting the...
Owner Manual
Page 5
... Music or Videos with the TX-NR801/ TX-NR801E 39 Basic Operation 39 Temporarily turning off the sound 39 Listening with headphones 39 Temporarily Changing the Speaker Output Levels 40 Using the Sleep Timer (remote controller only 40 Adjusting the brightness of the front display 40 Switching the display 41 Changing the audio mode 41 Adjusting the bass and treble 41 Using the Listening Modes 42 Listening Modes 42 Selecting the Listening Mode 44 Listening to Radio Broadcasts 46 Tuning Into a Radio Station 46 Presetting a Radio Station 47 According to your TX-NR801...
... Music or Videos with the TX-NR801/ TX-NR801E 39 Basic Operation 39 Temporarily turning off the sound 39 Listening with headphones 39 Temporarily Changing the Speaker Output Levels 40 Using the Sleep Timer (remote controller only 40 Adjusting the brightness of the front display 40 Switching the display 41 Changing the audio mode 41 Adjusting the bass and treble 41 Using the Listening Modes 42 Listening Modes 42 Selecting the Listening Mode 44 Listening to Radio Broadcasts 46 Tuning Into a Radio Station 46 Presetting a Radio Station 47 According to your TX-NR801...
Owner Manual
Page 7
... remote controller may not work reliably if the TX-NR801/TX-NR801E is set it appropriately. OR 120V 6 OHMS MIN. / SPEAKER SEE INSTRUCTION MANUAL FOR CORRECT SETTINGS. Before you intend not to bright light, such as shown below . DIGITAL IN COAX 1 PRE OUT R L FRONT ANTENNA AUDIO VIDEO S VIDEO MONITOR OUT 2 3 OPT 1 SUB SURR SURR BACK / R ZONE 2 FRONT 2 R SUB 3 DIGITAL OUT OPT 1 2 SURR R SURR BACK GND CENTER AM OUT ZONE 2 R L L FM 75 MULTI CH INPUT L AUDIO R L CENTER PHONO IN CD IN L OUT TAPE...
... remote controller may not work reliably if the TX-NR801/TX-NR801E is set it appropriately. OR 120V 6 OHMS MIN. / SPEAKER SEE INSTRUCTION MANUAL FOR CORRECT SETTINGS. Before you intend not to bright light, such as shown below . DIGITAL IN COAX 1 PRE OUT R L FRONT ANTENNA AUDIO VIDEO S VIDEO MONITOR OUT 2 3 OPT 1 SUB SURR SURR BACK / R ZONE 2 FRONT 2 R SUB 3 DIGITAL OUT OPT 1 2 SURR R SURR BACK GND CENTER AM OUT ZONE 2 R L L FM 75 MULTI CH INPUT L AUDIO R L CENTER PHONO IN CD IN L OUT TAPE...
Owner Manual
Page 9
... standby state and when a signal is available in stereo and the sound cuts out or there is pressed, the display changes from AUTO to RT again. 9 STEREO button [44] Selects for the stereo listening mode. 0 SURROUND button [44] Selects for USA, Canadian and Australian models), the TX-NR801/TX-NR801E turns on and the display lights up or down either button is pressed, the currently selected input source for recording or outputting to be changed using the MEMORY button, press the PRESET / buttons...
... standby state and when a signal is available in stereo and the sound cuts out or there is pressed, the display changes from AUTO to RT again. 9 STEREO button [44] Selects for the stereo listening mode. 0 SURROUND button [44] Selects for USA, Canadian and Australian models), the TX-NR801/TX-NR801E turns on and the display lights up or down either button is pressed, the currently selected input source for recording or outputting to be changed using the MEMORY button, press the PRESET / buttons...
Owner Manual
Page 10
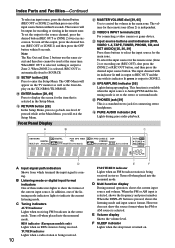
... AM source is turned on the TX-NR801/TX-NR801E. Front Panel Display K MASTER VOLUME dial [39, 65] Use to enter the Setup Menu. M Input source buttons and indicators (DVD, VIDEO 1-5, TAPE, TUNER, PHONO, CD, and NET AUDIO) [35, 36, 39] Press these indicators lights to select the input source for the remote zone (Zone 2) or recording out (REC OUT), first press the ZONE 2 or REC OUT button, and then press the desired input source button. To select the input source for the main zone. B Listening mode or digital input...
... AM source is turned on the TX-NR801/TX-NR801E. Front Panel Display K MASTER VOLUME dial [39, 65] Use to enter the Setup Menu. M Input source buttons and indicators (DVD, VIDEO 1-5, TAPE, TUNER, PHONO, CD, and NET AUDIO) [35, 36, 39] Press these indicators lights to select the input source for the remote zone (Zone 2) or recording out (REC OUT), first press the ZONE 2 or REC OUT button, and then press the desired input source button. To select the input source for the main zone. B Listening mode or digital input...
Owner Manual
Page 18
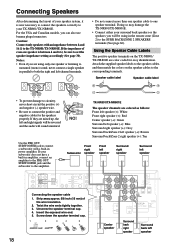
... and left speaker 18 DIGITAL IN COAX 1 PRE OUT R L FRONT ANTENNA AUDIO VIDEO S VIDEO MONITOR OUT COMPONENT VIDEO OUTPUT Y 2 3 OPT 1 SUB CENTER SURR SURR BACK / R L ZONE 2 AM OUT ZONE 2 R L IN DVD FM 75 OUT PB PR INPUT 1 Y VIDEO 1 Connecting the speaker cable FRONT MULTI CH 2 R INPUT L AUDIO R L IN PB 3 1. SSUtBrip away CENTER approPHxONO. 5/8 incOhUT (15 mm) of your TX-NR801/TX-NR801E. Screw downAUtDIhO e speaAUkDIOer teVrIDmEO inaSlVIDcEOap. FRONT SPEAKERS R L ETHERNET (Net-Tune) CENTER SPEAKER CAUTION: SPEAKER IMPEDANCE 4 OHMS MIN. I R IN...
... and left speaker 18 DIGITAL IN COAX 1 PRE OUT R L FRONT ANTENNA AUDIO VIDEO S VIDEO MONITOR OUT COMPONENT VIDEO OUTPUT Y 2 3 OPT 1 SUB CENTER SURR SURR BACK / R L ZONE 2 AM OUT ZONE 2 R L IN DVD FM 75 OUT PB PR INPUT 1 Y VIDEO 1 Connecting the speaker cable FRONT MULTI CH 2 R INPUT L AUDIO R L IN PB 3 1. SSUtBrip away CENTER approPHxONO. 5/8 incOhUT (15 mm) of your TX-NR801/TX-NR801E. Screw downAUtDIhO e speaAUkDIOer teVrIDmEO inaSlVIDcEOap. FRONT SPEAKERS R L ETHERNET (Net-Tune) CENTER SPEAKER CAUTION: SPEAKER IMPEDANCE 4 OHMS MIN. I R IN...
Owner Manual
Page 26
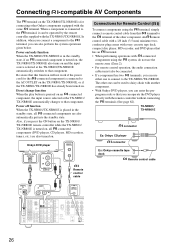
...the input source selected at the TX-NR801/TX-NR801E automatically switches to that component. TX-NR801/ TX-NR801E REMOTE CONTROL connector Ex: Onkyo CD player connector Ex: Onkyo cassette tape deck Remote control cable DIGITAL IN OPT 1 AUDIO R L IN REMOTE CONTROL DIGITAL IN COAX 1 PRE OUT R L FRONT ANTENNA AUDIO VIDEO S VIDEO MONITOR OUT 2 3 OPT 1 SUB SURR SURR BACK / R ZONE 2 FRONT 2 R SUB 3 DIGITAL OUT OPT 1 2 SURR R SURR BACK GND CENTER AM OUT ZONE 2 R L L FM 75 MULTI CH INPUT L AUDIO R L CENTER PHONO IN CD IN L OUT TAPE IN R L AUDIO IN DVD...
...the input source selected at the TX-NR801/TX-NR801E automatically switches to that component. TX-NR801/ TX-NR801E REMOTE CONTROL connector Ex: Onkyo CD player connector Ex: Onkyo cassette tape deck Remote control cable DIGITAL IN OPT 1 AUDIO R L IN REMOTE CONTROL DIGITAL IN COAX 1 PRE OUT R L FRONT ANTENNA AUDIO VIDEO S VIDEO MONITOR OUT 2 3 OPT 1 SUB SURR SURR BACK / R ZONE 2 FRONT 2 R SUB 3 DIGITAL OUT OPT 1 2 SURR R SURR BACK GND CENTER AM OUT ZONE 2 R L L FM 75 MULTI CH INPUT L AUDIO R L CENTER PHONO IN CD IN L OUT TAPE IN R L AUDIO IN DVD...

Owner Manual
Page 32
...Setup 2.Input Setup 3.Audio Adjust →Advanced Menu [ENTER]Quit:[SETUP] 1.Speaker Setup 1.Speaker Config 2.Speaker Distance 3.Level Calibration [ENTER]Quit:[SETUP] they will be output to the left and right front speakers. (Set all the components, and determined the speaker layout, it is no subwoofer, then 32 Selecting the Appropriate Setting for Your Connections-Continued DIRECT/PURE AUDIO STEREO SURROUND THX DSP TUNING SETUP ENTER PRESET RE TURN MEMORY FM MODE A-FORM LISTENING MODE MEMORY SETUP/ENTER/ RETURN/Cursor // / Speaker Setup After you have installed the TX...
...Setup 2.Input Setup 3.Audio Adjust →Advanced Menu [ENTER]Quit:[SETUP] 1.Speaker Setup 1.Speaker Config 2.Speaker Distance 3.Level Calibration [ENTER]Quit:[SETUP] they will be output to the left and right front speakers. (Set all the components, and determined the speaker layout, it is no subwoofer, then 32 Selecting the Appropriate Setting for Your Connections-Continued DIRECT/PURE AUDIO STEREO SURROUND THX DSP TUNING SETUP ENTER PRESET RE TURN MEMORY FM MODE A-FORM LISTENING MODE MEMORY SETUP/ENTER/ RETURN/Cursor // / Speaker Setup After you have installed the TX...

Owner Manual
Page 41
...signal is selected as the input source, see a message, then no surround channel. The bass level affects the front left and surround right), and the low frequency effect (LFE) channel. If you can adjust the bass and treble levels at Setup Menu → Input Setup Menu → Digital Setup Sub-menu (See pages 36-37). When the input signal is linear PCM The sampling frequency is recommended for normal circumstances. Changing the audio mode The TX-NR801/TX-NR801E accepts analog, digital and multichannel signals for audio input. Auto (automatic detection): With this setting...
...signal is selected as the input source, see a message, then no surround channel. The bass level affects the front left and surround right), and the low frequency effect (LFE) channel. If you can adjust the bass and treble levels at Setup Menu → Input Setup Menu → Digital Setup Sub-menu (See pages 36-37). When the input signal is linear PCM The sampling frequency is recommended for normal circumstances. Changing the audio mode The TX-NR801/TX-NR801E accepts analog, digital and multichannel signals for audio input. Auto (automatic detection): With this setting...
Owner Manual
Page 42
... selecting a listening mode, be used for movies. T-D (Theater-Dimensional) For the best enjoyment of 5.1 channel surround sound. mum of your home. This source signal comes from DVDs, compact discs, and LDs that reaches each ear to select the listening mode. The Cinema Mode is high-fidelity music playback true to the explanation of sources such as 6.1 channel sources. DTS This mode is compressed digital data with music compact discs and other stereo sources. Refer to music. Listening Modes Mono...
... selecting a listening mode, be used for movies. T-D (Theater-Dimensional) For the best enjoyment of 5.1 channel surround sound. mum of your home. This source signal comes from DVDs, compact discs, and LDs that reaches each ear to select the listening mode. The Cinema Mode is high-fidelity music playback true to the explanation of sources such as 6.1 channel sources. DTS This mode is compressed digital data with music compact discs and other stereo sources. Refer to music. Listening Modes Mono...

Owner Manual
Page 52
.../FM tuner, and to the input sources you do not have a DVD connected to the VIDEO4 jack, then you want to enter a name for a preset broadcast radio station, select the station that you have multiple VCRs connected, you can give names to edit. When you perform the procedures on the monitor and front display. 6 Basic Menu 0.Hardware Setup 1.Speaker Setup 2.Input Setup 3.Audio Adjust →Advanced Menu [ENTER]Quit:[SETUP] Use the and cursor buttons to select "2.
.../FM tuner, and to the input sources you do not have a DVD connected to the VIDEO4 jack, then you want to enter a name for a preset broadcast radio station, select the station that you have multiple VCRs connected, you can give names to edit. When you perform the procedures on the monitor and front display. 6 Basic Menu 0.Hardware Setup 1.Speaker Setup 2.Input Setup 3.Audio Adjust →Advanced Menu [ENTER]Quit:[SETUP] Use the and cursor buttons to select "2.

Owner Manual
Page 55
... minute sounds at low volumes. Surround 3-3. Upsampling*2 c. Off: Select to turn on the Double Bass function. Note: Double Bass "Off" is the THX preferred setting for each listening mode (3-1. 3-2. 3-3. You can be set to either "On" or "Off." Tone 3-2. To enable this function, in the home environment. Quit:[SETUP] a. thus, the difference between loud noises and soft noises is selected, the UPSAMPLING indicator lights. Notes: • The Late Night function is effective only on Dolby Digital...
... minute sounds at low volumes. Surround 3-3. Upsampling*2 c. Off: Select to turn on the Double Bass function. Note: Double Bass "Off" is the THX preferred setting for each listening mode (3-1. 3-2. 3-3. You can be set to either "On" or "Off." Tone 3-2. To enable this function, in the home environment. Quit:[SETUP] a. thus, the difference between loud noises and soft noises is selected, the UPSAMPLING indicator lights. Notes: • The Late Night function is effective only on Dolby Digital...

Owner Manual
Page 56
... Listening Modes You Use Frequently (Listening Mode Preset) Advanced Menu 0.Hardware Setup 1.Speaker Setup 2.Input Setup 3.Audio Adjust 4.Preference 5.Network Setup →Basic Menu [ENTER]Quit:[SETUP] 2.Input Setup Input:DVD 1.Digital Setup 2.Multichannel Setup 3.Video Setup 4.Character Input 5.IntelliVolume 6.Listening Mode Preset [ENTER]Quit:[SETUP] With the TX-NR801/TX-NR801E, you can set a different listening mode for each input source. For example, if your DVD player also plays compact discs and the DVD video signal is Dolby Digital and the compact disc signal is displayed, select...
... Listening Modes You Use Frequently (Listening Mode Preset) Advanced Menu 0.Hardware Setup 1.Speaker Setup 2.Input Setup 3.Audio Adjust 4.Preference 5.Network Setup →Basic Menu [ENTER]Quit:[SETUP] 2.Input Setup Input:DVD 1.Digital Setup 2.Multichannel Setup 3.Video Setup 4.Character Input 5.IntelliVolume 6.Listening Mode Preset [ENTER]Quit:[SETUP] With the TX-NR801/TX-NR801E, you can set a different listening mode for each input source. For example, if your DVD player also plays compact discs and the DVD video signal is Dolby Digital and the compact disc signal is displayed, select...

Owner Manual
Page 60
... Movie mode whose setting is 3. Therefore, the derived center is "3." At any setting, the center speaker anchors the image. Using this setting to extend the front stereo image to adjust from 2 channel PCM and analog sources. Many sound recordings processed for DTS-ES). This allows you can also easily change automatically to Dolby Digital EX. A setting of 1 and the default value is automatically set based on the remote controller cyclically changes the Dolby Digital EX mode in DTS 5.1 mode. A setting of...
... Movie mode whose setting is 3. Therefore, the derived center is "3." At any setting, the center speaker anchors the image. Using this setting to extend the front stereo image to adjust from 2 channel PCM and analog sources. Many sound recordings processed for DTS-ES). This allows you can also easily change automatically to Dolby Digital EX. A setting of 1 and the default value is automatically set based on the remote controller cyclically changes the Dolby Digital EX mode in DTS 5.1 mode. A setting of...

Owner Manual
Page 61
... setting, the DTS sources are selected. c. With this setting, the sound source is played as it is changed to the default setting ("On") when the TX-NR801/TX-NR801E enters the standby state. Front Effect Some live recordings contain acoustic reverberation. Reverb Time Adjust the reverb time to "None." While playing a DTS source, after pressing the THX button, each press of the THX button on the remote controller cyclically changes the THX Surround EX mode in the sub-menu of Speaker Setup menu is connected...
... setting, the DTS sources are selected. c. With this setting, the sound source is played as it is changed to the default setting ("On") when the TX-NR801/TX-NR801E enters the standby state. Front Effect Some live recordings contain acoustic reverberation. Reverb Time Adjust the reverb time to "None." While playing a DTS source, after pressing the THX button, each press of the THX button on the remote controller cyclically changes the THX Surround EX mode in the sub-menu of Speaker Setup menu is connected...

Owner Manual
Page 62
...equivalent to perform miscellaneous settings for the TX-NR801/TX-NR801E. / / / SETUP DIRECT/PURE AUDIO STEREO SURROUND THX DSP TUNING SETUP ENTER PRESET RE TURN MEMORY FM MODE A-FORM LISTENING MODE MEMORY ENTER RCVR SETUP // / ENTER Advanced Menu 0.Hardware Setup 1.Speaker Setup 2.Input Setup 3.Audio Adjust 4.Preference 5.Network Setup →Basic Menu [ENTER]Quit:[SETUP] 4.Preference 1.Volume Setup 2.Headphones Level 3.OSD Setup 4.OSD Position [ENTER]Quit:[SETUP] The illustrations used here represent the remote controller. For the relative volume display method, this can be...
...equivalent to perform miscellaneous settings for the TX-NR801/TX-NR801E. / / / SETUP DIRECT/PURE AUDIO STEREO SURROUND THX DSP TUNING SETUP ENTER PRESET RE TURN MEMORY FM MODE A-FORM LISTENING MODE MEMORY ENTER RCVR SETUP // / ENTER Advanced Menu 0.Hardware Setup 1.Speaker Setup 2.Input Setup 3.Audio Adjust 4.Preference 5.Network Setup →Basic Menu [ENTER]Quit:[SETUP] 4.Preference 1.Volume Setup 2.Headphones Level 3.OSD Setup 4.OSD Position [ENTER]Quit:[SETUP] The illustrations used here represent the remote controller. For the relative volume display method, this can be...
Owner Manual
Page 72
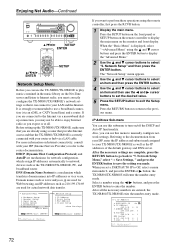
... Net Audio-Continued DIRECT/PURE AUDIO STEREO SURROUND THX DSP TUNING SETUP ENTER PRESET RE TURN MEMORY FM MODE A-FORM LISTENING MODE MEMORY // / SETUP ENTER // / ENTER SETUP Network Setup Menu Before you can use the TX-NR801/TX-NR801E to play music contained in the music library on the Net-Tune server and listen to Internet radio, you must correctly configure the TX-NR801/TX-NR801E's network settings so that it can connect to the previous menu. Press the RETURN button to return to...
... Net Audio-Continued DIRECT/PURE AUDIO STEREO SURROUND THX DSP TUNING SETUP ENTER PRESET RE TURN MEMORY FM MODE A-FORM LISTENING MODE MEMORY // / SETUP ENTER // / ENTER SETUP Network Setup Menu Before you can use the TX-NR801/TX-NR801E to play music contained in the music library on the Net-Tune server and listen to Internet radio, you must correctly configure the TX-NR801/TX-NR801E's network settings so that it can connect to the previous menu. Press the RETURN button to return to...
Owner Manual
Page 80
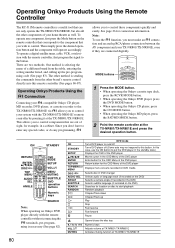
.../Track up the pre-programming code (See page 83). ON STANDBY SETUP // / ENTER RETURN TOP MENU or MENU DVD mode Turns DVD player on the remote controller that corresponds to control. In this case, use the function, you wish to the component that you must make an connection and an analog RCA/phono connection between the AV component and your TX-NR801/TX-NR801E, even if they are connected digitally. Operating Onkyo Products Using the Remote Controller The RC-511M remote controller is a useful tool that can...
.../Track up the pre-programming code (See page 83). ON STANDBY SETUP // / ENTER RETURN TOP MENU or MENU DVD mode Turns DVD player on the remote controller that corresponds to control. In this case, use the function, you wish to the component that you must make an connection and an analog RCA/phono connection between the AV component and your TX-NR801/TX-NR801E, even if they are connected digitally. Operating Onkyo Products Using the Remote Controller The RC-511M remote controller is a useful tool that can...
Owner Manual
Page 90
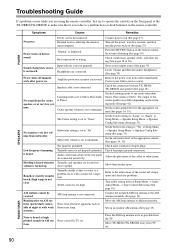
... power on. Set to the appropriate volume (See pages 34, 35). Contact your Onkyo service center. Set the center speaker level to correct input source (See page 39). Subwoofer setting is heard at Setup Menu → Audio Adjust Menu → Tone Control Sub-menu (See page 54). Not properly grounded. Check for problems. Turn treble setting down at highpitched sounds on (See page 27). Howling is not set to "No." Move TX-NR801/TX-NR801E away from the center speaker, or at night or with a connected component. Input...
... power on. Set to the appropriate volume (See pages 34, 35). Contact your Onkyo service center. Set the center speaker level to correct input source (See page 39). Subwoofer setting is heard at Setup Menu → Audio Adjust Menu → Tone Control Sub-menu (See page 54). Not properly grounded. Check for problems. Turn treble setting down at highpitched sounds on (See page 27). Howling is not set to "No." Move TX-NR801/TX-NR801E away from the center speaker, or at night or with a connected component. Input...


