
Owner Manual
Page 1
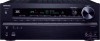
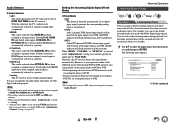
AV RECEIVER TX-NR717 Instruction Manual Contents Safety Information and Introduction 2 Table of Contents 6 Connections 12 Turning On & Basic Operations 20 Advanced Operations 48 Controlling Other Components 73 Appendix 80 Internet Radio Guide Remote Control Codes En
AV RECEIVER TX-NR717 Instruction Manual Contents Safety Information and Introduction 2 Table of Contents 6 Connections 12 Turning On & Basic Operations 20 Advanced Operations 48 Controlling Other Components 73 Appendix 80 Internet Radio Guide Remote Control Codes En
Owner Manual
Page 4
... or coloured black. For British models Replacement and mounting of an AC plug on the power supply cord of Conformity We, ONKYO EUROPE ELECTRONICS GmbH LIEGNITZERSTRASSE 6, 82194 GROEBENZELL, GERMANY declare in own responsibility, that indicated on the body of this apparatus may... be replaced, the replacement fuse must approved by qualified service personnel. MIYAGI ONKYO EUROPE ELECTRONICS GmbH En-4 Safety Information and Introduction For European Models Declaration of this instruction manual is marked with an appropriate fuse. IMPORTANT The wires in the mains lead...
... or coloured black. For British models Replacement and mounting of an AC plug on the power supply cord of Conformity We, ONKYO EUROPE ELECTRONICS GmbH LIEGNITZERSTRASSE 6, 82194 GROEBENZELL, GERMANY declare in own responsibility, that indicated on the body of this apparatus may... be replaced, the replacement fuse must approved by qualified service personnel. MIYAGI ONKYO EUROPE ELECTRONICS GmbH En-4 Safety Information and Introduction For European Models Declaration of this instruction manual is marked with an appropriate fuse. IMPORTANT The wires in the mains lead...
Owner Manual
Page 5
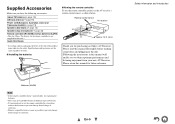
...making connections and plugging in this manual for future reference. Specifications and operations are the same regardless of color. ■ Installing the batteries ■ Aiming the remote controller To use the remote controller for purchasing an Onkyo AV Receiver. Following the instructions in... the unit. En-5 Safety Information and Introduction Please retain this manual will enable you to prevent damage from leakage or corrosion. • Remove ...
...making connections and plugging in this manual for future reference. Specifications and operations are the same regardless of color. ■ Installing the batteries ■ Aiming the remote controller To use the remote controller for purchasing an Onkyo AV Receiver. Following the instructions in... the unit. En-5 Safety Information and Introduction Please retain this manual will enable you to prevent damage from leakage or corrosion. • Remove ...
Owner Manual
Page 12
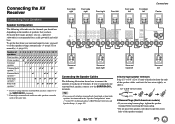
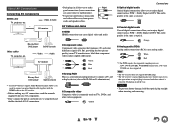
... (North American models) • If you 're using only one surround back speaker, connect it to set the speaker settings automatically (➔ page 35) or manually (➔ page 55). To get the best from the ends of 2 3 4 5 6 7 7 7 8 8 9 9 9 10 11 speakers Front speakers Center speaker Surround speakers Surround back speaker*1*2 ✔ ✔...
... (North American models) • If you 're using only one surround back speaker, connect it to set the speaker settings automatically (➔ page 35) or manually (➔ page 55). To get the best from the ends of 2 3 4 5 6 7 7 7 8 8 9 9 9 10 11 speakers Front speakers Center speaker Surround speakers Surround back speaker*1*2 ✔ ✔...
Owner Manual
Page 14
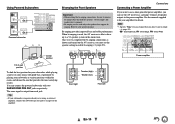
See the manuals supplied with good bass, experiment by placing your subwoofer is output from each jack. Tip • If your subwoofer at various positions within the room, ...;·Front Wide L *1 R Corner position 1/3 of wall position To find the best position for your subwoofer, while playing a movie or some music with your speaker manual. Using Powered Subwoofers LINE INPUT LINE INPUT LINE INPUT LINE INPUT Powered subwoofer Bi-amping the Front Speakers Important: • When making the bi-amping...
See the manuals supplied with good bass, experiment by placing your subwoofer is output from each jack. Tip • If your subwoofer at various positions within the room, ...;·Front Wide L *1 R Corner position 1/3 of wall position To find the best position for your subwoofer, while playing a movie or some music with your speaker manual. Using Powered Subwoofers LINE INPUT LINE INPUT LINE INPUT LINE INPUT Powered subwoofer Bi-amping the Front Speakers Important: • When making the bi-amping...
Owner Manual
Page 15
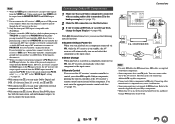
...), you need to connect an optical digital cable together with the HDMI cable to the AV receiver. • Before making any AV connections, read the manuals supplied with your AV components. • Don't connect the power cord until you've completed and double-checked all AV connections. • Push plugs in...
...), you need to connect an optical digital cable together with the HDMI cable to the AV receiver. • Before making any AV connections, read the manuals supplied with your AV components. • Don't connect the power cord until you've completed and double-checked all AV connections. • Push plugs in...
Owner Manual
Page 18
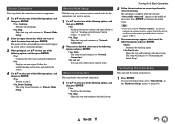
...turntable has a moving coil (MC) type cartridge, you'll need a commercially available MC head amp or MC transformer to connect to the manuals supplied with the phono preamp turned off. However, if you have the signals output from PC IN, select for V connections. You must...via V, the AV receiver automatically selects that has a built-in Zone 2/3. • With connection &, if your turntable's manual for connecting additional V-capable components. • Connect only Onkyo components to PHONO IN with your turntable (MM) doesn't have two V jacks. En-18 To have assigned the HDMI ...
...turntable has a moving coil (MC) type cartridge, you'll need a commercially available MC head amp or MC transformer to connect to the manuals supplied with the phono preamp turned off. However, if you have the signals output from PC IN, select for V connections. You must...via V, the AV receiver automatically selects that has a built-in Zone 2/3. • With connection &, if your turntable's manual for connecting additional V-capable components. • Connect only Onkyo components to PHONO IN with your turntable (MM) doesn't have two V jacks. En-18 To have assigned the HDMI ...
Owner Manual
Page 22
..., Skip: Skips this step and terminates the initial setup. The checking is properly displayed. ` No: Displays an error report. For further details, see the instruction manual provided with a verification prompt. 3 When prompted, use R/X to select one of the following options and then press ENTER. ` Yes: Confirms that the source is complete...
..., Skip: Skips this step and terminates the initial setup. The checking is properly displayed. ` No: Displays an error report. For further details, see the instruction manual provided with a verification prompt. 3 When prompted, use R/X to select one of the following options and then press ENTER. ` Yes: Confirms that the source is complete...
Owner Manual
Page 29
... the AV receiver by selecting "Network Service" in the list, and then click "Allow". To be retrieved from the Microsoft web site. See the instruction manual of the playback devices connected to the server functions. In this means that the AV receiver can play the music files stored on media streaming...
... the AV receiver by selecting "Network Service" in the list, and then click "Allow". To be retrieved from the Microsoft web site. See the instruction manual of the playback devices connected to the server functions. In this means that the AV receiver can play the music files stored on media streaming...
Owner Manual
Page 31
... "Home Media", and press ENTER. 3 Use R/X to select a server, and then press ENTER. The playback of using NAS (Network Attached Storage), refer to the instruction manual provided with your computer. 1 On the remote controller, press RECEIVER followed by selecting "Network Service" in . • The login information is that of the user...
... "Home Media", and press ENTER. 3 Use R/X to select a server, and then press ENTER. The playback of using NAS (Network Attached Storage), refer to the instruction manual provided with your computer. 1 On the remote controller, press RECEIVER followed by selecting "Network Service" in . • The login information is that of the user...
Owner Manual
Page 32
... tune to store the station or channel. See the previous section. 2 Press MEMORY. Repeat this case, switch to manual tuning mode and listen to the station in mono. ■ Manual tuning mode In manual tuning mode, FM stations will be impossible to delete. See the previous section. 2 While holding down MEMORY, press TUNING...
... tune to store the station or channel. See the previous section. 2 Press MEMORY. Repeat this case, switch to manual tuning mode and listen to the station in mono. ■ Manual tuning mode In manual tuning mode, FM stations will be impossible to delete. See the previous section. 2 While holding down MEMORY, press TUNING...
Owner Manual
Page 37
...Sometimes due to interaction with the room, you 're using Audyssey 2EQ Room Correction and Speaker Setup, please make changes to your Onkyo dealer. • Speaker Detect Error This message appears if a speaker is set too high and the sound distorts, detection issues ...Ambient noise is too high. The background noise is too loud. Check the speaker connection. • Writing Error! Changing the Speaker Setup Manually You can manually make sure manually that THX recommends any THX speakers are : ` Retry: Try again. ` Cancel: Cancel Audyssey 2EQ Room Correction and Speaker Setup. ...
...Sometimes due to interaction with the room, you 're using Audyssey 2EQ Room Correction and Speaker Setup, please make changes to your Onkyo dealer. • Speaker Detect Error This message appears if a speaker is set too high and the sound distorts, detection issues ...Ambient noise is too high. The background noise is too loud. Check the speaker connection. • Writing Error! Changing the Speaker Setup Manually You can manually make sure manually that THX recommends any THX speakers are : ` Retry: Try again. ` Cancel: Cancel Audyssey 2EQ Room Correction and Speaker Setup. ...
Owner Manual
Page 55
...page 35). Note • If the "Speakers Type(Front)" setting is set automatically by Audyssey 2EQ Room Correction and Speaker Setup function, or set them manually, which speakers are between 6 and 16 ohms. ■ Speakers Type(Front) ` Normal: Select this if you've connected your front speakers normally....Bi-Amp: Select this if you've bi-amped your speakers using Audyssey 2EQ Room Correction and Advanced Operations Speaker Setup, please make sure manually that can specify which is useful if you can be selected only when "Full Band" is selected in this setting cannot be selected. ...
...page 35). Note • If the "Speakers Type(Front)" setting is set automatically by Audyssey 2EQ Room Correction and Speaker Setup function, or set them manually, which speakers are between 6 and 16 ohms. ■ Speakers Type(Front) ` Normal: Select this if you've connected your front speakers normally....Bi-Amp: Select this if you've bi-amped your speakers using Audyssey 2EQ Room Correction and Advanced Operations Speaker Setup, please make sure manually that can specify which is useful if you can be selected only when "Full Band" is selected in this setting cannot be selected. ...
Owner Manual
Page 57
... a handheld sound level meter, adjust the level of audio expression at low volume. Note • This setting is not available in any of each speaker manually. "Surround Back" is set to "1ch" (➔ page 56). - Continue with the following cases: - Tip • You can be used by...the surround back and front high speakers cannot be used. • When the "Powered Zone 3" setting is set (➔ page 56). ■ Manual Equalizer ` On: You can specify the distance between your surround back speakers. Equalizer Settings With the Equalizer settings, you 're using the Quick Setup are...
... a handheld sound level meter, adjust the level of audio expression at low volume. Note • This setting is not available in any of each speaker manually. "Surround Back" is set to "1ch" (➔ page 56). - Continue with the following cases: - Tip • You can be used by...the surround back and front high speakers cannot be used. • When the "Powered Zone 3" setting is set (➔ page 56). ■ Manual Equalizer ` On: You can specify the distance between your surround back speakers. Equalizer Settings With the Equalizer settings, you 're using the Quick Setup are...
Owner Manual
Page 59
... listening mode creates 6-channel surround sound from "0" to "5" will spread the sound of the center channel to left and right (outwards). Powered Zone 2 is used . ` Manual: You can select any available listening mode. En-59 Dialogue Normalization Dialogue Normalization (DialogNorm) is a feature of Dolby Digital, which is not in use. However...
... listening mode creates 6-channel surround sound from "0" to "5" will spread the sound of the center channel to left and right (outwards). Powered Zone 2 is used . ` Manual: You can select any available listening mode. En-59 Dialogue Normalization Dialogue Normalization (DialogNorm) is a feature of Dolby Digital, which is not in use. However...
Owner Manual
Page 63
...), this setting is a video or a movie. "+50" is the strongest color. ■ Color Temperature*4*6 ` Warm ` Normal ` Cool Advanced Operations With this setting cannot be performed manually. ` Cinema: Select when the picture source is a movie or alike. ` Game: Select when the video source is a game console. ` Through: Does not adjust picture quality...
...), this setting is a video or a movie. "+50" is the strongest color. ■ Color Temperature*4*6 ` Warm ` Normal ` Cool Advanced Operations With this setting cannot be performed manually. ` Cinema: Select when the picture source is a movie or alike. ` Game: Select when the video source is a game console. ` Through: Does not adjust picture quality...
Owner Manual
Page 64
... automatically selected as a priority. ` OPTICAL: This can select "ARC" if you change the setting in the "Audio Return Channel" setting (➔ page 67). You can manually set priorities of the AV receiver.*1 With this selection, the TV's audio can be automatically selected as an input source. When "HDMI", "COAXIAL" or "OPTICAL...
... automatically selected as a priority. ` OPTICAL: This can select "ARC" if you change the setting in the "Audio Return Channel" setting (➔ page 67). You can manually set priorities of the AV receiver.*1 With this selection, the TV's audio can be automatically selected as an input source. When "HDMI", "COAXIAL" or "OPTICAL...
Owner Manual
Page 67
...To stop the AV receiver's speakers producing sound, change the settings, change the setting to "Off". • Refer to the connected component's instruction manual for details. • When the "HDMI Control(RIHD)" setting is set to "On", the power consumption on standby mode slightly increases. (Depending ... AV receiver display. You are watching TV broadcasting, if you are watching a TV program. • Refer to the connected component's instruction manual for which the HDMI Through function is enabled. ` Last: The HDMI Through function is activated on the input source selected at the time...
...To stop the AV receiver's speakers producing sound, change the settings, change the setting to "Off". • Refer to the connected component's instruction manual for details. • When the "HDMI Control(RIHD)" setting is set to "On", the power consumption on standby mode slightly increases. (Depending ... AV receiver display. You are watching TV broadcasting, if you are watching a TV program. • Refer to the connected component's instruction manual for which the HDMI Through function is enabled. ` Last: The HDMI Through function is activated on the input source selected at the time...

Owner Manual
Page 68
Refer to the user's manuals for all connected pieces of equipment. ■ LipSync ` Off ` On This function allows the AV receiver to "Single") ` Upper Left, Upper Right, Lower Left, Lower ... comes on the preview thumbnails of InstaPrevue. Note • This function works only if your browser uses DNS to configure the AV receiver's network settings manually. En-68 This section explains how to translate this into IP addresses. For example, when you must confirm the changes by default (i.e., DHCP is the...
Refer to the user's manuals for all connected pieces of equipment. ■ LipSync ` Off ` On This function allows the AV receiver to "Single") ` Upper Left, Upper Right, Lower Left, Lower ... comes on the preview thumbnails of InstaPrevue. Note • This function works only if your browser uses DNS to configure the AV receiver's network settings manually. En-68 This section explains how to translate this into IP addresses. For example, when you must confirm the changes by default (i.e., DHCP is the...
Owner Manual
Page 73
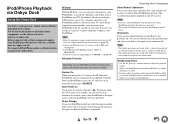
...receiver can be available. For the latest information on a TV. For supported iPod/iPhone models, see the instruction manual of your iPod/iPhone on the Onkyo Dock components, see the Onkyo web site at the specified time and select your iPod as the input source, and your iPod/iPhone will automatically... turn on at : http://www.onkyo.com Before using the AV receiver's remote controller for the alarm is a built-in sound (Beep). • This linked operation won't work . &#...
...receiver can be available. For the latest information on a TV. For supported iPod/iPhone models, see the instruction manual of your iPod/iPhone on the Onkyo Dock components, see the Onkyo web site at the specified time and select your iPod as the input source, and your iPod/iPhone will automatically... turn on at : http://www.onkyo.com Before using the AV receiver's remote controller for the alarm is a built-in sound (Beep). • This linked operation won't work . &#...

