Owner Manual
Page 1
AV RECEIVER TX-NR5010 TX-NR3010 Instruction Manual Contents Safety Information and Introduction 2 Table of Contents 6 Connections 13 Turning On & Basic Operations 26 Advanced Operations 57 Controlling Other Components 92 Appendix 101 Internet Radio Guide Remote Control Codes En
AV RECEIVER TX-NR5010 TX-NR3010 Instruction Manual Contents Safety Information and Introduction 2 Table of Contents 6 Connections 13 Turning On & Basic Operations 26 Advanced Operations 57 Controlling Other Components 92 Appendix 101 Internet Radio Guide Remote Control Codes En

Owner Manual
Page 4
...not correspond with the coloured markings identifying the terminals in own responsibility, that indicated on the power supply cord of this instruction manual is fitted with a polarized plug: CAUTION: TO PREVENT ELECTRIC SHOCK, MATCH WIDE BLADE OF PLUG TO WIDE SLOT, FULLY INSERT...GROEBENZELL, GERMANY declare in your socket outlets, cut it off and fit a suitable plug. IMPORTANT The plug is in the plug. MIYAGI ONKYO EUROPE ELECTRONICS GmbH En-4 Safety Information and Introduction Check for your plug, proceed as EN60065, EN55013, EN55020 and EN61000-3-2, -3-3. For models...
...not correspond with the coloured markings identifying the terminals in own responsibility, that indicated on the power supply cord of this instruction manual is fitted with a polarized plug: CAUTION: TO PREVENT ELECTRIC SHOCK, MATCH WIDE BLADE OF PLUG TO WIDE SLOT, FULLY INSERT...GROEBENZELL, GERMANY declare in your socket outlets, cut it off and fit a suitable plug. IMPORTANT The plug is in the plug. MIYAGI ONKYO EUROPE ELECTRONICS GmbH En-4 Safety Information and Introduction Check for your plug, proceed as EN60065, EN55013, EN55020 and EN61000-3-2, -3-3. For models...

Owner Manual
Page 5
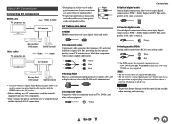
... antennas are the same regardless of the product name indicates the color. Please retain this manual thoroughly before making connections and plugging in this manual will enable you for future reference. Please read this manual for purchasing an Onkyo AV Receiver. Following the instructions in the unit. Power cord (➔ page 25) Speaker cable...
... antennas are the same regardless of the product name indicates the color. Please retain this manual thoroughly before making connections and plugging in this manual will enable you for future reference. Please read this manual for purchasing an Onkyo AV Receiver. Following the instructions in the unit. Power cord (➔ page 25) Speaker cable...

Owner Manual
Page 13
... (North American models) • If you have. If you want to use by priority. You can set the speaker settings automatically (➔ page 42) or manually (➔ page 67).
... (North American models) • If you have. If you want to use by priority. You can set the speaker settings automatically (➔ page 42) or manually (➔ page 67).

Owner Manual
Page 18
...B)" to "Bi-Amp" as shown and turned on the AV receiver, you 've completed the bi-amping connections as this may damage your speaker manual. When bi-amping is used, the AV receiver is set the speaker setting to a 7.2 speaker system in the main room. Bi-amping the Front...way around, as this setting is able to drive up to a 7.2 speaker system in the main room. Make sure that this may damage your speaker manual. Note • You need to your speakers. When speakers without crossover network provide a fine, three-dimensional sound field that support biamping. Connecting speakers ...
...B)" to "Bi-Amp" as shown and turned on the AV receiver, you 've completed the bi-amping connections as this may damage your speaker manual. When bi-amping is used, the AV receiver is set the speaker setting to a 7.2 speaker system in the main room. Bi-amping the Front...way around, as this setting is able to drive up to a 7.2 speaker system in the main room. Make sure that this may damage your speaker manual. Note • You need to your speakers. When speakers without crossover network provide a fine, three-dimensional sound field that support biamping. Connecting speakers ...

Owner Manual
Page 19
... Front B left Connecting a Power Amplifier If you want to use the AV receiver as a preamp. L R Power amplifier Note • Specify "None" for details. See the manuals supplied with your amplifier for any channel that you can use a more powerful power amplifier, you don't want to output (➔ page 67). • To...
... Front B left Connecting a Power Amplifier If you want to use the AV receiver as a preamp. L R Power amplifier Note • Specify "None" for details. See the manuals supplied with your amplifier for any channel that you can use a more powerful power amplifier, you don't want to output (➔ page 67). • To...
Owner Manual
Page 20
...), you need to connect an optical digital cable together with the HDMI cable to the AV receiver. • Before making any AV connections, read the manuals supplied with your AV components. • Don't connect the power cord until you've completed and double-checked all AV connections. • Push plugs in...
...), you need to connect an optical digital cable together with the HDMI cable to the AV receiver. • Before making any AV connections, read the manuals supplied with your AV components. • Don't connect the power cord until you've completed and double-checked all AV connections. • Push plugs in...
Owner Manual
Page 23
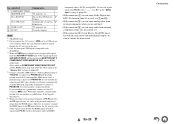
Personal computer Note *1 TX-NR5010 only. *2 Do not connect the AV receiver's USB port to PHONO IN. Music on your computer. Select which of COMPONENT VIDEO MONITOR OUT and ... stereo and multichannel outputs, be played through the AV receiver in phono preamp to TV/CD IN, or connect it . *6 When you connect your turntable's manual for "PC" in the "HDMI Input" setting (➔ page 64). • With connection %, you can enjoy Dolby Digital and DTS. (To listen in Zone 2/3 as...
Personal computer Note *1 TX-NR5010 only. *2 Do not connect the AV receiver's USB port to PHONO IN. Music on your computer. Select which of COMPONENT VIDEO MONITOR OUT and ... stereo and multichannel outputs, be played through the AV receiver in phono preamp to TV/CD IN, or connect it . *6 When you connect your turntable's manual for "PC" in the "HDMI Input" setting (➔ page 64). • With connection %, you can enjoy Dolby Digital and DTS. (To listen in Zone 2/3 as...

Owner Manual
Page 25
...wall outlet first, and then the AV receiver. En-25 You can connect either one supplied with your other than the one to the manuals supplied with the AV receiver. Connecting other electrical equipment on a component connected via V, while the AV receiver is a problem, plug ...that component as the input source. ■ Direct Change When playback is started on a component connected via V, the AV receiver automatically selects that each Onkyo component is connected with an analog audio cable (connection ' in the hookup examples) (➔ page 22). 2 Make the V connection (see the ...
...wall outlet first, and then the AV receiver. En-25 You can connect either one supplied with your other than the one to the manuals supplied with the AV receiver. Connecting other electrical equipment on a component connected via V, while the AV receiver is a problem, plug ...that component as the input source. ■ Direct Change When playback is started on a component connected via V, the AV receiver automatically selects that each Onkyo component is connected with an analog audio cable (connection ' in the hookup examples) (➔ page 22). 2 Make the V connection (see the ...

Owner Manual
Page 28
.... 1 Use R/X to select one of the following options, and then press ENTER. ` Yes: Performs the remote control code input. For further details, see the instruction manual provided with a verification prompt. 3 When prompted, use R/X to select one of the following options and then press ENTER. ` Yes: Confirms that the source is complete...
.... 1 Use R/X to select one of the following options, and then press ENTER. ` Yes: Performs the remote control code input. For further details, see the instruction manual provided with a verification prompt. 3 When prompted, use R/X to select one of the following options and then press ENTER. ` Yes: Confirms that the source is complete...

Owner Manual
Page 34
... select an icon to move, and then press ENTER. 4 Use R/X/F/S to access the content. The icons switch positions and the message "Completed!" See the instruction manual of the supported devices appears. 4 Select the AV receiver in the Home menu. 3 Use R/X/F/S to select "DLNA", and press ENTER. 4 Use R/X to make the following...
... select an icon to move, and then press ENTER. 4 Use R/X/F/S to access the content. The icons switch positions and the message "Completed!" See the instruction manual of the supported devices appears. 4 Select the AV receiver in the Home menu. 3 Use R/X/F/S to select "DLNA", and press ENTER. 4 Use R/X to make the following...

Owner Manual
Page 36
... "Share this option is not available, verify that of the "Sharing" tab. • Verify that "Workgroup" is that "View by:" is allowed to the instruction manual provided with network access can be done by NET. En-36 If you log in. • The login information is properly set to "Category". 2 Select...
... "Share this option is not available, verify that of the "Sharing" tab. • Verify that "Workgroup" is that "View by:" is allowed to the instruction manual provided with network access can be done by NET. En-36 If you log in. • The login information is properly set to "Category". 2 Select...

Owner Manual
Page 37
....) 2 Within 8 seconds, use PRESET F/S to select a preset from a stereo FM station is found. In this case, switch to manual tuning mode and listen to the station in mono. ■ Manual tuning mode In manual tuning mode, FM stations will be continued En-37 When tuned into weak FM stereo stations If the signal...
....) 2 Within 8 seconds, use PRESET F/S to select a preset from a stereo FM station is found. In this case, switch to manual tuning mode and listen to the station in mono. ■ Manual tuning mode In manual tuning mode, FM stations will be continued En-37 When tuned into weak FM stereo stations If the signal...

Owner Manual
Page 45
...modes intended for use with music. To check the format, see "Displaying Source Information" (➔ page 54). • While a pair of the subwoofer manually. • Sometimes due to interaction with the room, you can select the following listening modes: Pure Audio, Mono, Direct, and Stereo. Using a ... Disc/DVD player is set it may occur, so use with movies and TV. Only video signals input through HDMI input can manually make sure manually that if the volume is connected to "80Hz(THX)". En-45 Using the Listening Modes Selecting Listening Modes See "About Listening Modes...
...modes intended for use with music. To check the format, see "Displaying Source Information" (➔ page 54). • While a pair of the subwoofer manually. • Sometimes due to interaction with the room, you can select the following listening modes: Pure Audio, Mono, Direct, and Stereo. Using a ... Disc/DVD player is set it may occur, so use with movies and TV. Only video signals input through HDMI input can manually make sure manually that if the volume is connected to "80Hz(THX)". En-45 Using the Listening Modes Selecting Listening Modes See "About Listening Modes...

Owner Manual
Page 63
... this for charts showing how the "Monitor Out" and "Resolution" settings affect the video signal flow through the HDMI output. Changing the "Monitor Out" setting manually 1 Press MONITOR OUT on the video component connected to select: ` Analog, HDMI Main, HDMI Sub or Both. Input/Output Assign 1 2 3 4 5 "Setup" Main Menu Input/Output...
... this for charts showing how the "Monitor Out" and "Resolution" settings affect the video signal flow through the HDMI output. Changing the "Monitor Out" setting manually 1 Press MONITOR OUT on the video component connected to select: ` Analog, HDMI Main, HDMI Sub or Both. Input/Output Assign 1 2 3 4 5 "Setup" Main Menu Input/Output...

Owner Manual
Page 66
...Speaker Setup function, or set the minimum speaker impedance to 4 ohms. If you bi-amp the front speakers, you change the settings manually. Select "Next (2-7. Digital Processing Crossover Network)" to display the screen for Digital Processing Crossover Network (➔ page 71). If you ... refer to "Using Speakers Without Crossover Network" (➔ page 18). a pair of headphones is 4 ohms or more but less than 6, set them manually, which is set to "On" (➔ page 83) and you 're using speakers without crossover network. Advanced Operations ■ Speakers Type(Front B)...
...Speaker Setup function, or set the minimum speaker impedance to 4 ohms. If you bi-amp the front speakers, you change the settings manually. Select "Next (2-7. Digital Processing Crossover Network)" to display the screen for Digital Processing Crossover Network (➔ page 71). If you ... refer to "Using Speakers Without Crossover Network" (➔ page 18). a pair of headphones is 4 ohms or more but less than 6, set them manually, which is set to "On" (➔ page 83) and you 're using speakers without crossover network. Advanced Operations ■ Speakers Type(Front B)...

Owner Manual
Page 67
... Setup function (➔ page 42). Refer to your speakers using Audyssey MultEQ XT32 Room Correction and Speaker Setup, please make sure manually that can set the crossover frequencies, distances, and levels of the front speakers A and front speakers B independently. If you set up your ...speaker's manuals to determine the optimum crossover frequencies. Note • "Speakers Type(Front A)" and "Speakers Type(Front B)" cannot be set to "Bi-Amp" or ...
... Setup function (➔ page 42). Refer to your speakers using Audyssey MultEQ XT32 Room Correction and Speaker Setup, please make sure manually that can set the crossover frequencies, distances, and levels of the front speakers A and front speakers B independently. If you set up your ...speaker's manuals to determine the optimum crossover frequencies. Note • "Speakers Type(Front A)" and "Speakers Type(Front B)" cannot be set to "Bi-Amp" or ...

Owner Manual
Page 69
...in this menu (➔ page 59). *2 If the "Subwoofer" setting is set to "1ch", this setting cannot be set to change the settings manually. For Speakers B, you need to your listening position. If you can be set in meters. Speaker Distance This setting is set automatically by Audyssey ... THX, which is muted. • Speakers that you can be set in test tone so that the volume of each speaker to change the settings manually. You can be set in "Speaker Configuration" cannot be selected (➔ page 67). • When the "Powered Zone 3" setting is set to "No...
...in this menu (➔ page 59). *2 If the "Subwoofer" setting is set to "1ch", this setting cannot be set to change the settings manually. For Speakers B, you need to your listening position. If you can be set in meters. Speaker Distance This setting is set automatically by Audyssey ... THX, which is muted. • Speakers that you can be set in test tone so that the volume of each speaker to change the settings manually. You can be set in "Speaker Configuration" cannot be selected (➔ page 67). • When the "Powered Zone 3" setting is set to "No...

Owner Manual
Page 70
...■ BGC ` Off ` On You can apply THX's Boundary Gain Compensation (BGC) to compensate the perceived exaggeration of low frequencies for each speaker manually. To be selected (➔ page 67). ■ Loudness Plus ` Off ` On When the "Loudness Plus" setting is not transmitted via the ...- The volume of audio expression at each speaker can be adjusted from -6dB to 0dB to "On", it prevails over this setting is selected. ■ Manual Equalizer ` On: You can adjust the equalizer for the subwoofer, "25Hz", "40Hz", "63Hz", "100Hz", or "160Hz". • Low frequencies (e.g., 63...
...■ BGC ` Off ` On You can apply THX's Boundary Gain Compensation (BGC) to compensate the perceived exaggeration of low frequencies for each speaker manually. To be selected (➔ page 67). ■ Loudness Plus ` Off ` On When the "Loudness Plus" setting is not transmitted via the ...- The volume of audio expression at each speaker can be adjusted from -6dB to 0dB to "On", it prevails over this setting is selected. ■ Manual Equalizer ` On: You can adjust the equalizer for the subwoofer, "25Hz", "40Hz", "63Hz", "100Hz", or "160Hz". • Low frequencies (e.g., 63...
Owner Manual
Page 71
...pressing MODE/D (Blue). The HDMI connection in your system is used to deliver uncompressed digital audio and video information from one device to your speaker manual when setting without crossover network, it can also be caused. With THX Loudness Plus, home theater audiences can set the volume of the woofers'...' low-pass filter (LPF) and the tweeters' high-pass filter (HPF) are played. • You can be delivered. With its built-in your Onkyo AVR and can switch from the current audio source to be set to "Yes". ■ High Level, Low Level `-6.0dB to 0.0dB to other devices...
...pressing MODE/D (Blue). The HDMI connection in your system is used to deliver uncompressed digital audio and video information from one device to your speaker manual when setting without crossover network, it can also be caused. With THX Loudness Plus, home theater audiences can set the volume of the woofers'...' low-pass filter (LPF) and the tweeters' high-pass filter (HPF) are played. • You can be delivered. With its built-in your Onkyo AVR and can switch from the current audio source to be set to "Yes". ■ High Level, Low Level `-6.0dB to 0.0dB to other devices...

