
Owner Manual
Page 1
Please read this manual thoroughly before making connections and plugging in this manual for purchasing an Onkyo AV Receiver. Please retain this manual will enable you for future reference. Following the instructions in the unit. Setup Menu 82 Using the Remote Controller 124 Miscellaneous 143 En Contents AV Receiver Getting Started 2 TX-NR1000 TX-NR5000E Installation and Connections 18 Instruction Manual Operations 48 Thank you to obtain optimum performance and listening enjoyment from your new AV Receiver.
Please read this manual thoroughly before making connections and plugging in this manual for purchasing an Onkyo AV Receiver. Please retain this manual will enable you for future reference. Following the instructions in the unit. Setup Menu 82 Using the Remote Controller 124 Miscellaneous 143 En Contents AV Receiver Getting Started 2 TX-NR1000 TX-NR5000E Installation and Connections 18 Instruction Manual Operations 48 Thank you to obtain optimum performance and listening enjoyment from your new AV Receiver.
Owner Manual
Page 3
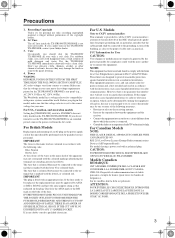
... For British Models Replacement and mounting of an AC plug on , the user is set to STANDBY does not fully shutdown the TX-NR1000/TX-NR5000E. However, there is not user-serviceable. For Canadian Models NOTE: THIS CLASS B DIGITAL APPARATUS COMPLIES WITH CANADIAN ICES-003.... the separation between the equipment and the receiver. • Connect the equipment into an outlet on the body of this model, make sure that interference will not occur in accordance with the limits for your Onkyo dealer. 3. Dry the TX-NR1000/ TX-NR5000E immediately afterwards with a soft cloth....
... For British Models Replacement and mounting of an AC plug on , the user is set to STANDBY does not fully shutdown the TX-NR1000/TX-NR5000E. However, there is not user-serviceable. For Canadian Models NOTE: THIS CLASS B DIGITAL APPARATUS COMPLIES WITH CANADIAN ICES-003.... the separation between the equipment and the receiver. • Connect the equipment into an outlet on the body of this model, make sure that interference will not occur in accordance with the limits for your Onkyo dealer. 3. Dry the TX-NR1000/ TX-NR5000E immediately afterwards with a soft cloth....
Owner Manual
Page 7
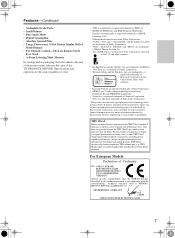
...other intellectual property rights. "This product incorporates copyright protection technology that the ONKYO product described in this copyright protection technology must be THX Ultra2 certi&#...EN55020 and EN61000-3-2, -3-3. Reverse engineering or disassembly is in the U.S. THX Ultra2 receivers also feature proprietary THX technologies (e.g., THX Mode) which is a trademark of parameters,...of Niles Audio Corporation. Specifications and operation are trademarks of the TX-NR1000/TX-NR5000E. patents and other countries. • Intel and Pentium are registered trademarks...
...other intellectual property rights. "This product incorporates copyright protection technology that the ONKYO product described in this copyright protection technology must be THX Ultra2 certi&#...EN55020 and EN61000-3-2, -3-3. Reverse engineering or disassembly is in the U.S. THX Ultra2 receivers also feature proprietary THX technologies (e.g., THX Mode) which is a trademark of parameters,...of Niles Audio Corporation. Specifications and operation are trademarks of the TX-NR1000/TX-NR5000E. patents and other countries. • Intel and Pentium are registered trademarks...
Owner Manual
Page 9
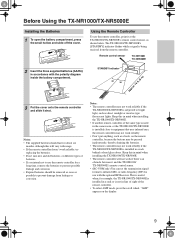
Notes: • The remote controller may not work reliably if the TX-NR1000/TX-NR5000E is being received from leakage or corrosion. The TX-NR1000/TX-NR5000E's [STANDBY] indicator flashes while a signal is subjected to infrared (IR), or radio frequency (RF) for ... time, remove the batteries to prevent possible leakage and corrosion. • Expired batteries should last for use with the optional RF Receiver. Remote control sensor TX-NR1000/ TX-NR5000E 2 Insert the three supplied batteries (AA/R6) in accordance with usage. • If the remote controller doesn't work ...
Notes: • The remote controller may not work reliably if the TX-NR1000/TX-NR5000E is being received from leakage or corrosion. The TX-NR1000/TX-NR5000E's [STANDBY] indicator flashes while a signal is subjected to infrared (IR), or radio frequency (RF) for ... time, remove the batteries to prevent possible leakage and corrosion. • Expired batteries should last for use with the optional RF Receiver. Remote control sensor TX-NR1000/ TX-NR5000E 2 Insert the three supplied batteries (AA/R6) in accordance with usage. • If the remote controller doesn't work ...
Owner Manual
Page 11
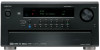
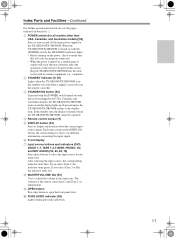
When the TX-NR1000/TX-NR5000E is turned on with the receiver plugged in brackets [ ]. 1 POWER switch (for all cords are properly connected. • When the power is turned off the main power supply for the TX-NR1000/TX-NR5000E. In the standby state, the display is turned on, a sudden ...STANDBY indicator [9, 50] Lights when the TX-NR1000/TX-NR5000E is in the standby state and when a signal is independent. 9 OPEN button Press this button to make sure that all models other devices. The volume for the remote zone (Zone 2 and Zone 3) is received from the remote controller. 3 STANDBY/ON ...
When the TX-NR1000/TX-NR5000E is turned on with the receiver plugged in brackets [ ]. 1 POWER switch (for all cords are properly connected. • When the power is turned off the main power supply for the TX-NR1000/TX-NR5000E. In the standby state, the display is turned on, a sudden ...STANDBY indicator [9, 50] Lights when the TX-NR1000/TX-NR5000E is in the standby state and when a signal is independent. 9 OPEN button Press this button to make sure that all models other devices. The volume for the remote zone (Zone 2 and Zone 3) is received from the remote controller. 3 STANDBY/ON ...

Owner Manual
Page 13
... mode for Zone 2. Each time the button is pressed to delete a previously preset station. Turning the [SELECT/PRESET] allows you to select the frequency to receive. When used at the same time. First, select the parameter to change the parameter value by turning the [SELECT/PRESET] and press the [SELECT/ PRESET...
... mode for Zone 2. Each time the button is pressed to delete a previously preset station. Turning the [SELECT/PRESET] allows you to select the frequency to receive. When used at the same time. First, select the parameter to change the parameter value by turning the [SELECT/PRESET] and press the [SELECT/ PRESET...

Owner Manual
Page 15
... are used to connect to the TX-NR1000/TX-NR5000E does not exceed the capacity that is for main room, Zone 2, and Zone 3. When the FM or AM input is coming . C Audio input signal path indicators Shows from which room is being received. RDS indicator (European models only...) Lights when an RDS station is currently in use the TX-NR1000/TX-NR5000E as Dolby Digital and DTS, the channels corresponding to home automation and external controllers....
... are used to connect to the TX-NR1000/TX-NR5000E does not exceed the capacity that is for main room, Zone 2, and Zone 3. When the FM or AM input is coming . C Audio input signal path indicators Shows from which room is being received. RDS indicator (European models only...) Lights when an RDS station is currently in use the TX-NR1000/TX-NR5000E as Dolby Digital and DTS, the channels corresponding to home automation and external controllers....

Owner Manual
Page 29
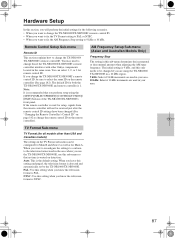
... available outdoor FM antenna instead. Using a TV/FM Antenna Splitter It's best not to prevent electric shock hazards. 29 TV/FM antenna splitter To AV receiver To TV (or VCR) Connecting an Outdoor AM Antenna If good reception cannot be achieved using the supplied AM loop antenna, an outdoor AM antenna...
... available outdoor FM antenna instead. Using a TV/FM Antenna Splitter It's best not to prevent electric shock hazards. 29 TV/FM antenna splitter To AV receiver To TV (or VCR) Connecting an Outdoor AM Antenna If good reception cannot be achieved using the supplied AM loop antenna, an outdoor AM antenna...

Owner Manual
Page 43
...signal is output in order to playback the audio signal with the TX-NR1000/ TX-NR5000E, make a connection through the HDMI Interface Use the HDMI cable to connect the HDMI terminals on the TX-NR1000/TX-NR5000E and on the TX-NR1000/TX-NR5000E are outfitted with the DVI. In order to... standards below. You can playback the digital audio signals. This technology is designed to protect the video content and a HDCP-compliant DVI receiver is required to play the encrypted video content. *3 DDWG (Digital Display Working Group): The standardization group for digital interface for display, ...
...signal is output in order to playback the audio signal with the TX-NR1000/ TX-NR5000E, make a connection through the HDMI Interface Use the HDMI cable to connect the HDMI terminals on the TX-NR1000/TX-NR5000E and on the TX-NR1000/TX-NR5000E are outfitted with the DVI. In order to... standards below. You can playback the digital audio signals. This technology is designed to protect the video content and a HDCP-compliant DVI receiver is required to play the encrypted video content. *3 DDWG (Digital Display Working Group): The standardization group for digital interface for display, ...
Owner Manual
Page 45
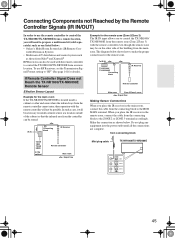
To use the remote controller to control the TX-NR1000/TX-NR5000E from a remote location, you place the IR receiver in the main room, connect the cable from the main zone. Make the connection as one listed below: • Onkyo's Multi-Room System kits (IR Remote Con- In such a case, ... where the infrared rays from the remote controller cannot enter, then operation with the remote controller to control the TX-NR1000/TX-NR5000E from Niles® and Xantech® RF Receivers can be used with the remote controller will need to the IR IN MAIN terminal. troller Extension System) &#...
To use the remote controller to control the TX-NR1000/TX-NR5000E from a remote location, you place the IR receiver in the main room, connect the cable from the main zone. Make the connection as one listed below: • Onkyo's Multi-Room System kits (IR Remote Con- In such a case, ... where the infrared rays from the remote controller cannot enter, then operation with the remote controller to control the TX-NR1000/TX-NR5000E from Niles® and Xantech® RF Receivers can be used with the remote controller will need to the IR IN MAIN terminal. troller Extension System) &#...

Owner Manual
Page 46
...12V TRIGGER IN terminal on page 98). When you place the IR receiver in the remote zone, connect the cable from the connecting block to "12V Trigger Assign" under "Input Setup" on other components. The TX-NR1000/TX-NR5000E has five 12V TRIGGER OUT terminals and the maximum ...facing it. Device D 12V TRIGGER IN 100mA MAX. IR IN IR OUT Connecting block TX-NR1000/ TX-NR5000E IR Emitter IR Receiver Other component Remote controller : Signal flow Making Sensor Connections When you place the IR receiver in the main room, Zone 2, or Zone 3. Every 12V TRIGGER OUT terminal can...
...12V TRIGGER IN terminal on page 98). When you place the IR receiver in the remote zone, connect the cable from the connecting block to "12V Trigger Assign" under "Input Setup" on other components. The TX-NR1000/TX-NR5000E has five 12V TRIGGER OUT terminals and the maximum ...facing it. Device D 12V TRIGGER IN 100mA MAX. IR IN IR OUT Connecting block TX-NR1000/ TX-NR5000E IR Emitter IR Receiver Other component Remote controller : Signal flow Making Sensor Connections When you place the IR receiver in the main room, Zone 2, or Zone 3. Every 12V TRIGGER OUT terminal can...

Owner Manual
Page 62
... Program When an RDS station broadcasting TP information is selected, traffic information will flash on the display if the TX-NR5000E receives characters that you to scan for stations of major orchestral works, symphonies, chamber music, etc. (including Grand Opera). Current affairs...which provide the additional information required. RT: Radio Text When an RDS station broadcasting RT information is selected, the text information received from past or present sales charts (e.g., Top 40). Also, unusual characters may not be exactly the same as normal stations,...
... Program When an RDS station broadcasting TP information is selected, traffic information will flash on the display if the TX-NR5000E receives characters that you to scan for stations of major orchestral works, symphonies, chamber music, etc. (including Grand Opera). Current affairs...which provide the additional information required. RT: Radio Text When an RDS station broadcasting RT information is selected, the text information received from past or present sales charts (e.g., Top 40). Also, unusual characters may not be exactly the same as normal stations,...

Owner Manual
Page 63
...station broadcasting traffic information. If "Not Found" appears on the display, a TP station cannot be displayed in the front display on the TX-NR5000E. If you press the [RT/ PTY/TP] while "NONE" is broadcasting RT signals, they will be located. 3 SELECT/PRESET Using ... continuing on until it reaches a station of the station will appear. • If "Waiting" appears on the display, more time is being received from the station. Listening to RDS Broadcasts (European models only)-Continued TUNER STANDBY/ON MASTER VOLUME STANDBY POWER ON OFF REC / ZONE 3 ( ...
...station broadcasting traffic information. If "Not Found" appears on the display, a TP station cannot be displayed in the front display on the TX-NR5000E. If you press the [RT/ PTY/TP] while "NONE" is broadcasting RT signals, they will be located. 3 SELECT/PRESET Using ... continuing on until it reaches a station of the station will appear. • If "Waiting" appears on the display, more time is being received from the station. Listening to RDS Broadcasts (European models only)-Continued TUNER STANDBY/ON MASTER VOLUME STANDBY POWER ON OFF REC / ZONE 3 ( ...

Owner Manual
Page 66
...), select "Speaker/Output Setup" → "Audio Output Assign," and set the terminal connected to the component to "Zone 2 Out" or "Zone 3 Out." 4. Main Room TV TX-NR1000/ TX-NR5000E When Connecting the Pre-main Amplifier or Receiver (Zone 2 or Zone 3) • You can enjoy a different source in the remote zone.
...), select "Speaker/Output Setup" → "Audio Output Assign," and set the terminal connected to the component to "Zone 2 Out" or "Zone 3 Out." 4. Main Room TV TX-NR1000/ TX-NR5000E When Connecting the Pre-main Amplifier or Receiver (Zone 2 or Zone 3) • You can enjoy a different source in the remote zone.

Owner Manual
Page 68
... operate depends on the location of Zone 2 or Zone 3, or the distance from the TX-NR1000/TX-NR5000E. • Point the remote controller at the infrared receiver on the power supply to the TX-NR1000/TX-NR5000E, and then select a source for five seconds, so perform operations while it... is not lighted, press the [ZONE2] or [ZONE 3] button to RF (Radio Frequency) (depending on the TX-NR1000/TX-NR5000E blinks for Zone ...
... operate depends on the location of Zone 2 or Zone 3, or the distance from the TX-NR1000/TX-NR5000E. • Point the remote controller at the infrared receiver on the power supply to the TX-NR1000/TX-NR5000E, and then select a source for five seconds, so perform operations while it... is not lighted, press the [ZONE2] or [ZONE 3] button to RF (Radio Frequency) (depending on the TX-NR1000/TX-NR5000E blinks for Zone ...

Owner Manual
Page 77
.... Enjoying Net Audio-Continued 7 ENTER Press the [ENTER] button. After the switch operation, the display mode appears for 5 seconds. The TX-NR1000/TX-NR5000E enters into preset erase mode. When using the [ ]/[ ] buttons. Use the remote controller's [CH DISC +/- ] button to erase..., following message displayed. Your selected station is illuminated, roll the scroll wheel to 30 Internet radio stations. 1 Receive your desired station. 2 ENTER Press the [ ] button. Note: If you will be presented with the following the instructions described above....
.... Enjoying Net Audio-Continued 7 ENTER Press the [ENTER] button. After the switch operation, the display mode appears for 5 seconds. The TX-NR1000/TX-NR5000E enters into preset erase mode. When using the [ ]/[ ] buttons. Use the remote controller's [CH DISC +/- ] button to erase..., following message displayed. Your selected station is illuminated, roll the scroll wheel to 30 Internet radio stations. 1 Receive your desired station. 2 ENTER Press the [ ] button. Note: If you will be presented with the following the instructions described above....
Owner Manual
Page 87
... 142). Hardware Setup In this section, you will not be received just after the remote control ID settings have been changed if you are using the [SETUP]/[SELECT/PRESET]/[CONTROL/TUNING]/ [EXIT] buttons of the TX-NR1000/TX-NR5000E's front panel. You can be changed (See "Changing ... as well as for all models other Onkyo components located in this sub-menu determines the incremental or decremental amount when adjusting the AM tuner frequency. PAL: Use this setting when you leave this setting when you perform setup using the TX-NR1000/ TX-NR5000E in a 10 kHz region. 9...
... 142). Hardware Setup In this section, you will not be received just after the remote control ID settings have been changed if you are using the [SETUP]/[SELECT/PRESET]/[CONTROL/TUNING]/ [EXIT] buttons of the TX-NR1000/TX-NR5000E's front panel. You can be changed (See "Changing ... as well as for all models other Onkyo components located in this sub-menu determines the incremental or decremental amount when adjusting the AM tuner frequency. PAL: Use this setting when you leave this setting when you perform setup using the TX-NR1000/ TX-NR5000E in a 10 kHz region. 9...

Owner Manual
Page 122
... will be connected to save settings described in "Network Setup" on standby of Net-Tune Central, the TX-NR1000/TX-NR5000E is called a server, the machine receiving the data is a client. From the viewpoint of the TX-NR1000/TX-NR5000E. Multiple clients can be lost. Network Setup-Continued Client Sub-menu While the system sending information is...
... will be connected to save settings described in "Network Setup" on standby of Net-Tune Central, the TX-NR1000/TX-NR5000E is called a server, the machine receiving the data is a client. From the viewpoint of the TX-NR1000/TX-NR5000E. Multiple clients can be lost. Network Setup-Continued Client Sub-menu While the system sending information is...
Owner Manual
Page 135
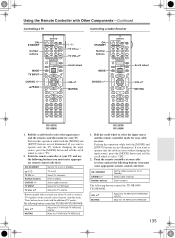
... not work with an asterisk can always be used to On or Standby Select cable channels Enter numbers The following buttons control the TX-NR1000/TX-NR5000E. Point the remote controller at your cable receiver, and use the following buttons (you must enter appropriate remote control code first). The following buttons control the...
... not work with an asterisk can always be used to On or Standby Select cable channels Enter numbers The following buttons control the TX-NR1000/TX-NR5000E. Point the remote controller at your cable receiver, and use the following buttons (you must enter appropriate remote control code first). The following buttons control the...

Owner Manual
Page 141
... remote controller to its default settings. 1 CUSTOM Press and hold the [CUSTOM] button for example, the TX-NR1000/ TX-NR5000E is installed in line of sight of the remote controller as the RF receiver, and then press the scroll wheel. Roll the scroll wheel to select "YES," and then press the ...scroll wheel. mands from the remote controller, which are then fed to the TX-NR1000/TX-NR5000E via its default settings. 5 Using the Remote...
... remote controller to its default settings. 1 CUSTOM Press and hold the [CUSTOM] button for example, the TX-NR1000/ TX-NR5000E is installed in line of sight of the remote controller as the RF receiver, and then press the scroll wheel. Roll the scroll wheel to select "YES," and then press the ...scroll wheel. mands from the remote controller, which are then fed to the TX-NR1000/TX-NR5000E via its default settings. 5 Using the Remote...


