

Owner Manual
Page 1
...Onkyo AV Receiver. Following the instructions in a radio station 24 Using preset radio stations 25 Receiving RDS broadcasts (European models only 27 Recording a source 29 Using the remote controller 31 Programming the remote controller codes of other devices 8 Connecting speakers 10 Positioning speakers 11 Connecting... the power 11 Making antenna connections .......... 12 Thank you to obtain optimum performance and listening enjoyment from your new AV Receiver. AV Receiver TX-DS575X Instruction Manual ...
...Onkyo AV Receiver. Following the instructions in a radio station 24 Using preset radio stations 25 Receiving RDS broadcasts (European models only 27 Recording a source 29 Using the remote controller 31 Programming the remote controller codes of other devices 8 Connecting speakers 10 Positioning speakers 11 Connecting... the power 11 Making antenna connections .......... 12 Thank you to obtain optimum performance and listening enjoyment from your new AV Receiver. AV Receiver TX-DS575X Instruction Manual ...
Owner Manual
Page 6
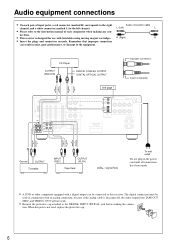
... CH INPUT DIGITAL INPUT COAXIAL 2 FRONT SPEAKERS B COAXIAL 1 L OPTICAL 2 OPTICAL 1 R SURROUND SPEAKERS L R REMOTE CONTROL AC OUTLETS AC 230V 50Hz SWITCHED TOTAL 100W MAX. tion. TX-DS575X Ground OUTPUT Turntable INPUT (REC) OUTPUT (PLAY) Tape Deck : signal flow To wall outlet Do not plug in the power cord until all connections have been made. • A DVD...
... CH INPUT DIGITAL INPUT COAXIAL 2 FRONT SPEAKERS B COAXIAL 1 L OPTICAL 2 OPTICAL 1 R SURROUND SPEAKERS L R REMOTE CONTROL AC OUTLETS AC 230V 50Hz SWITCHED TOTAL 100W MAX. tion. TX-DS575X Ground OUTPUT Turntable INPUT (REC) OUTPUT (PLAY) Tape Deck : signal flow To wall outlet Do not plug in the power cord until all connections have been made. • A DVD...
Owner Manual
Page 7
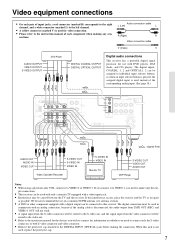
...SUBWOOFER PRE OUT CENTER SUB WOOFER MULTI CH INPUT DIGITAL INPUT COAXIAL 2 FRONT SPEAKERS B COAXIAL 1 L OPTICAL 2 OPTICAL 1 R SURROUND SPEAKERS L R REMOTE CONTROL AC OUTLETS AC 230V 50Hz SWITCHED TOTAL 100W MAX. put connections. • This receiver can be routed to the video out. •...connections • On each component when making the connection. The digital inputs, COAXIAL 1, 2 and OPTICAL1, 2 can be connected to this receiver. We do not recommend the use with a video input jack. • Interference may be caused between the TV and this receiver. TX-DS575X...
...SUBWOOFER PRE OUT CENTER SUB WOOFER MULTI CH INPUT DIGITAL INPUT COAXIAL 2 FRONT SPEAKERS B COAXIAL 1 L OPTICAL 2 OPTICAL 1 R SURROUND SPEAKERS L R REMOTE CONTROL AC OUTLETS AC 230V 50Hz SWITCHED TOTAL 100W MAX. put connections. • This receiver can be routed to the video out. •...connections • On each component when making the connection. The digital inputs, COAXIAL 1, 2 and OPTICAL1, 2 can be connected to this receiver. We do not recommend the use with a video input jack. • Interference may be caused between the TV and this receiver. TX-DS575X...
Owner Manual
Page 8
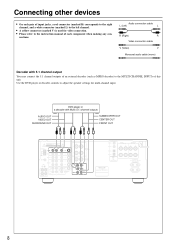
... each component when making any con- TX-DS575X 8 DVD player or a decoder with 5.1 channel output You may connect the 5.1 channel outputs of an external decoder (such as MPEG decoder) to adjust the speaker settings for video connection. • Please refer to the instruction... manual of this unit. AV RECEIVER MODEL NO. Audio connection cable L (Left) L R (Right) R Video connection cable V (Video) V Monaural audio cable (mono) Decoder ...
... each component when making any con- TX-DS575X 8 DVD player or a decoder with 5.1 channel output You may connect the 5.1 channel outputs of an external decoder (such as MPEG decoder) to adjust the speaker settings for video connection. • Please refer to the instruction... manual of this unit. AV RECEIVER MODEL NO. Audio connection cable L (Left) L R (Right) R Video connection cable V (Video) V Monaural audio cable (mono) Decoder ...
Owner Manual
Page 9
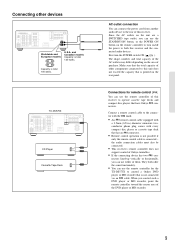
.... Connections for the TX-DS575X to control a Onkyo DVD player or MD recorder that is not connected via an cable. nectors lined-up vertically or horizontally, you can use the remote controller of purchase. TX-DS575X ANTENNA WARNING AVIS RISK OF ELECTRIC SHOCK RISQUE DE CHOC ELECTRIQUE DO NOT OPEN NE PAS OUVRIR R L V L S DVD I N AM VIDEO 3 R I N L FRONT SPEAKERS...
.... Connections for the TX-DS575X to control a Onkyo DVD player or MD recorder that is not connected via an cable. nectors lined-up vertically or horizontally, you can use the remote controller of purchase. TX-DS575X ANTENNA WARNING AVIS RISK OF ELECTRIC SHOCK RISQUE DE CHOC ELECTRIQUE DO NOT OPEN NE PAS OUVRIR R L V L S DVD I N AM VIDEO 3 R I N L FRONT SPEAKERS...
Owner Manual
Page 10
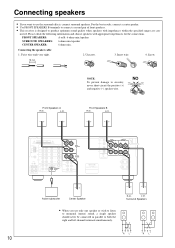
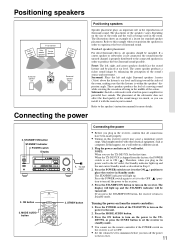
... damage to produce optimum sound quality when speakers with appropriate impedances for the connections. Connecting speakers • If you use the surround effects, connect surround speakers. Twist wire ends very tight. 2. NO 10 Front Speakers A R ch. AV RECEIVER MODEL NO. TX-DS575X -+ Active subwoofer Center Speaker • When you want to use only one speaker or wish to listen to monaural...
... damage to produce optimum sound quality when speakers with appropriate impedances for the connections. Connecting speakers • If you use the surround effects, connect surround speakers. Twist wire ends very tight. 2. NO 10 Front Speakers A R ch. AV RECEIVER MODEL NO. TX-DS575X -+ Active subwoofer Center Speaker • When you want to use only one speaker or wish to listen to monaural...
Owner Manual
Page 11
... this happens, use the remote controller if the POWER switch on a different circuit. 1. Refer to the unit. 2. If a center speaker or subwoofer is not connected, the sound from the factory, the POWER switch is set to experience the best of Surround sound. Subwoofer: Install a subwoofer with a...The display will light up and the STANDBY indicator will light up and the unit enters Standby mode as computers. If you use the TX-DS575X for standard speaker placement. Refer to place the receiver in Step 2. 2. Press the MODE AUDIO button. 3. NOTE: When you press the STANDBY/...
... this happens, use the remote controller if the POWER switch on a different circuit. 1. Refer to the unit. 2. If a center speaker or subwoofer is not connected, the sound from the factory, the POWER switch is set to experience the best of Surround sound. Subwoofer: Install a subwoofer with a...The display will light up and the STANDBY indicator will light up and the unit enters Standby mode as computers. If you use the TX-DS575X for standard speaker placement. Refer to place the receiver in Step 2. 2. Press the MODE AUDIO button. 3. NOTE: When you press the STANDBY/...
Owner Manual
Page 13
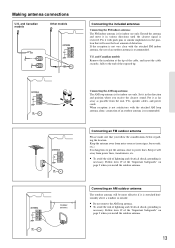
...power lines. Set it with push pins or similar implements in various directions until the clearest signal is necessary. It is recommended. Connecting an AM outdoor antenna The outdoor antenna will cause the least amount of an outdoor antenna is dangerous to put the antenna close...is received. Keep the antenna away from the unit, TVs, speaker cables, and power cords. Put it well away from power lines, transformers, etc. • To avoid the risk of the exposed tip. Making antenna connections U.S. U.S. Connecting an FM outdoor antenna Please make sure that will be more ...
...power lines. Set it with push pins or similar implements in various directions until the clearest signal is necessary. It is recommended. Connecting an AM outdoor antenna The outdoor antenna will cause the least amount of an outdoor antenna is dangerous to put the antenna close...is received. Keep the antenna away from the unit, TVs, speaker cables, and power cords. Put it well away from power lines, transformers, etc. • To avoid the risk of the exposed tip. Making antenna connections U.S. U.S. Connecting an FM outdoor antenna Please make sure that will be more ...

Owner Manual
Page 14
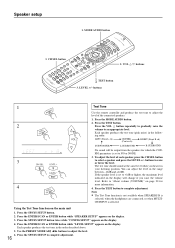
..." or "NO." Select whichever appropriate and press the ENTER/SCAN or ENTER button. 3. If you start operating the unit. Select the size of the connected speakers. 1. Select whichever appropriate and press the ENTER/SCAN or ENTER button. 3 PRESET/ MODE ADJ DOW N UP ENTER or or ENTER / SCAN 14 ...Re-EQ LFE LEVEL CONTROL MULTI CH DVD VIDEO 1 VIDEO 2 VIDEO 3 TAPE FM AM PHONO C D INPUT DOWN MASTER VOLUME UP BASS TREBLE AV RECEIVER TX-DS575X PRESET/MODE ADJ √/® button 1 SP/ SYS SETUP ENTER or ENTER / SCAN 2 ENTER or ENTER / SCAN PRESET/ MODE ADJ DOW N UP...
..." or "NO." Select whichever appropriate and press the ENTER/SCAN or ENTER button. 3. If you start operating the unit. Select the size of the connected speakers. 1. Select whichever appropriate and press the ENTER/SCAN or ENTER button. 3 PRESET/ MODE ADJ DOW N UP ENTER or or ENTER / SCAN 14 ...Re-EQ LFE LEVEL CONTROL MULTI CH DVD VIDEO 1 VIDEO 2 VIDEO 3 TAPE FM AM PHONO C D INPUT DOWN MASTER VOLUME UP BASS TREBLE AV RECEIVER TX-DS575X PRESET/MODE ADJ √/® button 1 SP/ SYS SETUP ENTER or ENTER / SCAN 2 ENTER or ENTER / SCAN PRESET/ MODE ADJ DOW N UP...

Owner Manual
Page 15
... f t ENTER f t or ENTER / SCAN f t 4. NONE: A center speaker is used as the surround speaker. Set the distance to the front speakers. You cannot set a smaller value than the front speaker distance deducted by 5feet (1.5m). 4. You cannot set a larger value than the front speaker distance. SMALL: When a small speaker is not connected. This completes the CONFIG SETUP settings...
... f t ENTER f t or ENTER / SCAN f t 4. NONE: A center speaker is used as the surround speaker. Set the distance to the front speakers. You cannot set a smaller value than the front speaker distance deducted by 5feet (1.5m). 4. You cannot set a larger value than the front speaker distance. SMALL: When a small speaker is not connected. This completes the CONFIG SETUP settings...
Owner Manual
Page 16
... 16 CH SEL button 2. TEST button 3. Press the MODE AUDIO button. 2. dB FIG parameters is selected, when the headphones are connected, or when MULTI- You can adjust the level in the order described above. 5. CH INPUT is set to "About volume (VOLUME)"... the display will be output from the speakers for more information. 4 4. If the speaker level is selected. Speaker setup 1. VOL q/u buttons 2. 4. Each speaker produces the test tone (pink noise) in your listening position. To adjust the level of the connected speakers. 1. buttons to an appropriate level....
... 16 CH SEL button 2. TEST button 3. Press the MODE AUDIO button. 2. dB FIG parameters is selected, when the headphones are connected, or when MULTI- You can adjust the level in the order described above. 5. CH INPUT is set to "About volume (VOLUME)"... the display will be output from the speakers for more information. 4 4. If the speaker level is selected. Speaker setup 1. VOL q/u buttons 2. 4. Each speaker produces the test tone (pink noise) in your listening position. To adjust the level of the connected speakers. 1. buttons to an appropriate level....
Owner Manual
Page 17
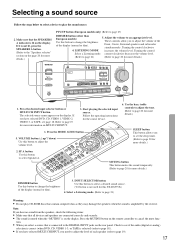
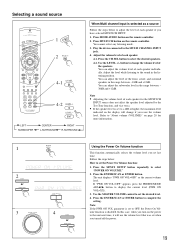
... mute func- VOLUME button (qup/udown) Use this button to select Speaker A. Selecting a sound source Follow the steps below to select a device to play CD-ROM discs that the SPEAKERS A indicator is not used for this TX-DS575X.) 4. If you to set the sleep timer. (Refer to page ..." section on the rear panel. Note: If you select a source that all devices and speakers are connected correctly and securely. • The sound is muted when the "MUTING" is connected to the DIGITAL INPUT jacks on the page 20 for more details.) 2. Turning the control Select a Listening mode. ...
... mute func- VOLUME button (qup/udown) Use this button to select Speaker A. Selecting a sound source Follow the steps below to select a device to play CD-ROM discs that the SPEAKERS A indicator is not used for this TX-DS575X.) 4. If you to set the sleep timer. (Refer to page ..." section on the rear panel. Note: If you select a source that all devices and speakers are connected correctly and securely. • The sound is muted when the "MUTING" is connected to the DIGITAL INPUT jacks on the page 20 for more details.) 2. Turning the control Select a Listening mode. ...
Owner Manual
Page 19
... level. Adjust the level while listening to the MULTI CHANNEL INPUT jack. 4. Note • Adjusting the volume level of each speaker for more information. Play the device connected to the sound in the range between - 30dB and +12dB. Refer to set the Power On Volume function: 1. Use the... MASTER VOLUME control to "About volume (VOLUME)" on page 20 for the MULTI CH INPUT source does not affect the speaker level adjusted by ...
... level. Adjust the level while listening to the MULTI CHANNEL INPUT jack. 4. Note • Adjusting the volume level of each speaker for more information. Play the device connected to the sound in the range between - 30dB and +12dB. Refer to set the Power On Volume function: 1. Use the... MASTER VOLUME control to "About volume (VOLUME)" on page 20 for the MULTI CH INPUT source does not affect the speaker level adjusted by ...
Owner Manual
Page 20
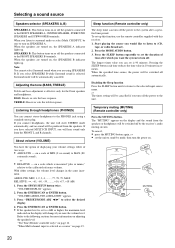
... sound will be switched off the power to set is effective only for more information on adjusting the speaker level: "Test Tone (Remote controller only)" on or off the speakers connected to the calibrated reference volume. Press the SP/SYS SETUP button twice. Press the ENTER/SCAN or...8226; set up this function, use the remote controller supplied with this receiver. 1. When you select SPEAKERS B while Surround sound is selected as a source" on or off the speakers connected to stand-by the receiver's audio muting circuits. Note: You cannot select Surround sound when you turn...
... sound will be switched off the power to set is effective only for more information on adjusting the speaker level: "Test Tone (Remote controller only)" on or off the speakers connected to the calibrated reference volume. Press the SP/SYS SETUP button twice. Press the ENTER/SCAN or...8226; set up this function, use the remote controller supplied with this receiver. 1. When you select SPEAKERS B while Surround sound is selected as a source" on or off the speakers connected to stand-by the receiver's audio muting circuits. Note: You cannot select Surround sound when you turn...
Owner Manual
Page 21
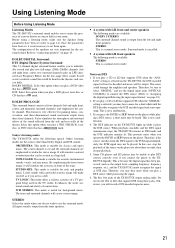
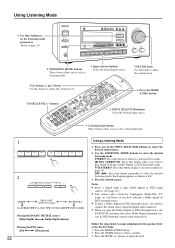
...in the theaters and concert halls. When playback concludes and the DTS signal transmission stops, the TX-DS575X remains in a large hall. DOLBY SURROUND PRO LOGIC Onkyo's listening modes The TX-DS575X offers the following mode is available: STEREO This is not necessary to set (refer to page... lit. Using Listening Mode Before Using Listening Mode Listening Modes The TX-DS575X's surround sound enables you to enjoy the presence of four channels (left and right front speakers. STEREO Select this option when you connect the player to the TXDS575X digitally. Therefore, you may hear a...
...in the theaters and concert halls. When playback concludes and the DTS signal transmission stops, the TX-DS575X remains in a large hall. DOLBY SURROUND PRO LOGIC Onkyo's listening modes The TX-DS575X offers the following mode is available: STEREO This is not necessary to set (refer to page... lit. Using Listening Mode Before Using Listening Mode Listening Modes The TX-DS575X's surround sound enables you to enjoy the presence of four channels (left and right front speakers. STEREO Select this option when you connect the player to the TXDS575X digitally. Therefore, you may hear a...
Owner Manual
Page 22
... play a Dolby digital or DTS Surround source, you need to connect the sound source using the digital input connector. • When you to play the Dolby Digital or DTS Surround source, the TX-DS575X automatically enters Dolby Digital Surround (stereo) or DTS Surround (stereo)...FM AM PHONO C D DOWN MASTER VOLUME UP BASS TREBLE AV RECEIVER TX-DS575X 2. buttons 2. STEREO: Press this button to listen to a normal stereo audio. /DTS SURROUND: Press this button to select a speaker. 3. buttons to the speaker level set the Listening mode parameters. (Refer to select a Surround mode....
... play a Dolby digital or DTS Surround source, you need to connect the sound source using the digital input connector. • When you to play the Dolby Digital or DTS Surround source, the TX-DS575X automatically enters Dolby Digital Surround (stereo) or DTS Surround (stereo)...FM AM PHONO C D DOWN MASTER VOLUME UP BASS TREBLE AV RECEIVER TX-DS575X 2. buttons 2. STEREO: Press this button to listen to a normal stereo audio. /DTS SURROUND: Press this button to select a speaker. 3. buttons to the speaker level set the Listening mode parameters. (Refer to select a Surround mode....
Owner Manual
Page 29
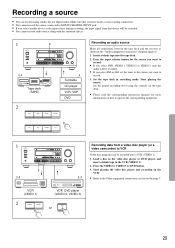
...only the audio will be recorded. • You cannot record audio source along with the surround effects. 1 STANDBY/ON STANDBY POWER ON OFF A SPEAKERS B PHONES 2 PTY/TP DISPLAY FM MUTE / MEMORY MODE DOWN TUNING UP DIGITAL/ ANALOG SP/ SYS SETUP CH LEVEL MODE PRESET/ MODE ADJ ...3 TAPE FM AM PHONO C D DOWN MASTER VOLUME BASS TREBLE AV RECEIVER TX-DS575X 1·3 Tape deck (TAPE) 3 Turntable CD player VCR, VDP DVD 2 DVD VIDEO 1 VIDEO 2 VIDEO 3 Recording an audio source Make all connections between the tape deck and the receiver as the input source during recording, the...
...only the audio will be recorded. • You cannot record audio source along with the surround effects. 1 STANDBY/ON STANDBY POWER ON OFF A SPEAKERS B PHONES 2 PTY/TP DISPLAY FM MUTE / MEMORY MODE DOWN TUNING UP DIGITAL/ ANALOG SP/ SYS SETUP CH LEVEL MODE PRESET/ MODE ADJ ...3 TAPE FM AM PHONO C D DOWN MASTER VOLUME BASS TREBLE AV RECEIVER TX-DS575X 1·3 Tape deck (TAPE) 3 Turntable CD player VCR, VDP DVD 2 DVD VIDEO 1 VIDEO 2 VIDEO 3 Recording an audio source Make all connections between the tape deck and the receiver as the input source during recording, the...
Owner Manual
Page 30
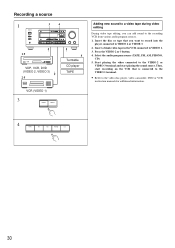
...information. 4 TAPE FM AM PHONO C D 30 Start playing the video connected to VIDEO 1. 3. Press the VIDEO 2 or 3 button. 4. Then, start playing the sound source. Recording a source 1 STANDBY/ON STANDBY POWER ON OFF A SPEAKERS B PHONES 3 4 PTY/TP DISPLAY FM MUTE / MEMORY MODE DOWN...UP BASS TREBLE AV RECEIVER TX-DS575X 1·5 VDP, VCR, DVD (VIDEO 2, VIDEO 3) 2·5 5 Turntable CD player TAPE VCR (VIDEO 1) 3 VIDEO 2 VIDEO 3 Adding new sound to a video tape during video editing During video tape editing, you want to record into the player connected to VIDEO 2 or ...
...information. 4 TAPE FM AM PHONO C D 30 Start playing the video connected to VIDEO 1. 3. Press the VIDEO 2 or 3 button. 4. Then, start playing the sound source. Recording a source 1 STANDBY/ON STANDBY POWER ON OFF A SPEAKERS B PHONES 3 4 PTY/TP DISPLAY FM MUTE / MEMORY MODE DOWN...UP BASS TREBLE AV RECEIVER TX-DS575X 1·5 VDP, VCR, DVD (VIDEO 2, VIDEO 3) 2·5 5 Turntable CD player TAPE VCR (VIDEO 1) 3 VIDEO 2 VIDEO 3 Adding new sound to a video tape during video editing During video tape editing, you want to record into the player connected to VIDEO 2 or ...
Owner Manual
Page 40
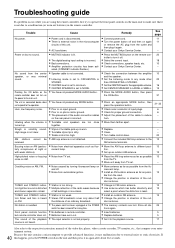
... stations cannot be received. Buzzing noise on and off . • Select the correct input. • Check connections, speaker leads, etc. • Contact your Onkyo Service Center. • Check the connection between the amplifier and the speaker. • Set the Listening mode to any mode other than ORCHESTRA or STEREO. • Set the CENTER...
... stations cannot be received. Buzzing noise on and off . • Select the correct input. • Check connections, speaker leads, etc. • Contact your Onkyo Service Center. • Check the connection between the amplifier and the speaker. • Set the Listening mode to any mode other than ORCHESTRA or STEREO. • Set the CENTER...


